Unit 4: Characteristics of Microbes
Learning Objectives
After reading the following, you should be able to:
- Describe common visual methods used to identify prokaryotes.
- Describe the process of Gram staining and explain why it can differentiate bacteria based on their cell walls.
- Describe various biochemical tests (oxygen tolerance, fermentation, gelatinase, urease, and deaminase) used in laboratories to identify microorganisms.
- Define serology and describe how slide agglutination and ELISA tests can be used to identify pathogens.
- Describe the role of DNA sequencing in analyzing unknown microorganisms.
As mentioned previously, a bacterial species is defined as a group of cells that share the similar characteristics. So what are these characteristics? They can be anything from what the cells look like to, to the composition of their cells walls, or even the type of metabolism they use. In this section we will be discussing some of the methods that scientists and clinicians can use to identify unknown bacteria.
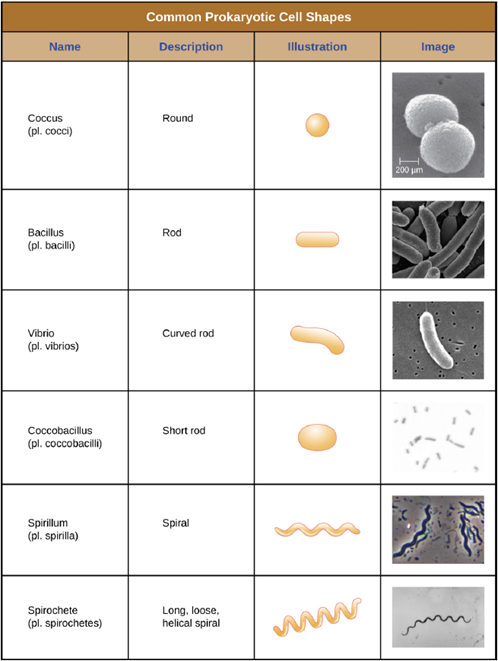
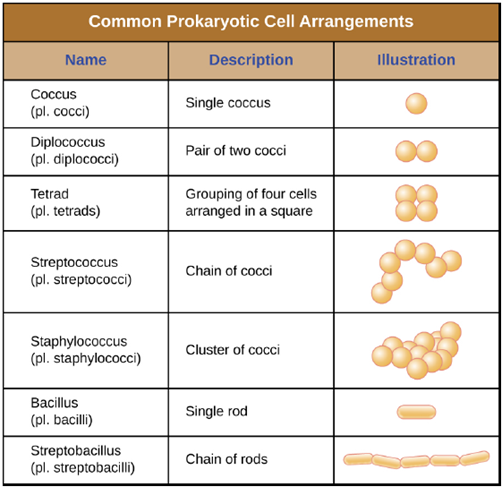
Cell Morphologies and Arrangements: Individual cells of a particular prokaryotic organism are typically similar in shape, or cell morphology. Although thousands of prokaryotic organisms have been identified, only a handful of cell morphologies are commonly seen microscopically. Figure 4.1 names and illustrates cell morphologies commonly found in prokaryotic cells. In addition to cellular shape, prokaryotic cells of the same species may group together in certain distinctive arrangements depending on the plane of cell division. Some common arrangements are shown in Figure 4.2. Cell size can also be used to distinguish between bacterial species. A group of cells that are 1mm in length would belong to a different species than a group of cells that are 3mm in length, even if both are bacilli.
Other features that were previously discussed, but can also be used to visually distinguish between two bacterial species include the number and arrangement of flagella as well as the presence or absence of endospores.
Visual identification is also a common means of identification for other cellular microbes such as fungi and protozoa, though proper identification requires training and familiarity to be able to correctly identify the specific species. For example, even with modern advances, visual identification is still the ‘gold standard’ for laboratory confirmation of a malaria infection.
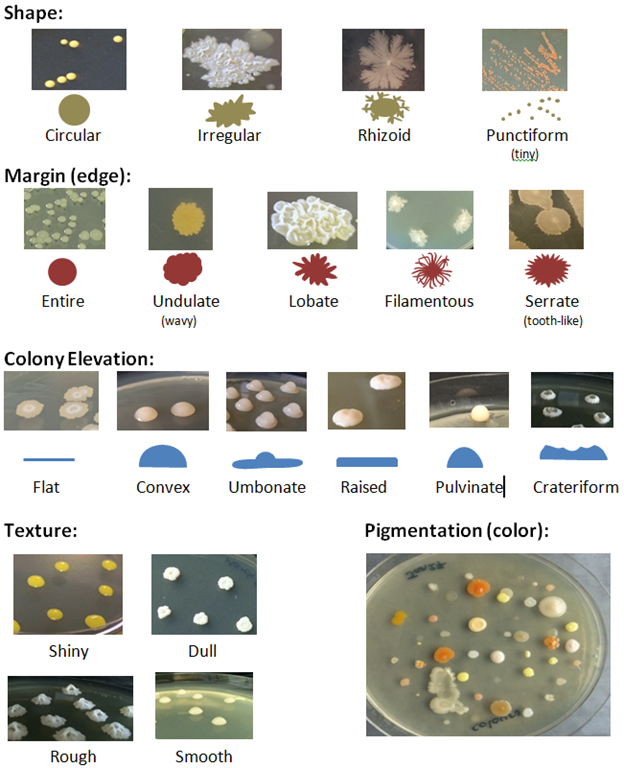
Colony Morphologies: Infectious material, such as pus or sputum often contains bacteria, so can environmental samples, such as water and food. When such samples are put on solid bacterial medium, colonies of bacteria can form. A colony is a visible mass of microbial calls that arose from a single cell. Since bacteria reproduce by binary fission, each cell in the colony should be identical to the original cell. Because of this, we can use the features of the colony to differential between different species of bacteria. You will be analyzing colony morphologies extensively in your labs, and will become very familiar with the different distinguishing features of colonies. These include: the colony size, shape, margin, elevation, texture and pigmentation (Figure 4.3).
Gram staining: The Gram stain procedure is a differential staining procedure that involves multiple steps. It was developed by Danish microbiologist Hans Christian Gram in 1884 as an effective method to distinguish between bacteria with different types of cell walls, and even today it remains one of the most frequently used staining techniques. The steps of the Gram stain procedure are listed below and illustrated in Figure 4.4.
1. After heat-fixing the bacterial sample on to the slide, a process which causes cells to adhere to the glass, the primary stain, crystal violet, is added. It enters into the cell walls of the bacteria. This stains all of the cells a purple color.
2. Next, Gram’s iodine, a mordant, is added. A mordant is a substance used to set or stabilize stains or dyes; in this case, Gram’s iodine acts like a trapping agent that complexes with the crystal violet. The crystal violet–iodine complexes are larger and are more difficult to remove from peptidoglycan in the cell walls. The cells are all still purple.
3. Next, a decolorizing agent is added, usually ethanol or an acetone/ethanol solution. The decolorizer removes the iodine-crystal violet complexes from the cell walls. Cells that have thick peptidoglycan layers in their cell walls are much less affected by the decolorizing agent; they generally retain the crystal violet dye and remain purple. However, the decolorizing agent more easily washes the dye out of cells with thinner peptidoglycan layers, making them again colorless.
4. Finally, a secondary counterstain, usually safranin, is added. This stains all of the cells pink, but is only visible in those cells that were colorless, as the purple color of the crystal violet masks the pink of the safranin.

Oxygen requirements: Another way that we can distinguish between different bacterial species is by observing their use of oxygen. We’ve previously discussed bacterial oxygen use in terms of whether they use aerobic or anaerobic respiration, but finer distinctions exist.
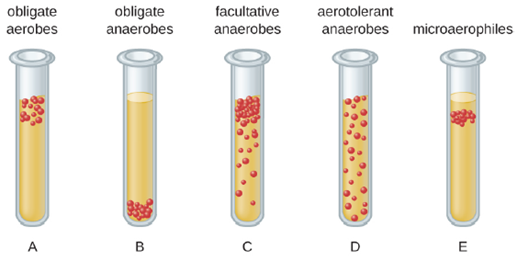
We can easily observe different requirements for molecular oxygen by growing bacteria in thioglycolate tube cultures. A test-tube culture starts with autoclaved thioglycolate medium containing a low percentage of agar to allow motile bacteria to move throughout the medium. Thioglycolate has strong reducing properties and autoclaving flushes out most of the oxygen. The tubes are inoculated with the bacterial cultures to be tested and incubated at an appropriate temperature. Over time, oxygen slowly diffuses throughout the thioglycolate tube culture from the top. Bacterial density increases in the area where oxygen concentration is best suited for the growth of that particular organism.
The growth of bacteria with varying oxygen requirements in thioglycolate tubes is illustrated in Figure 4.5. In tube A, all the growth is seen at the top of the tube. The bacteria are obligate (strict) aerobes that cannot grow without an abundant supply of oxygen. Tube B looks like the opposite of tube A. Bacteria grow at the bottom of tube B. Those are obligate anaerobes, which are killed by oxygen. Tube C shows heavy growth at the top of the tube and growth throughout the tube, a typical result with facultative anaerobes. Facultative anaerobes are organisms that thrive in the presence of oxygen but also grow in its absence by relying on fermentation or anaerobic respiration, if there is a suitable electron acceptor other than oxygen and the organism is able to perform anaerobic respiration. The aerotolerant anaerobes in tube D are indifferent to the presence of oxygen. They do not use oxygen because they usually have a fermentative metabolism, but they are not harmed by the presence of oxygen as obligate anaerobes are. Tube E on the right shows a “Goldilocks” culture. The oxygen level has to be just right for growth, not too much and not too little. These microaerophiles are bacteria that require a minimum level of oxygen for growth, about 1%–10%, well below the 21% found in the atmosphere.
Examples of pathogenic obligate aerobes are Mycobacterium tuberculosis, the causative agent of tuberculosis, Neisseria meningitidis, the causative agent of severe bacterial meningitis, and N. gonorrheae, the causative agent of sexually transmitted gonorrhea. Pathogenic obligate anaerobes include endospore forming members of the genus Clostridium, which are responsible for such diseases as tetanus and gangrene.
Fermentation tests: Another way to distinguish between bacterial species is to test for their ability to perform fermentation. Different bacterial species are able to ferment different nutrients. For example, a species might be able to ferment the sugar mannitol, but not lactose. Also, even though two species might both be able to ferment lactose, they might each produce different products. Two common fermentation products that are tested for are acids, such as lactic acid as in the case of lactic acid fermentation, and gases, such as the CO2 that is produced in alcohol fermentation.
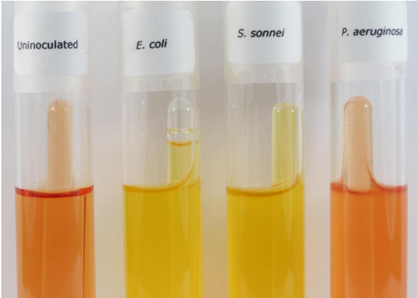
To test for the acid production, we use what is known as a pH indicator. pH indicators are substances that can change color depending on the pH of the environment that they are in. In the case of fermentation tests, a common pH indicator that is used is phenol red. Phenol red is red/pink under neutral condition, but becomes yellow if under acidic conditions. To perform the test, phenol red is added to the growth media, which in this case could be solid plates or liquid in test tubes, and the bacteria is then added and allowed to grow. If the media becomes yellow, then it is a positive test, and the bacteria is able to ferment, if the media doesn’t change, then it is a negative test and the bacteria cannot perform fermentation (Figure 4.6).
Testing for gas production requires the use of liquid media. The setup is the same as above, except that a second inverted test tube is place inside the one containing the media. This inverted test tube can then collect any gas that is produced. A gas bubble would signify a positive test, while the absence of a bubble would signify a negative test (Figure 4.6).
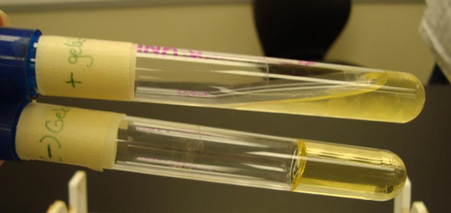
Gelatinase test: Recall that for bacteria to use proteins as a nutrient source, they must secrete extracellular proteases to digest the proteins. Not all bacteria have this ability and we can differentiate between bacterial species based on their ability to do so. One such protease is gelatinase, which digest the protein gelatin into amino acids. To test for presence of gelatinase, we create media that contains gelatin as the solidifying agent, instead of agar (Why agar is normally used as the solidifying agent will be explored in a later unit), and then add our bacteria. As the presence of gelatin is only thing that is keeping the media solid, if the bacteria is able to produce gelatinase and digest the gelatin, the media will convert back a liquid, so a positive test results in a liquid media, whereas if the media remains solid, the test was negative for gelatinase production (Figure 4.7).
Amino acid test: Another aspect of protein metabolism that can be tested for is amino acid digestion. Not all bacteria can digest amino acids, and not all that can are able to digest every amino acid, so unknown bacterial species can be identified based of which amino acids they are able to digest. Testing for amino acid digestion relies on the detection of the metabolic waste products that are produced. Recall that in bacteria, as in humans, amino acid digestion requires the removal of its nitrogen containing amino group by the enzyme deaminase, which produces ammonia. In humans, this ammonia is mostly converted into urea before excreted, but bacteria excrete the ammonia directly in to the environment.
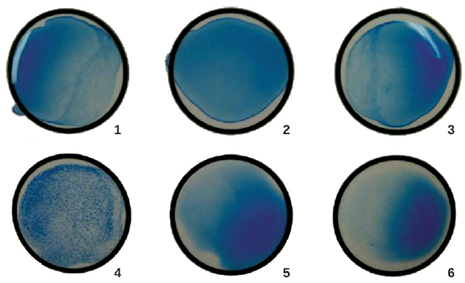
Ammonia is basic and as such, bacterial amino acid metabolism will result in their environment becoming more alkaline. As such, as was the case in the fermentation test, we can use a pH indicator to determine whether amino acid metabolism has occurred. The pH indicator used, once again, is phenol red. Phenol red also changes color under basic conditions becoming a bright pinkish purple (fuchsia/magenta) (Figure 4.8). To do the test, you add the amino acid you are testing, along with phenol red, to the culture media and observe whether any color change occurs. If the media becomes magenta, it is a positive result and the bacteria can digest the amino acid, if no change occurs, it’s negative with no amino acid digestion occurring.
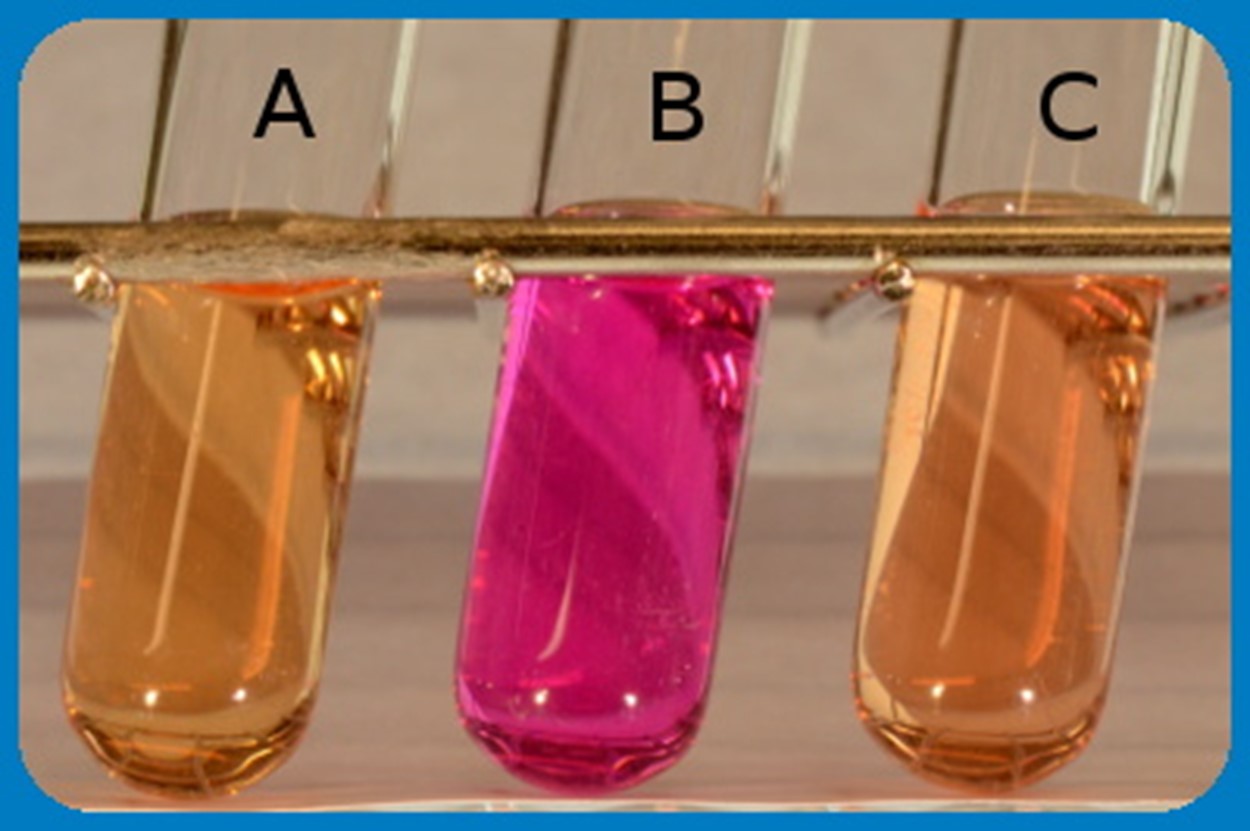
Urease test: Ammonia is a toxic waste produce produced as part of protein digestion. In most animals, this ammonia is converted into less toxic urea before being excreted. This conversion requires an investment of energy and carbon, and certain bacteria are able to use urea as an energy source. Using the enzyme urease, they convert urea back into ammonia, which they then excrete. As with amino acid catabolism, urea catabolism makes the extracellular more alkaline. As such, we can use phenol red to observe whether a pH change occurs when a bacteria is fed urea. To do the test, you would add urea and phenol red to the growth media along with the bacteria. A positive test for the presence of urease would result in the media turning magenta, if the bacteria lacks urease, then the test would be negative and the media would remain pinkish (Figure 4.8).
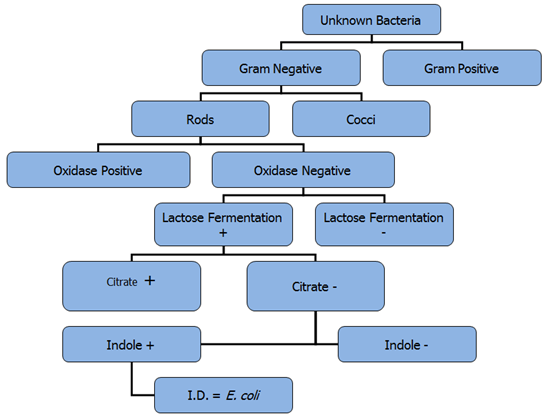
Putting it all together: It’s important to remember that one test alone is not sufficient to determine the identity of an unknown microbe. Many tests must be done to confirm the identity of the organism. As the identity of a bacterial species is dependent on its characteristics, when testing an unknown bacterium, the results must all match to a known bacterial species for confident identification to occur. Figure 4.9 illustrates a series of test results which conclusively identify a microbe as being E. coli. If any of the results had been different, then it organism could not be E. coli.
Serology: Serology is the science of studying blood serum (the liquid portion of blood) and the immune responses that can be detected in serum. Foreign substances that enter our bodies can elicit immune responses. Those that do, are called antigens (which is a contraction of “antibody generating’), because when they are attacked by our immune system, they result in the formation of antibodies. Antibodies (also called immunoglobulins) are glycoproteins that bind to antigens and play an important role our immune system. We will be discussing the functions and formation of antibodies in a later unit, but for now, what is important to understand is that each antibody is specific for its target antigen. They will only bind to that specific antigen and not any others.
Antigens can be anything from microorganisms, to toxins, to even drugs. Anytime a foreign substance enters into your body, it can cause an immune response, which results in the production of specific antibodies that can remain in your blood long after the original antigen has been eliminated. Antibodies can also be produced in laboratories for use for diagnostic tests, some of which are discussed below. Because of the specific nature of the antibody-antigen interaction, we can use antibodies to look for the presence of antigens in patient samples, or use antibodies to detect the presence of antibodies in a patient’s blood.
Due to the antibody-antigen specificity, serological tests are a common diagnostic method for more difficult to culture microorganisms such as fungi, protozoa and viruses.
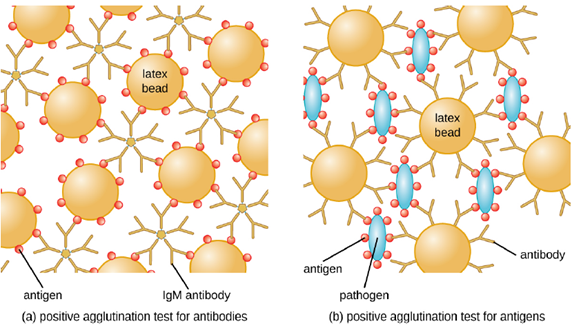
- Slide agglutination test: Antibodies can clump together cells or particles (e.g., antigen-coated latex beads) in a process called agglutination. Agglutination can be used as an indicator of the presence of antibodies against bacteria or red blood cells, or for the presence of a pathogen itself. If you recall, this is the same process that can be used when determining blood type. The most common type of agglutination assay used these days is an indirect agglutination assay, where the inert latex beads are used to help visualization of the agglutination. (It is called indirect because the agglutination of beads is used as a marker for the interaction between the antibody and antigen (Figure 4.10)) These tests can be used to detect the presence of either antibodies or specific antigens.
To identify antibodies in a patient’s serum, the antigen of interest is attached to latex beads. When mixed with patient serum, the antibodies will bind the antigen, cross-linking the latex beads and causing the beads to agglutinate indirectly; this indicates the presence of the antibody (Figure 4.11). This technique is most often used when looking for IgM antibodies, because their structure provides maximum cross-linking. One widely used example of this assay is a test for rheumatoid factor (RF) to confirm a diagnosis of rheumatoid arthritis. RF is, in fact, the presence of IgM antibodies that bind to the patient’s own IgG. RF will agglutinate IgG-coated latex beads.
In the reverse test, soluble antigens can be detected in a patient’s serum by attaching specific antibodies to the latex beads and mixing this complex with the serum (Figure 4.10). This is cheap diagnostic for detecting the presence of pathogens in a patient’s sample and is widely used in underdeveloped countries that may lack appropriate facilities for culturing bacteria.
- Enzyme-linked Immunosorbent Assays (ELISAs): The enzyme-linked immunosorbent assays (ELISAs) are other methods that take advantage of antibody-antigen specificity. They are more sensitive than agglutination tests and require less patient sample. They involve an antibody molecule bound to an enzyme. This enzyme converts a colourless substrate to a colored one, which allows the presence of the target to be visualized and quantified. There are two main types, direct ELISAs, which use known antibodies to test for the presence of antigens and indirect ELISAs, which use known antigens to detect the presence of antibodies.
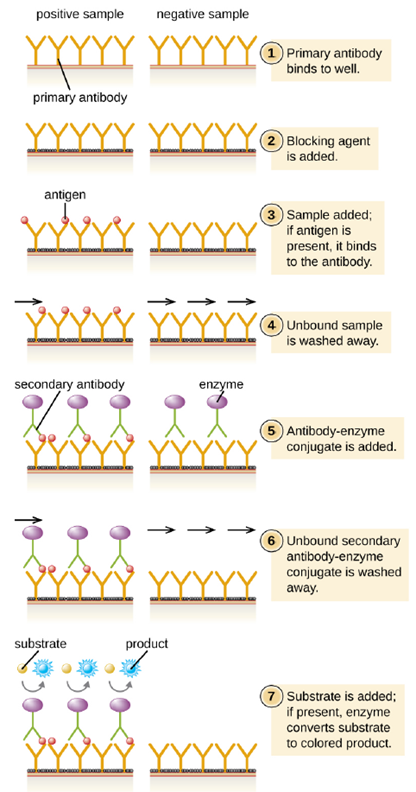
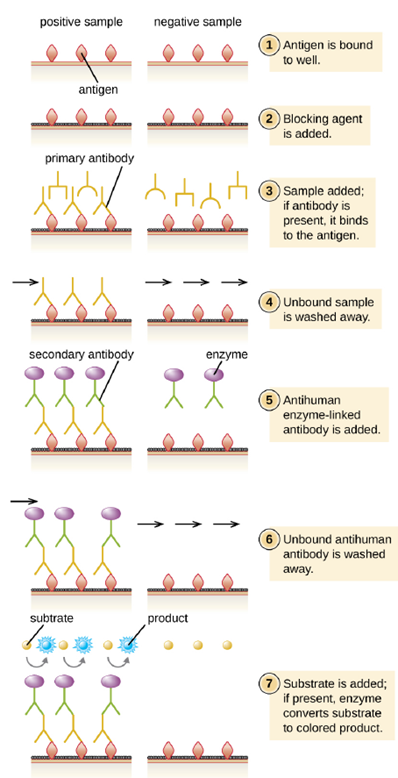
- Direct ELISA: In a direct ELISA, the goal is to use antibodies to detect the presence of a specific antigen present in a sample, such as antigen from a pathogen, a serum protein, or a hormone from the blood or urine, such as in pregnancy tests, to list just a few examples. The first step of a direct ELISA is to add the primary antibody to all the wells of a microtiter plate (Figure 4.12). The antibody sticks to the plastic by hydrophobic interactions. After an appropriate incubation time, any unbound antibody is washed away. Comparable washes are used between each of the subsequent steps to ensure that only specifically bound molecules remain attached to the plate. A blocking protein is then added (e.g., albumin or the milk protein casein) to bind the remaining nonspecific protein-binding sites in the well (this often just part of the washing solution). The patient sample is added and if positive for the antigen, the primary antibody captures the antigen. Following a wash to remove non-specific antigens, the secondary antibody is added, which is conjugated to an enzyme. After a final wash, a colorless substrate (chromogen) is added, and the enzyme converts it into a colored end product. The intensity of this color can be quantified, the darker the color, the more antigen present in the sample.
- Indirect ELISA: In an indirect ELISA, we quantify antigen-specific antibody rather than antigen. We can use indirect ELISA to detect antibodies against many types of pathogens, including Borrelia burgdorferi (Lyme disease) and HIV. Indirect ELISAs can also be used to determine the vaccination history of a person, or whether they need a vaccine booster. There are three important differences between indirect and direct ELISAs as shown in Figure 4.13. Rather than using antibody to capture antigen, the indirect ELISA starts with attaching known antigen (e.g., peptides from HIV) to the bottom of the microtiter plate wells. After blocking the unbound sites on the plate, patient serum is added; if antibodies are present (primary antibody), they will bind the antigen. After washing away any unbound proteins, the secondary antibody with its conjugated enzyme is directed against the primary antibody (e.g., antihuman immunoglobulin). The secondary antibody allows us to quantify how much antigen-specific antibody is present in the patient’s serum by the intensity of the color produced from the conjugated enzyme-chromogen reaction.
DNA Sequencing: In the last several years, technological advances have greatly reduced the cost of DNA sequencing, i.e. determining the sequence of nucleotides in a fragment of DNA. In the future, further cost reductions could quite possibly make DNA sequencing the quickest and most cost effective method of identifying unknown pathogens. As most pathogens contain DNA (with the exception of RNA viruses), DNA sequencing is an effective method of identifying the causative organism in bacterial, fungal, protozoan and viral infections. In DNA sequencing, a DNA sample in analyzed in a machine (there are multiple ways this can be done, none of which we will be covering), giving you a read out of the nucleotide sequence. This sequence would then be compared to a database of microbial genomes, giving a conclusive identification almost immediately.
