Module 3 – Creating OERs
Learning Objectives
At the end of this module, you will be able to
- Identify potential platforms and tools that you can use to create an OER.
- Use TASL attribution.
- Design your OER with accessibility best practices.
Why create an OER
There are many reasons why you might choose to create your own OER. Although cost savings are a major talking point in favour of adopting open educational resources, the freedom to adapt OER to instructional needs is often the most attractive aspect of OER. Since OER are openly licensed, educators are free to edit, reorder, and remix OER materials in many ways. You can tailor a resource to fit a specific context within your courses and research, create resources that can be used within or across disciplines, and enable all students to have equal access to course materials.
Take a moment
Platforms and tools
To create OERS, you can use many of the same tools that you currently use to create educational resources for your courses. However, you may want to consider using tools that were developed especially for creating OERs, which contain features that will facilitate openness, discoverability, accessibility, and sharing.
Below is a list of criteria to consider when choosing which tool you’d like to use to create your OER:
- Types of OER Supported: Does this tool allow you to create text-based or multimedia resources, or course modules that may contain both?
- Special Characters: If you plan to create a resource that will include special character/equations, does this tool support that?
- Accessibility: Does this tool facilitate creating content that is accessible?
- Sharing/Licensing: Does this tool allow you to easily apply a Creative Commons license?
- Hosting: Does this tool allow you to host your OER on an existing OER platform, with a permanent link for sharing?
- Export Options: Does this tool allow you to export your content to a format that others can reuse and share? Could your students export to a printable format, if they so choose?
- Cost: What will this tool cost to use? For you? For students? Will students have to create an account in order to view your OER? If so, what are the tool’s terms of use, and how does it manage your students’ personal data?
Pressbooks
Pressbooks is an online publishing platform that is built on the popular WordPress publishing and blogging platform.
Pressbooks allows you to create content once and publish it in many formats including a website, PDF document, EPUB (usable in most eReaders), MOBI (for Kindle readers), and various editable files. Pressbooks supports uploading of a variety of formats (including PDFs, Word docs, HTML) and content can be edited, modified and be published in a variety of formats. Students can choose to read the textbook online, download a PDF, read the textbook on their e-reader, or they could even request a print copy of the textbook, paying only the printing fees.
PB also provides many of the advantages of online materials. You can embed Youtube or Vimeo videos, add podcasts and interactive components using H5P. It is built off of WordPress so it’s easy to pick up and use. If you want an open educational resource that still feels like a textbook, Pressbooks is a really good option.
BCIT uses the BCcampus instance of Pressbooks available to instructors and staff at BC and Yukon institutions. BCcampus provides Pressbooks support for their platform with:
- Video tutorials
- BCcampus Open Education Self-Publishing Guide
- The Adaptation Guide
- BC Open Textbook Accessibility Toolkit
- LaTeX Support – schedule a tutoring session and find LaTeX information
Jupyter Notebooks
Jupyter Notebook is an open-source web application that allows you to create and share documents that contain live code, equations, visualizations, and text. Jupyter supports over 40 programming languages and can be shared through GitHub or the Jupyter Notebook Viewer.
The Jupyter Notebook is an interactive computing environment that enables users to author notebook documents that include code, interactive widgets, plots, narrative text, equations, images and even video! The Jupyter name comes from 3 programming languages: Julia, Python, and R. It is a popular tool for literate programming.
The Jupyter Notebook combines three components (from the docs):
- The notebook web application: An interactive web application for writing and running code interactively and authoring notebook documents.
- Kernels: Separate processes started by the notebook web application that runs users’ code in a given language (e.g. python, R, Julia, Go, and more — get the full list of kernels from the wiki) and returns output back to the notebook web application. The kernel also handles things like computations for interactive widgets, tab completion and introspection.
- Notebook documents: Self-contained documents that contain a representation of all content visible in the notebook web application, including inputs and outputs of the computations, narrative text, equations, images, and rich media representations of objects. Each notebook document has its own kernel. You can export your notebook in many other formats, even LaTex and PDF!
Literate Programming
Donald Knuth first defined literate programming as a script, notebook, or computational document that contains an explanation of the program logic in a natural language (e.g. English or Mandarin), interspersed with snippets of macros and source code, which can be compiled and rerun. You can think of it as an executable paper!
Open Journal Systems (OJS)
Open Journal Systems is an open-source and locally hosted journal publishing platform. It was created by and is hosted at SFU and the Public Knowledge Project (PKP). Along with providing a personalized website for each journal, OJS includes robust editorial workflow management functions that allow journals to manage submissions, peer review and editing all within the platform. BCIT provides an OJS instance for BCIT staff, faculty, and students.
The OJS system has a highly configurable system for editorial workflows with features including:
- Online author submission
- Blind, double-blind, or open peer-review processes
- Online management of copyediting, layout, and proofreading
- Delegation of editorial responsibilities according to journal sections
- Management of publication schedule and ongoing journal archiving
- Customizable presentation features
- Multilingual interface supporting 10 languages
- Support for a variety of reader tools, such as RSS feeds and share buttons
OJS can be used for non-journal monograph projects as well, especially if you are engaging in open pedagogy. For example, if you have an assignment that repeats throughout all of the times you teach a course, you could consider creating a journal for that assignment and publishing student work according to which term or section they are in as different volumes.
Other tools
An extended list can be found on the Open BCIT Resources – Tools list which includes tools for creating images, interactive H5P, videos, and more.
Games and simulations
Many industries (from automobile to weather forecasting) use simulation for training; classrooms are beginning to reflect this training and this type of learning. Open Labyrinth, for instance, is being used by a number of medical schools and institutions for training; it gives students a hands-on, practical, virtual environment to use. Likewise, Molecular Workbench enables students to explore hundreds of simulations for physics, chemistry, biology, biotechnology, and nanotechnology. Physlet Builder even allows students to create a physics simulation without writing code. Other examples of open simulations for education include Siafu (an open-source context simulator), SmartSim (an open-source digital logic circuit design simulator), Jasmin (an open-source robot simulator) and many others.
For more traditional board game environments, Tabletopia enables you to create online educational card or board games to experiment with the gamification of learning concepts and information.
Google Drive
A series of tools (Slides, Sheets, Docs) for creating presentations, documents, or spreadsheets online. Easy editing and sharing tools are built-in, as well as the ability to easily collaborate with others. They require a Google account to create, but you can set sharing permissions to make the resource available to anyone with the link.
Take a moment
Are there any that sparked an idea for an OER that you could create?
Adapting and using existing resources
When creating and authoring something we often end up pulling in and using works created by other people. These could be works such as images, tables, graphs, videos, or excerpts. “Open” does not just apply to the words that you write, but includes all elements within the OER as well. Creating your own OER using works from other people engages in the 5R activities of Reusing, Remixing, or Revising.
Combining licenses
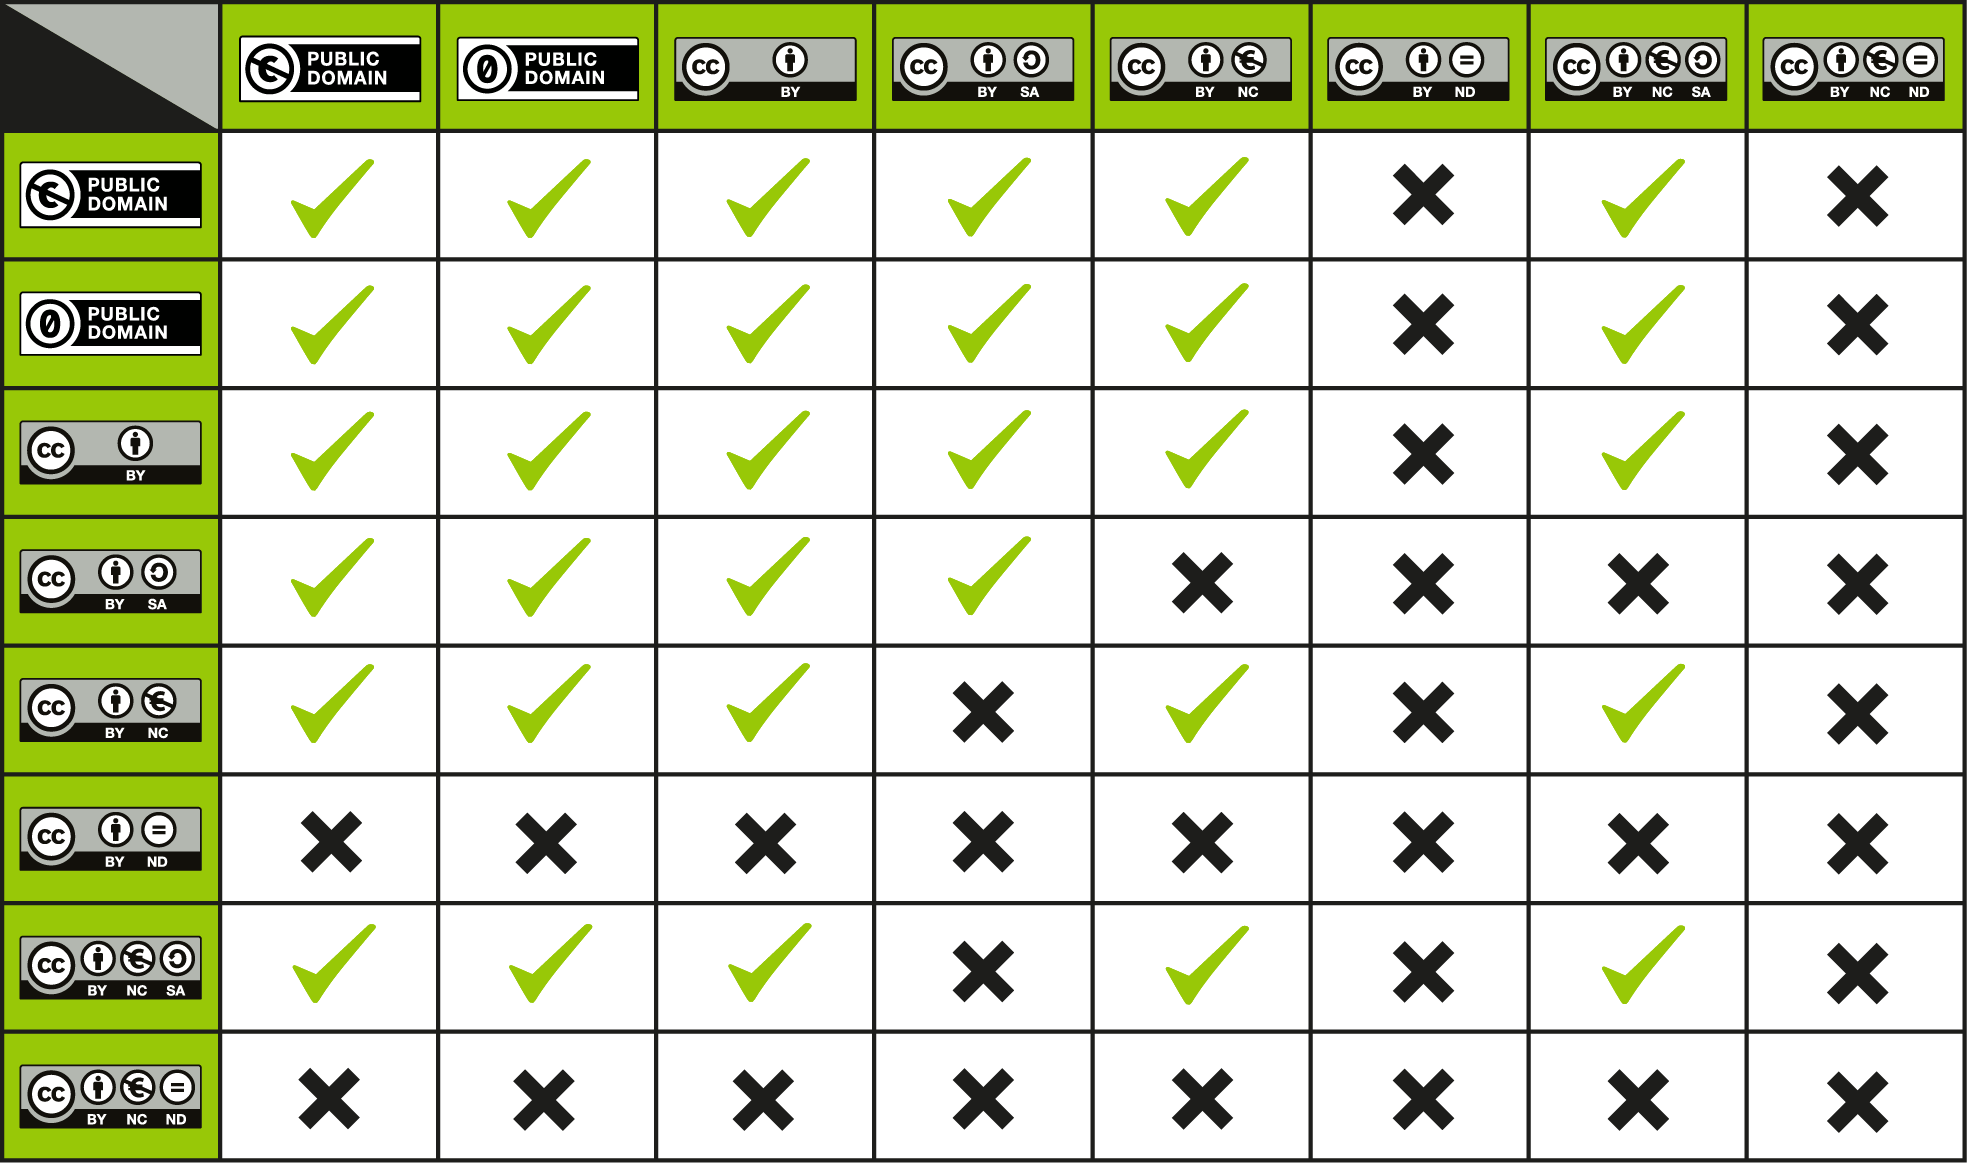
In Module 1, we learned about how each license allows or prohibits people from participating in 5R activities and thought about how restrictive each of the licenses is. When creating an OER, all images, tables, graphs, videos, etc. that you include must also have open licenses which are compatible with each other. Fair Dealing allows the use of copyrighted and other third-party materials in the classroom but does not apply when you are publishing something openly online, although there is some debate about if copyrighted materials can be included in CC materials through Fair Dealing provisions (appendix 3 gives the Canadian context).
Below is an image of a chart that you can use to check whether the licenses on your items are compatible.
Attribution
Citing the sources you use in your work is professional and standard academic practice, and OERs are no exception. However, because of their special licensing, OERs have their own attribution style known as “TASL”.

TASL stands for Title, Author, Source, License.
Title – What is the name of the material?
If a title was provided for the material, include it. Sometimes a title is not provided; in that case, don’t worry about it.
Author – Who owns the material?
Name the author or authors of the material in question. Sometimes, the licensor may want you to give credit to some other entity, like a company or pseudonym. In rare cases, the licensor may not want to be attributed at all. In all of these cases, just do what they request.
Source – Where can I find it?
Since you somehow accessed the material, you know where to find it. Provide the source of the material so others can, too. Since we live in the age of the Internet, this is usually a URL or hyperlink where the material resides.
License – How can I use it?
You are obviously using the material for free thanks to the CC license, so make note of it. Don’t just say the material is Creative Commons because that says nothing about how the material can actually be used. Remember that there are six different CC licenses; which one is the material under? Name and provide a link to it, eg. http://creativecommons.org/licenses/by/4.0/ for CC BY. If the licensor included a license notice with more information, include that as well.
Lastly, is there anything else I should know before I use it?
When you accessed the material originally did it come with any copyright notices; a notice that refers to the disclaimer of warranties; or a notice of previous modifications? (That was a mouthful!) Because that kind of legal mumbo jumbo is actually pretty important to potential users of the material. So best practice is to just retain all of that stuff by copying and pasting such notices into your attribution. Don’t make it any more complicated than it is — just pass on any info you think is important.
Regarding modifications: Don’t forget to note if you modified the work yourself (example).
Don’t make it too complicated
The license tells you to be reasonable:
You may satisfy the conditions in (1) and (2) above in any reasonable manner based on the medium, means and context in which the Licensed Material is used. For example, it may be reasonable to satisfy some or all of the conditions by retaining a copyright notice, or by providing a URI or hyperlink associated with the Licensed Material, if the copyright notice or webpage includes some or all of the required information.
There is no one right way; just make sure your attribution is reasonable and suited to the medium you’re working with. That being said, you still have to include attribution requirements somehow, even if it’s just a link to an About page that has that info.
Examples of attribution
Here is a photo. Use the slider to see examples of how people might attribute it.
Take a moment
How would you feel if you found out someone used your work in a way you didn’t authorize and/or didn’t give you credit?
Addressing accessibility
One of the basic premises of open education is access. The United Nations Educational, Scientific and Cultural Organization (UNESCO) believes
…that universal access to high-quality education is key to the building of peace, sustainable social and economic development, and intercultural dialogue. Open Educational Resources (OER) provide a strategic opportunity to improve the quality of education as well as facilitate policy dialogue, knowledge sharing and capacity building
– Open Educational Resources, UNESCO
Access in this context refers to the ability of students, instructors, and others to obtain access to education. Releasing textbooks and other educational resources with open-copyright licenses is a big step toward removing barriers, as it makes these materials free of cost and free to use, distribute, and change. But there is more that goes into accessing a resource than just being free and online. For a resource to be truly accessible, people of all abilities need to be able to access the content. This means designing an OER that accommodates people with diverse needs and ensuring the content can be accessed by all, regardless of ability.
Barriers to access
Listed below are some of the barriers students face during their education, as well as some solutions and examples of how to overcome these barriers in the resources you create.
| Barrier Type | Challenge | Solution | Example |
| Physical Impairments | Low vision or blindness | Use alternative text (alt-text) to describe an image’s content or function that can be read by a screen reader. | All images in Introduction to Psychology – 1st Canadian Edition have alt-text. |
| Hearing impairment or deafness | Add transcripts and captions to all audio content. | The instructional videos [YouTube – New Tab] created for Concepts of Biology-1st Canadian Edition are all captioned. | |
| Motor-skill impairment, immobility | Provide file formats that can be uploaded into a variety of mobile devices. | Introduction to Tourism and Hospitality in BC has a number of file types available. | |
| Learning Disabilities | Difficulty absorbing information via reading or difficulty concentrating (ADHD) | Add audio clips to printed text that students can listen to while reading along. | Common Core Trade series (23 books) has audio files that accompany the text. |
| Language Comprehension | Low literacy: adult basic education (ABE) student or English language learners (ELL) | Provide a print copy with increased font size or provide formats that allow the font size to be adjusted.
Wherever possible, keep the language clear and straightforward. |
The PDF of BC Reads: Adult Literacy Fundamental English – Reader 1 uses large text. |
| Limitations of Time and Place | Working, parenting, or live far from a college or university | Provide a version of the textbook that can be accessed from anywhere online. | All books in the B.C. Open Textbook Collection can be accessed online. |
| Unreliable or no access to the Internet | Set up a service that can supply a print-on-demand copy. | See the print-on-demand option for Principles of Social Psychology – 1st International Edition. |
Tips for accessibility
Here are some tips that can help to make an OER more accessible:
- Use clear, straightforward language. Make the content understandable.
- Provide multiple formats whenever possible. This will allow different users to access the resource in different ways.
- Use a clear organizational structure to guide readers through the resource.
- Provide proper information and resources to make the content readable and understandable for users (ie. Glossary, Abbreviation list).
- Use personas to ‘test’ out draft resources for different users.
- Develop an accessibility statement to show ways that the resource has been made more accessible and a way for users to contact you with suggestions to improve accessibility.
- When requesting peer reviewers, make sure to highlight the importance of accessibility, diversity, and inclusion.
Accessibility Resources
- BCcampus Open Education Review Rubric [Word file] addresses the issue of diversity and inclusion
- Checklist for Accessibility from Accessibility Toolkit – 2nd Edition by BCcampus
- Open UBC has put together an Accessibility Toolkit.
Take a moment
Is your definition narrow or broad?
What are some ways you can make your current work more accessible?
Module quiz
Test your knowledge about creating an OER.
Summary
Adaptation statements
This module adapted content from:
- Create – Open Educational Resources Libguide by Gordon Library, Worcester Polytechnic Institute, licensed under CC-BY-NC
- Which Tool Should I Use? Selecting a Tool for Open Education by UBC Library, licensed under CC-BY-NC
- Jupyter Notebooks – Data Management Planning Libguide by NYU Libraries, licensed under CC-BY-NC-SA
- Library Liaisons Toolkit: OJS (Open Journal Systems) by UF Libraries, licensed under CC-BY-NC-SA
- Gaming for education to strengthen schools in 2014 by Carolyn Fox at Open Source, licensed under CC-BY-NC
- OER and Alternative Textbook Handbook by Ariana Santiago is licensed under CC-BY
- Best Practices for Attribution by Creative Commons Wiki, licensed under CC-BY
- Open Textbook Publishing Guide by Erin Fields and Amanda Grey, licensed under CC-BY
- Self-Publishing Guide by BCcampus, licensed under CC-BY
Media Attributions
- CC License Compatibility Chart © Kennisland is licensed under a CC0 (Creative Commons Zero) license
- TASL © Office of Learning Innovation is licensed under a CC BY (Attribution) license
A persona is a representation of a fictitious user that gives a clear picture of how they're likely to use the resource and what they will expect from it.
Also known as user profiles, user role definitions, audience profiles.
