3 Connecting a Virtual Client to TB
In TB, the registered device serves as the connection point between the telemetry data and the platform, utilizing the MQTT (Message Queue Telemetry Transport) protocol. However, TB also supports other communication protocols such as NB-IoT, Sigfox, and LoRa [1]. A detailed description of these protocols is beyond the scope of this chapter.
As mentioned in the previous chapter, displaying telemetry data on the dashboard involves four basic steps: 1) adding the device, 2) adding the dashboard, 3) adding the alias, and 4) adding the widget. Once these settings are configured, TB is ready to establish communication with the device to receive the telemetry data. In this chapter, we will explore how to use Python programming to publish data to TB. Before delving into the Python code, let’s take a brief overview of the MQTT protocol.
3.1 MQTT Protocol
The MQTT protocol is widely used messaging protocol in the Internet of Things (IoT) domain. It defines a set of rules that govern the exchange of data between IoT devices over the Internet. MQTT is commonly used for both consumer and industrial IoT (IIoT) applications. The protocol follows an event-based communication model, employing the concepts of publishers and subscribers to establish a Pub/Sub (Publish/Subscribe) pattern for device connectivity [2] [3] [4] .
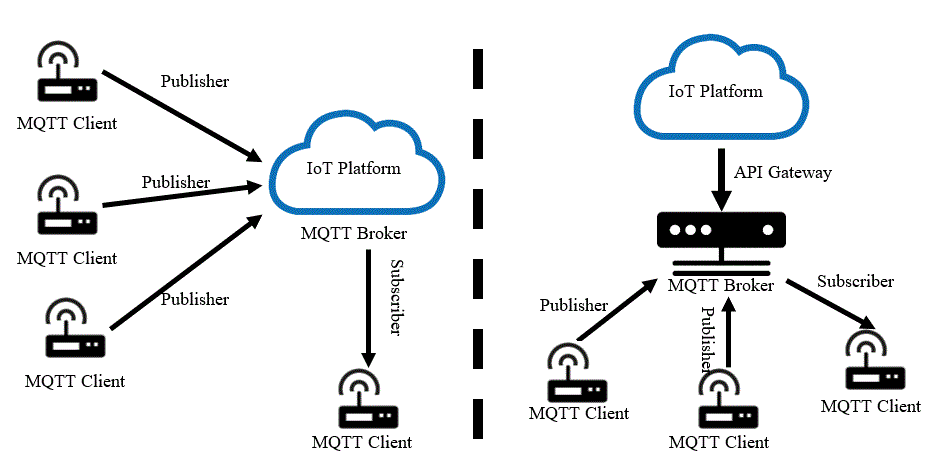
Publishing refers to the process where a device sends data to a server, also known as a broker. On the other hand, subscription refers to the process of receiving data from the broker. MQTT client libraries can be found on the Internet, catering to various types of publishers and subscribers. data is differentiated from one another using “topics”, which serve as identifiers within the MQTT ecosystem. The broker acts as an intermediary, managing the communication between IoT devices. It functions as a server, while the connected devices operate as clients. The MQTT broker ensures that they are delivered correctly to the subscribed clients.
1. MQTT Client
In the MQTT protocol, both publishers and subscribers are referred to as clients. The distinction between a publisher and a subscriber lies in their respective roles in the message exchange process. Publishers are clients that send messages or data to the broker server, while subscribers are clients that have subscribed to the broker server to receive messages.
The MQTT client can encompass a wide range of devices, from small microcontrollers to large servers capable of handling the TCP/IP stack required for network communication with the MQTT server. For instance, an MQTT client could be a resource-constrained device connected via a wireless network, running minimal code. Since MQTT is built on top of TCP/IP, both the client and the broker must support this network stack.
Implementing the MQTT protocol in a client is relatively straightforward and efficient compared to other protocols like HTTP, requiring minimal resources. Therefore, MQTT is particularly suitable for IoT solutions with limited resources. Numerous programming languages, such as Python, Java, JavaScript, and C/C++, have developed libraries to support MQTT. The MQTT wiki [5] provides a comprehensive list of these libraries, enabling developers to leverage MQTT in their preferred programming languages.
2. MQTT Broker
In the MQTT protocol, the broker plays a central role in facilitating publish/subscribe communication. A single broker has the capability to handle a large number of connected MQTT clients simultaneously. In the MQTT architecture, clients do not directly communicate with each other but instead communicate through the broker. The broker performs several essential functions, including:
- Message Acquisition: The broker receives and collects all published messages from the publishing clients.
- Session Management: The broker manages session data for each connected client, maintaining information about client subscriptions and message delivery.
- Message Filtering: The broker filters incoming messages based on their topic and determines the subscribers for each message.
- Message Distribution: The broker distributes the published messages to the appropriate subscribing clients.
- Authentication and Authorization: The broker is responsible for authenticating and authorizing clients. This is particularly critical in MQTT since data is transmitted over public networks like the Internet. Each client is assigned an access token to ensure secure communication with the broker.
The broker can be implemented as a server hosted in a cloud platform, providing scalable and reliable MQTT communication infrastructure. Alternatively, the broker can also function as an intermediate gateway that facilitates communication between different devices, allowing for seamless connectivity across diverse IoT devices and networks.
3.2 Telemetry Data
In the TB platform, a comprehensive range of features is available to handle telemetry data published from devices with various types and attributes. Telemetry data in TB is represented in JavaScript Object Notation (JSON) format and can be published or subscribed to by clients. A typical example of telemetry data in TB would be a list of key-value pairs, structured as follows:
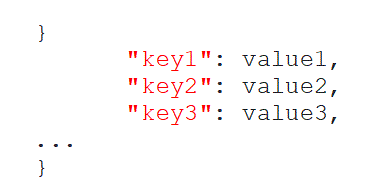
The JSON format allows for organizing and structuring the data in a readable and standardized manner. Each data point can be associated with a timestamp, capturing the time of its occurrence or recording. This timestamp provides valuable temporal information and enhances the context and usefulness of the telemetry data. Whether it is the value of a variable, the status of a switch, or any other relevant information, the inclusion of timestamps enables efficient time-series analysis and facilitates tracking data trends and patterns over time. Throughout the rest of the chapter, we will utilize this JSON formatting in Python to transmit telemetry data to TB, enabling seamless integration and communication between the Python code and the TB platform.
3.3 The Python Code
To send telemetry data to TB using Python programming, you need to publish the data in JSON format.
Opening the MQTT port
Before starting the coding process, it is important to check the client port used for communication with TB over MQTT. The default port for MQTT communication is 1883. To check if this port is open, you can follow these steps:
1- Open the Command Prompt (cmd) on your Windows PC or laptop with administrative privileges.
2- Enter the command “netstat -a” and press Enter.
3- Look for the printed results to find the open ports.
4- Check if port 1883 is listed among the open ports. If it is listed, it means that the port is open and available for MQTT communication with TB.

5- If you come across a closed port that isn’t included in the list, it’s necessary to open it. To do so, follow these steps: Go to “Windows Defender Firewall” by entering the “firewall.cpl” command in the Run command window. In the opened window, click on “Advanced settings” on the left side. From the options on the left, select “Inbound Rules”. On the right side, choose “New Rule”. Finally, proceed with the remaining steps in order to successfully open the port.
After opening the “New Inbound Rule” window, follow these steps:
- Choose “Port” and click “Next”.
- Select “TCP” and enter “1883” in the “Specific local ports” field. Click “Next”.
- Allow the connection by selecting “Allow the connection” and click “Next”.
- Check all the boxes for “Domain”, “Private”, and “Public” profiles, and click “Next”.
- In the “Name” field, enter “MQTT Service Port” and click “Finish”.
- Once completed, you will find port 1883 listed in the main ports as described in Step 4. You can refer to figure below for a visual representation of this step.
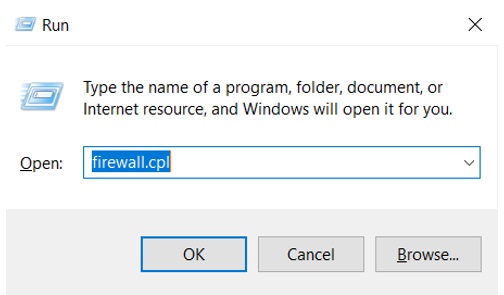
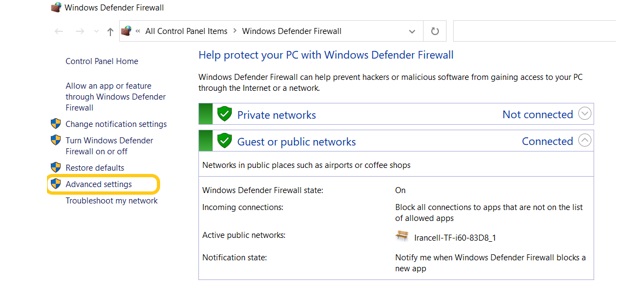
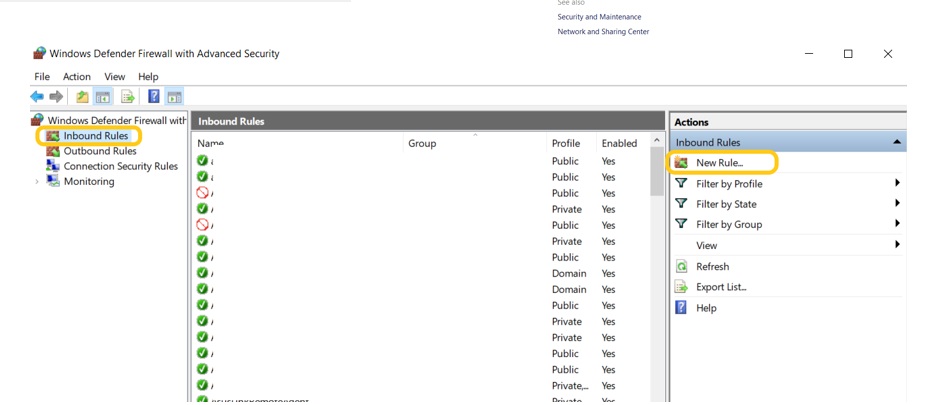
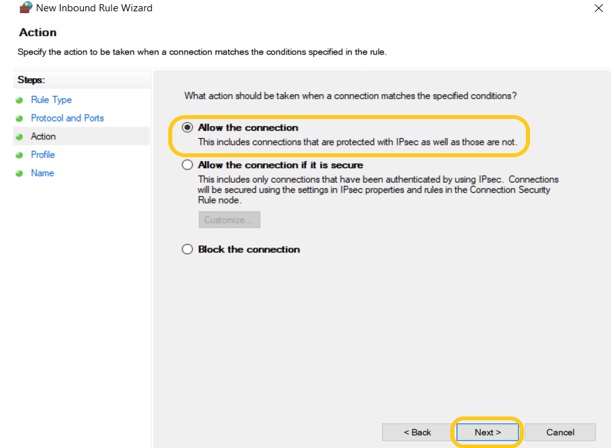
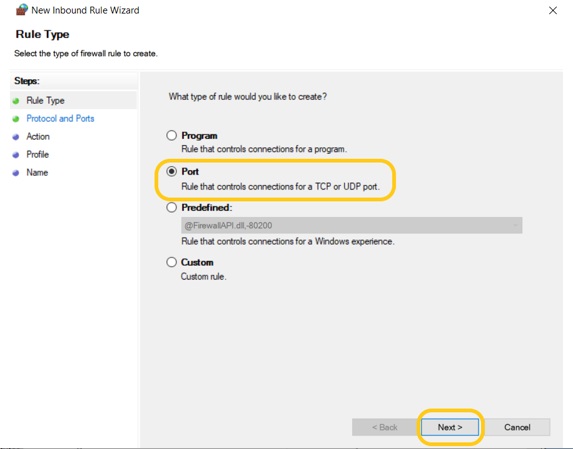
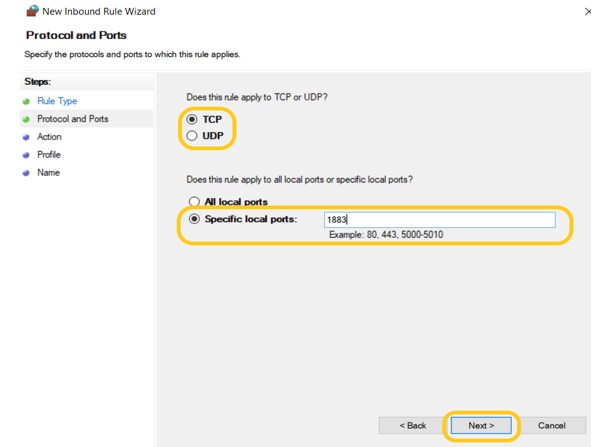
Figure 15. Opening the MQTT client port in Windows
Publishing Data to TB
1- To install the Paho MQTT library in Python, assuming you have Python already installed on your client machine, open a command prompt or terminal window and execute the command “pip install paho-mqtt”. This will download and install the Paho MQTT library along with its dependencies. Once the installation is complete, you’ll be able to utilize the library in your Python projects.
pip install paho_mqtt
2- Import the following required libraries into your code:
3- To define the “ACCESS_TOKEN” variable along with the address of the broker and the client port, you should include the following lines in your code:
Replace “your_access_token” with the actual value of the access token derived from the TB platform, as it was shown in Figure 6. Similarly, replace “broker_address” with the address of your MQTT broker which in our case is “thingsboard.cloud”. Assign the appropriate port number (i.e., 1883) to “broker_port“. By defining these variables, you will have the necessary information to establish a connection between your code and the MQTT broker.
4- To define the callback method for publishing data and handle the response when telemetry data is successfully published to ThingsBoard (TB), you can include the following code snippet:
5- Define a client object in your code and configure its parameters:
6- Publish sample telemetry data that is written in JSON format in an infinite loop:
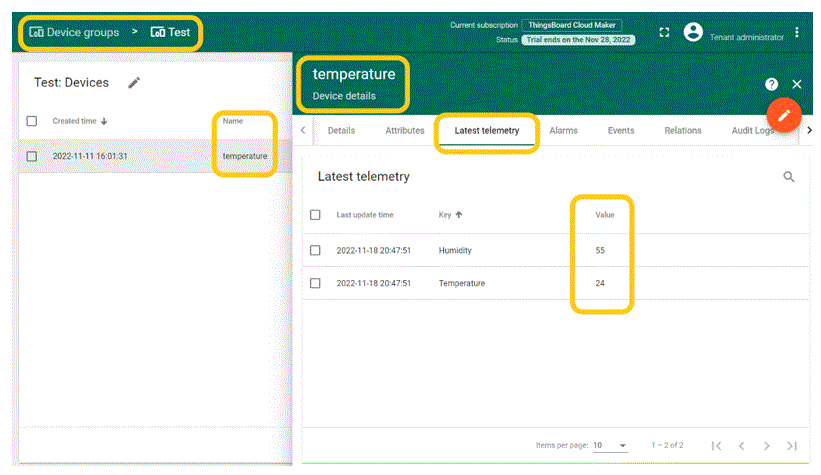
In this step, you can put your telemetry data, i.e., Humidity = 55 (%) and Temperature = 24 (0C), in a variable named payload, publishing it to the following topic: “v1/devices/me/telemetry”.
7- Aggregating the aforementioned Python scripts, the final code will be as follow. Running this code will publish the telemetry data every five seconds.
8- To view the latest telemetry data of defined devices in your TB account, navigate to the “Latest Telemetry” section. This section provides you with the most recent telemetry data sent by your devices, allowing you to monitor the values of attributes or parameters being tracked.