Brightspace
Groups

Things to consider
Before setting up Groups in Brightspace, consider preparing the following:
Group Purpose
Define clear objectives for using groups. Whether for discussions, assignments, or projects, having a well-defined purpose helps you select the appropriate group settings and communicates to students why they’re working in groups.
Group Formation Strategy
Decide how you want to form groups based on your pedagogical goals:
- Random assignment works well for short-term activities
- Self-enrollment gives students agency and may increase engagement
- Instructor-assigned groups allow for balanced composition (skill level, experience, etc.)
- Single-user groups can be useful for individual reflections or sign-ups
Group Size
Consider the optimal size for your activity:
- Smaller groups (2-3) encourage full participation but provide less diversity of perspectives
- Medium groups (4-5) balance participation and diversity
- Larger groups (6+) provide more perspectives but may lead to uneven participation
Group Tools
Determine which Brightspace tools the groups will use:
- Discussion areas: For group conversations and collaborative idea development
- Assignment folders: For group submissions of projects or assignments
- Lockers: For file sharing among group members
Timeline
Plan the group activity timeline:
- When will groups be formed?
- How long will students work in these groups?
- Do you need enrollment start/end dates for self-enrollment?
Communication
Prepare clear instructions for students about:
- How to find their group
- What they’re expected to do within their group
- How to communicate with group members
- How their group work will be evaluated
Students can belong to multiple groups within the same course. For example, each student can simultaneously belong to a group for the class project, a group for a special interest discussions, and group of one for journalling. Each group can have its own discussions forums, assignments, and locker area to work in. You can grade members of groups individually or as a team.
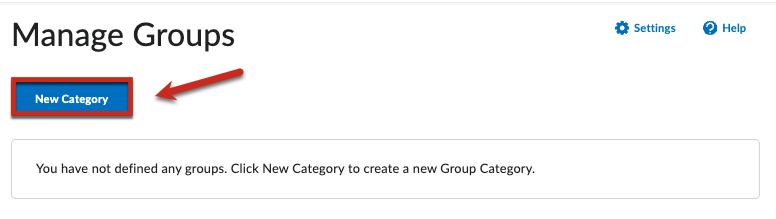
To create groups in Brightspace:
Step-by-step guide to creating groups
Step 1: Go to My Tools > Groups.

Step 2: Click the New Category button to begin creating groups.
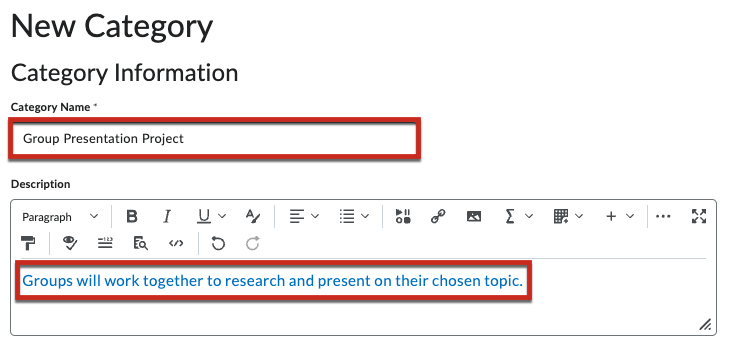
Step 3: Enter a Category Name (required) and an optional description.
- Choose a descriptive name that clearly identifies the purpose (e.g., “Project Teams” or “Discussion Groups Week 3”)
- The description can provide context for both you and your students
Step 4: Select the appropriate Enrollment Type based on your needs:
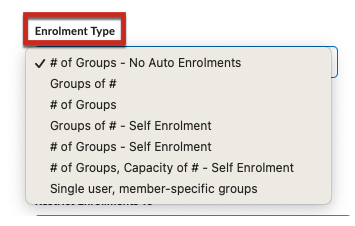
- # of Groups – No Auto Enrollments: Creates empty groups for manual assignment (best when you want specific student combinations)
- Groups of #: Creates groups with a specific number of members (e.g., “groups of 4 students each”)
- # of Groups: Creates a specific number of total groups (e.g., “6 groups total”)
- Groups of # – Self Enrollment: Allows students to join groups themselves (good for student agency)
- Single User: Creates individual groups with one member each (useful for reflective activities or sign-ups)
Step 5: Configure the Advanced Properties (options vary based on enrollment type):
If you choose the Groups of # or # of Groups enrollment types, you will have three additional options under Advanced Properties.
- Auto-enroll new users – If enabled, this setting will automatically add any new students to a group in this category if they are added to the course later.
- Randomize users in groups – If enabled, this will enroll students in a random order. If this is not enabled, students will be enrolled based on their order in the classlist.
- Make category and group descriptions visible to group members.
For automatic enrollment, choose whether to randomize users in groups (recommended for most cases)
For self-enrollment, set enrollment start and end dates if needed (e.g., give students one week to join)
Step 6: Select Additional Options as needed:
- Discussion areas: Creates group-specific discussion forums where only group members can participate
- Lockers: Provides file-sharing space for group members to exchange documents
- Assignment submission folder: Creates a group assignment submission area for collaborative work
Step 7: Click Save to create the groups. The system will process your request in the background.
- You’ll see a notification that groups are being created
- You can continue with other tasks while this processes
Group Enrollment Types Explained
When creating groups in Brightspace, you’ll need to choose how students will be assigned to groups. Here’s what each enrollment type means in plain language:
Understanding Group Enrollment Types
# of Groups – No Auto Enrollments
What it means: You specify how many empty groups to create, with no students automatically added.
Best for: When you want complete control over which students go into which groups.
Example: Creating 5 project teams where you’ll manually place students based on their skills or interests.
Groups of #
What it means: You specify how many students should be in each group (e.g., groups of 4).
Best for: When you have a specific group size in mind for effective collaboration.
Example: Creating discussion groups with exactly 3 students per group for focused conversation.
# of Groups
What it means: You specify the total number of groups, and students are distributed evenly across them.
Best for: When you need a specific number of groups regardless of exact size.
Example: Creating 6 lab groups to match the number of lab stations, with students evenly distributed.
Groups of # – Self Enrollment
What it means: You create groups with a maximum size, and students choose which group to join.
Best for: When you want to give students agency in selecting their groups.
Example: Creating “Topic Selection” groups where students join the topic that interests them most.
Single User
What it means: Each group contains exactly one student.
Best for: Individual activities, sign-ups, or one-on-one interactions.
Example: Creating presentation time slots where each student signs up for a specific time.
Important Notes on Group Types
- With automatic enrollment, students are assigned to groups in order from the class list unless you select “Randomize users in groups”
- Self-enrollment can have a time limit (enrollment period) after which remaining students can be automatically assigned
- Enrollment types determine which advanced properties are available to customize
The group enrollment type options can be confusing. Watch the following video to get more information.
- The maximum number of students per individual group is 200.
- Single user groups: this option can be used if you want to give students a personal space to journal that can only be accessed by the student and the instructor.
- Users can belong to multiple groups within the same course but cannot self-enrol in more than one group in the same category.
- “Restrict Enrolments To” will not be an available option in most situations, with the exception of a combined course that has more than one section. In that case, you can create groups that are restricted by section.
Group Discussions
Group discussions create focused conversation spaces where students can only see and interact with posts from members of their own group. This creates smaller, more manageable discussion communities within your course.
When you enable group discussions:
- Students can only view and respond to posts from their own group members
- You (the instructor) can see and participate in all group discussions
- Each group has its own dedicated discussion space
- Grading is streamlined, making this ideal for assessed discussions
You can set up group discussions in two ways:
- During group creation: Select “Discussion areas” under Additional Options when creating groups
- For existing groups: Create a new discussion topic and link it to your group category
Important: Once a discussion topic is created, you cannot convert it between a regular (open) topic and a group topic. Choose the right format from the beginning.
For detailed instructions on creating discussions, visit the Discussions Quick Start Guide.
Assignment Folders for Group Submissions
Group assignment folders allow teams to collaborate on a single submission. This simplifies the submission process for group projects and ensures all team members have access to the same feedback.
You can create group assignment folders in two ways:
- During group creation: Select “Assignment submission folder” under Additional Options when setting up groups
- For existing groups: Create a new assignment and link it to your group category during setup
When using group assignment folders:
- One submission represents the entire group’s work
- All group members can contribute to the submission
- Grades and feedback are shared with all group members
- You can choose whether each student submits individually or the group submits once collectively
For complete instructions on creating assignments, visit the Assignments Quick Start Guide.
Use Cases for Groups
Collaborative Projects
Create groups with an assignment folder to facilitate team projects. Students can collaborate on reports, presentations, or research tasks with shared submission and evaluation.
Example setup: Groups of 4-5 students with both a group locker (for file sharing) and a group assignment folder (for final submission).
Group Discussions
Foster focused discussions on course topics by creating smaller discussion groups where students can engage more deeply with concepts.
Example setup: Groups of 6-8 students with discussion areas only, using “Create one topic with threads separated by group” for easier monitoring.
Peer Review Activities
Set up groups where students can provide feedback on each other’s work through structured peer review.
Example setup: Groups of 3 students with discussion areas for sharing feedback, possibly rotating groups for different assignments.
Individual Sign-up Slots
Use single-user groups with self-enrollment to allow students to sign up for presentation times, lab sessions, or office hours.
Example setup: Single-user groups with descriptive names like “Monday 10:00 AM Presentation” and self-enrollment option.
Further Resources
- See the student view of groups
- Learn how to email groups
- Find out how to modify groups
Contact edtech@langara.ca for more information.
![]()
