3. INFORMATION DESIGN
3.2 Headings and Lists
Headings and lists are standard features of technical writing that, if used effectively, can enhance readability in numerous ways, but if used poorly, can create confusion or irritation. Headings and lists help to break up text in meaningful ways that makes the reader’s journey through the information smoother and easier. For example, look at the differences between the formatting of information in Figure 3.2.1, which uses headings and lists to format the information for enhanced readability, and Figure 3.2.2, which presents the same information, but without headings and lists. It is just a series of paragraphs or “wall of text.”
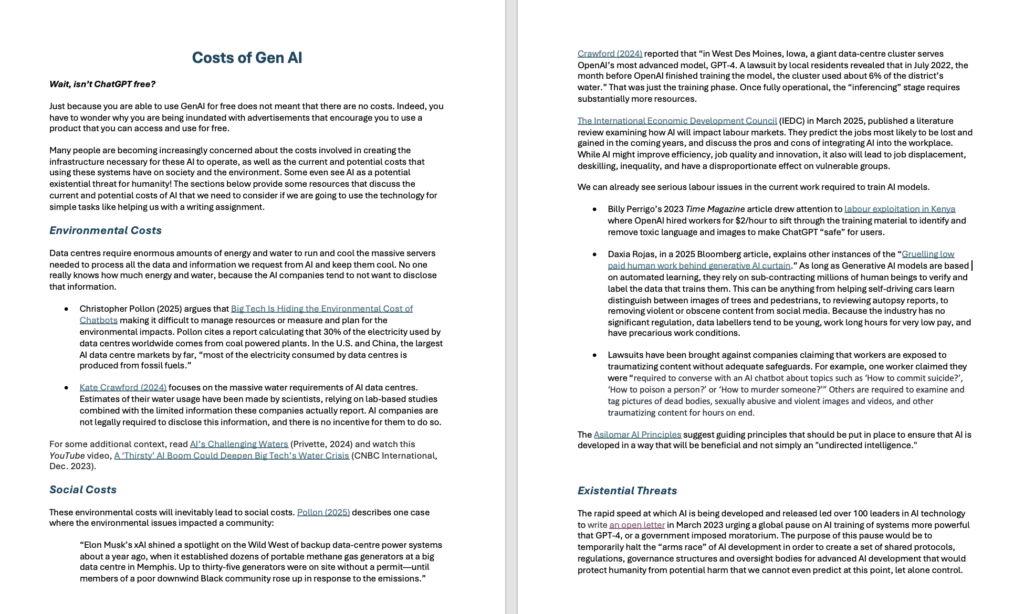
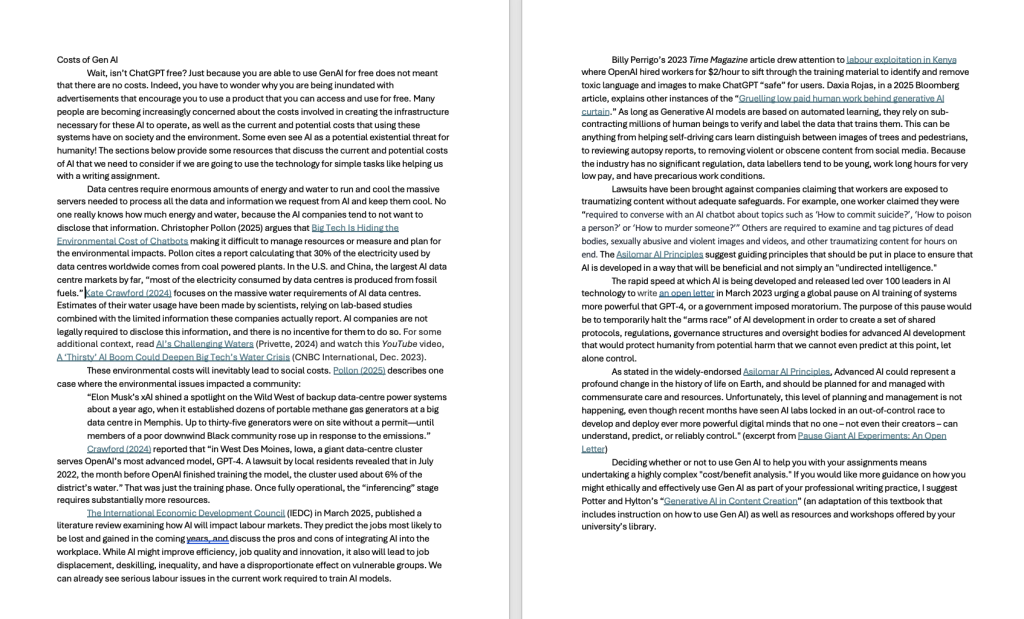
This textbook uses headings, lists, typographical cues like bold and italics, and visuals to help illustrate the information in the paragraphs in reader-friendly ways. Imagine if all the information in this book were presented only in paragraphs, with no additional formatting to break up the wall of text. Would you have gotten this far?
The following sections describe the typical conventions of headings and lists to help you use them to format information in ways that will be effective for your purpose and audience.
Headings
Headings are generally created using the Styles tool in MS Word (or similar tool in other programs) in order to “code” them as headings within the document or webpage and distinguish them from body text. This allows you to auto-generate a table of contents based on the headings, and allows screen readers to identify headings for the listener.
Heading serve several important functions:
Provide organizational overview of the document and the logical development of ideas
Show hierarchical relationship of ideas (headings, sub-headings)
Allow the reader to scan and read selectively
Increase readability of the document by providing breaks and passive space
Allow screen readers to recognize headings, thereby enhancing the accessibility of your text for readers with visual disabilities.
Effective headings use concrete, descriptive language to tell the reader what to expect from the content of each section. Avoid vague or function-based headings when writing technical reports. Function-based headings are a convention used in documents that have highly consistent structures, such as science lab reports, where each section must fulfill a particular function. For example,
- Introduction
- Materials
- Procedure/Methodology
- Data/Results
- Discussion/Conclusions
- References
Technical reports are usually not so strictly organized or predictable. Readers will find it much more helpful if headings concretely describe the content of each section rather than the function. You can craft descriptive headings by pulling key words or phrases from the section they head to give the reader a preview of what to expect.
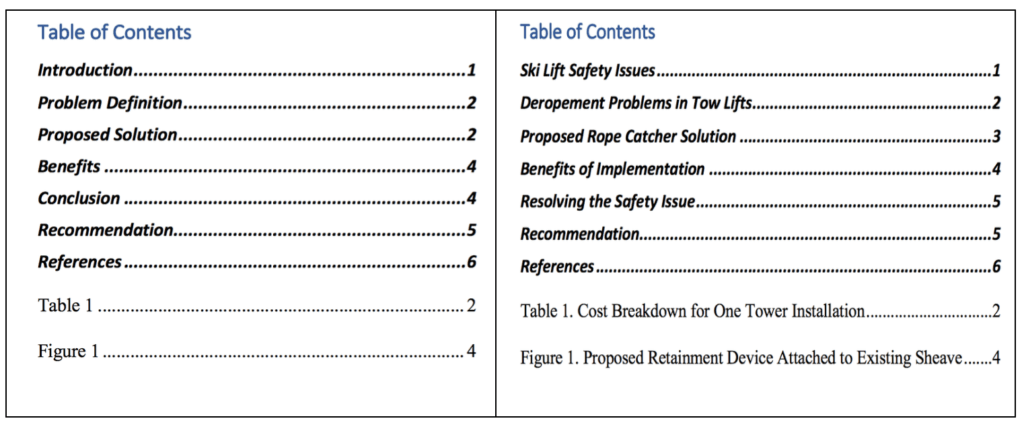
Note the differences in the two Tables of Contents in Figure 3.2.3, each generated automatically from headings and captions within their respective documents. Which one gives a clearer idea of what the report is about?
General Principles for Designing Headings
When designing the headings in your document or online space, keep in mind these general principles:
- Hierarchical Relationship of Ideas: use typography (font size and type), boldness, italics, indentation, and colour to indicate the relative importance of ideas and how they inter-connect. In general, first level headings are larger and bolder than second and subsequent level headings.Headings should help the reader see how information is organized.
- Consistency: if you use headings, every section must have a relevant heading. Make sure your headings at each level are consistent in design (font, size, colour, indentation, etc.) Use the STYLES function in Word to help design and maintain effective and consistent headings throughout your document. You can modify the default styles to suit your preferences.
- Readability: leave passive space above and below headings. There should be slightly more space above the heading than below it (so the heading is closer to the section it relates to).
- Frequency: Avoid overusing headings; use them strategically to delineate specific sections of your document (every paragraph does not necessarily need its own heading). Too many headings actually impedes readability by separating ideas that should be coherently connected. For example, a Problem Definition is one idea, and should not have elements split up under separate headings.
- Specificity: use descriptive heading text to inform the reader of the content of each section. Avoid vague or generic headings, unless these are expectations of the genre you are using. Make sure the content in each section is appropriately described by its heading.
DO the following:
- Use a sans serif font for your headings
- Use font sizes of 12-20 point for headings in documents
- Use descriptive words or short phrases in the heading that indicate the content of the section
- Make sure there is slightly more passive space above a heading than below it
- A heading should have a block of body text below it; avoid adding a heading directly below a previous heading with no intervening body text (known as “stacked headings”)
- Use the Styles function in MS Word to create your headings (see this helpful video on “How to Create and Customize Headings” using Styles
AVOID the following:
- “Stacked” headings. Avoid stacking one heading directly below another. A heading is like a chapter title; it must have at least a sentence of information below it, and can often have several paragraphs of content. Stacked headings can indicate inefficient organization of information that you might consider revising.
- Overuse of headings. Keep in mind that every sentence does not require its own heading, nor does every paragraph or figure. Ideally, a heading should have at least one, often several, paragraphs of text below it. A heading defines a section of the document. Overuse of headings indicates an inefficient organization of ideas that needs revision.
- Do not use a heading to introduce a table, figure, or list. You should have text below a heading that introduces and explains the figure or table. A list requires a lead-in sentence to explain what it is a list of.
- Avoid creating “widows and orphans” –that is, leaving a heading at the bottom of the page with no body text below it. Insert a hard page break before your heading to avoid this.
- Don’t refer to a heading as “this” in the body text below it. Begin your sentence as if the heading were not there, even if this seems repetitive. Avoid starting a new section with a pronoun that refers to a previous idea.
- Avoid manually designing your headings by simply bolding and enlarging body text (unless you do not want them to appear in your Table of Contents).
Using the Styles function in MS Word, rather than simply making text larger or bold manually, offers you may advantages. For example, the algorithm created using Styles allows you to
- Enable Screen Reading software to identify your heading hierarchy
- Create and automatic Table of Contents (TOC) from your headings and sub-headings
- Create hyperlinks to other sections in your document (or bookmarks in a .pdf document)
- Use Word’s Navigation Pane
- Use Word’s “outline” feature when drafting your document
Enabling screen reader software helps make your documents more accessible. Creating an automatic table of contents will save you tons of time! Nobody should ever type all those dots manually…. In addition, the TOC can be updated as you revise your document and add sections, which will help when you are collaborating with other writers. Similarly, you can also create an automatic List of Figures if you use the Caption function. Learning how to use the Styles formatting tool will make your report writing much easier, and will allow you combine sections written by different team members easily and effectively (figure and table numbers will automatically update). Use the tutorials in Word, or search for current online video tutorials showing how to use these tools.
EXERCISE 3.2 Review questions
Answer the following review questions:
- What is an acceptable size range and font style for headings in a document?
- What are “widows and orphans” in the context of document design?
- What are several functions that headings can serve in a document?
- What are “stacked headings?” Should you use them?
- What is the difference between a “function-based” heading and a concrete or “descriptive” heading?
- True or False: You should have more white space above a heading than below it.
- True or False: A heading can be used to introduce a figure or a list.
Further practice:
Review a document you have written, such as a research essay, and see if you can divide it into logical sections introduced by concrete, descriptive headings.
Lists
Lists, when used effectively, can be a technical writer’s—and reader’s—best friend. Lists allow you to cut a lot of verbiage, emphasize important ideas, and make them stand out from the body text. Using SmartArt in MS Word to create these lists can provide additional interest to your design and make the list pop! But be careful not to overuse this feature. Lists increase the readability of text by simplifying long sentences or paragraphs and adding aesthetic passive space to make reading more pleasant. They can also allow you to present information more efficiently. However, using the wrong kind of list or poorly formatting a list can create confusion rather than enhance readability. Overusing lists can make your ideas seem underdeveloped. Therefore, it is important to understand the various types of lists and how and why to use them.
Guidelines for Creating Lists
Adhere to the following guidelines when creating lists of any kind:
- Include between 2-8 items in a list. You must have at least two items in a list (or it’s not a list; it’s just an item). Having more than 8 items in a list can have the reverse effect. If you emphasize too many ideas, you end up emphasizing nothing. Use 8 items as a guideline (not a rule)
- Avoid splitting a list over two pages, if possible.
- Avoid overusing lists. A list should always have explanatory text around it to indicate what this is a list of and its purpose. A series of lists does not give a reader adequate information and context, and makes your document look like a rough outline rather than a polished final product.
- Adjust spacing before, after, and within lists to enhance readability. Avoid having a list of information all scrunched up into a dense block of text; this defeats the purpose of enhancing readability.
- Capitalize the first letter of each list item (or don’t; just be consistent).
- Use parallel phrasing for each listed item (note that each item in this list starts with a verb; these verbs are bolded only to catch your attention, not as a style you must follow).
- Do not use a heading to introduce a list. A list needs a lead-in sentence that contains a subject and a verb.
Each kind of list is suited for specific purposes, and generally conforms to a set of rules of construction and formatting. Learning to use the Paragraph formatting tool in Word (see Figure 3.2.4) is crucial to designing lists that are effective and accessible to assistive technology like screen readers.
NOTE: Avoid making lists by hitting ENTER then TAB and then a dash; this may make future editing difficult, and your list may not be recognized by a screen reader, creating confusion for the person trying to understand your document. Especially when writing documents collaboratively that will need extensive revision and editing, make sure to use the appropriate formatting tools consistently.
Common Types of Lists
Just as bar graphs serve a different purpose than pie charts, different kinds of lists also serve different purposes. This section will describe when and how to use the following five commonly used types of lists:
- Numbered Lists: use when order is important, such as steps in instructions
- Bullet Lists: use when order of listed items is not important
- Labelled Lists: use when the listed items require some explanation or amplification (like this one)
- In-sentence Lists: use when you want to maintain sentence and paragraphing structure, and have a short list (2-4 items)
- Nested Lists: use when listed items have sub-lists (list within a list).
NUMBERED or ORDERED LISTS
Use numbered lists (also called “ordered lists”) when the order of the listed items is important and ideas must be expressed in chronological order. For example, use a numbered list when you must enumerate a series of steps in instructions, or when you are introducing ideas that will be discussed in a certain order in the following text. If you have a list of more than 8 items, consider breaking up the list in two or more stages or categories (Steps in Stage 1, Steps in Stage 2, etc.).
Revision of your document should be undertaken in 4 stages done in the following order:
- Check formatting for readability
- Review content to ensure the document contains all necessary information
- Edit sentence style and structure to ensure ideas are clearly and correctly expressed in a formal and precise manner
- Proofread for grammar, spelling, punctuation and usage errors.
NOTE: The 4 steps in the sample numbered list each begin with a verb (check, review, edit, and proofread), indicating what the reader should do, and the numbers indicate the order in which these steps should be performed.
BULLET LISTS
Bullet lists are the most commonly used kind of list. They are effective when
- You want to emphasize two or more items
- You can place the items in any order (no particular order is required)
- You want to add white space to your document to enhance readability.
Bullet list items should generally be short (a word or a phrase). If you find your bulleted items are longer than this, consider using another kind of list, such as a labelled list or a nested list.
LABELLED LISTS
Use a labeled list when you are listing items that need further explanation. This may be the most common type of list you will use, as they allow you to present a lot of detailed information in a concise and clearly delineated format. These can be bulleted, numbered, or maintain paragraph format but use a bolded label. Use bold and/or italicized text to convey the list item, the word or term (the “label” portion) you want to emphasize. Place a a colon after the list item, and after the colon, write the explanation or amplification of the term or concept in normal body text.
The course assessment plan includes three main written assignments given in the following order:
- Report One: an internal proposal written in Memo format
- Report Two: an internal proposal written in Short Report format
- Report Three: A comparative recommendation report written in Long Report format.
The plan also includes two oral presentations:
- Presentation 1: Individual presentation on a technical writing topic
- Presentation 2: Team presentation giving a progress report on Report 3
Keep in mind that argument and synthesis are not the same:
ARGUMENT is a complex writing move that might include any or all of the above strategies. An argument is intended to persuade or influence the reader’s thinking or behaviour in some way. An effective argument should define a context or controversy, present a clear position or claim, explain why this position is valid, and provide compelling supporting evidence.
SYNTHESIS entails combining and summarizing ideas from different sources and perspectives in order to enhance your own perspective. Like summarizing, synthesis must accurately and objectively represent the ideas of other, and should offer a comprehensive and proportional representation of the sources relevant to the topic. Synthesis might be used to show significant consensus on a topic, reveal the complexity and variety of perspectives on an issue, identify trends in the research, point to gaps in existing research, or even create new understanding by linking different ideas together.
Make sure the label portions (before the colon) are phrased consistently and either italicized or bolded (or both!) for emphasis; try to make the explanations that follow similar in length and detail.
IN-SENTENCE LISTS
Use in-sentence lists when you want to (a) keep paragraph style, (b) to avoid having too many lists on one page, and (c) when the list items are relatively short and can be expressed in a sentence clearly without creating a run-on. The previous sentence is an example of an in-sentence list. Note that a bracketed, lower-case letter introduces each listed item.
Typically, in-sentence lists have 2-4 items. Generally avoid putting more than 4 items in this kind of list (unless they are very short), or your sentence might become difficult to read.
NESTED LISTS
A “nested” list is a list-within-a-list or a list with sub-listed items. These can be useful for avoiding overly long bullet lists by categorizing items into sub-lists. Note the long bullet list on the left does not effectively categorize items, so emphasis is lost. The Nested List on the right is more effective.
| Sample Bullet List (too long) |
Sample Nested List |
|
Every restaurant should contain the following beverage containers:
(12 items is too many for one list!) |
Every restaurant should contain the following kinds of beverage containers:
|
This is not an exhaustive list of the kinds of lists you may run across in your technical reading. These are simply the most common kinds of lists, and ones you should be able to identify and use effectively in your technical writing assignments to enhance readability.
EXERCISE 3.3 Rewrite the following paragraph so that in incorporates a labeled list
Writers often use three rhetorical appeals to persuade their audience. These appeals are referred to in Greek as logos, the appeal to logic or reason; pathos, the appeal to emotion, and ethos, the appeal to credibility or authority. When writers appeal to logic, they ground their claims in reasoning, facts, statistics and formal definitions. When appealing to emotion, authors try to evoke specific emotions in their readers, such as hopefulness, anger, nostalgia, pride or even guilt. Authors appeal to credibility in order to gain the trust of the reader and get them to see that author as a knowledgeable and reliable source of information on the topic. Writers must determine which appeals will be most effective for their particular audience, purpose and content.
Note how much more concise you can make this paragraph by incorporating a list.
A Note on Punctuating the End of List Items
Conventions for punctuating list items vary depending on the context. Legal writing and policy documents tend to use more punctuation than technical writing (list items often end in semicolons and the final item is introduced by an “and” in legalistic writing). In technical documents, because this style favours simplicity and brevity, you typically place a period only after the final item in your list. If each listed item has complete sentences within it, then you will place a period at the end of each list item. If you have a simple bullet list, you may omit the final period.
EXERCISE 3.4 Identify the design errors in the following example
Five Kinds of List:
- Bullet lists
- numbered lists.
- Lists can be written within a sentence using bracketed letters to introduce the list items.
- nested list
- Also called a “list within a list”
- Labelled List
Integrating Lists into Body Text
Just as there are rules for constructing lists, there are rules for how to incorporate them into your text. Most importantly, a list must be introduced by a lead-in sentence (or clause) that contains both a subject and a verb. Technical writers often use the expression “the following” somewhere in the lead-in sentence to clearly indicate that a list of items will follow.
If the lead-in is a complete sentence that contains both a subject and verb (ie. it could end in a period), it should end in a colon that introduces the listed items. If the sentence is not a complete thought, (ie. you could not put a period there) the lead-in should not end in any punctuation, and each listed item must be able to grammatically complete the lead-in sentence.
COMPLETE LEAD-IN SENTENCE (ends in a colon)
The term’s design project must allow students to incorporate the following elements into their solution:
-
- Mechanical engineering principles
- Electrical engineering knowledge
- Software/programming basics.
PARTIAL LEAD-IN SENTENCE (no punctuation after lead-in)
The term’s design project must allow students to design a solution using
-
- Mechanical engineering principles
- Electrical engineering knowledge
- Software/programming basics.
Note how each listed item can complete the lead-in sentence.
EXERCISE 3.5 Which of the follow lead-ins should end in a colon? Which should end with no punctuation?
- Our solution aims to meet the following objectives
- The design constraints that must be considered are
- All proposed designs must abide by the following constraints
- The proposed solutions offers many tangible benefits, such as
- The proposed solution offers the following tangible benefits
EXERCISE 3.6 Identify the types of lists below
| 1. List type: | 2. List type: |
Revision of your document should be undertaken in 4 stages:
|
The assessment plan for this course includes three main writing tasks:
|
| 3. List type: | 4. List type: |
The 7 Cs refers to seven characteristics of effective professional writing. This writing should be
|
The term design project tests your knowledge of the following principles:
|
EXERCISE 3.7 Practice using the Paragraph Tools in Word to make a list
Create your own list, using the Paragraph Tools in Word. For example, make a list of as many kinds of vehicles as you can think of, being as creative as you can. If you can think of more than 8, consider what kind of list would be most suitable.
-
- Could you categorize them into nested lists? What kind of categories?
- Consider what text would introduce and follow your list.
- What kind of document would contain a list of vehicle types? Who would read it?
Image descriptions
Figure 3.2.1 image description:
Function-based headings:
- Introduction
- Problem Definition
- Proposed Solution
- Benefits
- Conclusion
- Recommendation
- References
- Table 1
- Figure 1.
Descriptive headings:
- Ski Lift Safety Issues
- Deropement Problems in Tow Lifts
- Proposed Rope Catcher Solution
- Benefits of Implementation
- Resolving the Safety Issues
- Recommendation
- References.
- Table 1. Cost breakdown for one tower installation.
- Figure 1. Proposed Retainment Device
