Chapter 1. Basic Settings
1.1 Basic Settings
Learning Objectives
- Create a basic configuration in FortiGate
- Identify CLI commands in FortiGate
- Create an IP access in FortiGate
- Create a DHCP server in FortiGate
- Restore previous configurations in FortiGate using backups
Explore the CLI
To explore the CLI, from the GNS3 double click on FortiGate to open the console. In the Password field, type <the default password is blank>, and then press enter.
Enter the following command:
This command displays basic status information about FortiGate. The output includes FortiGate’s serial number, operation mode, and a lot of useful information. When the More prompt appears on the CLI, do one of the following:
- To continue scrolling, Space bar.
- To scroll one line at a time, Enter.
- Enter the following command: get ?
This command shows all of the options that the CLI will accept after the # get command. Depending on the command, you may need to enter additional words to completely specify a configuration option.
- Enter the following command: execute ?
- This command lists all options that the CLI will accept after the execute command.
- Type exe, and then press the Tab key. Notice that the CLI completes the current word.
- Press the space bar and then press the Tab key three times.
- Each time you press the Tab key, the CLI replaces the second word with the next possible option for the execute command, in alphabetical order.
You can abbreviate most commands. In this book, many of the commands that you see will be in abbreviated form. For example, instead of typing execute, you can type exe.
Use this technique to reduce the number of keystrokes that are required to enter a command. Often, experts can configure FortiGate faster using the CLI than the GUI.
Configuration
| Action | Command |
|---|---|
| Check configuration | # show # show | grep xxxx # show full-configuration # show full-configuration | grep XXXX # show full-configuration | grep -f XXXX ← display with tree view |
Network
| Action | Command |
|---|---|
| Check Routing | # get router info routing-table detail # show router static# config router static (static) # show (static) # end |
| Check Firewall Policy | # show firewall policy # show firewall policy XXXX# config firewall policy (policy) # show |
Hardware
| Action | Command |
|---|---|
| Check Hardware Information | # get hardware status |
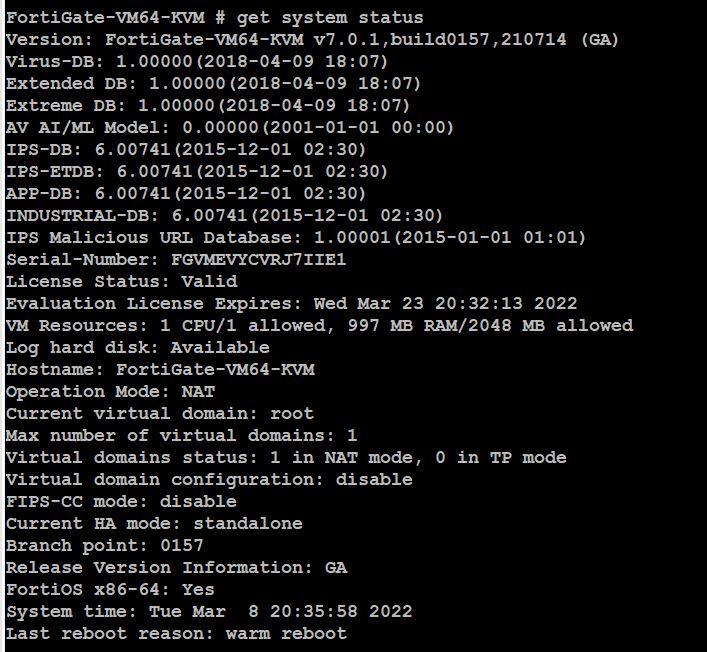
| Check Version, BIOS, Firmware, etc. | # get system status |
| Check version | # get system status |
| Display CPU / memory / line usage | # get system performance status |
| Display of NTP server | # get system ntp |
| Display the current time and the time of synchronization with the NTP server | # execute time |
| Check interfaces status, Up or Down | # get system interface physical |
| Check interfaces | # config system interface (interface) # show (interface) # end |
| Display of ARP table | # get system arp |
High Availability (HA)
| Action | Command |
|---|---|
| Check HA Status | # get system ha status |
| Check HA Configuration | # get system ha # show system ha |
Network Time Protocol (NTP)
| Action | Command |
|---|---|
| Check NTP | # execute time # get system ntp # diagnose sys ntp status |
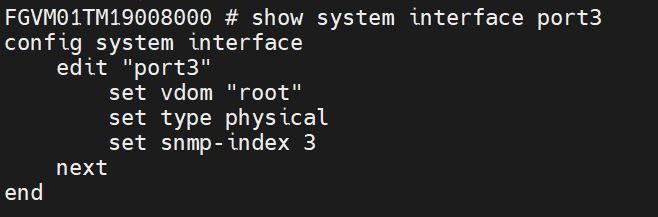
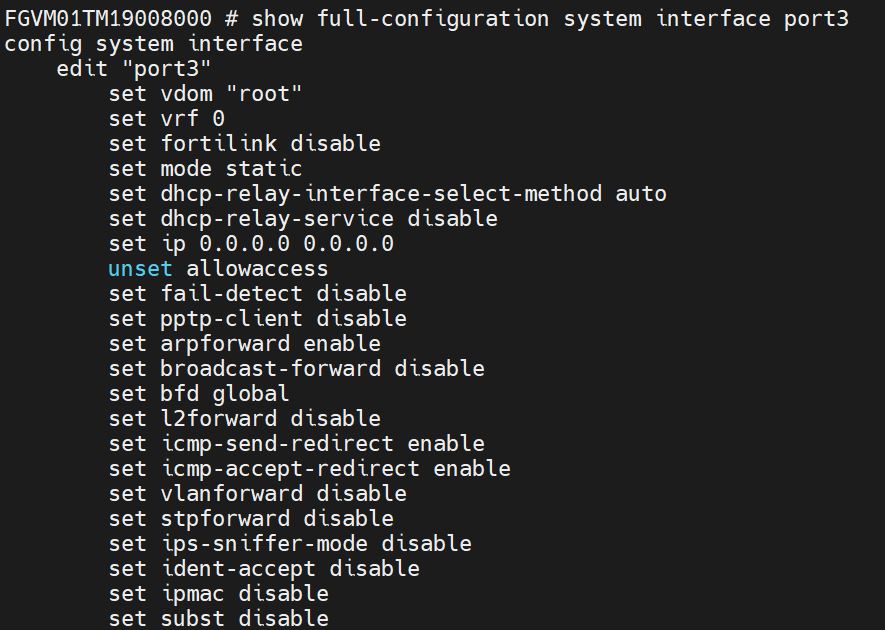
On a fresh line, enter the following command to view the port3 interface configuration:
Enter the following command:
Enter the following command:
For setting an IP address on the port1:
edit port1
set mode static
set ip 192.168.10.1 255.255.255.0
set allowaccess ping ssh http https
end
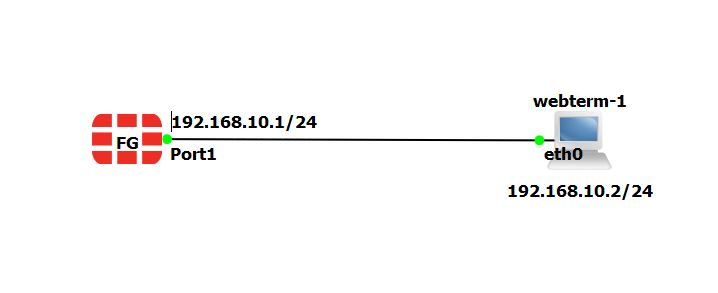
Now you should be able to reach the firewall from port1. In browser, type https://192.168.10.1 and enter username and password.
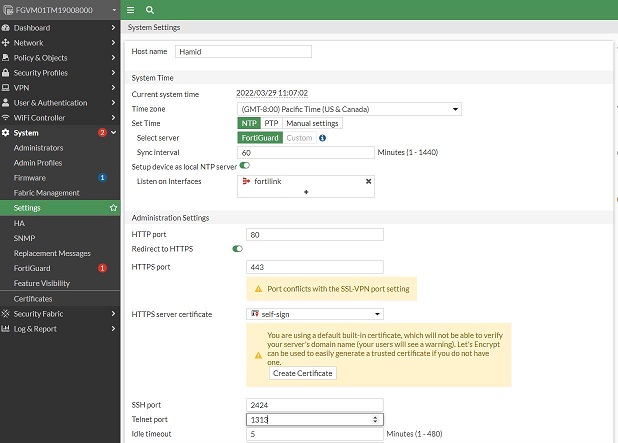
Configuring Administrator Accounts
FortiGate provides flexible options for managing administrator privileges. For example, you can restrict which IP addresses administrators are permitted to log in from. In this process, you will work with both administrator profiles and administrator accounts. An administrator profile acts as a role assigned to an administrator, defining the specific actions they are allowed to perform in both the FortiGate GUI and CLI.
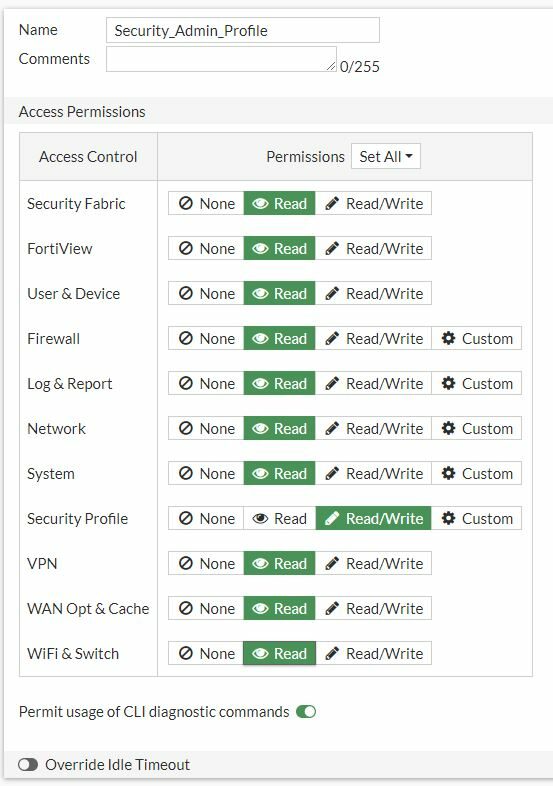
Configure a User Administrator Profile
- Click System > Admin Profiles.
- Click Create New.
- In the Name field, type Security_Admin_Profile.
- In the permissions table, set Security Profile to Read-Write, but set all other permissions to Read.
- Click OK to save the changes.
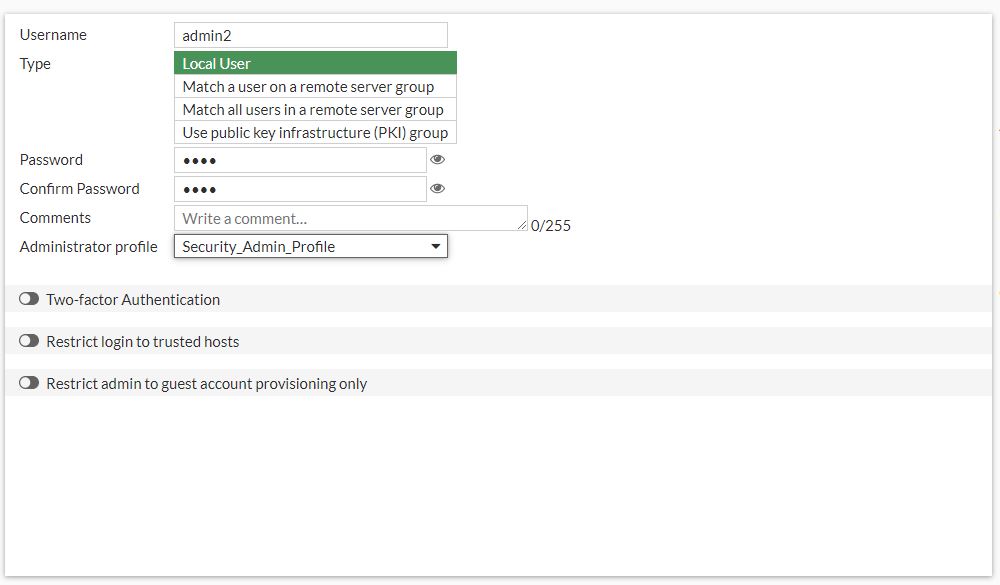
Create an Administrator Account
Now, you will create a new administrator account. You will assign the account to the administrator profile you created previously. The administrator will have read-only access to most of the configuration settings. To create an administrator account Continuing on the Local-FortiGate GUI, click System > Administrators. Click Create New and then click Administrator to add a new administrator account and assign the previous profile you have created to the administrator.
Test the New Administrator Account
In this procedure, you will confirm that the new administrator account has read-write access to only the security profiles configuration.
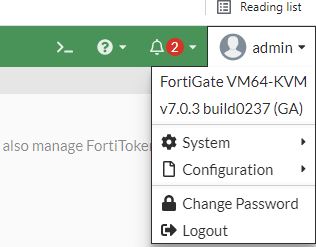
To test the new administrator account Continuing on the Local-FortiGate GUI, click username (in my case, it’s admin2) and then Logout to log out of the admin account’s GUI session.
Explore the permissions that you have in the GUI. You should see that this account can configure only security profiles. Log out of the GUI once done.
Restrict Administrator Access
Now, you will restrict access for FortiGate administrators. Only administrators connecting from a trusted subnet will be allowed access. This is useful if you need to restrict the access points from which administrators connect to FortiGate. To restrict administrator access.
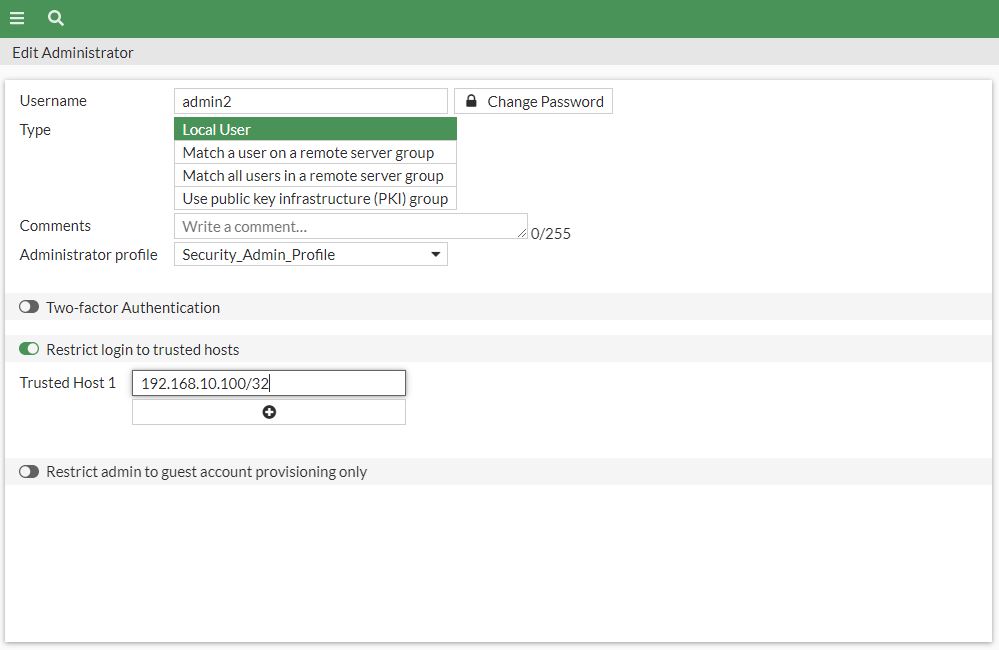
- Click System > Administrators. Edit the admin account.
- Enable Restrict login to trusted hosts, and set Trusted Host 1 to the address
192.168.10.100/32. - Click OK to save the changes.
To test the restricted access
- Continuing on Local-Windows, log out of the Local-FortiGate GUI session as the admin user.
- Try to log in to the admin2 account. If your PC address is 192.168.10.101,you shouldn’t be able to connect.
- Log in as admin. Enter the following CLI commands to add 192.168.10.101/32 as the second trusted IP subnet (Trusted Host 2) to the admin account:
config system admin
edit admin
set trusthost2 192.168.10.101/32
end - Try to log in to the Local-FortiGate GUI . You should be able to log in. (Hint: add the IP address 192.168.10.101 to WebTerm and try to reach to the firewall.)
Configuration Backups
The configuration files produced by backups allow you to restore to an earlier FortiGate configuration.
Backup & Restore
Always back up the FortiGate configuration before making any changes, even small ones, because there is no undo option. Think carefully before using encrypted backups. Encryption keeps your settings and private keys safe, but it also makes troubleshooting harder because Fortinet support cannot read encrypted files. You may prefer to save plain-text backups and store them safely instead.
Now, you will create an encrypted backup of the FortiGate’s current configuration.
To save an encrypted configuration backup
Continuing on the Local-FortiGate GUI, in the upper-right corner, click admin, and then click Configuration > Backup. On the Backup System Configuration page, enable Encryption. In the Password field, enter fortigate and repeat in the Confirm password field.
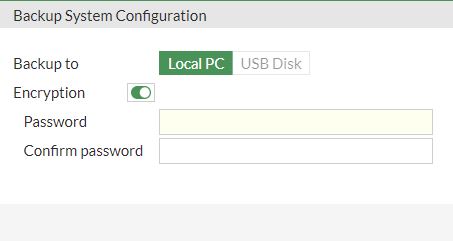
Click OK.
Select Save File and click OK.
To restore an encrypted configuration backup
Continuing on the Local-FortiGate GUI, in the upper-right corner, click admin, and then click Configuration > Restore. On the Restore System Configuration page, click Upload. Browse to your Downloads folder and select the configuration file that you created in the previous procedure. In the Password field, type fortigate, and then click OK.
DHCP (Dynamic Host Configuration Protocol)
You can configure one or more DHCP servers on any FortiGate interface. A DHCP server dynamically assigns IP addresses to hosts on the network connected to the interface. The host computers must be configured to obtain their IP addresses using DHCP.
Configure DHCP on the FortiGate
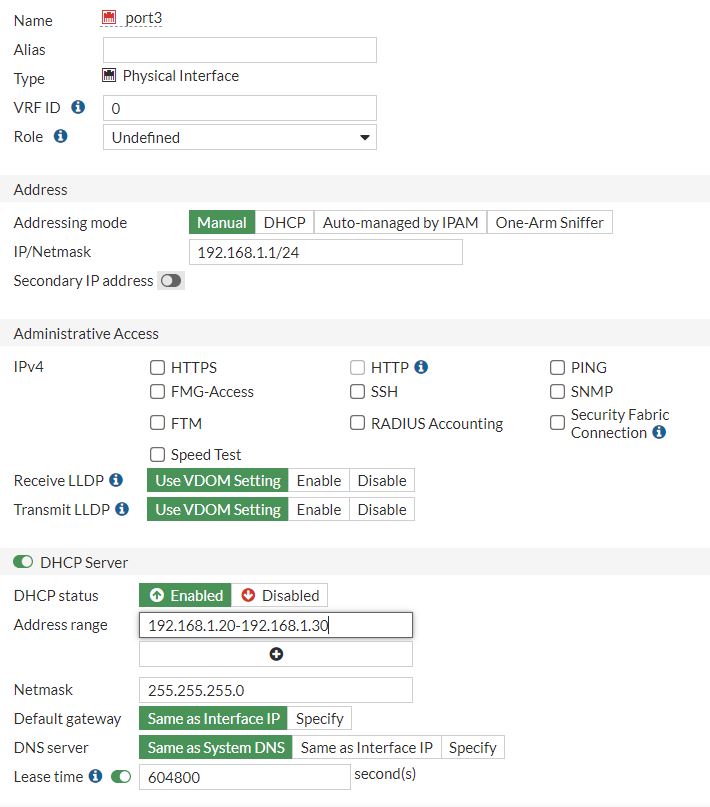
To add a DHCP server on the GUI:
- Go to Network > Interfaces.
- Edit an interface.
- Enable the DHCP Server option and configure the settings.
To do it through command line, use following commands:
edit 1
set interface “port3”
set dns-service default
set netmask 255.255.255.0
set lease-time 86400
config ip-range
edit 1
set start-ip 192.168.1.20
set end-ip 192.168.1.30
next
end
next
end
