Part 2 – UAS Operations
Chapter 2.1 – Flight Operations
Overview
At this point, all of the preoperational checks have been completed including batteries charged, software and operating system updated, UAS, Controller and intelligent flight battery firmware checked and updated and all mission-critical elements verified for flight worthiness. This chapter takes place outdoors and on location where the image acquisition mission will take place.
Operational Briefing
Be aware that a minimum of two individuals are required to conduct any UAS mission; a pilot-in-command (PIC) and a safety spotter. Additional personnel may be needed as ground access control crew according the specific mission safety and security plan. Safety spotters and ground access control crew must be briefed on their roles and responsibilities prior to heading to the field.
A weather check must be performed in order to verify the following minimum operational parameters;
- Visibility at least 2 statute miles (3.2km)
- Winds less than 30km/h
- Ceiling at least 1,000ft
- Temperature above 0 deg Celsius
- No icing conditions
Notice to Airmen (NOTAM’s) must also be checked to ensure no conflicts with any other manned or unmanned air operations.
Prior to heading to the mission area, make sure to have with you the following items;
- UAS case with all mission-critical components packed safely inside
- Weather-clothing and footware
- Valid Transport Canada-approved Special Flight Operations Certificate, Certificate of Completion of UAV Ground School, valid insurance certificate, valid radio operators certificate (if required), current MAAC membership (if required), current Flying Club membership (if required), pre-flight and emergency checklist(s)
- High visibility safety vest
- Protective eyewear (sunglasses are fine)
- Safety cones, signs and flagging tape (if required)
- Two-way radios
- Hand-held anemometer (if available)
- Foldable landing pad
Pre-Flight Operations
Once on site, visually double check the weather conditions. If a hand-held anemometer is available, verify wind velocity and direction. Inspect the proposed take-off landing site to make sure it is clear of any debris and obstacles. Check the proposed mission area to ensure that the planned mission height is sufficiently above any structures or obstacles.
Set up safety cones around the take-off area and deploy the safety spotter and any ground access control personnel to their pre-defined positions. Test two-way radio communication and only rely on cell phone communication as a back up.
Set up the landing pad and unpack the UAS as per the instructions in the previous chapter. Once the UAS and associated components (Controller and iPad) are switched on and connected, proceed to the next section.
Flight Operations
In order to consistently log all UAS flights, locate and launch the UAV Logbook app and tap Quickstart to start logging the mission.
At this point check that the rear green indicator lights on the UAS is blinking, the green indicator light on the Controller is solid green and the Pix4Dcapture app is open with the appropriate mission as per the screenshot below.
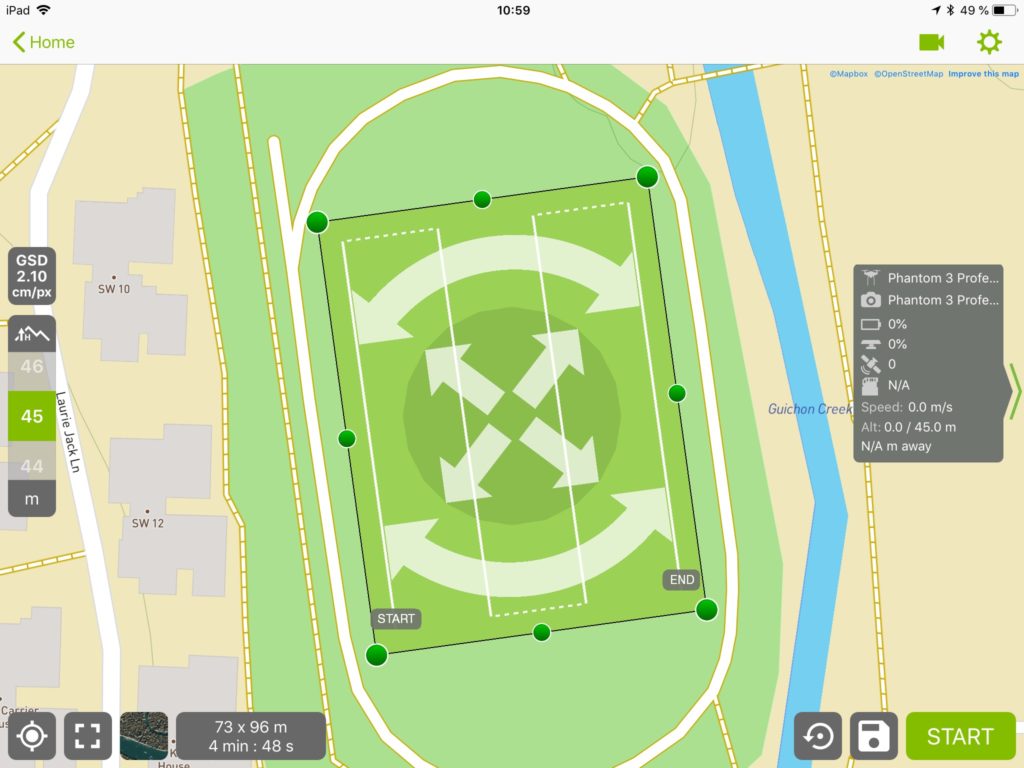
Tap Start and verify connection with the drone then tap Next>.
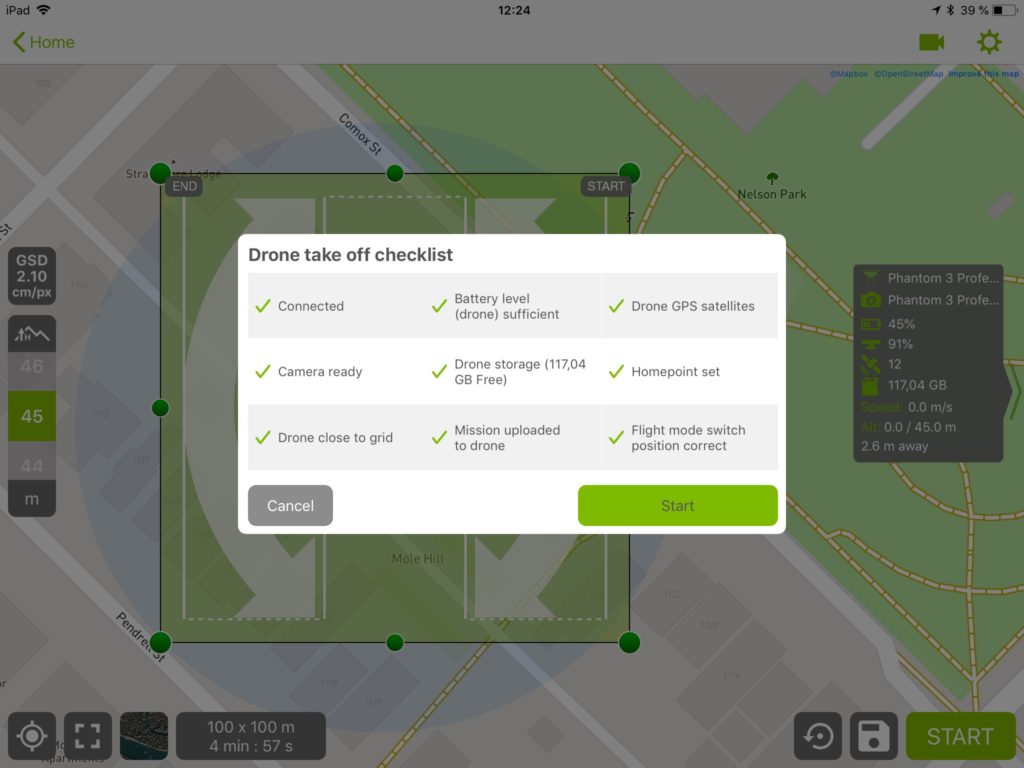
Pix4D Capture verifies all mission-critical parameters via the check list above. Conduct one last visual assessment of the take-off zone, announce loudly and over the two-way radio “TAKE OFF!” and tap Start. The UAS will immediately take-off and proceed to the first way point.
As the mission now proceeds semi-automatically, the main task for the PIC is to maintain visual contact with the UAS at all times and to ensure that the mission is proceeding at the correct altitude, heading in the correct direction along the pre-programmed route and that the camera is being triggered at the desired interval. The main role of the safety spotter during the mission is to maintain visual contact with the UAS and immediately notify the PIC of any hazards or departures from the pre-programmed flight (e.g. fly away or sudden loss of power/control).
During flight, the camera view can be checked by tapping the camera icon in the upper right which opens a small window which can be expanded by tapping the icon in the bottom left of the window. Exposure can be manually adjusted by rolling the dial accessible by the right index finger on the controller.
Once the image acquisition mission is complete, the UAS will climb to the pre-determined fly-home altitude and return to the take-off spot for automated landing. The main task for PIC is to maintain visual contact with the UAS to ensure there are no obstacles or structures in the path of the UAS as it returns home. Once the UAS begins to descend, the PIC will announce loudly and over the two-way radio “LANDING!” and perform a quick visual inspection to ensure the landing zone is clear.
Alternate Landing Zone
If, for whatever reason, the primary landing zone becomes obstructed and the UAS cannot be safely landed there, the PIC will announce loudly and over the two-way radio “ALTERNATE LANDING ZONE!” and proceed to guide the UAS to a safe landing in the alternate location.
The UAS will automatically attempt to land where it took off from, but due to GPS errors, this may vary by up to 5m. Thus, the PIC should gently manually guide the UAS as it descends to ensure it lands in the correct spot on the landing pad.
Post-Flight Operations
Once the UAS is safely on the ground and the engines have been shut down, the PIC should perform a quick assessment of the continued airworthiness of the UAS by checking the following;
- Condition of propellers (any nicks or cracks)
- Temperature of motors (check for excessive heat)
- Temperature of battery (does it feel too hot to touch?)
- Condition of the lens (does it need to be cleaned?)
Once the PIC has verified further airworthiness of the UAS, they have two options depending on mission requirements;
- Complete the mission and proceed to pack up the UAS for transport back to the office, or;
- Turn around the UAS for another flight.
UAS Turn-around
The PIC will notify the safety spotter and ground access control crew (if present) that the UAS is being turned around and to standby for further instructions.
It is strongly advisable to check the image quality on a laptop by removing the memory card from the UAS and inserting it into a compatible MicroSD memory card adapter. This allows for a better means of assessing image quality than can be done on the iPad in the Pix4Dcapture app. Images should be checked for correct number of frames, exposure, focus and presence of any motion blur. Should any aspect of image quality not be to the expected standard, the PIC must make the decision whether to re-fly the mission or not.
If the next flight is short enough to be carried out using the same battery, the PIC will follow the steps outlined in the Pre-Flight Operations section. If a battery swap or recharge is required, the UAS will need to be powered off and a fresh battery inserted. Controller and iPad battery status should also be checked along with the remaining capacity of the memory card.
Complete Mission
Prior to ending flight operations, it is strongly advisable to check the image quality on a laptop by removing the memory card from the UAS and inserting it into a compatible MicroSD memory card adapter. This allows for a better means of assessing image quality than can be done on the iPad in the Pix4Dcapture app. Images should be checked for correct number of frames, exposure, focus and presence of any motion blur. Should any aspect of image quality not be to the expected standard, the PIC must make the decision whether to re-fly the mission or not.
Once the images are deemed to be of sufficient quality, the PIC will notify the safety spotter and ground access crew (if present) that the mission is complete and to rendezvous at the landing or alternate landing zone.
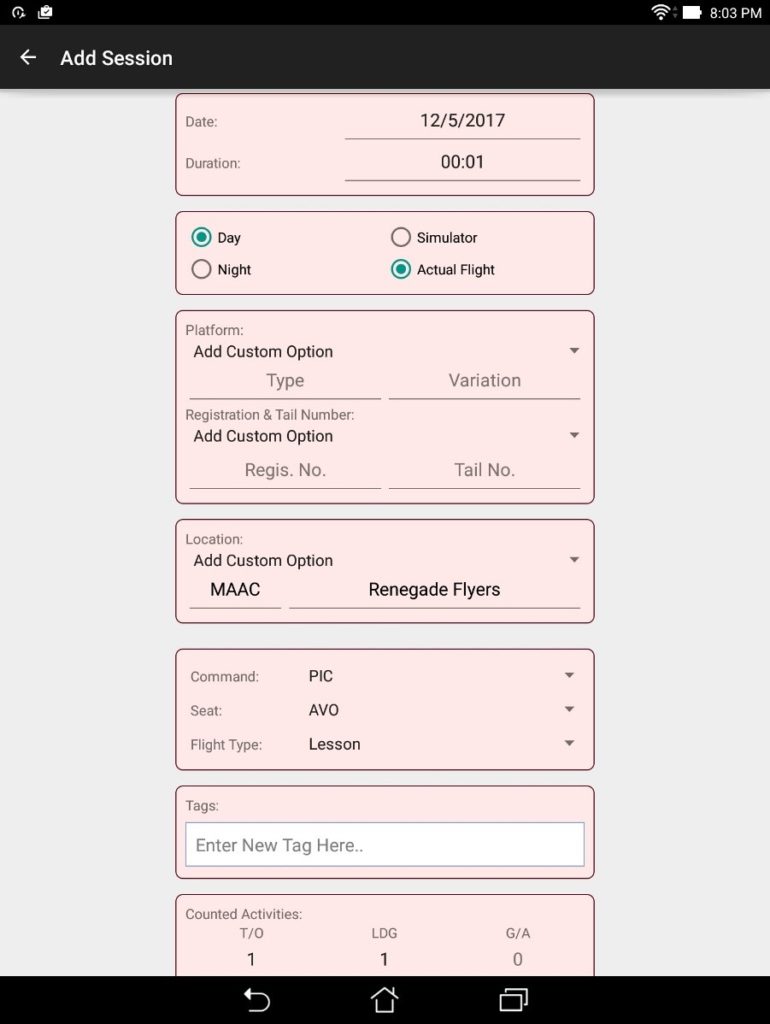
Switch to the UAV Logbook app and enter in as much of the pertinent information as possible referring to the sample screenshot below.
With the mission complete, follow the steps in the Packing Up UAS section and proceed back to the office for the Operational Debrief.
