Learning Task 3
Describe The Installation of Piping for Sewers
As noted in Learning Task 1, different piping materials are used in the construction of sewer systems. The best pipe material for the project depends on the type of system being designed, the type of waste being carried through it, the depth of installation, the pipe’s surroundings, the loads being exerted on the pipe, the available handling equipment and the pipe’s cost. All these factors must be considered before choosing the appropriate pipe. The installation methods may differ slightly due to the materials being used but overall, the procedures will be similar.
Sewer Installation Procedures
Determine the Elevations
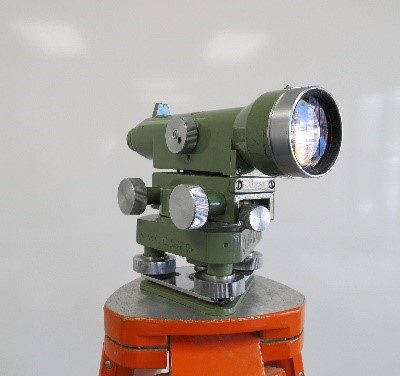
The first main step of a sewer pipe installation is to determine the elevations of the upstream and downstream ends. For a residential installation, the building sewer pipe typically starts where the home’s building drain exits the house foundation. The line then slopes downhill to where it connects to the city’s connection at the property line or to where it connects to the inlet to a septic tank. Elevations can be measured and laid out using various tools such as a laser level, GPS, or traditional surveying equipment.
Pipe Path and Grade
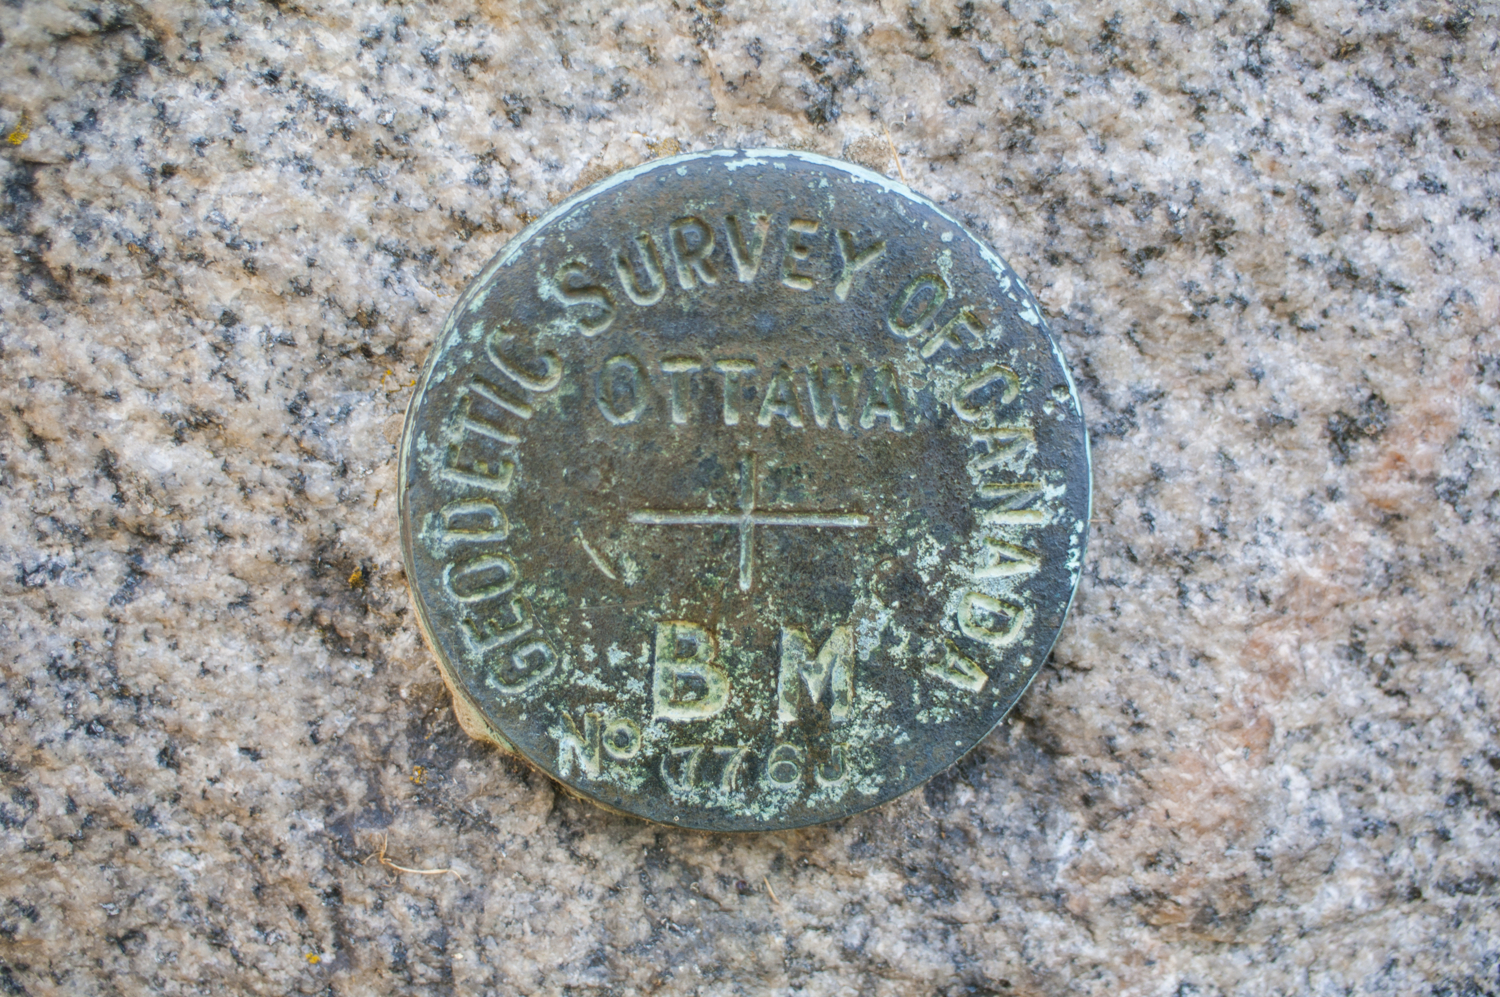
In some cases, the installer must adhere to the elevations given on an engineered drawing. These often include installing the pipe at a particular grade and meeting elevations at specific points on the site. A benchmark (starting point) elevation may be used that is a true geodetic one (elevation above sea level) or an assumed one (e.g., using 100.00’ for the roadway or sidewalk). In any case, the installer must establish the elevations required and select a pipe path that meets those requirements.
The elevations and the length of the pipe run are used to make the initial slope calculations. Subtracting the ending elevation from the starting elevation yields the total drop in elevation. Dividing the drop by the total run (length) of the pipe yields the grade. For example, if the grade is to be consistent throughout the installation of a 75m long run of sewer pipe, the downstream elevation (e.g. 92.376m) would be subtracted from the upstream elevation (e.g. 93.501m) to arrive at a total fall of 1.125m between the two points. If that total fall is then divided into the length, in this case 1.125m ÷ 75m, a grade of 1.5% is the result. This can be thought of as, for every metre of run, the pipe will drop by 15mm.
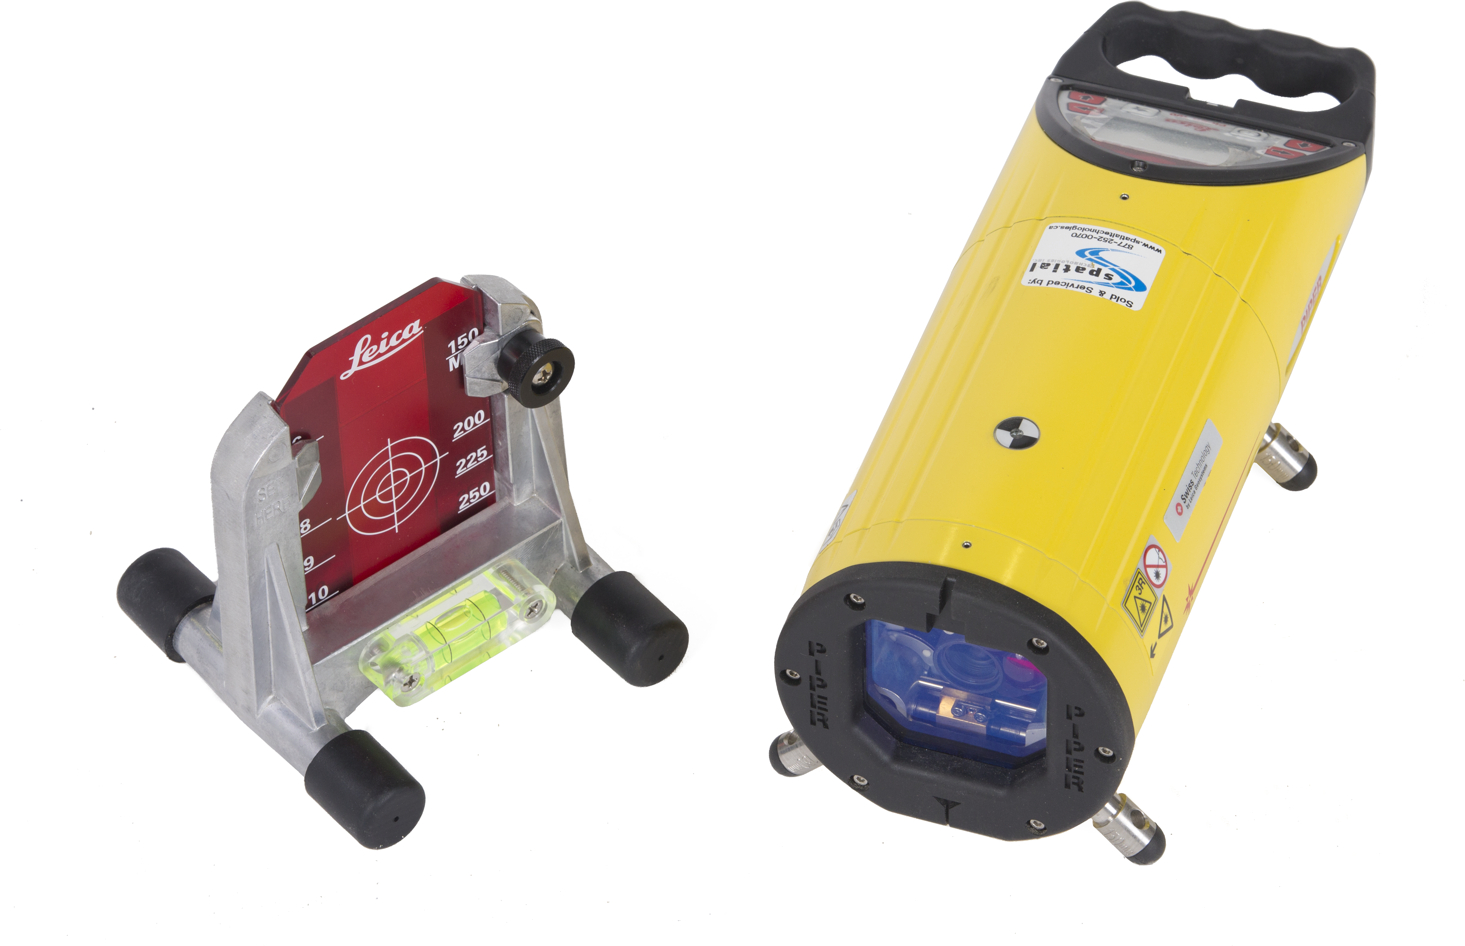
The grade to which the pipe is to be laid is generally specified on the project drawings and may vary depending on the sewer pipe material. For instance, some PVC sewer pipe manufacturers require a grade that is sufficient to provide a minimum flow velocity of 0.6 m/s (2.0 fps). This will ensure that the flow is always self-cleansing inside the pipe. Laser levels, as picture below, are available that help to ensure that pipes are laid straight and at a consistent grade.
The standard minimum slope for most sizes and varieties of nominally horizontal pipe is 2 percent, or 2 feet of drop per 100 feet of run. Although not exact, this grade is so close to ¼” per foot that the two are considered the same. The actual slope between the two ends of the sewer can be slightly steeper than this target but must meet the requirements of the local code. However, a slope that is too steep may cause the liquids to run faster than the solids, leading to clogs. A slope that is too shallow does not create enough velocity for proper drainage. The NPC and BCPC allow slopes as shallow as 1 in 400 but in this case the pipe has to be at least 12 inches (300 mm) in diameter.
Sewers are expected to be installed in as straight and direct a path as possible. According to the NPC and BCPC, manholes are commonly required whenever abrupt directional changes of 45 degrees or more for horizontal building sewers of 8 inches (200 mm) or larger occur or where cleanouts are required for those pipe sizes. Pipes smaller than 8 inches do not require manholes; they only require acceptable pipe configurations, such as a wye and 1/8th bend, for cleanouts or excessive changes of direction.
Excavation
As a rule, do not excavate too far ahead of pipe laying. Avoiding long stretches of opened trench will often minimize costly and dangerous problems such as:
- the possibility of flooding the trench
- cave-ins/sloughing caused by ground water
- frozen trench bottoms and backfill
- safety hazard risks to workers and traffic
Obviously, keeping open trench lengths to a minimum will necessitate very careful planning and layout. Problems can occur when pipe is installed and backfilled prior to meeting up with the intended destination. If too much grade has been used, the pipe will need to be removed and regraded, whereas if installed with insufficient slope, the installation may not meet minimum requirements and may be rejected by the Authority Having Jurisdiction.
Trench Width
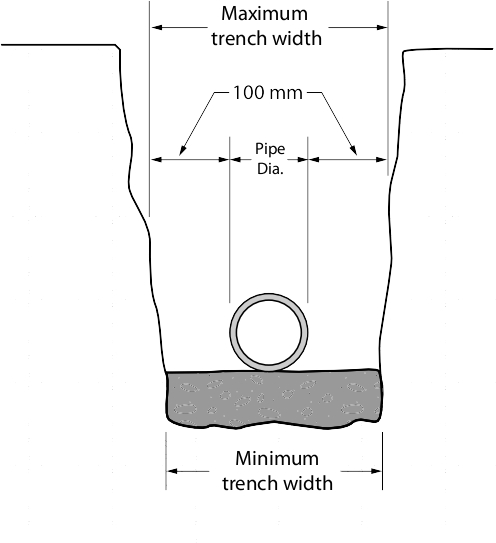
The width of the trench at the top of the pipe should allow for proper placement and compaction of the haunching materials (the aggregate that surrounds the part of the pipe above the compacted trench bottom). Generally, the minimum trench width should be 450 mm (18 inches) or 300 mm (12″) greater than the outside diameter of the pipe, whichever is the lesser. The trench width must also allow compacting machinery enough room to properly prepare the trench bottom. For even the smallest compactor, this is usually at least 300 mm (12 inches) in width. As well, consideration must also be given for workers to be able to handle the pipe by standing or kneeling beside it. On the other hand, keeping the trench width narrow is important since the load imposed upon the pipe is a function of the trench width. Over-excavating also increases costs and takes away the stability that un-excavated “native” soil provides.
Preparation of Trench Bottom
Preparation of the trench bottom is the starting point for a satisfactory and safe sewer pipe installation. The trench bottom should be compacted to a smooth and properly graded finish, free from large stones, clumps of dirt, and any frozen material as approved by the engineer. It is economical on most sewer installations to slightly undercut the trench bottom by machine and bring it up to grade using granular bedding material such as sand. If the bedding is hard and compacted, excavation for the pipe hubs, known as “bells” should be provided. Creating “bell holes” ensures that bell-and-spigot pipe is uniformly supported along its entire length.
Install the Pipe
Sewer pipe is installed one section at a time. When installing a building sewer, it is often customary to start at the upstream end near the building and trench toward the property line. This is the normal practice, but site conditions may dictate starting at the downstream end and working back upstream.
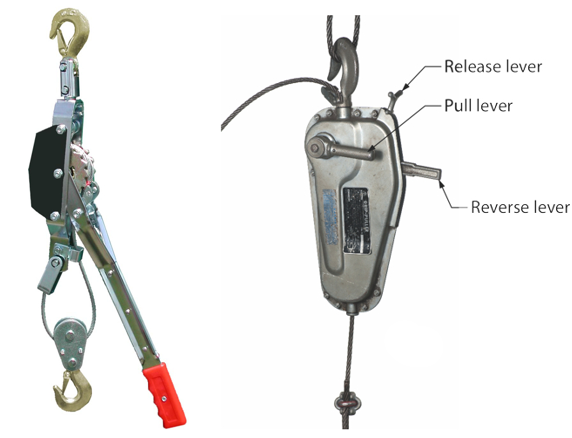
Regardless of the pipe material chosen, if using bell and spigot type pipe, the bell (female) end of each pipe section must be at the upstream end to conform to code as well as to minimize the chances of blockages caused by material coming up against the blunt spigot end of pipe. Pipe gasket lubricant is spread on both the inside of the rubber gasket and the outside of the beveled spigot end before pushing the spigot into the bell. On smaller pipe, the back side of a shovel driven into the soil and placed against the bell end of the upstream pipe will allow a worker to exert enough force to push the pipes together by hand. On larger pipes, slings and a come-along or cable puller may be needed. Some installers use the excavator bucket to gently push the sections together. This practice requires a machine operator with a delicate touch to avoid damaging the piping and should only be considered if the use of slings and pulling equipment is not feasible.
PVC sewer pipe in sizes up to 375 mm (15″) diameter are capable of being handled and lowered into the trench by hand. Larger PVC and concrete sewer pipe should be lowered using hoisting equipment with slings. Pipe and fittings should be inspected for defects or damage prior to lowering into the trench. Any defective or damaged pipe or fittings should be repaired or replaced.
Pipe Terminations
At the downstream end, the pipe connects to the city main per the city’s specifications, and at the upstream end, most codes require cleanouts to provide easy access to the pipe for maintenance or for cleaning with a sewer auger. Once installed, the pipe must be tested and inspected as per the requirements of the AHJ.
Backflow Prevention
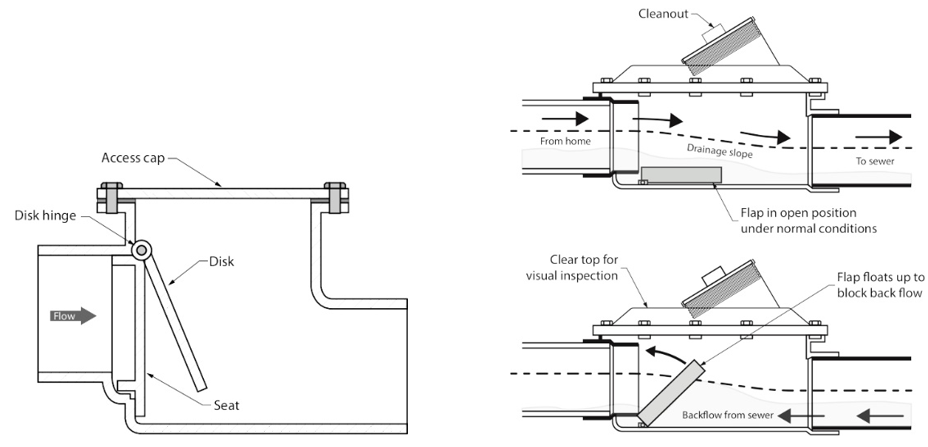
A backwater valve (sometimes called a backflow or sewer backup valve) is a check valve installed on a gravity drainage line and is designed to allow water or sewage to flow in only one direction. In certain instances, such as when there is a sudden heavy rainfall, the city sewer lines can become overwhelmed, causing water or sewage to flow back towards the buildings. If there is a sewer system backup, and there is a backwater valve in place, the likelihood that sewage will flow back into a building will be greatly minimized or negated.
Backwater valves are required by some municipalities and recommended by others. They can be installed as part of new construction or can be retrofitted into existing lines. Installing during the initial construction is naturally much less costly. The risk of sewer backup increases if there is a basement in the building and the basement is very close in elevation to the elevation of the city sewer. If a new building has any fixtures located lower than the street level, it is a requirement of most prevailing plumbing codes to have a backwater valve installed. According to those codes, the backwater valve must not be installed on the building drain or sewer unless it is of the “normally open” variety and is allowable by the AHJ. Installing a “normally closed” backwater valve on a building drain or sewer can interfere with the venting of the city’s sewer through the building’s venting system.
If a backwater valve is installed, it must be accessible for periodic inspection and maintenance. They can become inoperative due to items damaging or becoming lodged against the internal components. They are best installed within the building, on branches that drain the lowest fixtures.
Backfill the Trench
After the sewer is completely installed and passes final inspection, the trench is backfilled to complete the project. The backfilling process often involves using sand or other fine haunching material that will not damage the pipe. It is installed in layers known as “lifts” and each lift is compacted. Once there is a reasonable thickness of fine compacted bedding material covering the pipe, the excavated soil can be placed over the bedding, doing so again in lifts. Compacting each lift ensures the amount of settlement will be minimized and helps keep water from penetrating the trench.
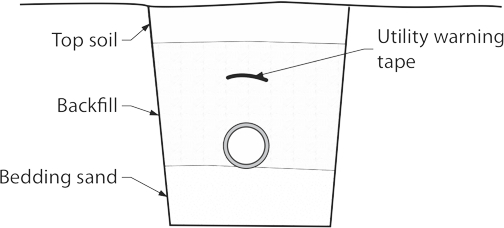
The presence of fine bedding material over the top of the pipe is a visual indicator for any future excavations that there may be a buried pipe nearby. To further avoid future mishaps involving unintentional contact with buried pipe, it is a good idea, and often a requirement, to lay a plastic warning tape over the top of the first compacted layer of “spoils” (previously excavated earth) being replaced into the trench. This alerts crews to the presence of the pipe buried below.
Trench Boxes (Trench Shields or Shoring)
It is good safety practice, and mandated by provincial Workers’ Compensation Board regulations, to use movable trench boxes whenever possible while installing pipe in a below ground trench that is over 1.2m (4 ft) deep. The trench box serves as a lateral support to protect workers from possible cave-ins in areas where proper sloping is not an option.
How to Install Reinforced Concrete Pipe (RCP)
Reinforced concrete pipe, or RCP, is one of the standard materials used in storm sewer systems, sanitary systems, and large irrigation projects. RCP offers high strength and durability at competitive costs and is the primary alternative to high-density polyethylene (HDPE) plastic pipe in many applications. One benefit of concrete is its inherent strength, which simplifies installation and backfilling procedures. It is capable of withstanding very heavy loads which may occur where it is buried at shallow depths under public roadways. On the other hand, RCP is very heavy and must be handled carefully during transportation and installation.
Handling Reinforced Concrete Pipe
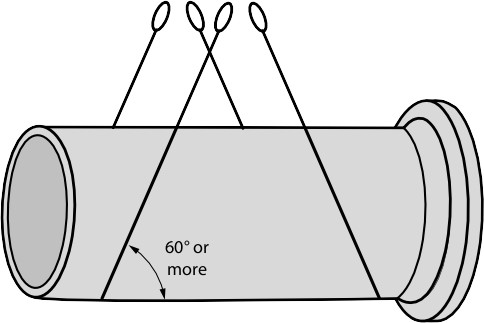
RCP must be handled and moved carefully to prevent damaging the bell (the flared end of the pipe sections), the spigot (the narrow end that is inserted into the bell of an adjoining pipe) and any bells of pipes that are cemented into short sections of RCP to create a wye fitting. RCP should never be dragged to the site. It is best if the pipes are unloaded with the use of a nylon sling or other certified material that can support the weight of the pipe. The pipe must be balanced precisely in the sling for safety and to prevent damage.
When storing pipes prior to their installation, set the pipe sections on dunnage on the ground to both protect the pipe ends from being damaged by the pipe’s sheer weight and to allow easier access for re-slinging.
Excavating for Reinforced Concrete Pipe
Trenches for RCP should be wide enough to accommodate at least two pipes. This provides sufficient room to verify the required slope, and it helps ensure that any subsequent trenching will not impact the pipe installation or compromise worker safety. The grade (pipe slope) is established during trenching, followed by laying down a bedding material. The bedding should be free of debris and must provide a uniformly level surface. When setting RCP into the trench prior to installation, the pipes should not be supported on their bells, as this can damage them. As previously mentioned, dig bell holes wherever necessary.
Preparing Joining Surfaces of RCP
Just before installation, each RCP section is cleaned to remove all dirt from the pipe’s bell. If the surface is not properly cleaned, it may prevent proper homing of the pipe. After cleaning, workers apply a lubricant to the pipe bell, using a brush or gloves. Lubricant should be sufficient to prevent the gasket from rolling away and damaging the bell end. Next, the spigot or tongue end of the adjoining pipe is also cleaned and lubricated to ensure a good seal with the joint gasket.
Installing RCP
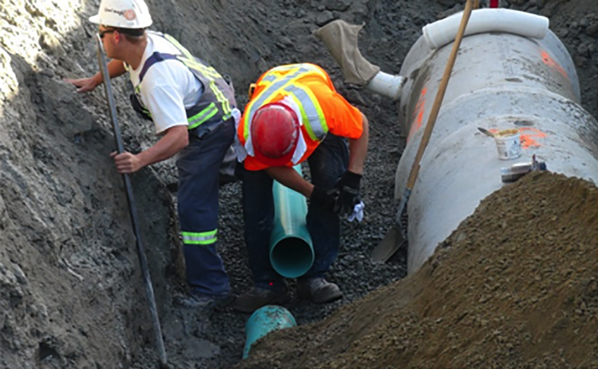
Installing each section of RCP requires at least two workers to manage the pipe. The pipe is lowered into the trench with a crane or backhoe, while the workers guide the pipe section into place. Typically, the spigot end of the new pipe is inserted into the bell of the pipe at the end of the installed pipeline, then the new section is pushed into place with a crowbar, pipe pullers, or other means.
Some RCP must have its bell gasket stretched, using a rounding device. The device is passed several times along the circumference of the gasket to make sure everything is in place. If the gasket is not stretched, the pipe could leak at the joint or the bell can crack.
Once the new section is fully seated, workers make sure it is properly aligned, using surveying or leveling instruments.
Backfilling Reinforced Concrete Pipe
The final step of installing RCP is to add bedding and backfill material and compact it thoroughly. The bedding material is placed evenly in lifts on both sides of the pipe until the trench is filled about one foot above the top of the pipe. The spoils may then be replaced into the trench.
It is important that the spoils are not bulldozed into the trench or dropped directly onto the pipe. The backfill material must not contain large boulders, which do not compact and could damage the pipe. The material also should be free of roots and other organic material.
Once the pipe is adequately backfilled and compacted, the trench can be filled up to grade, per the project specifications. At any stage during the backfilling process, heavy construction equipment should not drive over the pipe until adequate backfill is in place or the pipe is deep enough that it will not be damaged.
Now complete Self-Test 3 and check your answers.
Self-Test 3
Self-Test 3
- What is the point known as that is the basis for determining any elevations surrounding a sewer pipe installation?
- A geodetic elevation
- A necessary elevation
- An assumed elevation
- A benchmark elevation
- What would be the grade on a sanitary sewer that is 60m long if the starting and ending elevations were 72.875m and 71.350m?
- 1%
- 1.5%
- 2%
- 2.5%
- Generally, what is the minimum width of a trench if a small “jumping jack” compactor is meant to be used in it?
- 18 inches
- 12 inches
- 10 inches
- 6 inches
- What trenching feature allows bell and spigot pipe to be installed so that it is uniformly supported along its length?
- Bell holes
- Pipe stands
- Piers and blocks
- Spigot supports
- If a backwater valve is required to protect a building from sewer backup, what are the two main points to be considered?
- It is accessible and normally closed
- It is accessible and installed on a branch
- It is at least 6″ diameter and normally open
- It is normally closed and installed on a building sewer
- Which one of the following would likely be the best choice for ensuring that buried pipe is not accidently contacted when digging in that area?
- Lay warning tape on the trench bottom
- Pour concrete on top of the buried pipe
- Lay warning tape on top of the first lift of compacted spoils
- Provide at least 600 mm (2 ft) of fine bedding material over the top of the pipe
- Which one of the following choices would be preferred where heavy loads may occur on top of pipe that is shallow in its burial depth, such as under public roadways?
- PVC
- RCP
- ABS
- HDPE
- Which one of the following would not be a good choice for trenching operations?
- Grade and compact the trench bottom before installing any pipe
- Bulldoze the spoils back into the trench once haunching has been compacted
- Lay the pipe sections on dunnage beside the trench near the installation point
- Compact the bedding and backfill in lifts of approximately 300 mm (1 ft) depths
Check your answers using the Self-Test Answer Keys in Appendix 1.
Media Attributions
- Figure 1 Builders level on tripod by Greg Wirachowsky is licensed under a CC BY-NC-SA licence.
- Figure 2 Geodetic benchmark by ITA is licensed under a CC BY-NC-SA licence.
- Figure 3 Pipe laser and target for pipe interior by ITA is licensed under a CC BY-NC-SA licence.
- Figure 4 Example of trench for pipe by ITA is licensed under a CC BY-NC-SA licence.
- Figure 5 Cable puller and “Tirfor”® by ITA is licensed under a CC BY-NC-SA licence.
- Figure 6 N.C. backwater valve and N.O. backwater valve by ITA is licensed under a CC BY-NC-SA licence.
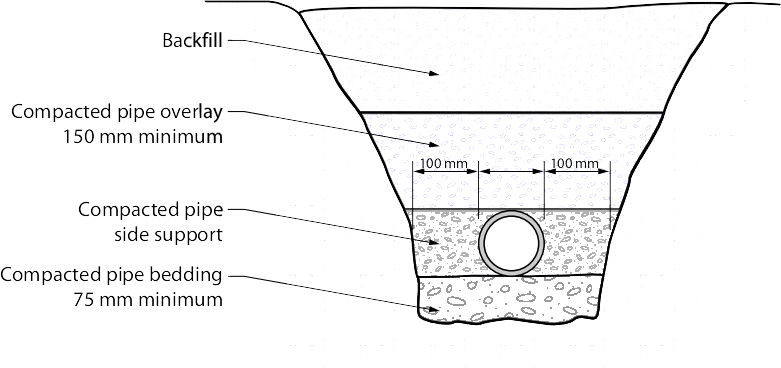
- Figure 7 Proper trench construction by ITA is licensed under a CC BY-NC-SA licence.
- Figure 8 Trench with warning tape above pipe by ITA is licensed under a CC BY-NC-SA licence.
- Figure 9 Lifting reinforced concrete pipe section by ITA is licensed under a CC BY-NC-SA licence.
- Figure 10 Installing two pipes in one trench by ITA is licensed under a CC BY-NC-SA licence.
