19 Further Applications of PCR
Introduction
In this section we’ll look at some applications of PCR, beyond those already covered in the alternative cloning approaches and traditional cloning chapters. You will already appreciate that we can add sequences to PCR primers so that we can amplify products that can be cut with certain enzymes or generate overhangs for ligase independent cloning.
But we can use PCR for other purposes as well.
In terms of making transgenic organisms, we can use PCR to introduce mutations into DNA sequences in order to study the function of the gene. We can also use PCR to fuse two sequences together- as always, primer design is key here and the primers include sequence overlaps between the two pieces to be combined (you have seen the same concept in the SLIC cloning chapter).
Once the transgenic organism is produced, we can also use PCR as a way to confirm the presence of the transgene in the organism, determine the exact location of the transgene, and test individuals to find out if they are homozygous or heterozygous for the inserted DNA.
This recording covers a few basics about adding nucleotides to primers for cloning purposes. An example is adding restriction sites to primers so that an insert can be cloned directionally. It is mainly review. Click here for the powerpoint slides.
Contents
Learning Outcomes
A. Site-directed mutagenesis
A-1. Types of changes that can be introduced
A-2. Using the genomic DNA as template
A-3. Using the cloned gene in a plasmid as a template
B. Fusion PCR
C. PCR on transgenic organisms
C-1. Confirmation of the presence of the foreign DNA
C-2. Determining the position of the transgene
C-3. Checking for homozygosity or heterozygosity
Learning Outcomes
- Describe and explain the processes described in the chapter
- Given a gene of interest, and any needed information, design primers to generate specified mutations in the GOI
- Given the results of a PCR on a transgenic organism, be able to interpret the results about whether the organism has the transgene and if it is homozygous or heterozygous for it
A. Site-directed mutagenesis:
You can use PCR to introduce mutations into a GOI by introducing the change you want in the gene into the primers. You have already seen this in action in the Molecular Cloning simulation worksheet – a primer was designed to remove the stop codon of the Rad52 gene and to simultaneously introduce an XbaI site in order to fuse Rad52 to GFP in frame. Just two nucleotides were “mismatch” nucleotides in the primer and this can be tolerated so long as the mismatches are not at the 3′ end of a primer. When the PCR product is amplified all the products contain the primer or its complement and thus have the desired mutation. This use of a primer with a small number of mismatches, to induce a particular change in a gene sequence is an example of site directed mutagenesis.
A-1. Types of changes that can be introduced
All of these are genetic changes that can be introduced into a gene of interest:
- Insertion of nucleotides for the purposes of tagging the protein (6-his e.g.) or for other purposes such as generating a restriction enzyme site or additional amino acids that may alter a gene’s function
- Removal of a stop codon, usually to allow fusion to a reporter gene
- Introduction of a stop codon to truncate the protein product
- Change of key amino acids suspected to be crucial to protein function
- Deletion of key amino acids suspected to be crucial to protein function
These generally fall under 3 main categories: point mutations (changes in a single amino acid, so the alternation of 1-3 nucleotides in a gene), insertions (the addition of one or more nucleotides to a gene), and deletions (the removal of one or more nucleotides from a gene).
A-2. Using the genomic DNA as a template
When we use the genomic DNA as a template there are limitations in the mutations to be introduced. The mutations are introduced in via primers and rely on the fact that we the primer can bind to the template despite a few mismatches if we alter the stringency conditions. We lower the annealing temperature to a point where the small number of mismatches won’t prevent primer binding to the intended target sequence. We cannot drop the temperature too low, though, or we may amplify artifacts. Touchdown PCR would be a good approach in this case (see Chapter 5 for a review of touchdown PCR if you don’t remember what it is).
The mutations introduced are limited to the ends of the PCR products, since they are in the primer sequences. You can introduce mutations into the middle of a gene but this requires performing multiple PCRs and then the different PCR products would need to be correctly combined through restriction enzymes, or SLIC cloning, to assemble the complete gene containing the introduced mutations. Attention to reading frame would be essential to this process. It is a lot of work.
A-3. Using the cloned gene in a plasmid as a template
Making mutations in a GOI from a plasmid insert is easier because of the circularity of the plasmid. You can place the primers wherever you wish, directed away from each other, and incorporating the desired change. This results in a linear PCR product which can then be ligated back into a circular plasmid that now contains the gene of interest with the desired mutation. The process is described in the recording. It will help to draw the results of the PCRs to see how each type of mutation: point mutation, insertion, or deletion, is generated. The following sections focus on the sequence and placement of the primers, in order to generate the desired mutation.
A-3i. Making point mutations
To introduce a point mutation, the primers are directed away from each other, with no overlap and no nucleotides between them. As you are trying to alter one amino acid to another, you will have one mutagenic primer, that contains a mismatch of 1 -3 nucleotides. It depends on how many nucleotides must be changed to change the resulting amino acid.
A-3ii. Making deletions
In order to make deletions, neither primer needs to be mutagenic. Both can perfectly match the template sequence, but you place them to either side of the sequence you want to delete. When the PCR product is amplified, it will lack those nucleotides and when the product is religated, you now have a version of your gene that is missing those nucleotides and thus a protein product that is missing those amino acids.
A-3iii. Making insertions
If the insertion you want to introduce into the gene is small, perhaps just one codon (three nucleotides), you can add the sequence to the middle of the mutagenic primer. This is option 2 in the recording. However if the insertion is longer- multiple amino acids – then the extra sequence is added to the 5′ end of one of the primers. The gene specific parts of the primers are right next to each other, so there is no overlap between them, nor any nucleotides between them.

Click here for the powerpoint slides.
B. Fusion PCR:
Fusion PCR is a PCR-based method of combining two sequences. It works well in some instances; we’ve done this in BISC 357 in the past with variable success. It requires careful pipetting and more time spent purifying the products etc than we really have time for in the class.
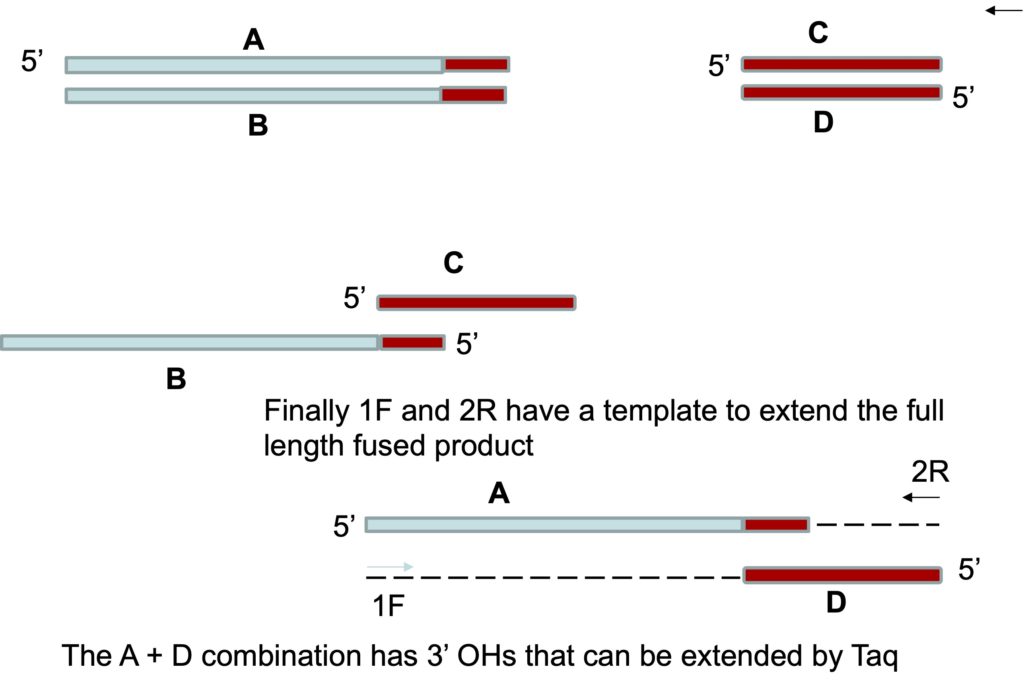
In this method, you PCR amplify the two pieces you want to combine with some overlapping sequence on the primers- similar to how it is done with SLIC. The image below shows the two PCR products generated in preparation for fusion PCR. The first amplicon (blue) has a reverse primer that has a 5′ end complementary to the forward primer of the second amplicon (red). The two PCR reactions are amplified separately, and when the first one is complete, it has sequence at its 3′ end that matches the 5′ end of the second amplicon, shown with colour coding.

The two pieces are amplified separately and then the products are column purified, which is essential because we need to get rid of all the primers that are in the reactions. If there is a lot of background, we might gel purify the products that are the correct size to enhance the likelihood of success.
Then we combine the products of the two PCR reactions together in equal amounts, in a tube with primers specific for the forward end of the first product (1F) and the reverse end of the other (2R). The two products can bind to each other due to the overlapping sequences generated on the amplicon, and there are two orientations where this is possible. In one orientation nothing will happen because the recessed ends are 5’ ends. However, in the other orientation the recessed ends are 3’ ends and in the first cycle, Taq polymerase can extend these as it would any primer – generating strands of DNA that now include the combined fragments.
The image below shows this. The strands of the products are labeled A through D for the purposes of the explanation. There are four ways that the DNA strands can bind. A and B can bind and C and D can bind. These strands can’t be extended. Strand C and B can bind each other as well, due to the overlapping complementary region. If they do, as shown below, no extension of the strands can occur as the recessed ends are both 5′ ends. Finally strands A and D can also bind each other due to their overlapping region. In this case, the recessed ends are 3′ ends which can be extended by Taq. The result will be that the A and D strands will be extended to generate the full length desired product.
In the next cycle the primers 1F and 2R that match the ends of the combined fragment can make the complementary strands. This generates a PCR product that has fused the two amplicons from the first reaction into a single larger amplicon. The alignment of the A and D strands of DNA will not happen frequently in the PCR reaction but even if it occurs occasionally, that will be enough to generate a fusion product. This is the power of PCR. Study tip: You should draw this out with a few nucleotides indicating the “overlap” sequence to ensure you understand it.
Click here for the powerpoint slides.
C. PCR on transgenic organisms:
C-1. Confirmation of the presence of the foreign DNA
If we have generated organisms that we think are transgenic, we want to confirm that the transgene is incorporated in the genome. We can use gene specific primers that should recognize only the introduced DNA. These will only generate a product if the transgene is present. Clearly, it cannot be a gene that naturally occurs in the organism. And the positive and negative controls are really important. If we don’t see a band, we want to be sure that this is a real negative result – that the organism really doesn’t have our transgene. Which control is the most important one to reassure us that we COULD have amplified the band if the gene was present? If we do see a band, we want to be sure this band was amplified from the template we added and not some contaminating DNA. Which control lets us feel confident that our bands indicate a real positive result rather than a contaminant?
C-2. Determining the position of the transgene
We can use inverse PCR to determine where in the genome our foreign DNA is inserted. We use the sequence we do know to identify the sequence we don’t know but want to know.
We start by cutting the genomic DNA with a restriction enzyme that we know does not cut inside our construct. This cuts the genome into many pieces. Then a ligation is performed in a very large volume to ensure that the DNA is very dilute. In this case, the closest free end that the DNA can ligate with is on the same molecule. This favours circularization of the DNA pieces.
Then PCR is performed using primers that recognize the edges of the construct and are directed outward. The product that is made consists of the sequence to either side of the construct. We only need perhaps 30 or 40 nucleotides of sequence to pinpoint unique sites in the genome unless our construct is in the midst of a repeat sequence.
C-3. Checking for homozygosity or heterozygosity
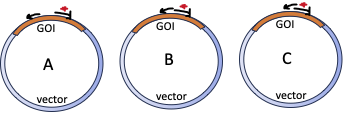
When we have transgenic organisms, we want to know whether they are homozygous or heterozygous for the construct. In this case we use our information obtained from part C-2 and we design a primer set in which one forward primer recognizes the insert and the other forward primer recognizes sequence upstream of the insert. The reverse primer recognizes sequence downstream of the insert. Depending on whether or not the insert is in the DNA, you will either get a band from the combination of the insert-specific primer plus the reverse primer, or from the upstream specific primer combined with the reverse primer. It is important that:
- The band sizes for each pair of primers is different and easy to distinguish.
- The insert is so large that if it is present in the DNA, the second forward primer will be unable to generate a band with the reverse primer.
In the image below, the three primers are shown on the upper chromosome, which has the insert (in orange) and the two primers are shown on the lower chromosome, which does not have the insert. The expected band sizes are just an example. The insert is not to scale. Assume that it is about 8-`15 kb in length.
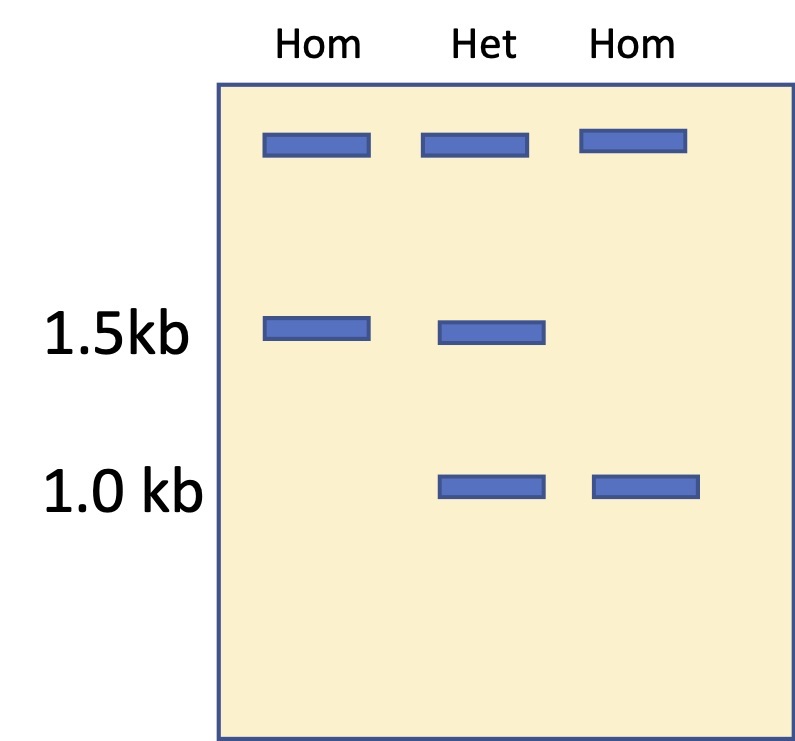
When the PCRs are run on a gel, the band sizes tell us whether the individual is homozygous for the normal chromosome (1.5 kb band), homozygous for the inserted chromosome (1 kb), or heterozygous (one of each type of chromosome, one 1.5 and one 1.). Please ensure that you understand the image above and the gel schematic below.
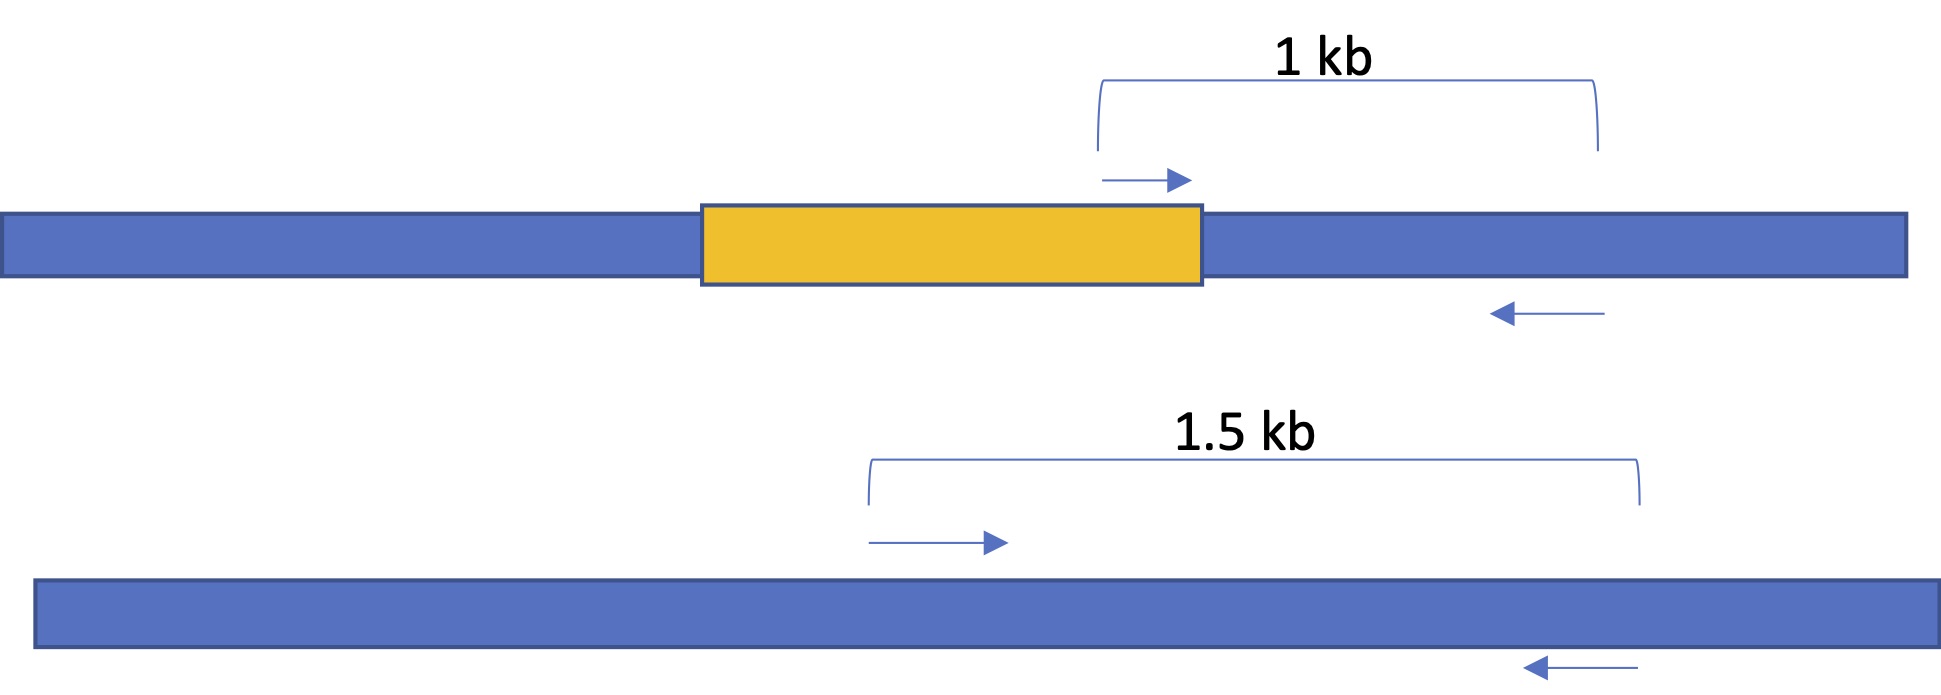
Here are some images for the self-test questions below. The first shows an image of a gene on a chromosome, one version with no inserted transgene and one version with an inserted transgene. Three primers are shown: F1 is the forward primer that recognizes the F’ end of the gene and R is the reverse primer that recognizes the 3′ end of the gene. F2 is a forward primer that recognizes the transgene. Please note that the schematic is not to scale. The GOI is about 1.5 kb in length, while the transgene is about 10 kb in length.

Below are images that show the chromosome constitutions of three different individuals. Please answer the questions below each image, about the individual shown in that image.


Please note that there is an error in the recording for iPCR. The sequencing primers are the same ones used in the PCR.
Click here for the powerpoint slides.
