7 Plasmids and Cloning Basics
Introduction
In this section we will look at some qualities/features of plasmids: the features they all have and the features that only some have. The selection of the correct plasmid for your purposes is important; otherwise work can be wasted.
Then we’ll consider simple restriction enzyme-based cloning: generating an insert and ligating it into your plasmid.
Finally we will look at transformation of competent bacterial cells and selection of clones that have your construct. Selection of the right cells is important- depending on what you are trying to clone and how you plan to do the selection, using cells with the wrong genotype can ruin the experiment. Before purchasing competent cells, or making them yourself, ensure you know the genotype. Once you have colonies you can select individual colonies to grow up for a plasmid prep, that will give you (we hope) enough DNA for further analysis.
Contents
Learning Outcomes
A. Features and use of plasmids
A-1. Terminology
A-2. Several types of cloning vectors
A-3. Characteristics of plasmids
A-4. Types of plasmids
A-5. Plasmid names
B-1. Selection of Enzymes
B-2. Using PCR to add RE sites to your insert
B-3. Cloning with compatible sticky ends: molar ratio
B3-i. TA cloning (a quick aside)
C-1. Competent cells
C-2. Transformation procedures
C2-i. Heat shock
C2-ii. Electroporation
C2-iii. Calculating transformation efficiency
C-3. Selecting bacteria with the desired construct
C3-i. Antibiotic resistance
C3-ii. Blue-white selection
C3-iii. Lac operon (review if you need it)
C3-iv. Transformation efficiency: how good are my cells?
D1-i. Plasmid conformation
D1-ii. Alkaline lysis procedure
D-2. Sphaeroplast method (based on size)
Learning Outcomes
A. Features and Use of plasmids:
A-1. Terminology
Plasmids are small extrachromosomal circular (usually) DNAs found in bacterial cells. Extrachromosomal means that they are separate from the bacterial chromosome. There are many different types of plasmids and a bacterium can contain different types under some circumstances. Plasmids replicate independently of the bacterial chromosome and some types of plasmids are found in many – even hundreds – of copies in each bacterial cell.
Most plasmids are circular, although there are some linear plasmids. We won’t be discussing these here. Plasmids perform a variety of functions in bacterial cells. You may remember the F-factor or the F-plasmid from introductory genetics- this is the “fertility factor” which allows the bacterium that contains it to form a pilus, a kind of tube that connects two bacteria, and transfer the plasmid and any genes on the plasmid to a recipient bacterium during conjugation. Some plasmids can actually kill the cells that take them up. Others confer resistance to antibiotics or introduce components of the restriction-modification system, which you read about in Chapter 4. Other functions played by some types of plasmids are: allowing bacteria to tolerate heavy metals in their surroundings, protecting them from UV light, conferring the ability to parasitize plants (we’ll talk about this towards the end of the course) and the ability to enter into symbiosis with plants. In this last case, legumes (peas, beans, peanuts, soybeans etc) form nodules which house the bacteria and in return the bacteria fix nitrogen from the atmosphere to allow the plants to grow better. It seems to be a mutually beneficial arrangement.
What is interesting about plasmids is that they can undergo horizontal transfer. This means that they are not passed only between bacteria of the same species. Instead they can be passed among many different species of bacteria. Horizontal transfer results in genetic changes that were not inherited through reproduction (which is called vertical transfer). Bacterial strains that have acquired multiple drug resistance most likely did so through acquiring plasmids that contain the genes for resistance to antibiotics from other species of bacteria.
Plasmids are a type of cloning vector. A vector is used to introduce DNA into cells. There are many types of vector, which is a more general term, and plasmids (the more specific term) are one type.
A-2. Several types of cloning vectors
Although we are focused here on plasmids, you should know that many other types of vectors exist for cloning purposes. We’ll briefly describe these. If you work in a lab that uses these, there will be an opportunity to learn much more; this serves just as a brief introduction. Different types of vectors are used for cloning different sized inserts.
Plasmids are used in bacteria and can hold inserts up to about 15 kb, though often the inserts are smaller than this.
Lambda phage is a virus, and it can be used to transfer inserts of up to about 25 kb into recipient bacterial cells. The viral particles contain the insert in place of the genes needed to replicate more viruses. Thus although the viruses can infect the bacterial cells, no new viruses are formed in the hosts. In addition to being able to transfer larger insert DNAs into recipient cells, viruses have the advantage of being more efficient at infecting cells than the transformation process we use with plasmids (discussed in part C)
Cosmids have features of lambda phage and plasmids- they use the efficiency of viral infection to transfer the DNA into recipient bacterial cells but once the DNA is inside the bacteria, we can work with the DNA as a plasmid. Cosmids can transfer up to 45 kb into the recipient bacterial cells.
Artificial chromosomes of various types (P1 artificial chromosomes and bacterial artificial chromosomes, or BACs) are used to transfer even larger amounts of DNA into recipient cells, mostly bacteria. In the case of yeast artificial chromosomes (YACs) which can transfer 250 kb to 2 Mb of sequence, the recipient cells are yeasts. Yeasts are extremely useful organisms because they are eukaryotes, but you can culture them in large numbers like bacteria. Artificial chromosomes have all the components needed for a real chromosome: an origin of replication, and if the chromosome is a YAC, telomere and centromere sequences that allow the chromosome to survive in the cell and segregate properly during cell division. The rest is the inserted DNA.
A-3. Characteristics of plasmids
All plasmids- that we use for cloning – have the following features:
- An origin of replication (ori) so the plasmid can be duplicated inside the bacterium. This is usually an A/T rich sequence that the proteins needed for replication can bind to and initiate replication of the DNA.
- Plasmids may also carry genes for the proteins needed for their own replication. Some plasmids may also rely on proteins encoded on the bacterial chromosome. There is a lot of variation in the exact mechanisms of replication of plasmids, which is beyond the scope of our course. These differing mechanisms probably contribute to variations in copy number and host range, described below.
Plasmids can be low copy number or high copy number. Low copy number plasmids carry genes regulating (limiting) their own replication. Their replication and segregation is generally coordinated with the bacterial chromosome. There is usually 1 or just a few copies of the plasmid in each cell. They tend to be quite large plasmids, up to 200 kb.
High copy number plasmids have very little regulation of their replication, which is not tied to replication of the bacterial chromosome or the division of the cell. They are usually quite small plasmids, 2 – 20 kb in length. A low copy number plasmid can be transformed into a high copy number plasmid through deletion of the genes that constrain its replication. High copy number plasmids are used extensively in molecular work. We need many plasmids per cell in order to be able to isolate huge amounts of our DNA to analyze the gene we are studying. Remember that DNA is very SMALL. Therefore in order to work with it, and see the results on a gel, we need lots of it. High copy number plasmids can have hundreds of copies in each cell. Commonly used high copy number plasmids are also narrow host range plasmids. They can replicate in only a small number of related species. This is because they depend in part on the proteins encoded by the bacterium to replicate and divide and so cannot replicate in a host cell with an incompatible set of proteins. Note the difference between relying on polymerases and such from the bacterium and having your replication regulated by the bacterium. Narrow host range plasmids have a high copy number because they don’t encode proteins to limit their replication. But the replication of the plasmid still requires polymerases and other factors encoded on the bacterial chromosome. Broad host range plasmids tend to be low copy number plasmids. Because these plasmids encode a lot of their own replication machinery they are able to survive in a lot of different, not necessarily closely related, bacterial species.
Click here to download the powerpoint slides for the following video:
Plasmids also contain:
- A polylinker or multiple cloning site (MCS)- a region with a number of restriction enzyme sequences that cut only once in the plasmid. This is not a natural feature of plasmids- it is engineered in. And in some cases the plasmid had to be “cured”. For example, if EcoRI is one of the polylinker restriction enzyme sites, you want to be able to cut the plasmid with EcoRI and have it cut only in the polylinker. If there were any naturally occurring EcoRI sites in the rest of the plasmid, site-directed mutagenesis would be performed to remove them. That is what “cured” means. You will find out how PCR can be used to perform site-directed mutagenesis in a later chapter.
- The polylinker is where the insert is cloned. The insert is the piece of DNA you want to clone. Just for the sake of terminology: the plasmid, also called the vector, that contains the inserted DNA, is called a construct (a noun, emphasis is on the first syllable). The insert (noun, emphasis on the first syllable) is the piece or pieces of DNA that were cloned into the vector.
- A gene for antibiotic resistance, so that we can selectively plate for cells that contain our plasmid. These may or may not have the insert DNA (see selection, below).
- Primer binding sites to either side of the polylinker. We can use commercially available primers to amplify the insert by PCR. Or we can use these for sequencing as well (covered in Chapter 9)
- Promoter sequences to direct transcription of the inserted sequence.
Promoters that allow for expression of your insert may be strong ubiquitous promoters (strong expression all the time). Others allow for inducible expression. That means that your insert won’t be transcribed unless you add the inducer – you can control when the gene is expressed and when it is not. Often this involves components of the lac operon but can include other types of promoters also. We will see examples of inducible expression this semester. Here is another example of one. The arabinose operon in E. coli encodes three genes needed to digest arabinose (a sugar). The promoter for the operon is called pBAD (B, A and D are the abbreviated names of the three genes in the operon). The repressor for this operon is encoded by a gene called ara C. The ara C protein binds near the pBAD promoter and prevents transcription of the operon. If arabinose is present, it can bind to ara C and release the repression of the operon. So if we had the pBAD promoter next to our gene of interest, and our plasmid (or the bacterium) also had the ara C gene, the gene of interest would not be expressed unless we added arabinose to the medium. This is an example of inducible expression. One of my former students used this during her Master’s research to turn on expression of her gene of interest. We are planning for her to do a guest lecture toward the end of the semester. She has had a couple of interesting jobs in biotech and has advice on career building that I think will be useful to you.
Plasmids may contain other components, depending on what they are used for. Some contain part of the lacZ gene in the polylinker to allow for a colour-based selection of plasmids that have inserts in the polylinker (blue-white selection, described below). While antibiotic resistance tells us that cells in a colony contain the plasmid, we don’t know if the plasmid has an insert or not unless we have an additional selection mechanism like blue-white selection.
The plasmid may be designed for a particular type of cloning so it may contain special sequences needed to use that approach. We’ll talk more about these when we discuss the alternative approaches to cloning in plasmids.
A-4. Types of plasmids
There are many types of plasmids, used for different purposes
Cloning plasmids are for cloning a DNA fragment, in order to make large amounts of it to study. These types of plasmids tend to be small and straightforward, with an ori, MCS, antibiotic resistance gene and not a lot of what we might think of as “bells and whistles”. These may or may not have a promoter sequence next to the polylinker.
Expression plasmids are used to express the cloned sequence either to make a probe, study the RNA, or isolate the protein product. Beyond the basics listed above, they must have a promoter sequence and a terminator. The insert is cloned between these. The promoter may be an inducible promoter; this gives better control over the expression of the gene.
Knock-out or knock-down plasmids are designed to reduce or eliminate the expression of a gene of interest. We will talk about two types of knock-out in Chapter 8: RNAi (RNA interference) and CRISPR.
Some plasmids are “shuttle” vectors. These can live in bacteria, where we clone and propagate the plasmids. But they can also be used to transform or transfect other types of cells, like yeast and plants. In that case there are additional sequences needed for the plasmid to survive in the other host cell. A different antibiotic resistance gene will be needed for selection in eukaryotes, and a eukaryotic origin of replication. In my experience of vectors that shuttle from bacteria to yeast, they are high copy number in the bacteria but low copy number in the yeast. There may be exceptions to this.
Reporter plasmids are a type of expression plasmid with a specific purpose: using a reporter gene to find out when and where in an organism a gene is expressed. A reporter gene encodes a protein that can be easily visualized in a cell either through fixing and staining for the protein which then shows up as a blue stain, or by fluorescence when stimulated with a particular wavelength of light. Some types of reporter plasmids will also tell us where in the cell a protein product is located. These are much more complicated to make and will be discussed in Chapter 7B.
Viral plasmids aid in delivery of DNA to target cells. We’ll talk about these later when we’re talking about getting DNA into eukaryotic cells. The plasmids are used to assemble viruses that contain your construct instead of their own genomes. Then the virus infects host cells and very efficiently introduces the desired DNA into the host. But no new virus particles are produced.
A-5. Plasmid names
Plasmids are named by a set of rules like restriction enzymes are. The name begins with a lower case p, for plasmid. Then there is an identifier that depends on who named the plasmid. Sometimes it is named for the people who developed it, the place where it was developed or some feature of the plasmid, like the way colonies are selected. The name often also has a number.
Examples:
pBR322: the BR stands for Bolivar and Rodriguez, the people who made it, and 322 is an identifying number.
pUC19: The UC stands for University of California, where it was developed. 19 is a numerical identifier. There is a pUC18 which is identical to pUC 19 except that the polylinker is in the reverse orientation. pUC19 is used a lot in the lab for transformation controls; we use a tiny (really tiny) amount of the pUC19 to transform some competent cells and then we plate a really tiny amount of the transformation on plates to see how many colonies we get. This tells us how good the competent cells were.
pBluescript: Here the Bluescript refers to the blue-white selection which is how you can select colonies that have your insert (described below). There are two versions of Bluescript that relate to the orientation of the polylinker; one is called SK and the other is called KS. S refers to the SacI restriction enzyme at one end of the polylinker and K refers to KpnI at the other end. SK and KS plasmids are identical except for the orientation of the polylinker sequence.
Click here to download the powerpoint slides for the following video:
B. Restriction enzyme cloning:
We will describe a few basics of using restriction enzymes to clone inserts into plasmids. As you will learn in subsequent chapters, there are other methods for getting inserts into plasmids but using restriction enzyme digest, followed by ligation, is a standard method.
B-1. Selection of enzymes
Each plasmid has a set of known restriction enzymes in the MCS. So you cut the plasmid with an enzyme or two enzymes and generate a linear plasmid with sticky ends.
Then you cut the insert with the same or a compatible enzyme(s) to generate the same sticky ends. NEB and other companies have online sites you can use to search your insert DNA sequence for restriction sites.
The benefit of cutting the plasmid with two restriction sites is that the linearized plasmid will have different overhangs at each end of the molecule. This is valuable in two ways. First of all, when we want to ligate the insert into the plasmid, we want to ensure that the plasmid doesn’t recircularize. Suppose we cut it and our insert with EcoRI only. When we add insert and vector into a ligation reaction there is nothing to stop one end of the plasmid finding a compatible sticky end at the other end of the same molecule. In fact depending on how much DNA is in the ligation reaction, the other end of the same molecule could well be the closest available compatible sticky end- the more insert DNA we use, the less likely this is and when we have a large excess of insert, we make this quite unlikely. If we don’t use this excess of insert DNA in our ligation we could produce mostly what we call “empty vector”; a term we use to describe a plasmid that doesn’t contain our insert. In this case, the cut vector just ligated back into a circle during the ligation. I usually refer to vector ligation as “reclosing”. When we cut the plasmid we say that we open it because now it is possible to insert our gene or other sequence into it. And then if the vector religates we say it has closed. This is how we refer to it in the lab casually. You will likely not see it written this way in text books.
But when we double cut the vector – that means cut with two different enzymes – the overhangs are not compatible and so the plasmid cannot self-ligate. The only way the vector can form a circle is if it ligates with the insert. And in order to survive inside the bacterium, the plasmid needs to be a circle. Linear DNA will be recognized as foreign and degraded in the bacterium (recall that there are some bacteria with linear chromosomes – we don’t work with these in this type of situation). In practice we will still have some empty vectors in our ligation reaction. However these will be plasmids that were not cut in the first place. The restriction enzyme digests are rarely 100% despite our best efforts. However if we have done everything correctly in our cloning, the recircularized plasmids are likely to be in a very small proportion of colonies. And we have other ways to enhance our preferential isolation of colonies containing plasmids with inserts. See blue-white selection, below.
The second advantage to cutting with different enzymes is directional cloning. Suppose you want to put your GOI (gene of interest) into an expression vector. You want your gene cloned in between the promoter and terminator sequences in the vector but you also need it to be inserted in the correct orientation to produce the correct, sense RNA. If you clone it in backwards, the wrong RNA will be produced and thus the wrong protein sequence, if any. So if you cut your insert with two different enzymes and your vector with the same two enzymes, there is only one possible orientation for the insert and if you have planned the experiment correctly, it will be the orientation that allows you to produce the desired RNA.
B-2. Using PCR to add RE sites to your insert
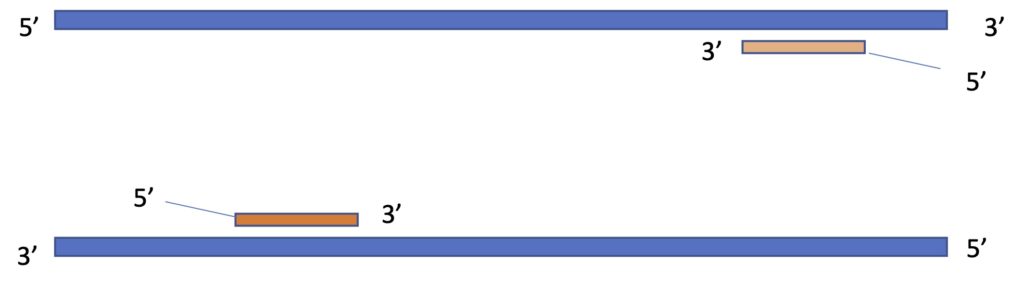
What if your insert does not have the desired restriction sites? This is frequently going to be the case. But you can use the power of PCR to add restriction enzyme sequences to your PCR primers in order to introduce the desired restriction sites into your insert. The restriction enzyme sequence will NOT match the template target DNA. Therefore it needs to be introduced at the 5′ end of the primer. Try to visualize the primer sitting on the template with a mismatch at the 3′ end. If the sequences are not base paired, the polymerase will not be able to add nucleotides to the 3′ end of the primer. However if the 3′ end of the primer is base paired to the template but the 5′ end is not, amplification can still proceed. There is still a 3′ OH to which nucleotides can be added. And after a few cycles the product of the PCR becomes the template and all the product molecules contain the restriction sites at either end.
The PCR product is purified and then cut the with the enzyme(s), creating an insert that has compatible sticky ends with the plasmid. When we add restriction sites to the ends of primers we sometimes need to add 2 or more extra nucleotides to the 5′ end of the primers. Some restriction enzymes won’t cut on the very edge of a DNA molecule, so the extra nucleotides are added to improve the efficiency of the enzyme digest. Companies that sell restriction enzymes have tables you can use to find out how many nucleotides should be added to the primer 5′ to the restriction enzyme site.
The image below depicts two primers in orange and the place on the DNA template (blue) that they recognize. The thin blue lines at the 5′ end of the primers represent the extra sequence added (the restriction enzyme site plus a couple of extra nucleotides at the 5′ end. That part of the primer is not binding to the DNA template because this sequence is not found in the template at this position. The main point of this sketch is to show why the restriction enzyme sites must be at the 5′ end of the primer.
B-3. Cloning with compatible sticky ends: molar ratio
When we ligate an insert into a vector with compatible sticky ends, we can use about a 3:1 insert to vector ratio. This is not done by weight (ng) unless the molecules in question are about the same size. Suppose you have a vector that is 5 kb and an insert that is 1 kb. We want to put them into a ligation in a 3 insert to one vector ratio. So here is a way to think about how much of each needs to be added. Suppose that 100 molecules of the 5 kb vector weighed 100 ng (which is grotesquely wrong- but this is just for thinking about the subject). So then suppose you could precisely cut every vector molecule into 5 equal pieces of 1 kb each. Now you have 500 molecules of DNA. What is the weight?
I’m giving you a moment to think about it.
Ok, it still weighs the same. So if you added 100 ng of the 1 kb pieces to 100 ng of the 5 kb pieces what is the insert to vector ratio?
I’m giving you another minute to think………
… Ok it is 5:1 insert to vector because the same weight of DNA of the smaller piece is 5 times more molecules. This is what molar ratio means – it refers to the number of molecules. So suppose we’ve decided to use 120 ng vector (which is 5 kb) and we want a 3:1 insert to vector ratio. How much 1 kb insert do we add? Try this question:
Figuring out molar ratio involves both the weight (ng) of the DNA added, and the length. The way I approach it is to take the weight of the insert, multiplied by the length of the vector and divide it by the weight of the vector multiplied by the length of the insert. You multiply them by each others’ length to account for the inverse relationship between size and number of pieces: the weight of a short piece of DNA will have more pieces than the same weight of a larger piece. There will be a few more questions about this in some of the quizzes. You will get lots of practice figuring this out. Practice will help you feel more confident in your calculations. The video below describes the general approach to RE cloning.
Click here to download the powerpoint slides for the following video:
B-3i. TA cloning (a quick aside)
This doesn’t mean what you might think: making more helpers for our lab course. It is a way of taking advantage of the fact that Taq polymerase and some other thermostable polymerases with no proofreading functions will usually add an extra A at the 3′ end of the amplicon. One approach is to polish” the ends of an amplicon by using an exonuclease or a polymerase that can remove the one-nucleotide overhang. Or we can choose an enzyme for PCR that doesn’t leave 3′ A overhangs. OR! We can use a “T-tailed vector“; one that has been digested with a blunt-cutting enzyme and then a T has been added to the free 3′ ends using terminal transferase (here is terminal transferase again). We use dideoxy–T; this is a modified T nucleotide that has had the 3′ OH removed. So when we add one T the enzyme can’t add a whole string of them because there is no free 3′ OH to add to. Now we have a PCR product with 3′ A overhangs and a vector with 3′ T overhangs at the cloning site and we can ligate our insert into our vector. Keep this idea of TA cloning in mind for later chapters when we talk about Sanger Sequencing and Next Generation sequencing. There are connections and seeing these connections helps you understand both topics and remember more easily. You can cut and T-tail the vector yourself, which takes time and may not work well or you can buy an already prepared, “tailed” vector. The first approach is less expensive but less reliable.
B-4. Blunt end ligation
Blunt end ligation is not as efficient as sticky end ligation. Even though the sticky ends don’t bind tightly enough to keep the molecules together for a long time, they do interact for short periods of time. This makes ligation easier because the molecules stay together long enough for ligase to act on them.
If two molecules have blunt ends, they may come close to each other sometimes but there is nothing to hold them together even for that short time needed for the ligase enzymes to act. So overall it is less likely that the ligation reaction can take place. The main way we deal with the lack of efficiency is to increase the amount of insert. We use 5:1 or even 10:1 ratios of insert to vector. With so much insert into a small volume ligation- often only 10 μl total volume- we are increasing the chances that the vector and insert molecules come close enough to be ligated.
Watch the lecture recording for more on how we can promote good results for blunt end cloning. Most semesters we do this in our course and we get good results. However we cannot do directional cloning using blunt end ligation. The insert can insert in either orientation. Generally we make minipreps (plasmid DNA isolation, covered in section D) for multiple colonies and do a restriction digest of the plasmid for each one to check the orientation. We use a restriction enzyme that cuts once in the polylinker and once in the insert. But we choose an enzyme that cuts towards one end of the insert so that the resulting restriction fragments will be different sizes in the two different orientations.
Click here to download the powerpoint slides for the following video:
Optional practice: Go to LabXchange, and do this pathway to get a good sense of plasmids, how they are used and how we clone them using restriction enzymes. This is both for understanding the cloning process but also to see how the various topics we are covering relate to each other..
Building a recombinant plasmid: Restriction Enzymes
C. Transformation of bacteria:
Once we have ligated our insert into the plasmid, we need to be able to make more copies of it – to clone it. Therefore we introduce it into bacterial cells and allow them to grow overnight with the plasmid inside the cells. We use high copy number plasmids. Suppose the bacterial colony had 5 billion cells in it and our plasmid averaged about 200 copies per cell. That would be a trillion copies of the plasmid. These large amounts are needed in order to work with the DNA- to isolate the plasmid, to cut it with restriction enzymes, maybe to sequence the insert, and other applications.
C-1. Competent cells
The cells we introduced the plasmid into must be chemically altered so they will take up the plasmid. This is called making them competent. The procedure takes a few days to do. A colony is first streaked on an agar plate and grown overnight. Then a liquid culture is inoculated with a single colony (which originated from a single cell) and grown overnight. These first two steps are done to get the cells growing vigorously. A small amount of the liquid culture is inoculated into a large flask of media. They are grown for a few hours, to a point where they are actively growing but the culture is not at all crowded yet (that would begin to slow their growth). Then they are chilled on ice for variable lengths of time depending on the protocol but around 20 -30 minutes. The cells are harvested by centrifugation and resuspended in ice cold magnesium chloride. This is repeated and the cells are resuspended this time in ice cold (all is done on ice) calcium chloride. This causes a weakness in the cell wall, so that when the cells are heat shocked, their responses to the shock allow the uptake of DNA. Finally the cells are suspended in a calcium chloride solution with 15% glycerol and snap-frozen on a bath of ethanol in dry ice. Snap-freezing means it freezes really quickly – freezing slowly would damage the cells. And the glycerol keeps the cells from being damaged by freezing and then thawing when we want to use them for transformation. Competent cells are stored this way as glycerol stocks in the -80oC freezer. Even at this low temperature they don’t stay competent forever but they should last for months at least. In our lab we used our competent cells within about 3-6 months. Purchased cells usually last at least a year and often longer.
Each batch of competent cells we made in the lab had a slightly different transformation efficiency (see calculations and explanation below) when we tested them. We were very careful to avoid contamination as well. It is very important to use your best sterile technique when making chemically competent cells. A former student of mine was working in a lab and she was very frustrated with the cells made by the student who worked there before her. She finally tested the presumed genotype that had been written on the labels and found they were completely different cells. The tubes had either been mislabeled or contaminated and it wasted a couple of months of her time. This is why careful labeling and good sterile technique are essential to this kind of work.
Purchased cells cost more but they are guaranteed and are more consistent in quality. The genotype is known and contamination should not be a problem. Their transformation efficiency is also known. But we always run a positive control (described below) to find out whether our handling and treatment of the cells is good. Our transformation efficiency should be within 10-fold of the guaranteed efficiency the company claims. Transformation efficiency is a measure of the ability of the cells to be transformed.
C-2. Transformation procedures
The two transformation procedures we will cover are heat shock and electroporation.
C2-i. Heat shock
With the heat shock procedure, we thaw the competent cells on ice and we treat them very gently throughout the procedure. They are very fragile and rough handling- like pipetting vigorously up and down to mix them with the ligation mix – can damage many/most of the cells and give very poor results overall. A small amount of ligation reaction, usually one or two microlitres, is added to the cells. Depending on the procedure you might use perhaps 100 or 50 μl of cells. Only thaw the minimum needed for the experiment. Trying to refreeze and reuse cells that were not used the first time has not worked well in my experience. When we make our own competent cells we freeze them in the aliquots we expect to use in a transformation so they are only thawed one time.
After the DNA is added to the cells, you want to give them the wrong idea about what is about to happen (:D). You incubate them on ice for about a half hour. They sit on the ice and the DNA is floating around and nothing much happens. Then you do a heat shock. You bring the ice bucket to the water bath or heating block and put the cells at 42oC for 30 -60 seconds. Different protocols have different times and some procedures stipulate that the heat shock should be at 37oC. The cells you buy will have instructions for what works best for them. During the heat shock, the cells have a kind of stress response which might involve pinocytosis, sometimes called cell drinking. The cell membrane pockets inward, bringing fluid from the surroundings into the cell. Sometimes a plasmid will be brought in at the same time. Most of the time there will be no plasmid taken up- heat shock is quite inefficient. That is why each aliquot of cells has many millions of cells in it.
At the end of the heat shock you immediately put the cells back on ice so they can recover. Most procedures stipulate at least 2 minutes on ice. Longer won’t hurt them. Then you add enough media to bring the volume to 1 ml total. Usually we use a very nice rich media. We have shocked the cells and now we want them to recover and start growing. As they begin growing, the cell wall is repaired and they are not as fragile as they were at the beginning of the procedure. We take the tubes to a shaker/incubator and grow the cells with shaking at 37oC for about an hour. This is enough time for the cells to begin growing. They will go through a couple of cell divisions in an hour. If they took in a plasmid during the heat shock, the plasmid can be replicated now, and can also start expressing its genes. So it will make the gene product needed for antibiotic resistance. After one hour we plate the cells on selective solid media (agar plates) – “selective” means the plates that contain antibiotics.
We usually plate a fairly small amount of the transformation mix on one plate (which we label with some unambiguous information on the plate and not the lid) to make a low density plate. In our lab we usually put 50 μl of the mix on the first plate and we use a flamed (sterilized) spreader and keep the bunsen burner on during the spreading of the bacteria on the plate. We turn the plate with one hand while spreading the bacteria with the other. We really want to get the cells widely distributed on the plate because if we don’t, the colonies that grow could all be clumped together and we would not be able to select individual colonies. And we need to select individual colonies – we don’t want to isolate DNA from several colonies that may have different versions of the plasmid (with or without an insert for instance). This plate now contains 5% of the total cells from the transformation. Then we also take the remaining 950 μl of cell and plate those as well, for a high density plate. But it can be very messy putting such a lot of fluid onto the plate. So we first spin the cells for 20 seconds in the centrifuge to bring them all to the bottom of the tube. Then we take out most of the media from the tube. We can leave about 50 to 100 μl in the tube and we re-suspend the cells in this smaller volume which is easier to pipette and spread properly on the plate. However keep in mind that this is still 95% of the cells from the transformation.
We do one low density plating and one high density plating because we cannot be sure which will give the best results. Sometimes the low density plate has one or two hundred colonies and the high density has thousands – too many to count (TMTC). Other times the low density plate has nothing and the high density plate has 100 or fewer. The quality of the DNA we used and whether the ligation was successful makes the difference. The accuracy of our pipetting and handling of the cells also affects the results.
The plates are grown at 37oC overnight, and are stored lid side down in the incubator. The next day we check for colonies and find out if the transformation worked or not.
C2-ii. Electroporation
One advantage of electroporation is that the procedure for making competent cells is somewhat easier than the procedure described above for heat shock. Currently we mostly purchase our cells, so this is less of an issue than it used to be.
During electroporation we introduce our ligation mix into a tube with cells, kept on ice. Then we use an electroporator to introduce an electric current. You add your transformation to special cuvettes and these must be scrupulously clean or the current will be too high and the cells will be killed. You cannot add too much DNA to the cells either or the same thing will happen. In both cases this is due to salt. If there is too much salt in the cuvette, the electroporation introduces too much current. In our lab, most of us had the experience of “frying” the cells once in a while. This ruined the transformation, but because the entire ligation reaction is not used, we could repeat the transformation a bit later. But the loud “pop” that occurs when the cells get zapped is very startling.
During proper electroporation there is no sound except the beep of the machine. The current applied introduces temporary “pores” in the cell membrane and sometimes the plasmid will enter the cell through this pore. Most of the time this doesn’t happen – electroporation is still quite an inefficient process, though it is a bit more efficient than heat shock. We have a lot of cells in the transformation mix, so even if only a small proportion are transformed, we will be able to identify them through their antibiotic resistance. We plate the cells on solid media that contains the antibiotic, and only cells that are resistant – those that contain the plasmid – will survive on the plate and form a colony. Because the heat shock and electroporation are not very efficient, it is quite unlikely that we will face the problem of multiple plasmids in a single cell. It can happen, but it is fairly rare.
The actual treatment of cells after the electroporation is similar to what we do with heat shock, so I won’t repeat all the steps – adding the media, incubation with shaking, and plating on selective media. These are the same. The difference is how we introduce the DNA into bacteria. For both procedures, spreading the cells well on the plate is important. We want each colony that grows on the plate to be derived from a single cell containing a plasmid: that is what the “cloning” is in our procedure. If a colony is derived from multiple cells then we have kind of a “mixed brood”, in which some cells contain one plasmid and other cells have a different one. This is not desirable.
C2-iii. Controls
To check that the transformation works, and help us troubleshoot if it does not, we do some controls.
- We set up a ligation with our cut vector but no insert. This is the vector-only ligation. And we do the entire transformation procedure with that. Ideally we expect no colonies at all, if we have taken measures to prevent vector self-ligation but in practice we usually see some. These are vectors that were never cut by the restriction enzyme in the first place and the number colonies are on the plate indicates the success of the ligation. Suppose our experimental plate had 150 colonies on it but the vector only ligation had 120. It means that the vast majority of colonies on our experimental plate contain self-ligated vectors (also called “empty vectors”. We should re-do the digestion of vector and start over. But if we had 10 colonies on the vector only plate and 200 on the experimental plate, we are happy because it means most of the colonies on the experimental plate should have our insert.
- Positive control. Competent cells come with a very small amount of pUC19 or other plasmid. This is used to test that the cells are competent for transformation – cells do expire and sometimes you can get a “bad batch”. You use a very small amount of the vector, usually just one pg, or even 100 fg, added to the tube of competent cells. You put the cells through the same transformation steps as the experiment and then when you plate the cells you need to plate smaller amounts. I generally plate 1 μl (with 50 μl of media added to it because you cannot spread 1 μl on a plate), and 10 μl (also with media added to it for ease of handling) and 25 or 50 μl. Usually the last plat, or even the last two plates have TMTC colonies. That is our abbreviation for too many to count. We use this control to ensure that our procedures were correct and the cells were good. If we get no colonies, we have to troubleshoot. The first step is to repeat it in case the plasmid was not put into the cells – pipetting a small volume is sometimes tricky. And check the expiry date on the cells. Ensure that the incubators are set to the correct temperature. I once had someone change the temperature of my incubator and I didn’t check before putting – in this case- some flies into it and it killed some valuable stocks. This was a lesson to always just look at the display and check that the temperature is set correctly. It is important to note that pUC19 is ampicillin resistant. If you are doing an experiment with a kanamycin resistant plasmid, all the plates you are using contain kanamycin. You need to remember to use the correct plates for the positive control. They have to be ampicillin plates if pUC19 is the plasmid you are using.
- Negative control. This control takes the competent cells through the entire procedure but without any DNA added to them. We expect of course that there should be no colonies on the plate as the cells should be susceptible to the antibiotic. If there are colonies then it is likely that there is a contaminating bacterium in the cells in very low amount. If there is a lawn of bacteria (that means the entire plate is covered with bacterial growth and no separate colonies are visible) then probably we have not checked the genotype of the cells. Commercially produced cells should come with a product insert giving their genotype and some are naturally resistant to certain antibiotics. I once made the mistake of using a plasmid with kanamycin resistance on it but transformed it into cells that were already resistant to kanamycin. This was an epic fail and there was a thick lawn of bacteria on the plates the next day! I had to find different cells to use for that experiment. Another possibility is using the wrong plates- ones that lack antibiotic. Also, ampicillin and other antibiotics will eventually degrade over time so if the plates are months old you can assume the antibiotic is no longer active in the media. You need to make fresh plates in that case.
C-3. Selecting bacteria with the desired construct
We generally use antibiotic resistance to select bacterial cells that have the plasmid in them. But having the plasmid does not mean that the plasmid contains an insert. In some systems that we’ll talk about later, there are ways to ensure that we only get colonies when cells contain plasmid with the desired insert.
In the case of restriction digest cloning, if we have taken care to reduce vector self-ligation, many of our colonies will have the desired insert and if we make DNA preps from many colonies, usually we can find one or more with the construct we want. We can increase the odds of finding a colony with the desired construct by using blue-white selection, described below.
C3-i. Antibiotic resistance
Antibiotics are substances that kill bacteria. There is a lot of competition among microorganisms and some fungi and bacteria secrete antibiotics that kill competing organisms nearby. Although antibiotics were naturally produced substances originally, many are either partially or fully synthesized in labs now.
There are several antibiotics you might use in your lab, depending on which plasmids you are working with. Ampicillin or carbenicillin, a more stable form, are derivatives of penicillin, and all three inhibit cell wall formation in bacteria that are susceptible. This means that bacteria cannot divide and they eventually die.
Streptomycin and tetracycline both interfere with protein synthesis by interaction with the ribosome subunits. You have ribosomes too but they are different enough from bacterial ribosomes that antibiotics don’t stop your protein synthesis. Streptomycin inhibits the initiation of protein synthesis which is lethal. Tetracycline affects the elongation steps and so slows/inhibits growth but does not outright kill the cells. Kanamycin also binds to ribosomes and causes incorrect translation which is lethal as well. Imagine if suddenly the wrong amino acids are being incorporated into all the proteins being synthesized in the bacterium. They would lack proteins needed to survive.
Each type of antibiotic has been outwitted by some type of bacterium and the genes for this are strongly selected in conditions where there is a lot of antibiotic. This is the reason why hospitals and industrial farms (where a lot of antibiotics have been traditionally used) seem to be breeding grounds for bacterial strains with resistance to multiple antibiotics. These resistance genes are used in genetic engineering for the purposes of selection.
As an example of one of the antibiotic resistance genes, the beta-lactamase gene (bla) produces the enzyme beta-lactamase – it is secreted into the surrounding media and inactivates ampicillin (and carbenicillin, penicillin etc.) by cleaving it. As the resistant colony grows, it creates a kind of “halo of protection” around itself. This area has been cleared of the antibiotic and so satellite colonies can grow here. These are formed by bacteria that do not contain the plasmid and are not themselves resistant to the antibiotic, but are kind of freeloading off of the resistant colony. When you select colonies to isolate DNA if you accidentally choose a satellite colony, your prep won’t grow because the bacteria did not have the plasmid in them. A good way to avoid satellite colonies is to streak each colony you plan to use for a prep on a new plate – by itself – with antibiotic. The resistant colonies will grow and the satellite colonies will not because there is no resistant colony to clear the antibiotic from the media for them. It is often possible to tell the colonies apart because the resistant colony grows quite large before the “halo of protection” forms. So satellite colonies are quite tiny compared to the real colonies. However if the plate is left long enough, the satellite colonies could grow large and would be mistaken for colonies with plasmids that contain inserts.
C3-ii. Blue-white selection
Plasmids like pBluescript have the lac operon promoter (including the operator) and just the first part of the lac Z gene, called the alpha fragment. The size of the first part of the lac Z gene is differently described for different plasmids – the key point to remember is that the plasmid has the sequence for the N-terminus of the lac Z protein. The polylinker is inside the lac Z gene alpha fragment. Lac Z is an enzyme that is used for one of the steps in digesting lactose, a disaccharide.
It turns out that the lac Z enzyme can interact with a substrate called X-gal ( 5-bromo-4-chloro-3-indolyl-β-D-galactopyranoside) which is a molecule that in places chemically resembles lactose. The result of lac Z acting on this substrate is a blue colour. So if you plate bacterial cells with a functional lac Z gene on a plate that contains X-gal, the cells turn blue. It turns out that the lac Z enzyme can be split into two separate parts and these can find each other after translation. They will work together to perform their function. This is called alpha-complementation..
The polylinker of pBluescript is in the lac Z alpha fragment and it has been engineered to be in-frame with the gene. That means that the polylinker nucleotides are in a multiple of three so that the reading frame of the gene is not disrupted. The amino acids that are added to the protein by the polylinker do not affect the function of the enzyme. And the polylinker in the KS and SK forms of the plasmid are in opposite orientation. Neither orientation interferes with the reading frame or the function of the protein produced. I greatly admire the people who designed this plasmid. Therefore if the plasmid is introduced into a bacterial cell that has the second part of the lac Z gene but is missing the first part, the combined proteins from the plasmid and the bacterial protein will provide the lacZ enzyme function and the cells will be blue if plated on X-gal medium. Bacteria without the plasmid would be white if plated on the same medium (so long as it lacks ampicillin) because they would be missing the lacZ fragment that is provided by the plasmid.
The genotype of the competent cells used is essential. They cannot have the full wild type lac Z gene on their chromosome. And they cannot completely lack the gene either. The cells we use for blue-white selection have no full length lac Z gene, but have the remaining part of the gene (the part that the plasmid doesn’t have) on an episome, a small plasmid. The genotype of these cells is lacZΔM15. The symbol Δ is used in genetics to indicate a deletion of some DNA sequence. In this case the deleted sequence is the 5′ end of the lac Z gene, which encodes the N-terminus of the lac Z protein.
This is the blue part of blue-white selection. What happens if we clone an insert into the polylinker? We will have interruption of the lacZ gene either because the reading frame is interrupted or because a large number of additional amino acids will be introduced into the protein that will prevent it performing its function through improper folding. If cells that contain this plasmid are plated on X-gal media, they should be be white. So in a transformation with pBluescript, all the colonies that grew contain the plasmid because we’ve plated on ampicillin plates and so the cells have resistance to ampicillin from the plasmid. If the colonies are blue, they contain the plasmid without an insert and if the colonies are white they contain the plasmid with an insert. There are of course some exceptions to this. Think about what these might be.
Think about whether blue white selection would work properly in cells that have lost the plasmid with the deleted lac Z gene on it. What if they had that plasmid, as well as the complete lac Z gene on their chromosome?
The video below contains a description of blue-white selection. Please note that at some point I think I say that beta-galactosidase digests galactose when I should have said lactose.
Click here to download the powerpoint slides for the following video:
C3-iii. Lac operon (review if you need it)
This is quite a simple overview- it will help you understand how blue-white selection depends on the genotype of the cells we use. They can either be I–, which means they don’t make any repressor, or I+. If they do make repressor, then we have to induce expression from the lac promoter by adding IPTG which is shaped very similarly to lactose and can remove the repressor from the operator. This video explains how the repressor controls expression. A pair of sisters make these videos – one is a science teacher and the other is a cartoonist. These are good quality, accurate videos that present complex materials in an accessible way.
C3-iv. Transformation efficiency: how good are my cells?
We calculate transformation efficiency as a measure of the success of the experiment. We express it as CFU/ μg vector. We do not factor in the amount of insert used, just the vector because only the vector will allow colonies to form. CFU means colony forming units and it is really just the number of colonies. The information we need in order to make the calculation is:
A. The amount of vector that was in the ligation. Suppose it was 100 ng, in a 10 μl reaction.
B. The proportion of the ligation we used to transform the cells. Suppose we used 2μl. That is 1/5 of the total ligation, so 20 ng of vector.
C. The total volume of transformation mix after the media is added to it, often 1000 μl (1 ml). So there is 20 ng of vector in the total volume of the transformation.
D. The amount of transformation mix that you plated. Say it was 100 μl. That is 1/10 of the total transformation and so represents 2 ng vector total.
E. The number of colonies you got. Suppose it was 50 colonies. So you got 50 colonies from the amount of vector in the cells you plated.
Your transformation efficiency is 50 colonies per 2 ng vector or 25 colonies per ng. But! the way of expressing it is: CFU/ μg vector. Therefore we have to convert. A ng is 1/1000 μg. So our transformation efficiency is 25,000 CFU/μg DNA. This is quite low but it is good enough. If we are doing a positive control, in my experience we generally get about 1 x 10⁷ to 1 x 10⁸ depending on the type of cells used and how rushed I am. If we are transforming a ligation with vector and insert we expect 10X to 100X lower transformation efficiency than the positive control.
You will be asked to calculate transformation efficiencies several times through the semester so ensure you understand how the calculations work. I’ve walked us through the steps to try to be clear about the thinking that accompanies the calculations. Here is an example for you to try.
- Suppose you set up a ligation reaction, with 100 ng of your insert and 50 ng of your vector. The total volume of the reaction was 20 μl. After the ligation is complete, you start the transformation by adding 3 μl of the ligation to 100 μl of competent cells.
2. After the heat shock and recovery, you add media to the cells to a total volume of 500 μl. You incubate at 37C with shaking for one hour and then plate a low density plate using 50 μl of the mixture.
3. You obtain 17 colonies on the low density plate, 6 blue and 11 white.
D. Plasmid Purification:
Once you have colonies, you generally want to make a prep of the plasmids in order to check that you have the intended construct, and to work further with the gene of interest. For both of the preps described below you begin by inoculating a liquid culture of media plus the appropriate antibiotic. You use a wire loop (or a pipette tip) and locate on the plate a colony that is well separated from others and the right type of colony, for instance a white colony if you’ve done blue-white selection. Sterilize the loop and touch it to the colony you’ve selected (**using sterile technique throughout – the bunsen burner is on, you are working close to the flame and you’ve cleaned the bench carefully and sterilized the loop in the flame). Just touch the colony to pick up a few cells; avoid trying to pick up the whole thing- the culture will overgrow if you do that. Then swish the loop in the tube of media and label the tube unambiguously. Even if you know what is in the tube someone else in the lab may not, so labeling is essential. Sterilize the loop again before returning it to its proper location. Alternatively we sometimes use a sterile pipette tip, touch it to the colony and then eject the tip into the tube, which again, is carefully labeled. The culture is grown for about 16 hours with vigorous shaking. Most commonly we grow at 37oC though some types of cells might grow best at a different temperature. For instance, the procedures for working with yeasts (Eukaryotes you can grow on a plate! Very useful!) are quite similar but you grow for three days at 30oC. The next day, your culture is ready to make your plasmid prep.
D-1. Alkaline lysis method
The alkaline lysis method takes advantage of the fact that most of the plasmid in a cell is in a supercoiled state – this conformation protects it from denaturation if the denaturing conditions do not proceed for too long. The bacterial chromosome is not protected from denaturation and so we are able to isolate plasmid DNA and leave the bacterial chromosomal DNA behind.
D1-i. Plasmid conformation
Plasmids exist naturally in a supercoiled state. Think of an elastic band that you hold tightly at both ends. Start to twist the elastic band and it begins to have a spiral appearance. But if you keep twisting it, the spiralled elastic starts spiralling around itself. It forms a very compact, super-twisted type of structure. If we run supercoiled plasmid in a gel, the supercoiled plasmid will run through the gel much faster than a linear plasmid of the exact same size. This is because the compact shape can navigate more easily through the mesh of the gel than the linear DNA. If a nick is made in the double helix of the plasmid’s DNA it can release all the supercoils of the plasmid. Now we have what is called a nicked circle. A nicked circle moves slower through a gel than the linear form of the same plasmid. I visualize it as a balloon trying to squeeze through the pores in the gel. This reminds me that it moves slower through the gel. When just one of the strands is broken, this is called a nick. If both DNA strands are broken this is called a break. Now the plasmid is linear. In this form, it migrates through the gel predictably, and we can easily determine its size by comparing to the DNA in our ladder. If you make a plasmid DNA preparation and run out a little of the DNA on the gel, you should see mostly the supercoiled form that is running well ahead of the linear form. You may see two faint bands, one that matches the linear length of the plasmid (this is broken DNA; and you hope not to see much of this) lags behind the linear piece (this is the nicked circle form). If you see a lot of the nicked circle or linear form it means you have not been gentle enough with your handling of the DNA during the preparation. Note that all three of these forms of plasmid are the same SIZE! If the plasmid is 3kb in length, then whether it is supercoiled or nicked or linear it is the same 3kb in length. What is different in these three forms of plasmid is the SHAPE. When we speak of conformation, that is what we are talking about.
Now that we understand about plasmid conformation, we’ll turn to the actual procedure.
D1-ii. Alkaline lysis procedure
In alkaline lysis, we spin down the cells that we’ve grown overnight and remove all the media. The media the cells were grown in contain buffers that keep the pH constant and the alkaline lysis procedure depends on rapid pH changes. Sometimes we even remove the media from the tube, re-suspend the cells in a bit of nuclease free water and spin them down again and remove all the fluid. This ensures that there is no media remaining among the cells.
We re-suspend the cells in a resuspension buffer. We may have to pipette up and down to get them to go into suspension, or even vortex briefly. Then we add a strongly alkaline solution. This breaks open the cells and exposes the contents to the alkaline conditions. The bacterial chromosome is vulnerable to denaturing. If we left the solution for a long time, the plasmids would denature too and all the DNA would come out of solution. But the plasmids are a bit protected by being supercoiled. They can resist denaturation for a short time and if they do begin to unwind they can renature quickly when the solution is neutralized. We let the denaturation (the alkaline lysis step) proceed for 3 or 4 minutes and then we add the neutralization solution which has acetic acid in it. The lab smells strongly of vinegar when we are doing lots of mini-preps. The rapid return of pH to neutrality or near neutrality causes a white, flaky precipitate to form in the solution. This contains cell components, including bits of the cell wall, with the bacterial chromosome attached- when the solution is rapidly neutralized, the strands of the bacterial chromosome don’t have time to find and base pair with the correct partners and so the DNA clumps out of solution. If we neutralized slowly, with lots of time for the chromosome to renature, we could not preferentially isolate plasmids. The preps are spun in the centrifuge, and the supernatant, with the plasmid in it is kept, while the pelleted material including the bacterial chromosome, is discarded.
You have several options now for isolating the plasmid DNA, but most labs do a column purification. The steps of the purification are the same as the column purification already described in Chapter 3. Phenol/chloroform extraction and alcohol precipitation is less expensive and usually gives higher yields.
D-2. Sphaeroplast method (based on size)
I have never used this method of plasmid isolation myself and I believe that most labs do alkaline lysis. However this method is still a possible option. It is more finicky than alkaline lysis in some ways.
The sphaeroplast method of plasmid purification relies on the much smaller size of plasmids compared to the bacterial chromosome. The cells are lysed in a solution that has high sucrose so that although the cell walls are disrupted, the cells sort of stay together, supported by the dense media. These are called sphaeroplasts. They are treated with a detergent like Triton-X-100 which lyses the cells. During this lysis, the bacterial chromosome is broken into large pieces. The bacterial chromosome has attachments to the inner membrane/cell wall – it doesn’t just float around in the cell – and after lysis, these attachments are maintained so long as the handling is gentle. Then the cells are centrifuged and when the pieces of cell wall and cell membrane are spun out, the bacterial DNA goes along with it due to being attached. The plasmids are left behind in solution – they are not attached to any other structures inside the cell, and their DNA is isolated either by phenol/chloroform extraction and alcohol precipitation, or column purification.
The final “lecture” recording briefly describes these two methods of plasmid purification, with special emphasis on plasmid conformation.
Click here to download the powerpoint slides for the following video:
