6 Polymerase Chain Reaction
Introduction
Polymerase chain reaction, or PCR, is one of the most ubiquitously used molecular biology techniques from forensics to evolutionary studies. It is a powerful technique that allows you to amplify- make many copies of – a specific sequence from a very tiny sample of DNA. This is why it has been so useful in forensics for example; a very tiny sample, like a hair follicle or tiny drop of blood contains very little DNA but PCR allows amplification of billions of copies of a desired sequence from that tiny sample. The specificity of PCR comes from the primers, short segments of DNA that we design to target the DNA sequence we are interested in. The technique is very powerful; consider the human genome as a book with 6 billion letters. We can design primers so specific that we can selectively make multiple copies of a paragraph of perhaps 500 letters from somewhere in that book.
Because of the sensitivity of PCR, it will amplify any target DNA sequence that is introduced into the reaction, whether or not it is the intended template DNA. Because of this, being very careful and using appropriate controls is essential to good practice. You need to be sure that the DNA you amplify really comes from the template you intended to amplify and not a contaminant. In the case of PCR, the term “contaminant” means any DNA that is contaminating one of your reagents, your pipette or other equipment, and that can be recognized and amplified by your primers.
In this chapter, we’ll go through the basics of how PCR works and some tips for setting up the reactions and designing good primers. We’ll talk about altering the buffer and temperature to get the desired stringency; i.e. amplifying the product we want without amplifying other sequences. Finally we’ll touch very briefly on a few uses for PCR besides amplifying a piece of DNA to clone for further study. We’ll go into more detail on some of these in a later chapter.
Contents
Learning Outcomes
A. Basics of PCR
B. The practical aspects: Setting up a PCR reaction
B-1. Reaction components
B-2. How much template DNA?
B-3. Sample recipe and use of master mix
B-4. Primer considerations: what are you trying to amplify?
B-5. Stringency in PCR: getting the product you want
B5-i. Magnesium concentration
B5-ii. Annealing temperature
C-1. Positive control
C-2 Negative controls
D. Types of thermostable polymerases
E. Types of PCR
E-1. Gradient PCR
E-2. Touch Down PCR
E-3. qPCR
E-4. Primer modification
Learning Outcomes
- Explain exactly how the amplification of DNA works via PCR
- Given starting information, predict the number of molecules that would result from up to 5 rounds of amplification (we’ll do in lab)
- Identify the limiting factors in an amplification (i.e. those components that would stop the amplification if they ran out)
- Given the template information and the primer sequences, predict the expected product size.
- Distinguish between linear and exponential amplification
- Explain the effect of annealing temperature on product specificity
- Design primers for specific purposes as directed in bioinformatics assignments
A. Basics of PCR:
PCR is a powerful technique that allows researchers to make many copies of a gene or other sequence, so that they can work with the DNA. The key to PCR amplification is the DNA primers; these are short stretches of DNA that we have synthesized according to our specifications. Primers are generally about 18- 24 nucleotides in length. They are designed to recognize and bind (by complementary base pairing) to either side of the sequence you want to target. This means that in order to amplify a gene or other sequence, you would need to know the sequence of the gene, and nearby it on either side. There are ways to amplify unknown sequences, involving linkers and adaptors. We will talk about these in a later chapter.
So, primers are key to PCR; they determine what piece of DNA will be amplified. And the DNA template you provide has to be single-stranded in order for primers to bind to their target sequences. So the DNA is first denatured by heating it to 95oC. This breaks the hydrogen bonds between complementary nucleotides and makes the DNA single stranded. Then the temperature is lowered so that the small primers can bind to their complementary sequence on the template DNA. The temperature will vary but is often between 55oC and 65oC. Then the temperature is raised to 72oC (though in some reactions, I have seen 68oC used). At this temperature the thermostable DNA polymerase is highly active and will add nucleotides to the 3′ OH groups of the primers, building a strand of DNA that is complementary to the template. Then the reaction temperature is raised to 95oC again, and the process repeats. These cycles of denaturing, annealing and extension (sometimes also called elongation) are repeated between 25 and 35 times (it can be more or fewer cycles for some types of PCR, too). During this time, there is exponential amplification (replication) of the sequence between the two primers and including the primers, as they are the base upon which the new strands are built. After the first few rounds of amplification, the product molecules begin to outnumber the original template and every product molecule synthesized in one round of PCR can serve as a template for the next round. This is why the amplification is exponential.
The following video shows a summary of PCR. It shows the difference between linear and exponential amplification very well. There is no narration, just some overly dramatic music- if you find the music annoying just mute it – you won’t miss anything. Pay careful attention to where the primers are binding and the sizes of the resulting DNA strands. In which cycle do we start to generate double stranded target DNA?
The discovery and use of thermostable DNA polymerases, such as Taq polymerase, made PCR practical to perform; prior to that many rounds of DNA synthesis could be performed only by adding more DNA polymerase I during each round as it would be killed (i.e. inactivated) by the denaturation step of each new cycle. And there were no thermocyclers (machines that automatically switch temperatures according to a program) to begin with, so the researcher would plunge the tubes with the reactions into water baths of different temperatures for 30 cycles. This was highly impractical.
A typical PCR program might look something like this:
95oC for 2 min (this is a beginning step to denature the template DNA
25-35 cycles of:
- 95oC for 30sec
- 55oC for 30 sec (or whatever temperature selected for annealing; most commonly 55oC-60oC)
- 72oC for 30 sec
72oC for 5 min
(Click here to download the powerpoint slides for the video below)
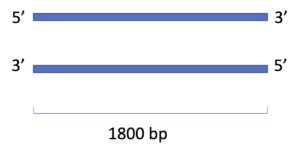
To test yourself on the amplification process, use this image. It shows a single molecule (2 strands) of DNA that is the starting material of the PCR. At time =0 these two strands are the only DNA molecules (except primers) in the tube. The forward primer binds 50 bp from the left edge of its template strand and the reverse primer binds 200 bp from the right edge of its template strand.
Make note of the size of the template and positions of the primers during amplification- it will be much easier to understand and figure out if you draw it. Doing this will help prepare you for the lab worksheet on this topic. Here is a question about the early stage of amplification.
B. The practical aspects: Setting up a PCR reaction:
B-1. Reaction components
The components of a PCR reaction are pretty much what you would expect to need in order to synthesize DNA. You must have the template DNA you are using, and you must have the primers to recognize the target sequence on the template DNA. To build DNA strands you must also have dNTPs, deoxyribonucleotides. Nucleotides and primers are added to the reaction in HUGE excess. That is because they are depleted as the PCR proceeds. Every cycle, a large number of primers have nucleotides added to their 3′ OHs and they are now unavailable to build more DNA. So we don’t want these building blocks of the product to run out.
We also need the DNA polymerase, to catalyze the formation of phosphodiester bonds between the nucleotides of the new DNA strand. There are several choices of enzyme, though Taq polymerase was the first used and it is still commonly used in many labs. Taq was isolated from the bacterium, Thermus aquaticus, a thermophile living in hot springs in Yellowstone National Park, in the United States.
We’ll discuss some alternative enzyme choices a bit further on.
Finally, a buffer is required that provides the right salt concentration and pH for the enzyme. This buffer has some MgCl2 in it; Mg2+ cations are important in PCR for two reasons. They stabilize the DNA double helix, so promote primer:template binding, and they serve as cofactors for the polymerase. Mg2+ concentration can be an important consideration for stringency, as will be discussed in more detail below.
Depending on what type of template you are using, the amount added to the reaction varies. For genomic DNA we can generally use 25 – 100 ng, although with more sensitive enzymes and optimized conditions you can sometimes use even less. Consider that each full copy of the genome of a diploid organism, containing thousands of genes, has only 2 targets for your primers ideally. So quite a bit of DNA (relatively speaking) is needed to provide enough target sequences for the reaction to get started. In theory a single target sequence in the reaction tube should be able to amplify billions of copies of the product but in practice we use more than that!
If you have made cDNA you would probably use about the same amount of DNA in your PCR as for genomic DNA, or a bit less. It depends on whether the gene you are trying to amplify is highly expressed in the tissue you used, or expressed very weakly. In the former case we might expect many of the cDNA first strands to be targets for your primers, so a smaller amount of starting template would still have many target sites. If it is expressed very weakly then we would probably use the same amount of cDNA as gDNA, because within the large sample of first strands, only a very few would be targets for the primers.
If we are amplifying from a plasmid DNA prep, then we use much less than 100 ng of DNA. There are many many plasmids in even a femtogram of DNA and every one has the sequence that your primers will recognize. A common mistake is using too much plasmid DNA as a template and getting no product. This is because there is so much plasmid in the reaction that the products never become template and the reaction does not “go exponential”. We call this linear amplification; you will do a short exercise in the lab to help you understand the difference between linear and exponential amplification. [In short, when we have linear amplification we have a certain number of molecules added each cycle. So 10 new strands each cycle. When amplification is exponential, it is doubling each cycle so every cycle twice as many- or more in the case of PCR – new strands are added. ] I once used 100 ng of a plasmid prep for PCR and saw no product at all on the gel. When I repeated the PCR with just 1 ng of template, I got a lot of product. It is counterintuitive but important to keep in mind.
B-3. Sample recipe and use of master mix
A typical recipe for a PCR reaction would be something like this:
- Template DNA (25-100ng/μl)——–1 μl
- 10X PCR buffer (contains MgCl2)—-2.5 μl
- dNTPs (10 mM)——————–2.5 μl
- Forward primer (10μM) ————0.5 μl
- Reverse primer (10μM)————-0.5 μl
- Taq polymerase (5U/μl)————0.5 μl
- ddH20—————————-17.5 μl
Total volume: 25 μl
The volume of template DNA added might vary; suppose your concentration was only 10 ng/μl. In that case you would add between 2.5 and 4 μl of template. Then you would decrease the amount of water added, to keep the total volume at 25 μl. If your nucleotide mix is more concentrated, you would add less and then increase the amount of water to keep the total volume constant. When you buy enzyme and buffer, it comes with suggested protocols (which we sometimes refer to as recipes) which are a good starting point, although the lab you work in will often have already determined the best protocol to use for their particular work.
Notice that in the above recipe, there are some very small volumes. In general it is difficult to pipette very tiny volumes. For this and other reasons, it is common to make a master mix for PCR. We combine larger volumes of all the common ingredients to multiple PCR reactions, mix it well, and then pipette some of this mix into multiple PCR tubes. Then we add the reagents that are unique to each reaction. This approach accomplishes two things. First it means you don’t have to try to get 0.5 of enzyme or primer into each PCR reaction. It is easy to make a mistake and end up leaving out an essential component of the reaction. The second benefit is that if there is a contamination in one of your reagents, or something has been left out of the mix, you can sometimes determine which reagent is contaminated or missing. So the use of a master mix can help with troubleshooting.
Here is an example. Suppose you wanted to test the DNA of 5 different patients with a set of primers to detect a virus. To make a master mix, you would take the recipe above, and multiply the common components by 8. Why 8? You have 5 patients, each of which needs a separate reaction. You also have a positive and a negative control (see discussion of controls below) and you need to add one extra reaction’s volume to account for pipetting errors.
Here is what the calculations would look like: You are using the same recipe as above and the only component that differs between the reactions is the template you add.
- Template DNA (25-100ng/μl)——–1 μl [LEAVE OUT OF CALCULATION]
- 10X PCR buffer (contains MgCl2)—-2.5 μl [x8 = 20 ul]
- dNTPs (10 mM)——————–2.5 μl [x8 = 20 ul]
- Forward primer (10μM) ————0.5 μl [x8 = 4 ul]
- Reverse primer (10μM)————-0.5 μl [x8 = 4 ul]
- Taq polymerase (5U/μl)————0.5 μl [x8 = 4 ul]
- ddH20—————————-17.5 μl [x8 = 140 ul]
Total volume: 192 μl
Mix well to ensure that all components are evenly distributed. Pipette 24 μl into each of the 7 PCR tubes, properly labeled, and to each of the patient’s reactions add 1 μl of their DNA template. To the negative control (see part C) add 1 μl of ddH20, and to the positive control add the template you use for that control, 1 μl. You can do the arithmetic and you might think there would be a lot of master mix left over but actually it is usually just enough. Small amounts of liquid transfer on the outside of the pipette tip as well as the inside, which means you transfer a little more than you intend to each tube. That is why we add one extra reaction in the calculations. Alternatively we can add 10% extra.
If you intend to PCR amplify multiple DNA samples with the same set of primers, or test one DNA sample with several different primer pairs, or test multiple templates with multiple primer pairs, it is standard practice to use a master mix. Currently many manufacturers offer their PCR polymerases in kits that include a 2X master mix. This is the case for our lab as well. The mix contains buffer, nucleotides, enzyme, MgCl2 and water. If you are setting up PCRs with total volume 25 μl you use 12.5 μl of the master mix and then add DNA, primers and water to each reaction to bring the volume to 25 μl. Some kits also offer the master mix with a small amount of dye in it, so that the PCR products can be run on a gel immediately after amplification. This is really convenient.
B-4. Primer considerations: what are you trying to amplify?
We have been talking a lot about primers but we haven’t said much about their characteristics yet. When we design primers, what features should they have?
In part, this depends on what you are trying to amplify. Usually we want to amplify just one particular sequence. In this case, we must ensure that the primer sequences we use are unique. If your primer can recognize many targets in the genome, you will amplify many of the wrong bands. You can do a BLAST search with your primer sequence to check that it only aligns with one target site in the genome of your research organism (https://blast.ncbi.nlm.nih.gov/Blast.cgi).
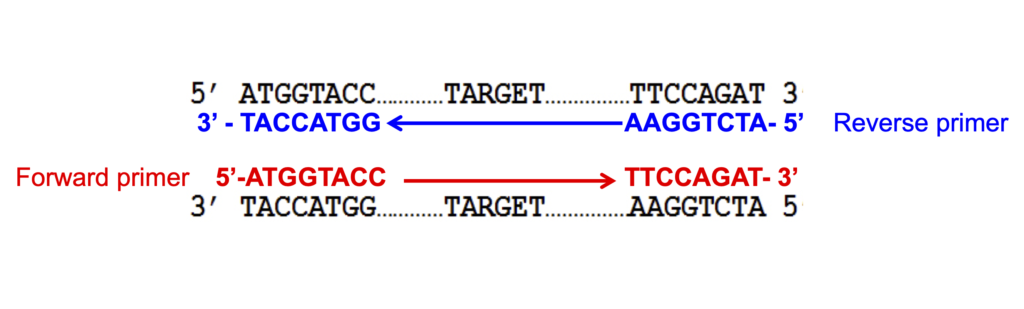
The primers must be complementary to the sequences they target. If you think about a double stranded DNA molecule that you want to amplify, the forward primer will have the same sequence as the upper strand and will bind (be complementary to) to the lower strand. The reverse primer will have the same sequence as the lower strand and will be complementary to the upper strand. This is show in the image below. Notice the sequence of the forward and reverse primers and how they relate to the target DNA sequence.
 Sometimes though, you may want to amplify a set of related sequences. For instance suppose you were studying a newly discovered organism and you wanted to amplify all the genes in a certain family from this organism. In that case you want to target your primers to the sequences that you know are conserved between different members of the family in other organisms. This would increase your chances of amplifying all members of the gene family from the new organism. There are other ways to make primers with some redundancy using inosine and/or incorporating some variability of sequence into your primer. If you are interested in this, you can ask me.
Your primers should be about 18-24 nucleotides (nt) long. We sometimes use longer primers for certain applications but it is usually not a good idea to have very long primers. 18-24 nt is fairly standard. It is also important that the Tm, the melting temperature, of the primers are similar to each other; within a few degrees Celsius. The relationship between temperature and the annealing of primers to a target sequence is a sigmoidal curve, and as the temperature increases, more and more hydrogen bonds are required to keep the two pieces of DNA bound to each other. The melting temperature, Tm, is defined as the temperature at which 50% of the primers will be bound to the template and 50% will not. At lower temperatures, more primers will bind to the template. As the temperature gets lower, the chance of the primers annealing to sequences that are not perfect matches will increase. This can cause artifact products to be amplified. As the temperature increases beyond the Tm, fewer and fewer primers are able to bind the template until finally none can.
So how do we know what annealing temperature to use? For many thermostable polymerases, you choose an annealing temperature 2-5oC below the Tm. If there is a large difference in the Tms of the two primers, then you make the annealing temperature 2-5oC below the higher of the Tms, though some people strongly recommend using 2-5oC below the average of the Tms. I never choose primer pairs with more than a 1oC different in Tm so this has not been an issue I’ve had to grapple with. When we design primers we want the Tms to be fairly close, precisely so that this type of problem doesn’t occur. If one Tm is much higher than the other, you have to use the lower Tm to ensure you’ll get enough of that primer binding to the template but at that lower temperature, the other primer can bind non-specifically leading to unwanted artifacts.
If primers are fairly short you can make a rough estimate of the Tm by taking the number of Gs and Cs in the sequence and multiplying by 4oC and the number of As and Ts and multiplying by 2oC. This estimate is based on the idea that it takes 2oC to break the hydrogen bonds between one A-T pair and 4oC to break the hydrogen bonds between a G-C pair. For short primers, this is a fairly accurate way to calculate the Tm. But for longer primers, calculating the actual Tm is a bit more complex than that because the position of the nucleotides in the primer makes a difference. Several G-C pairs in a row might somewhat increase the Tm, while runs of A-T pairs could lower it.
Some of the newer, high fidelity and fast enzymes require annealing conditions a few degrees ABOVE the Tm. So it is important to check the information that comes with the enzyme.
B-5. Stringency in PCR: getting the product you want
Stringency in a PCR reaction requires that the conditions are adjusted so that only a perfect match between the primers and the template will be tolerated. If the conditions are too stringent we will not get any detectable product because there will not be enough primers that can bind the target DNA and make the product. If the conditions are not stringent enough, we can amplify artifacts, products that are not the intended one.
Having a reasonable amount of template, as already discussed above, is important, because too little template has the effect of increasing the stringency, and having too much can promote interactions between primers and target sequences that are similar but not identical to the intended target sequence. This is a concentration effect which results in lowered stringency. I have never had artifact bands result from using too much template, so I believe you really have to have a large excess for this to occur. I have certainly had colleagues talk about this issue, so it definitely can happen.
Other factors that have a strong effect on stringency are: the concentration of MgCl2 in the buffer and the annealing temperature used in the cycles.
B5-i. Magnesium concentration
Magnesium cations are a required cofactor for DNA polymerases, therefore leaving this out of the reaction can result in no product due to insufficient activity of the polymerase. Mg+2 ions also stabilize double stranded DNA, in this case stabilizing the template:primer binding. This helps promote the synthesis of the desired product. In some cases, for a particular template and set of primers a slightly higher or lower magnesium concentration might be best; it is sometimes necessary to determine the optimal conditions empirically (that means by testing multiple concentrations and determining which is the best; a form of trial and error). Taq and other polymerases are often provided with a buffer without MgCl2, one with a standard concentration of MgCl2 and a tube of MgCl2 that can be used to make a buffer with a non-standard magnesium concentration.
Optimization is necessary because a concentration of Mg+2 that is too low can lead to little or no product, but a concentration that is too high can “over-stabilize” the interaction between the DNA template and the primers. If this happens the primers can bind to the wrong target sequences and potentially amplify artifact products. If the magnesium concentration is too high, the annealing temperature too low, or both, the primers are able to bind to sequences in the template that are similar to your target sequence. A few mismatches at either the 5′ end of the primer or somewhere in the middle may still allow amplification to proceed. If this happens, you now have your primer sequence attached to the wrong product sequence. And in the next PCR cycle these products can act as a template for the primers, leading to amplification of the artifact band.
Artifact bands may also result from contaminating DNA template. In that case, appropriate controls can help you detect a contaminant and good lab practice will help you avoid contamination. See section C, below, where controls are discussed.
B5-ii. Annealing temperature
As already discussed, the annealing temperature must be chosen so that the primers can only bind the intended targets. If the annealing temperature is too high, the primers can only bind the intended target but not enough of them are able to bind it, giving little or no product. If the temperature is too low, many primers can bind the target sequences but they can also bind other sequences that are similar to the target sequence but not identical to it. The lowered temperature allows for some mismatches between the primer and target sequence. Once the primers have extended a little (new DNA from the wrong target sequence is added to them) they become template for the wrong sequence to be amplified. If the artifact product is smaller than the intended product, you may see much more of the wrong product than the right one when you run a gel. This is because smaller products are favoured in the PCR reaction – they can be completed faster so more can be made in the same time. Suppose the enzyme can add 1,000 nucleotides per 30 sec. That means that it can make twice as many 500 nt pieces than 1000 nt pieces in the same time. Polymerases are remarkably fast; there are some now that can add 1,000 nt per 10 seconds. Imagine 1000 phosphodiester bonds being made in 10 seconds.
A good way to avoid artifacts is to be careful in setting up the PCR reactions- these should be kept on ice at all times. Even if false priming (primers binding to the wrong DNA sequences) occurs, the enzyme is not able to extend the primers, because of the low temperature. Watch for this in the simulations and even some videos and you will probably see this SERIOUS MISTAKE occasionally. The tubes should not be held in your hand; at 37oC, this is the perfect temperature for primers to bind to the wrong sequence. If they extend even a little bit, you might easily see artifacts in the PCR.
I bring my PCR reactions to the PCR machine in the ice bucket and begin the cycles before loading the tubes into the machine. When it reaches 80oC I pause the machine and load in the tubes. Then I start the cycles again. From this point, the temperature will not drop below the optimal annealing temperature, so that there should be no non-specific annealing of primers to template. There are more sophisticated ways to deal with annealing temperature (see touch down PCR, below)
(Click here to download the powerpoint slides for the video below)
C. Use of controls:
PCR is used for a variety of purposes. These can range from amplifying DNA from evidence at crime scenes to testing food samples for the presence of pathogens. If we are using the presence or the absence of a PCR product as a diagnostic, as in the latter case, we need to be sure that our results are meaningful. Suppose we are testing some food for evidence of Salmonella bacteria, and we see a band in every sample. Does this mean all of the samples contain the bacteria or is it possible there is some bacterial DNA contamination in our water or on one of our pipettes? Suppose we see that all samples show no PCR product. Can we be sure that the food is free of bacteria or is it possible we made a mistake in pipetting – leaving out a primer, say. Or maybe we set the PCR machine incorrectly and the annealing conditions were wrong. When we’re testing food for dangerous contaminants, or diagnosing medical conditions as in the PCR test for COVID 19, we need to be able to trust that the results mean what we think they mean. The negative result needs to be correct and not the result of a mistake. The positive result needs to be correct and not the result of contaminants in our equipment or reagents. To be able to trust the results we get, we typically perform both positive and negative controls. Each of these helps us be more confident in our PCR results.
C-1. Positive control
A positive control is set up so that when we see a negative result in our PCR we can trust it. The positive control includes all the same reagents as the experimental PCRs we are setting up, and it includes a known template and primers that reliably generate a band of a known size under the conditions of our PCR experiment. In other words, it works under the same PCR cycles, especially annealing temperature.
As we are usually using a master mix in such experiments, it means setting up one additional reaction with the same master mix but with the template that we know should give us a band.
If our positive control has worked in the PCR but some of our experimental PCRs did not amplify a band, we can feel more confident that the lack of a band is meaningful- in the case of diagnosing an illness, for instance, it would mean the person did not have the illness. To account for possible pipetting errors like accidentally failing to correctly add the template for this person’s PCR we might perform two or three replicates. It is very unlikely you would make the same slip in all the replicates.
C-2. Negative controls
Negative controls are used for detecting (not preventing) contamination. If the negative control works, we can trust that the products we’ve amplified are meaningful. So in the above example, if we are using PCR to determine if patients had a certain virus or bacterial infection, if we see a PCR product for several samples, we want to be sure that the band we’re seeing on the gel is from that patient’s sample and not a contaminant in our reagents or equipment. In this case we set up another additional reaction, using the same master mix, which has the same enzyme, primers, buffer, dNTPs and water, but to which we do not add any template. In this case we should not see any product at all because we have provided no template. If we don’t see a band in the negative control (on a gel of course) then we can trust the other results. If we DO see a band in the negative control, then we cannot trust bands we see in the PCRs of the patients’ samples. The reagents must be discarded, the equipment cleaned, and new reactions have to be run.
There is another type of contamination that can happen when amplifying human DNA and that is contamination that occurs as the reactions are being set up, if for instance, a flake of the researcher’s skin falls into the tube. If the PCR was one where different people might generate bands of different sizes, such as for forensic work, then one strategy for detecting this type of contamination would be for the operator to routinely run a reaction containing their own DNA as a reference. This allows detection of the contamination as well.
(Click here to download the powerpoint slides for the video below)
D. Types of thermostable polymerases:
Polymerases used for PCR vary in their speed and accuracy. The speed of the enzyme affects yield- a faster enzyme will generate more product. It also determines the parameters of the program, specifically the extension time. You must know the speed of the enzyme in order to set an extension time long enough. Suppose for instance you were using an enzyme that could synthesize 1000 nt per 60 sec. Suppose also that you were expecting a product size of about 500 nt in your PCR. You would likely set the extension time at about 40 seconds, a little longer than you think it would take to make DNA pieces of 500 bp. But suppose the product size you expected was 1600 bp? Then if your PCR program still has a 40 sec extension time you won’t get any product. The enzyme won’t have enough time to make pieces of DNA that are that long. The key to avoiding this problem is knowing your enzyme and knowing the size of product you expect.
If you are doing a diagnostic PCR (i.e. looking for just the presence or absence of a band, for example if you are trying to detect a bacterial contaminant in a food sample) then you don’t need a proofreading enzyme- an occasional incorrect nucleotide does not affect your ability to determine whether or not the sample is contaminated. However if you are amplifying a sequence in order to make a construct which you will use to express a functional protein, it is important to use an accurate enzyme to ensure your product has the correct DNA sequence. Of course, you would not use your cloned construct until it had been sequenced to ensure it is correct. But it is most likely to be correct if you have used a proofreading enzyme. In general proofreading enzymes are slower because proofreading takes extra time. That means that the amount of product is usually less. In the past we used to have to decide if we wanted a lot of product that might have some errors, or less product that was more likely to be correct. However, today there are some very fast enzymes (1kb per 10 seconds!) that are also quite accurate.
Less accurate enzymes are still quite good; published error rates for Taq vary somewhat but are around 1 error in 104 bases per cycle. This means that for instance, for an amplicon (amplified product of PCR) of length 450 bp, after 30 cycles of amplification, around half of the molecules produced have the correct sequence. When the fidelity (accuracy) of other enzymes are described they are generally described in comparison to Taq. For many of the higher fidelity enzymes, at the end of 30 cycles, over 90% of the molecules produced have the correct sequence. This link from NEB (New England Biolabs), allows you to check the fidelity of a variety of different enzymes.
E. Types of PCR:
E-1. Gradient PCR
Gradient PCR requires a special thermocycler that allows the annealing temperature and also the cycling times to differ in different parts of the machine. You set up a test PCR, and it is a large volume, which you then divide between several tubes. Each of these is cycled in the machine using a different annealing temperature and this allows you to determine which temperature gives the best yield and no visible artifacts.
E-2. Touch Down PCR
Touch down PCR is used to prevent background/artifact bands. In this case the machine begins the cycling program using an annealing temperature that is definitely too high and every few cycles the annealing temperature is dropped a little bit. This means that during the beginning stages of amplification the conditions have the highest possible stringency. Artifact bands cannot form because the annealing temperature does not go low enough for false priming until the tube is already full of a lot of molecules that are the correct ones. These act as the template for additional cycles of amplification.
Sometimes artifacts cannot be avoided. In that case you may be able to gel purify your PCR product. It must be cut out of the gel and then the band treated to dissolve or melt the agarose into a buffer. DNA can be isolated from that band through phenol/chloroform extraction followed by ethanol precipitation. Alternatively, a column can be used to isolate the DNA with a procedure much like the column procedure described in Chapter 3. When you digest some DNA and it generates multiple bands, only one of which you want to clone, you can use the same approach.
(Click here to download the powerpoint slides for the video below)
E-3. qPCR
qPCR is a quantitative method that allows you to compare copy number of a target sequence to a set of standards and/or assess how highly expressed a certain gene is in a certain tissue. It involves monitoring the PCR reaction as it proceeds and determining when the amount of product that has been made passes a certain threshold. It requires robust controls. It will be discussed in more detail in the chapter covering qPCR and RNA-seq.
E-4. Primer modification
PCR primers can be modified for many purposes: you can include extra sequences on the 5′ ends of your primers to aid in cloning, which we’ll cover in a lot more detail later. Some of your bioinformatics assignments will make use of these modifications- for instance adding the DNA sequence of a restriction enzyme site onto the primer. Then you can cut your PCR product with the restriction enzyme and create sticky ends that can be used to clone your product into a plasmid, for instance. You can also use PCR to make mutations in your gene of interest to find out which parts of the gene are essential for its function, or sometimes to modify the function of the protein product. This topic is also covered in more detail in a later chapter.
Previous (Chapter 4)Next (Chapter 6)
A technique exploiting the ability of DNA polymerase to form new DNA strands complementary to the sample DNA strand to make billions of copies of a particular region of the sample DNA in vitro.
A defined set of conditions, including temperature, pH, ionic strength and the presence of formamide and urea, that promote or prevent hybridization between nucleic acids. It determines the likelihood that two DNA strands will associate with each other through complementary base pairing between the bases. A reduction in stringency increases the incidences of non-specific hybridization.
Short, single stranded DNA sequence with a free 3'-OH group terminus base-paired to a template DNA strand that enable the addition of successive nucleotides through polymerase reaction; also, in a polymerase chain reaction, a pair of primers hybridize to a sample DNA strand to delimit a region of DNA to be amplified.
