16 CRISPR project
Introduction
Here you will find information on the CRISPR project we will do in the lab, including important background information, and the procedures we will do in the lab.
Contents
CRISPR stands for Clustered Regularly Interspaced Short Palindromic Repeats. It was initially discovered in bacteria, functioning as is a naturally-occurring genome editing system used for defense against viral infection. When a virus infects a bacterium, a piece of the viral DNA is incorporated into the bacterial genome in a CRISPR locus. When the same virus tries to infect the bacterium again, the CRISPR/Cas9 locus is transcribed, producing tracrRNA, crRNA, and cas9. tracrRNA binds Cas9 and crRNA. crRNA hybridizes to complementary DNA, bringing Cas9 to the target region. cas9 then makes a double-stranded break in the phage DNA, inhibiting its activity and ability to replicate, therefore preventing infection.
In 2012, Dr. Jennifer Doudna and Dr. Emmanuelle Charpentier found that this system could be harnessed for use as a targeted gene editing tool in humans – a discovery that won them the 2020 Nobel prize in Chemistry. In their modified system, tracrRNA and crRNA are combined into sgRNA (single guiding RNA). Only two components are introduced into the cell: sgRNA, designed complementarily to the region of DNA you want to modify, and a gene for the Cas9 protein. The sgRNA binds Cas9, then binds to the target region, where Cas9 induces a double-stranded break. Once cut, the DNA can be repaired via non-homologous end joining or homologous repair.
Why is CRISPR important?
The CRISPR/Cas9 system marked a massive advance in gene editing technology due to its ability to target DNA in a relatively easy manner. Its uses are widespread – with CRISPR, you can perform gene knockouts, knock-downs, base editing, screens, and more. The advancement has had significant real-life effects as well, with applications in gene therapies, diagnostics, agriculture, and bioenergy fields to name a few. For example, in 2019 researchers developed a cancer therapy in which the patient’s own immune cells were modified with CRISPR to better attack cancerous cells. In clinical trials, the treatment was able to temporarily stop tumour growth in two of the three patients.
What is this project?
With this lab project, you are joining an international effort to diminish the impacts of climate change on the agricultural sector. In recent decades, the demand for food has grown alongside the global population. Unfortunately, the global food supply is struggling to keep up. Crop yields are increasing less and less each year, which in turn drives food prices up and promotes food insecurity worldwide. One of several reasons for this reduction in yield is climate change’s impact on photosynthesis. The enzyme RUBISCO is critical to this process. During photosynthesis, RUBISCO catalyzes the fixation of atmospheric CO2. This kicks off the Calvin Cycle, and leads to the eventual production of sugars that the plant can use as energy. RUBISCO can also fix O2 . When this happens, it triggers photorespiration instead of photosynthesis. Whereas photosynthesis generates sugar, photorespiration doesn’t. In fact, it even causes the plant to lose CO2. The issue brought on by climate change is that at high temperatures, RUBISCO is more likely to bind O2 over CO2.
Most plants perform C3 photosynthesis. The C3 mechanism provides no method for preventing photorespiration, meaning climate change significantly reduces the plants’ photosynthetic efficiency and their ability to grow. Some plants, however, perform C4 photosynthesis. C4 plants have adapted their photosynthetic mechanism to minimize photorespiration, making them more tolerant to high temperatures. This has sparked an international effort to generically engineer C3 rice that can perform C4 photosynthesis. Through the analysis of various C4 plants at various stages of C4 development, researchers have determined certain physical changes that seem to be required for the natural evolution of C4 photosynthesis. One of these traits, which is the focus of our project, is an increase in vein density of C4 plants.
In his lab, SFU professor Jim Mattsson is trying to identify which genes are responsible for increased vein density in the C4 plant Setaria italica by performing CRISPR-mediated gene knockouts. The idea is that if a gene knockout results in decreased vein density, that gene’s normal function must be to increase vein density. While we don’t know what these genes are yet, we do know that auxin, a plant hormone, plays a role in vein development. This is where you come in! During this project, each lab group will be designing a CRISPR construct that targets genes believed to play a role in auxin synthesis, transport, receptors, or response. At the end of the project, your constructs will be sent for sequencing and successfully edited constructs will be sent to Dr. Mattsson for use in his lab.
1. The Starting Blocks
We will be using the vector pRGEB32 for this project. Note that this vector contains a gene for resistance to the antibiotic Kanamycin, marked by a green arrow labelled “Kan” in the diagram below. Over the course of this lab project, you will design an insert, cut the vector open using the BsaI sites depicted below, and ligate your insert into the now open space. Then, you will transform the entire construct into a strain of E. coli cells. Whereas pRGEB32 has resistance to Kanamycin, the E. coli cells’ DNA does not. You will plate your transformation reaction on Kanamycin. Only successfully transformed cells will survive, which we will then analyze to determine whether you and your partner generated a successful construct.

Image from https://www.addgene.org/63142/
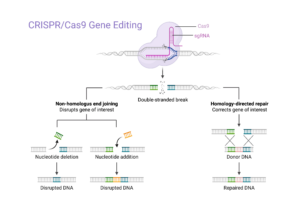
The above image gives a general overview of different ways the CRISPR/Cas9 system can be used to edit genes, and the different outcomes that are possible to achieve with it. You will be designing sgRNA that Dr. Mattsson can use in his lab to target the Setaria italica gene assigned to you. We suspect these genes of being linked to vein density. When they are knocked out or disrupted, the outcome (i.e. phenotype) shown by the edited plants can give us a better idea of whether or not our suspicions are correct. If knocking out the gene results in little to no vein formation, that gene is likely responsible for increasing vein formation. If knocking it out has no effect on vein formation, it is likely unrelated.
2. Oligo annealing
The purpose of this step is to anneal the single-stranded oligonucleotides that you designed into double-stranded DNA fragments that have 5′ overhangs (sticky ends) that are complementary to the vector we want to ligate them into.
2.1 Procedure
1. Combine your powdery oligo samples with TE to create a 100 μM stock solution, then dilute with nuclease-free water to create a 10 μM, then 1 μM solution.
- Although we only need a 1 μM working solution, we make the stock solution 100 μM because oligos are more stable at high concentrations
- We are storing the 100 μM and 10 μM solutions. Now, if you make a mistake at some point during this lab project, you can restart from the beginning using a dilution of your stored materials
2. To a microcentrifuge tube, add ddH2O, equal molar amounts of your forward and reverse oligos, and the annealing buffer, which contains:
- Tris, pH 8: the basic pH protects DNA from hydrolysis
- NaCl: salt helps hydrogen bonds form, meaning [salt] determines the efficiency of your reaction!
- EDTA: protects nucleic acid degradation by sequestering the metal ions needed for nucleases to function
3. Run the reaction in the thermocycler. The contents will be at 95°C for 5 minutes, then cooled to 25°C at a rate of 1°C per minute.
- Heating the solution at 95°C breaks pre-existing hydrogen bonds
- Cooling it to 25°C lets the oligos find and bind their complementary sequences
2.2 Helpful hints
- The reaction requires 10 pmol of each oligo. Before lab begins, determine how many μL that is equal to.
- Recall: your working solution is 1 μM
- You MUST label each of your solutions with your gene number, the concentration, and whether it’s the F or R oligo
- Be very careful not to contaminate your samples with foreign DNA as this will create issues in future labs
- Review the diagram below to make sure you understand what your oligos will look like before and after annealing. Consider the following:
- In what orientation will the forward and reverse oligos be when they are annealed to one another?
- Are there overhangs? If yes, are they 5′ or 3′? What are their sequences?
2.3 Diagram

2.4 Practice
3. Vector Digest + Column Purification
The purpose of the vector digest is to digest the cloning vector pRGEB32 using the restriction enzyme BsaI-HFTM, generating sticky ends whose overhangs are complementary to the overhangs on your annealed oligos. The purpose of the column purification is to remove the vector fragments generated during digestion to prevent the vector from re-closing. Note: this step will usually be done for you by the professor to save time, but you are still expected to know and understand the process.
3.1 Procedure
1. Mix dd H2O, CutSmart buffer, BsaI-HFTM, and pRGEB32
2. Incubate at 37ºC overnight
- 37ºC is the optimal temperature for BsaI-HFTM function
- During this incubation, BsaI will cut pRGEB32 at its recognition site
3. The next morning, add more BsaI-HFTM and incubate at 37ºC for 2 hours, then 65ºC for 20 minutes
- Doing this extra “mini-digestion” ensures all the plasmid are cut properly
- Incubation at 37ºC allows for BsaI-HFTM to work efficiently
- Incubation at 65ºC inactivates BsaI-HFTM, stopping the digestion
4. Column purify the digested vector. Elute with elution buffer, then measure the concentration using NanoDrop.
- In this step, the fragments that were cut out of the vector during digest are removed from the solution
- This prevents the fragments from ligating back into the vectors and allowing them to close (think: why is this bad?)
- We are now left with a solution of purified, digested (AKA linearized) pGREB32 plasmids with 5′ overhangs
3.2 Helpful hints
- BsaI is a type II restriction enzyme. It’s recognition sequence is GGTCTCN/NNNN (N=A,T,C or G)
- The vector we are using in this project, pRGEB32, has two BsaI sites, meaning it will be cut in two different locations
- Because of this, digestion generates two non-complementary overhangs on the vector – this prevents any self-ligation, or ligation of one digested pRGEB32 vector to another!
- Understand what the vector looks like before and after digestion. Use the diagrams to help
- BsaI has optimal efficiency at 37ºC, and is deactivated at 65ºC
3.3 Diagram

3.4 Practice
4. Ligation
The purpose of this step is to ligate your double-stranded annealed oligos into the digested and purified pGREB32 vector.
4.1 Procedure
1. To a microcentrifuge tube, add pGREB32, your oligo annealing reaction, nuclease-free water, T4 DNA ligase, and T4 buffer
- T4 DNA ligase: catalyzes the formation of a phosphodiester bond between 5′ phosphates and 3′ hydroxyl termini
- T4 buffer: contains Tris-HCl, MgCl2, ATP, and other components that help optimize enzymatic activity and maintain the structural integrity of the nucleic acids in the reaction
2. Incubate at room temperature for 1 hour, then store in the freezer
- Temperatures too high or low reduce enzymatic efficiency, so we perform the ligation at room temperature
4.2 Helpful hints
- You will need to add 40 ng of pGREB32 vector to your ligation reaction. Ensure you understand how to determine what amount of vector to add, in μL, depending on the concentration given to you by the professor
- Think about how your insert will ligate into the vector. What orientation will it be in?
- Test your understanding: if we wanted to insert our annealed oligos in the opposite orientation, what would you do differently?
4.3 Diagram

4.4 Practice
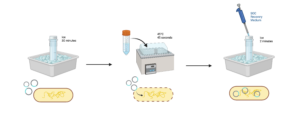
5. Transformation
The purpose of this step is to get our CRISPR constructs into competent Stellar cells.
5.1 Procedure
1. Incubate your ligation reaction at 70ºC for 15 minutes
- This kills the T4 DNA ligase
2. Gently combine the ligation reaction and competent cells. Incubate on ice for 30 minutes
- The competent cells are extremely fragile. If you are too rough, you can easily damage them (i.e. break them open)
- Incubating the cells on ice essentially lowers their defenses
3. Heat shock the tube at 45ºC for 45 seconds, then immediately place the tube on ice for 2 minutes
- During the heat shock the membrane fluidity of the Stellar cells rapidly increases, allowing for the uptake of your CRISPR constructs
- When the tube is back on ice, the membrane fluidity rapidly decreases, effectively ‘trapping’ the constructs inside
4. Add pre-warmed SOC medium, then incubate on a 37ºC shaker at 225 rpm for 1 hour
- SOC is a recovery medium that contains glucose
- Heat shock is a, for lack of better word, shock to the Stellar cells. Remember, they are fragile – providing nutrient-rich medium helps them survive the process and strengthen their membrane while they’re in the shaker
5.2 Helpful hints
- You will need to pre-chill a centrifuge tube on ice before getting competent cells. Do this as soon as you enter the lab!
- The safest way to gently combine your ligation reaction and cells is by swirling with a pipette tip. If you vortex or pipette up and down, you will break the cells
- Timing is everything – make sure you have a timer ready/set for each step of the heat shock and recovery process
- We are using competent Stellar cells, a strain of E. coli that has high transformation efficiency, for our transformations
- Heat shock is not the only transformation method. Think about the other methods for transforming competent cells, and why we might have chosen this one for our project
- We will select for transformants based on their ability to grow in the presence of kanamycin. Why is this possible?
5.3 Diagram
5.4 Practice
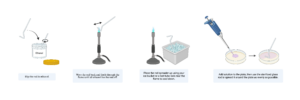
6. Plating
The purpose of this step is to select for transformants based on their ability to grow in kanamycin.
6.1 Procedure
IMPORTANT SAFETY NOTE: When using the bunsen burner to sterilize your glass rod, DO NOT wear gloves. Ethanol is highly flammable. If it drips onto your hand and you are wearing a glove, it can melt it onto your skin. Review lab safety protocols and equipment before coming to lab. Never leave your bunsen burner unattended. Before leaving, ensure all bunsen burners are off and all gas taps are closed.
1. Dip a bent glass rod into 70% ethanol, pass it through the flame to burn off the ethanol, then allow it to cool spreader-up in an ice rack
- This step must be performed without gloves on
- This process sterilizes the glass rod for plating, preventing contamination
- While the glass rod cools, keep it near the still-lit bunsen burner. This maintains a sterile field around the rod, further preventing contamination by anything that might be in the air
- Check to see whether your rod is cool enough by holding the back of your hand close to it without touching. If you accidentally touch the rod, redo this step as it is likely contaminated with your DNA
- Important: NEVER leave a lit flame unattended. Ensure your bunsen burner is off and your gas tap is closed before walking away from your bench
2. Add 20% of your total transformed cells to an LB selection plate containing kanamycin
- LB: stands for “luria broth”. It’s a nutrient-rich broth; when combined with agar it provides the bacteria with a nutrient-rich gel to grow on
- Kanamycin: lets us select for bacteria that have kanamycin resistance after plating. pGREB32 has kanamycin resistance whereas the Stellar cells do not; this means that only the bacteria that successfully took up a plasmid will be able to grow
- We only plate 20% of the transformed cells to ensure we don’t overcrowd the plate, as well as ensure that we have plenty of nutrients available for the bacteria to grow
3. Using the glass rod, spread until the entire surface is coated and the solution is absorbed into the plates
- The best practice is to begin spreading around the edges of the plate first. If you start with the center, the solution often absorbs into the plate too much by the time you try to spread it around the edges, making it very difficult to get an even coating
4. Place the plate upside-down in a 37ºC incubator overnight
- We incubate the plates upside down to prevent any condensation from dropping onto our samples. Condensation would interfere with the growth of the bacteria, possibly adding contamination as well
5. The next day, wrap the edge of the plate with parafilm and store it upside down in the fridge
- The parafilm prevents contamination of the plate by creating an airtight seal around it. It has the added benefit of preventing dehydration!
6.2 Helpful hints
- Make sure your glass rod has fully cooled down before you use it to spread anything. If you don’t, the rod may be hot enough to kill your transformed cells
- We are not using blue/white selection for this project. Why not?
- You need less parafilm than you think. Watch a demo video before coming into lab to understand how to use parafilm
6.3 Diagram
6.4 Practice
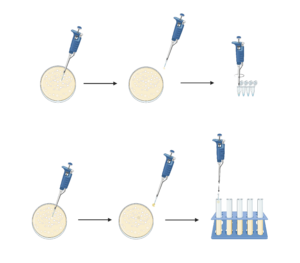
7. Colony PCR
The purpose of this step is to directly test bacterial colonies for presence of the desired construct.
7.1 Procedure
1. Make a mastermix containing the following:
- HIFI mastermix: we are using the HIFI Taq polymerase kit because it is a fast enzyme, which should allow us to complete the PCRs and gels by the end of the lab period.
- Forward oligo, vector-specific right primer: using one insert-specific and one vector-specific primer allows for us to selectively amplify our desired product only. If we used two vector-specific primers, we would obtain a PCR product from the vector regardless of whether or not it contained an insert, whether or not the insert was ligated in the correct orientation, or whether or not the insert it contained was the correct one
- Nuclease-free water: brings the mastermix to the correct concentration and amount; it is also nuclease-free which avoids DNA degradation by nucleases
2. Select 5 colonies from your plate and label them
- The colonies you select should be large, well-separated colonies
- To label them, circle and number each one from 1-5 with a permanent marker
3. Pick up a small amount of each colony by touching it with a pipette tip, then eject the tip into a tube with a corresponding label. Swirl, then carefully remove the tip
- Use the smallest pipette tip possible for this step. Once these samples have been evaluated, you will need the remainder of the colony in order to proceed with the next steps of the lab, so do not take the entirety of it
- It is to pre-label your tubes to avoid any confusion or mix-ups
4. Run a PCR – this step will be done by the prof.
- In this PCR, we are amplifying the DNA from your bacterial colonies so that there is enough in each sample to analyze with NanoDrop
5. Prepare an agarose gel with SYBR safe dye, then run your samples on the gel
- This gel will be done in groups. You will need to communicate with other members of your lab group/section about timing
- With this gel, you are looking to get a band representing the length of the digested pGREB32 vector plus the length of your insert. Determine what that length is before coming into lab so that you know what to expect
6. Choose up to 4 colonies with the best results. Touch each with a pipette tip, picking up the remainder of the colony. Eject the tip into the appropriately labelled culture tube, which contains LB and kanamycin. The tubes will be cultured overnight
- In this step, you can now pick up the remainder of the colonies. At the end of the lab, you will hopefully have 4 culture tubes containing colonies that are confirmed to contain your insert ligated in the desired orientation
- The culture tubes contain LB to provide nutrients for growth, and kanamycin which will ensure that any bacteria that lack kanamycin resistance (i.e. do not have the pGREB32 vector) are killed off
7.2 Helpful hints
- In this lab, you will be dealing with many tubes with similar contents. It is highly recommended that you review lab procedure before coming in and label all the tubes you will need before you begin any steps of the lab
- Before lab, ensure you know what “good” results look for – given the size of the plasmid and the size of the insert, what do you expect to see when you run the gel? What do you expect to see if the ligation was not successful, or the insert was ligated in the wrong orientation?
- Our PCR reaction will be performed with a lot of whole cells, which means there will be a lot of background bands/artifacts. As long as you see the correct band (about 280bp) in there, you’re ok
7.3 Diagram
7.4 Practice
8. Alkaline Lysis
The purpose of this step is to isolate the bacterial (Stellar) cells from each culture, then lyse them to expose and denature the nucleic acids within them.
8.1 Procedure
1. Centrifuge, decant, then micropipette any remaining liquid from each culture
- This step condenses all the bacterial cells into a pellet
- The bulk of the liquid media can be removed by dumping it out. Before moving on to the alkaline lysis, however, you must use a micropipette to remove all visible liquid
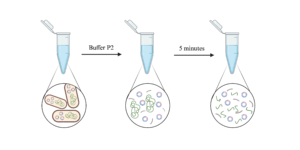
2. Re-suspend each pellet by adding Buffer P1 and slowly pipetting up and down
- Buffer P1 is the re-suspension solution containing RNase A
- RNase A: an endonuclease that specifically degrades single-stranded RNA. When the cells are lysed, RNase A will degrade the cellular RNA
3. Add Buffer P2, gently invert 4-6 times, then leave at room temperature for maximum 5 minutes
- Buffer P2: denaturing solution containing NaOH and SDS
- SDS: strong detergent. lyses the cells
- NaOH: breaks down the cell wall and disrupts hydrogen bonds between DNA bases (denaturation), turning dsDNA into ssDNA
- Different conformations of DNA have different levels of stability, which is why the denaturation step is central to this method of isolating our plasmids. Because stability varies, the rate and extent of denaturation does as well
- Plasmid DNA is circular and supercoiled, making it the most stable conformation and the least sensitive to denaturation. The other DNA in the solution, including the chromosomal bacterial DNA and any plasmids with breaks/nicks, are less stable, therefore sensitive to denaturation
- Max 5 minutes: while the plasmid DNA is the least sensitive to denaturation, that doesn’t mean it’s completely insensitive to it. If left too long, the plasmid DNA will also be denatured, meaning you will inadvertently remove it from your solution along with the rest of the denatured DNA. By limiting the amount of time the lysis and denaturation are allowed to proceed, we reduce this risk
8.2 Helpful hints
- Timing is very important with this step. Label tubes in advance so that you are prepared at each step of the lab. Ensure one person is carefully timing each step, and that you are prepared to continue onto the neutralization step as soon as the five minutes is up
- SDS and NaOH are fairly harsh reagents – be careful not to get it on your skin and change your gloves when needed
- We still want to be gentle with our solutions – bacterial cells and DNA are fragile!
8.3 Diagram
8.4 Practice
9. Neutralization
The purpose of this step is to stop the alkaline lysis of bacterial cells, then isolate and wash the vectors with our insert
9.1 Procedure
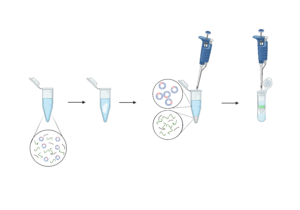
1. Add Buffer N3, then immediately and gently invert the tube 4-6 times
- Buffer N3: neutralization solution, contains guanidine hydrochloride and acetic acid. The solution should become cloudy immediately after you add this buffer.
- Acetic acid: reduces the alkalinity of the mixture – in other terms, neutralizes the lysate. When this occurs, bacterial DNA doesn’t have time to renature. Instead, it clumps together in large pieces. The plasmid DNA, however, will retain/regain its supercoiled configuration and remain dissolved in the solution
- Guanidine hydrochloride: in the next steps, we will be applying the plasmid-containing supernatant to a column. The addition of guanidine hydrochloride (a chaotropic salt) allows DNA to easily bind to the silica in the column
2. Spin for 10 minutes in the centrifuge
- This precipitates the bacterial DNA. Plasmid DNA will remain in the supernatant
3. Apply the supernatant to the center of a QIAprep column. Centrifuge, then discard the flow-through
- The column binds the plasmid DNA. The flow-through will contain any contaminants, including metabolites, proteins, and other cell debris, therefore can be discarded
4. Add Buffer PE, then centrifuge
- Buffer PE: wash buffer containing ethanol
- Ethanol: washes off any remaining contaminants from the solution (especially salts!) while keeping the DNA out of the solution and bound to the beads of the column
5. Place the column in a clean tube, then add EB and let it stand in the 70°C incubator. Centrifuge
- We use a clean tube for this step as the old one is contaminated with the flow-through from the wash steps. Using the dirty
- EB: elution buffer, contains Tris-Cl pH 8.5.
- Tris-Cl, pH 8.5: optimizes the pH for elution of DNA
- Incubating the tube and using pre-warmed elution buffer will increase the efficiency of the reaction and maximize the amount of plasmid DNA you obtain from your reactions
6. Run each sample on the NanoDrop, then record your results.
9.2 Helpful hints
- You will repeat the wash step several times to remove as much salt as possible. Why would having extra salt in our solution be an issue? How would you be able to tell when there was too much salt? What could you do to fix it?
- When applying the supernatant to the column, aim for the center of the column. If you apply it to the sides, you risk the solution dripping around it and bypassing the column entirely, meaning the DNA is not bound to the beads and you will obtain no product. You must also avoid touching the column itself with your micropipette, as this can disrupt your yield
- What solution will you use to zero the spec?
9.3 Diagram
9.4 Practice question
10. Sequencing
10.1 Procedure
1. Choose your 2 best colonies. Prep each of them for sequencing by adding 1 µg of DNA to each sample, then adding nuclease-free water to bring the total volume to 12.5 µL.
- Once you have completed this step, samples will be collected by the professor/TA
- We will add vector-specific primer, bringing the total volume to 15 µL
2. Samples will be sent off to be sequenced. Results will be sent to each group as soon as they are returned from the sequencing lab
10.2 Helpful hints
- You will be completing a sequencing report based on the results of your project. Start thinking about it now: if you were successful, what will the results look like? What will they look like if you were not? Where might you have gone wrong?
- You will be choosing your best colonies based on the NanoDrop reading. What determines a good vs. bad colony?
Tris-EDTA buffer: a buffer solution that protects DNA degradation by hydrolysis and nucleases
A very concentrated solution that would typically need to be diluted to a lower concentration for actual use.
The solution actually being used in a procedure. Can be a dilution of a more concentrated stock solution.