21 The GFP Project
Author: Esme Markey
Introduction
Welcome to the GFP project! In this project, we will be annealing the Green Fluorescent Protein (GFP) gene into the pBAD plasmid before transforming the whole construct into competent cells. The goal with this is to observe the cells that contain the plasmid with the correct insert by viewing the cells under a blacklight to see if they glow. This glowing demonstrates the presence of an inducible construct: the GFP gene. We will be able to turn on the expression of our GFP gene by adding the inducer, IPTG, which is responsible for inducing the operon of the gene we are inserting GFP into the middle of.
To accomplish this, we will be using the SLIC cloning method. The primary reason for using this method is that it allows us to achieve expression of the GFP gene in our competent cells by maintaining reading frame of the inserted gene. The reading frame from the Lac-Z gene in the plasmid must be continuous with the inserted GFP gene to observe correct expression within the cells. SLIC allows us to ensure this will be the case with specific primer design. In this chapter, we will review SLIC as a cloning process in the context of this project, discuss how to design primers, have a detailed look at the lab procedure and hopefully get you excited about SLIC and GFP cloning with some interesting facts.
A. Fun with GFP
GFP is one of the most interesting proteins to have been discovered and has been revolutionary to science in many ways. Since its discovery, scientists have found many amazing, and often beautiful, ways to use it. Let’s look at a couple of examples.
Here we have some beautiful images from a study by Geanette Lam and their team where they were studying the gene btl-GAL4 and its drivers throughout the development of the Drosophila trachea. They used GFP as their marker to track this protein and its expression throughout development, by essentially tagging the btl-GAL4 gene with a GFP gene insert. This means that any time the btl-GAL4 gene is expressed, the GFP gene will be transcribed with it. This results in a GFP tail on the end of the btl-GAL4 protein that will glow. You can really see here how GFP can make tracking gene expression easy!
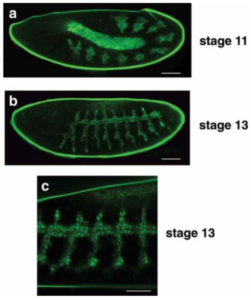
Read more about this here: https://www.tandfonline.com/doi/full/10.1080/19336934.2022.2030191#abstract
Here is another amazing image from Erin C. Jacobs research, looking at neuronal development and how early born neurons influence the circuitry of the developing cortex in mice. In this image we see the MAP2 and synapsin genes shown in red against the bright green GFP neurons. This imaging made visualizing gene expression and neuronal development easy for the researchers, and it’s pretty!
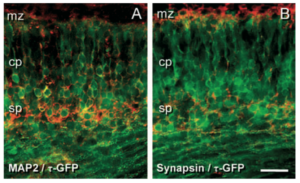
Read more about this here: https://web-p-ebscohost-com.proxy.lib.sfu.ca/ehost/pdfviewer/pdfviewer?vid=0&sid=a25f04e1-432c-4ce3-a318-85ce98ecea32%40reds
B. Review of SLIC
Now let’s get into the mechanics of this project. We’ll review how SLIC will work specifically for this project, but for a more in-depth review of SLIC, please refer to the SLIC lecture notes.
To put is as simply as possible, SLIC is a way of sticking DNA segments together while maintaining the reading frame of both pieces of DNA. These pieces of DNA can be a gene to a plasmid or multiple genes together. In this project, we are trying to anneal the GFP gene (from the pBAD plasmid) into the pUC plasmid.
Figure 1: Our building blocks:
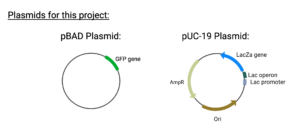
Created in BioRender. Markey, E. (2025) https://BioRender.com/15uyohz
SLIC is done by first PCR amplifying our gene of interest out of its plasmid, as has been the typical procedure for any other kind of cloning we do. With this PCR amplification, however, we will be using special primers. The specific steps to design these primers will be addressed in the next section of this chapter. The primers will contain sequence overlapping with the plasmid that we wish to place our gene into. This is because later, we will use T4 DNA polymerase to chew up the 5’ end of the overlapping region on our insert and our plasmid, forming complementary overhangs. The plasmid and the insert will then stick together at this complementary region. No ligase is required for this as the overlapping region should be about 15 to 20 nucleotides long, which is enough for the complementary nucleotides alone to hold the two pieces of DNA together. The ligation step is usually necessary in other cloning methods where the complementary region is shorter and the few nucleotide bonds alone are not strong enough to hold everything together.
The use of specially designed primers and the T4 polymerase means that we do not need to use any restriction enzymes. This allows us to skip the step of checking for the presence of restriction enzyme binding sites within our inserts and inserts in regions we do not want out DNA to be cut. For this reason, SLIC can also be a good cloning method to use if you cannot find a restriction enzyme for your experiment that does not have a site in you DNA building blocks.
GFP is an inducible construct in this project, meaning that when we insert the GFP protein into the middle of the LacZ gene of our plasmid, we are not only blocking the LacZ gene function, but also using its operon and promoter to activate our inserted gene. The insertion of the GFP gene into the LacZ gene with maintained reading frame will mean that the LacZ gene can still be transcribed, and should this gene be turned on (as it is by IPTG on the agar plates), the GFP gene within it will also be transcribed. This will result in the LacZ protein being translated, with the GFP protein sitting in the middle of it. The LacZ protein will not be functional, as half of it will be sitting on either end of our GFP protein. The GFP gene, however, will be functional, despite it having a fragmented Lac-Z gene sitting on either end of it. The GFP gene will then be able to fluoresce under black light, indicating the presence of the insert in our colonies. Should the reading frame of the GFP gene be disrupted, a frame shift mutation will occur, shifting each amino acid code and drastically altering the resulting protein, often to the point of the protein no longer being functional.
Figure 2: The Importance of Reading Frame
Created in BioRender. Markey, E. (2025) https://BioRender.com/15uyohz
As you have seen from this example, the exact end-to-end joining of DNA from the plasmid and the insert makes the maintenance of reading frame easy. As long as the primers have been designed properly, the ends of the DNA should sit right next to each other, preventing any frame shift mutations from occurring. It should be noted, though, that we do have to take care when designing our primers to not choose to insert our gene right in the middle of a three-nucleotide code of an amino acid within the plasmid, as this can also disrupt the reading frame. We’ll get into designing primers later but keep this in mind as a potential point of error during the design process.
The GFP gene makes IDing our colonies with the insert very easy. If they glow, they contain the insert, in the correct place with maintained reading frame. If not, no insert is present. Due to the high efficacy of SLIC, most of the colonies on the plates will appear as white. The few blue colonies we observe will not contain an insert, but will have an empty plasmid. With the long overhangs used to anneal the plasmid and insert together, it is next to impossible for the insert to be place in the wrong location or in the wrong direction, as can sometimes be the case with other cloning methods.
Now let’s take a look at the step-by-step process for SLIC to break it down a bit more.
Figure 3: The SLIC Process Part 1


Created in BioRender. Markey, E. (2025) https://BioRender.com/15uyohz
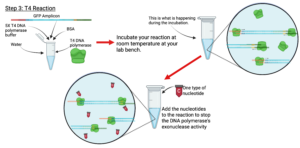
The T4 DNA polymerase is a very important piece to the SLIC cloning method. This enzyme has the dual function of synthesizing DNA in the 3’ to 5’ direction at high concentrations of nucleotides (known as polymerase activity) and breaking up DNA in the 5’ to 3’ direction at low concentrations of nucleotides (known as exonuclease activity). Essentially, if there are nucleotides present that the DNA polymerase can use to build DNA in the 3’ to 5’ direction, it will do so. If not, it will chew up the DNA in the opposite direction. This makes it extremely useful to us as we can use to it generate our overhangs with the exonuclease activity, and then stop the exonuclease activity by adding nucleotides to the reaction. To prevent the overhangs we generated from being re-synthesized by the enzyme’s switch back to the polymerase activity in the presence of nucleotides, we only add one type of nucleotide to the reaction, for example, cytosine (C). This will successfully stop the exonuclease activity; however, the DNA will not be able to be resynthesized because there will not be enough of each nucleotides present (A, T and G) to do so. At most, a couple of C nucleotides will be added back to the DNA, but this shouldn’t pose a problem.
Figure 4: The SLIC Process Part 2

Created in BioRender. Markey, E. (2025) https://BioRender.com/15uyohz
Test Your Knowledge
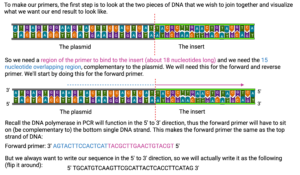
C. Designing Primers
We want to design primers that will PCR amplify the GFP gene out of the pBAD plasmid, but also contain an overlapping sequence of about 15 nucleotides complementary to the pUC plasmid that we want to anneal our insert into. Designing these primers is tricky, however it is crucial that you understand and be able you do it yourself, for this project and this course. Let’s go through an example that will resemble the primers we will use in this project.
Keep in mind that this is different from the examples we saw in lecture, as those examples were for joining two genes together at their ends, both of which have been PCR amplified independently. In this project, we are joining our gene to the plasmid in the middle of the Lac-Z gene, thus both the forward and reverse primers for our insert must contain the overhangs. This is because we are not going to PCR amplify our plasmid, so the overhangs must be generated on the only part of the DNA we are PCR amplifying: the GFP insert.
Here is a reminder of the placement of our primers when they are used to PCR amplify the GFP gene out of the plasmid:
Figure 5: Primer Map
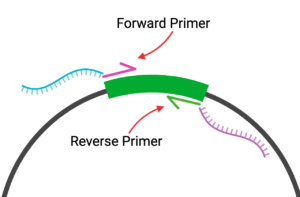
Created in BioRender. Markey, E. (2025) https://BioRender.com/9izact6
Now lets get right into the design process for our primers:
Figure 6: Primer Design
Created in BioRender. Markey, E. (2025) https://BioRender.com/15uyohz
Practice Designing Primers:
D. Lab Procedure
Now let’s walk through the step-by-step procedure for this project. In this project, the primers have been designed for you, so we’ll be jumping right into the PCR reaction. Use this section to solidify your understanding of what we are doing at each step of the project and why. Understanding this will help you avoid errors in the lab and assist with your overall understanding of the course material.
Figure 7: Lab Procedure
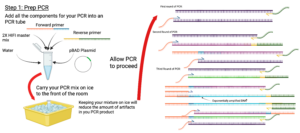
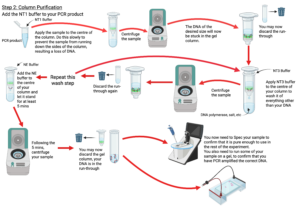
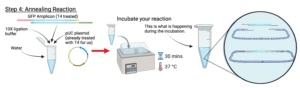
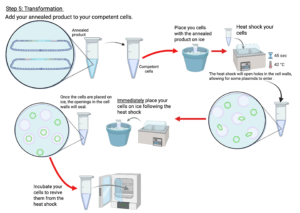
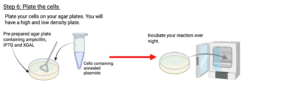

Created in BioRender. Markey, E. (2025) https://BioRender.com/15uyohz
E. Common Points of Error
There are a few areas where people will make mistakes with this project. While this project is usually quite successful for students, it is recommended to take the time to review these points to ensure you do not make the same errors in the lab. These points are in the order of when they could occur during the project.
- In general, read your lab handout very closely and ensure you understand what is happening at each step of the project. The most common errors occur because students have not read their lab handout before getting to lab.
- In the column purification step, be sure to leave your column sitting in the NE buffer for the full 5 minutes, if not longer, before centrifuging. This will significantly improve the amount of DNA you are able to extract from the column and use in the rest of your experiments.
- Be sure to stop the T4 reaction by the addition of the single nucleotide as close to the recommended time as possible. This will yield the best overhangs.
- Be sure to use your T4-treated insert in the annealing reaction and not your untreated PCR product insert. No annealing between the plasmid and the insert will occur if you do not use the T4-treated insert.
- Be very gentle with the competent cells at each stage, but especially before they have had the DNA transformed into them. They are very fragile at this time and can rupture with too much movement. Only gently stir them with the pipette tip and do not vortex them.
- Be sure to gently stir the competent cells with your pipette tip before pipetting the liquid culture onto the plate. If you do not do this, you may end up only pipetting liquid and no cells will end up on your plate.
- Be sure to allow the rod you are sterilizing to plate your cells to cool before using it to streak the cells on the plates. If it is still hot, you may end up frying your cells.