Exercise 9.1. Using Fossils for Correlation
This exercise integrates all of the previous labs, so you will be building on the knowledge you already have about rock facies and fossils.
Recall from the Lab 4 Practice Interlude that you have been hired to draw a cross-section from four borehole logs provided by an exploration company. The cores were drilled in a very level landscape so the top of each core represents the same elevation.
In Lab 4, you examined 4 incomplete borehole logs provided by the company. These included depth intervals for all the different facies, but only some of the rock descriptions and facies interpretations needed to complete the logs. You examined a series of rocks and made further facies identifications to complete the logs. At the end of the activity, you had identified depositional environments for most depth intervals. You were able to do some lithostratigraphic correlation and possibly even to identify some unconformities in the cross section. However, there may have been places with insufficient information to complete the lithostratigraphic correlation.
Now the company has provided four additional sets of borehole notes about the fossil content and some additional samples. In this lab you will use biostratigraphic principles to determine the geological age of each facies and make decisions about time-stratigraphic correlations. This information will also help you complete any missing lithostratigraphic correlations.
Types of Borehole Log Data
Borehole logs can be found on the pages that follow. The logs contain the information provided previously, but fossil samples and a few additional notes are now available as well. The following list summarizes the key elements of the logs.
Depth
For each borehole you are given the depth of each sedimentary facies contact below the ground surface.
Facies Description
The company has also provided some preliminary information on the sedimentary facies. For each facies they may have identified the depositional environment, provided a description of the rock, or collected a rock sample.
Facies Labels
Each facies is labelled using two identifiers. The first identifier is a number that indicates which core the facies is in. The second identifier is a letter that gives the location relative to the bottom of the core.
Example 1: Facies 1-A is in Core 1. It is at the bottom of the core.
Example 2: Facies 1-B is in Core 1. It is the unit immediately above Facies 1-A
NEW: Fossil Samples
Fossil sample photos and/or written descriptions of the fossils present are now included.
What to Do
Step 1. Worksheets
Start by downloading the worksheets at the beginning of this lab. The worksheets include four pages for field notes that you will need to fill in. Note: The field notes worksheets contain only some of the same borehole log information that you will need. Refer to this Lab Manual for the complete details.
Step 2. Field Notes
The core logs available to you contain extra stratigraphic information and questions. The first column of each log identifies the depth and facies label. The second column provides the lithological information from Lab 4. The third column is the new set of fossil field notes. Similar to Lab 4, the notes on the fossils are incomplete. To complete them you will need to examine the specimens and fill in all blanks with the information requested. Follow the detailed instructions below.
Step 2A. Identify the Fossils
Identify each fossil by its taxonomic class (Taxon). You must do this to the same level of taxonomic classification as was used for each fossil group in Labs 6 to 8. For example, for brachiopods use Phylum Brachiopoda, whereas graptolites are accurately identified as Phylum Hemichordata, Class Graptolithina.
Additional rock samples are provided for practice with rock identification. See if you can spot the key features that would help you name them.
Step 2B. Fill in the Biozones
Fill in the taxon range biozones (Taxon Range) and peak biozones (Peak) for each fossil using Figure 9.5 or your notes from previous labs. Where there is more than one type of fossil, determine the concurrent range biozone (Concurrent Range). You may need to use your lecture notes for some of the more challenging samples, and for some facies there may not be enough information to determine the age to a single Period.
Step 2C. Determine the Environmental Range
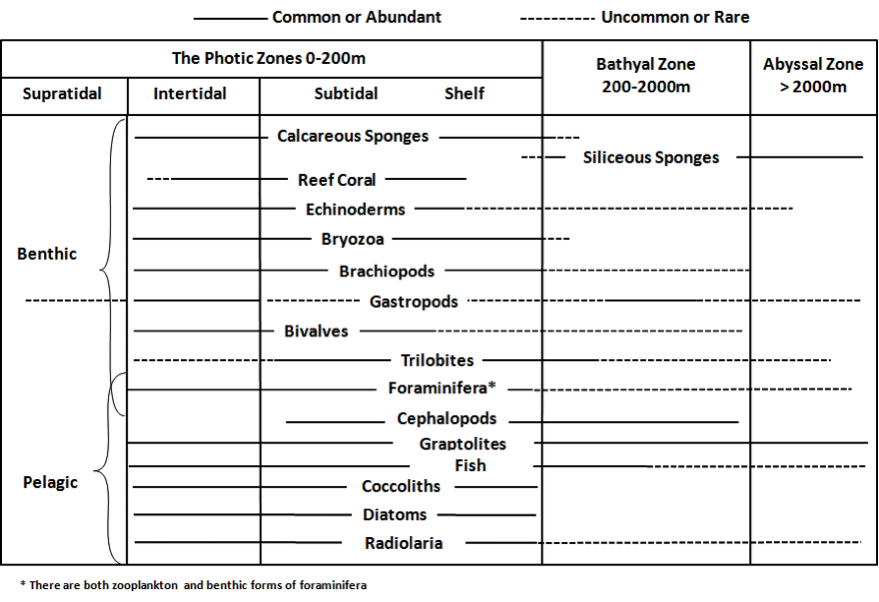
Determine the common environmental range (Env. Range) of each fossil using Figure 7.4 (reproduced below for your convenience.) This figure shows both the common (solid line) and uncommon (dashed line) environment ranges. Where there is more than one type of fossil, determine the habitat(s) in which they overlap.
Step 3. Cross-Section
Take out the cross section you completed for the Practice Interlude at the end of Lab 4.
Step 3A. Add Time Ranges
Beside each depth interval, add your estimate of the possible time range for this depth interval from Step 2B above. Determine any missing time ranges.
Step 3B. Determine Age Estimates
Identify the specific geologic time when each rock layer was deposited using the information from all four cores. Use the fossil information to narrow down your age estimate to the shortest time interval. You may need to go back and forth between lithologies, facies, time ranges and existing correlation lines.
For example, if Fossil A in Core 1 was dated from the Jurassic to Recent, and the concurrent range zone of the fossil assemblage in the same layer in Core 2 was dated from the Devonian to the Cretaceous, you can estimate that the rock layer was deposited between the Jurassic and the Cretaceous from the concurrent range.
In this lab, it may be possible to date some layers at the level of a single Period, while with others, as in the example here, it may only be possible to narrow the age down to a range of geological time.
Step 4. Identify the Unconformities
Identify and label any unconformities (covered in Lab 3) not already identified in the section. Adjust any lateral facies changes and draw them appropriately (i.e. a jagged vertical line).