Going Live: Best Practices for Online Classes with Microsoft Teams
Scheduling and Hosting Teams Sessions
Scheduling Meetings (Teams Calendar vs. Outlook Integration)
Here’s how to schedule a Microsoft Teams meeting and share the link — using either the Teams app or Outlook:
Option 1: Schedule the Teams Meeting Using Microsoft Teams
- Open Microsoft Teams. Make sure you are signed in using your UNBC user name and password. You can use either the desktop version or the Teams App in a web browser. (for more information on UNBC Staff, Faculty & Student access to Microsoft 365 Office Apps see here)
- Go to the Calendar tab on the left.
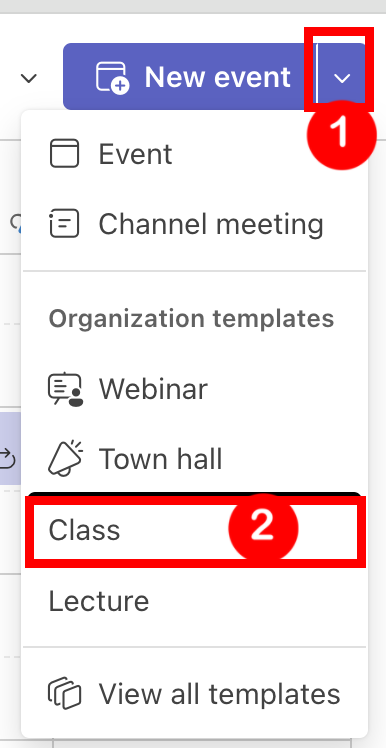
- Click on the down arrow to the right of the New Event button (top right) and select “Class” from the options.
- Fill out the details:
- Title (e.g., “Course Q&A Session”)
- Date and time
- Add required attendees (or leave blank to create a general link that you can share in your Moodle.unbc.ca course)
- Make sure the toggle to schedule an Online/Teams Meeting is blue in the “Location” section

-
- (Optional) Add description or meeting agenda file
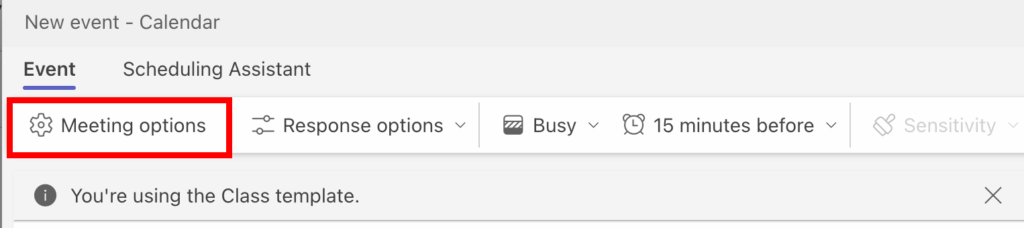
5. Adjust Meeting Options
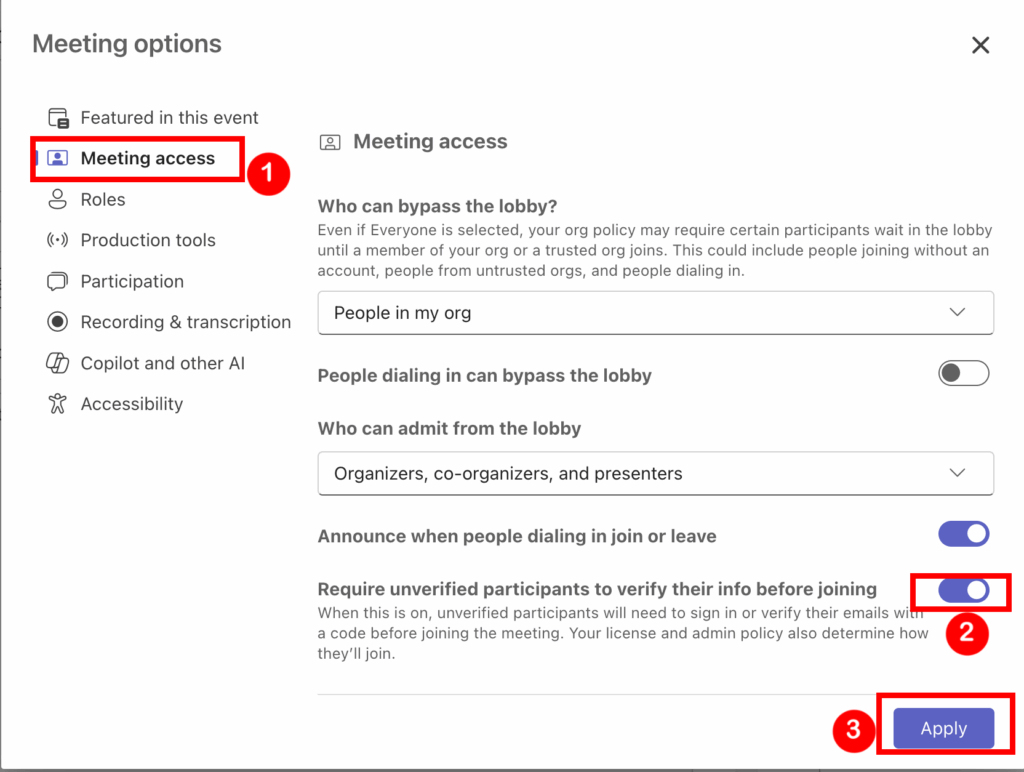
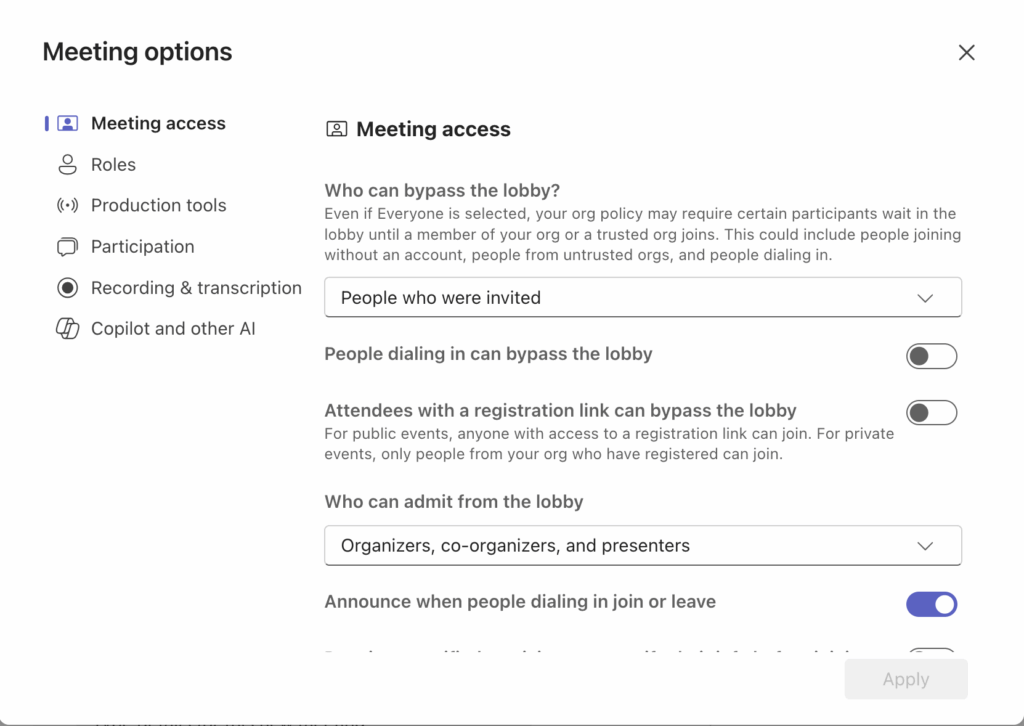
Lobby Settings: determine who can enter the meeting without you having to click “allow” to let them in. It is recommended that you select “People in my org” to allow UNBC people to join without a lobby/waiting room.

Toggle the option that says “Require unverified participants to verify their info before joining’ to on (blue). This gets UNBC people to sign into their account and allow them to participate in polls, chat and other features during the class.
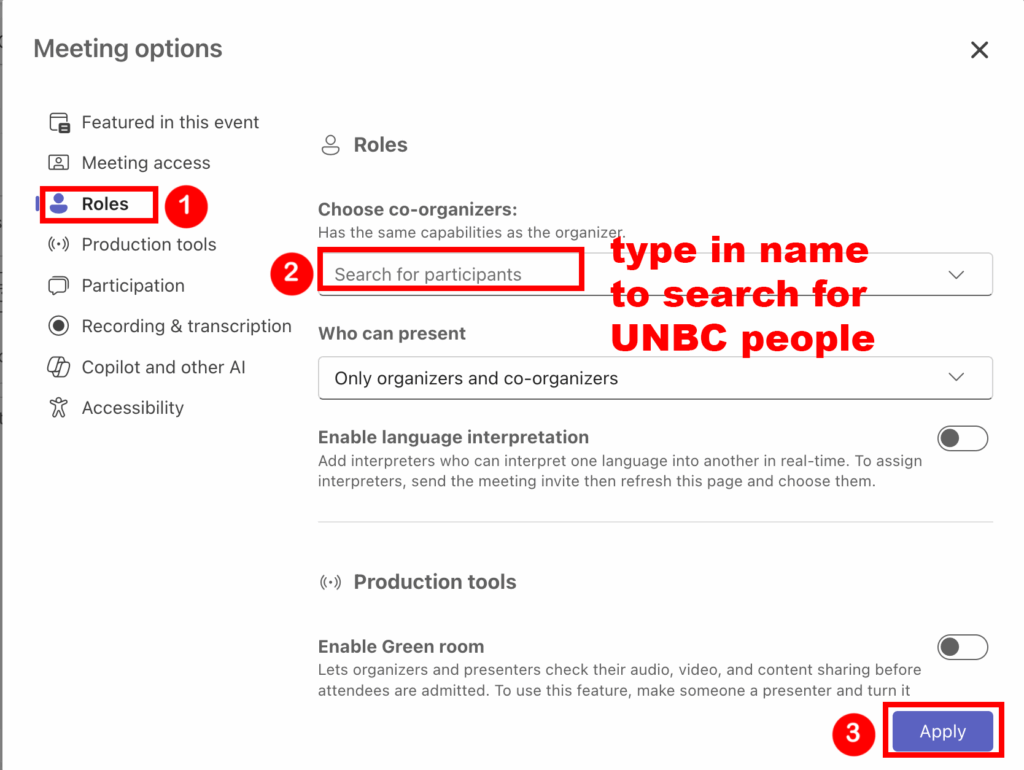
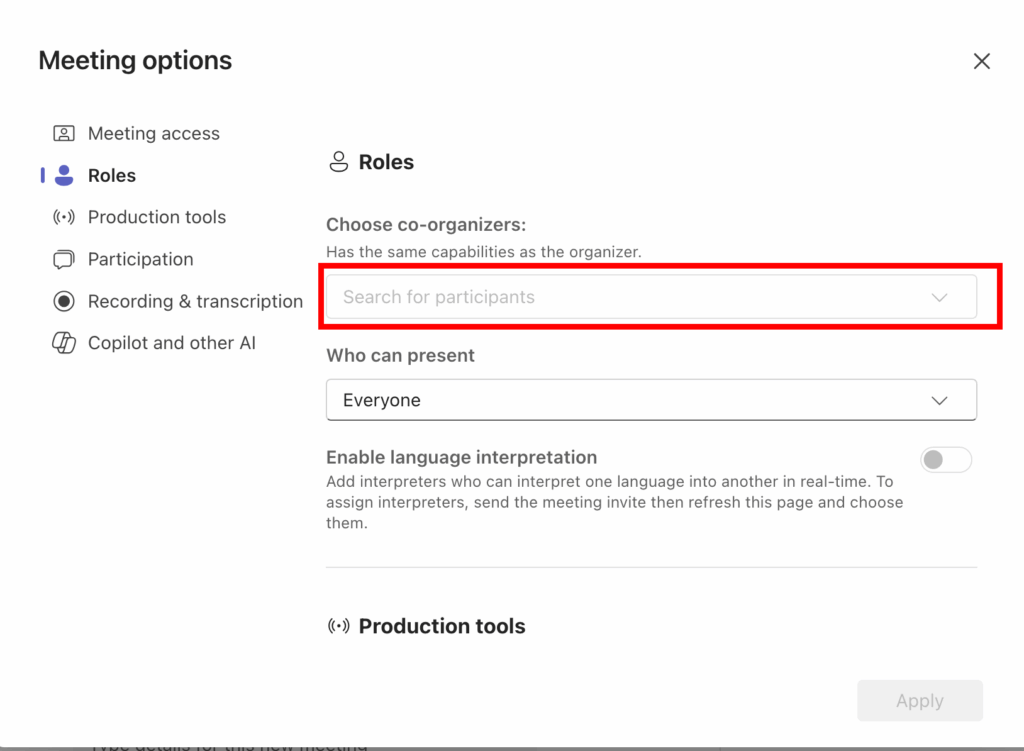
If you have co-instructors or anyone you want to allow instructor-level privileges, add them to the Co-organizers box shown below. It is found under the Roles menu item. Click in the “Choose co-organizers” box and start typing their name. Names of UNBC people should show up automatically. Click on their name to select them.
If you wish to record all meetings automatically, toggle the “Record & Transcribe automatically” switch to on (blue). This will start the recording as soon as you start the meeting, and end when you leave the meeting.
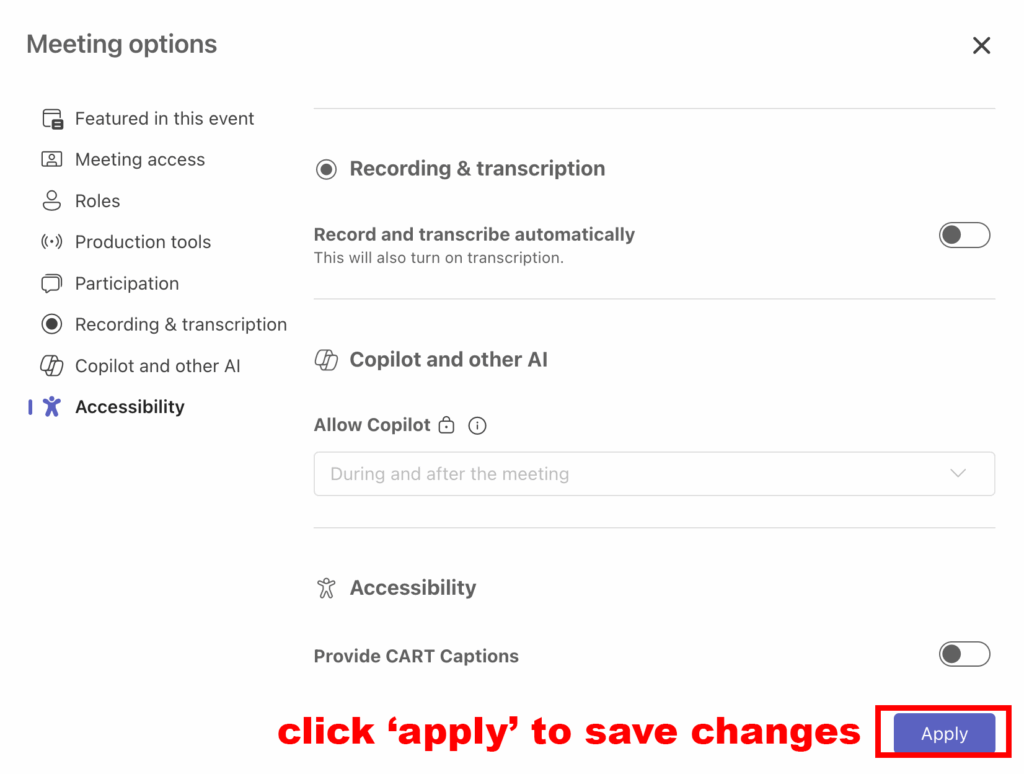
6. Click on “Apply” to save all of your changes to the meeting options.
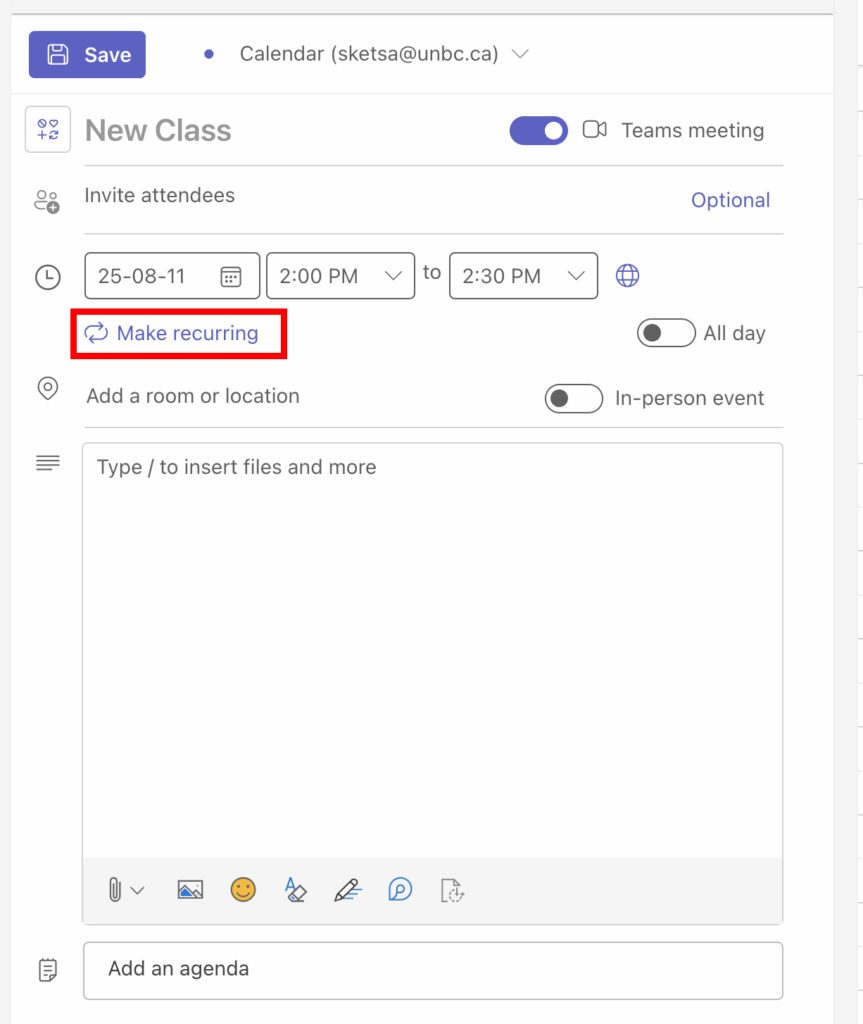
7. Set the dates of your meeting – if it is a recurring course, click on “Make recurring” and set the days the course occurs on.
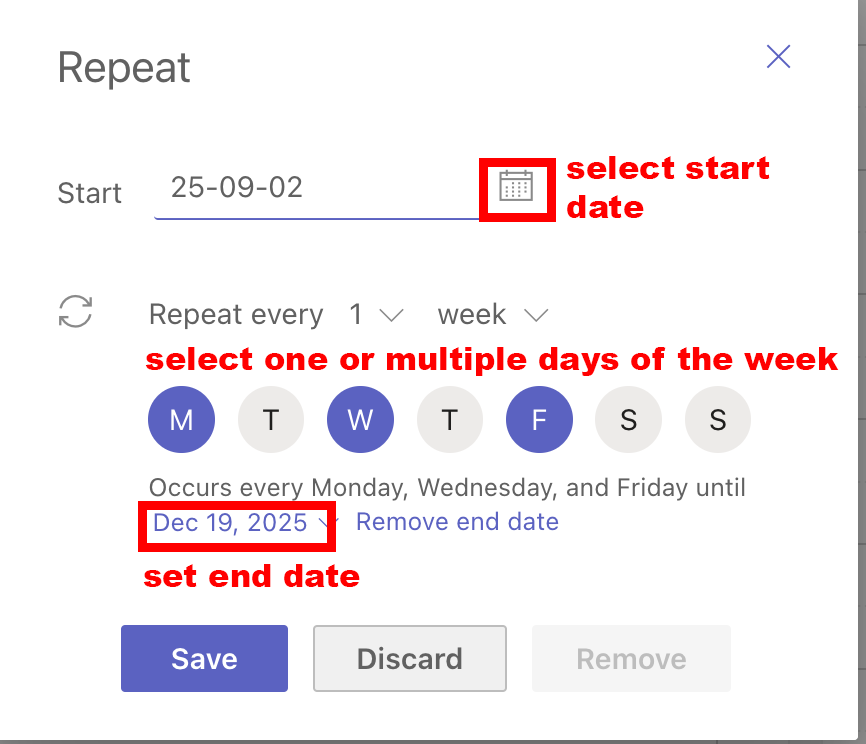
Select the Start Date using the calendar button.
Select the days of the week.
Set the End Date.
Click “Save”.
7. Click “Save” — this will schedule the meeting.
🔗 To Share the Meeting Link:
- After saving, open the meeting in your calendar in the Teams app Calendar or Outlook Calendar.
- Select/Highlight the Microsoft Teams Meeting join the meeting info at the bottom of the entry
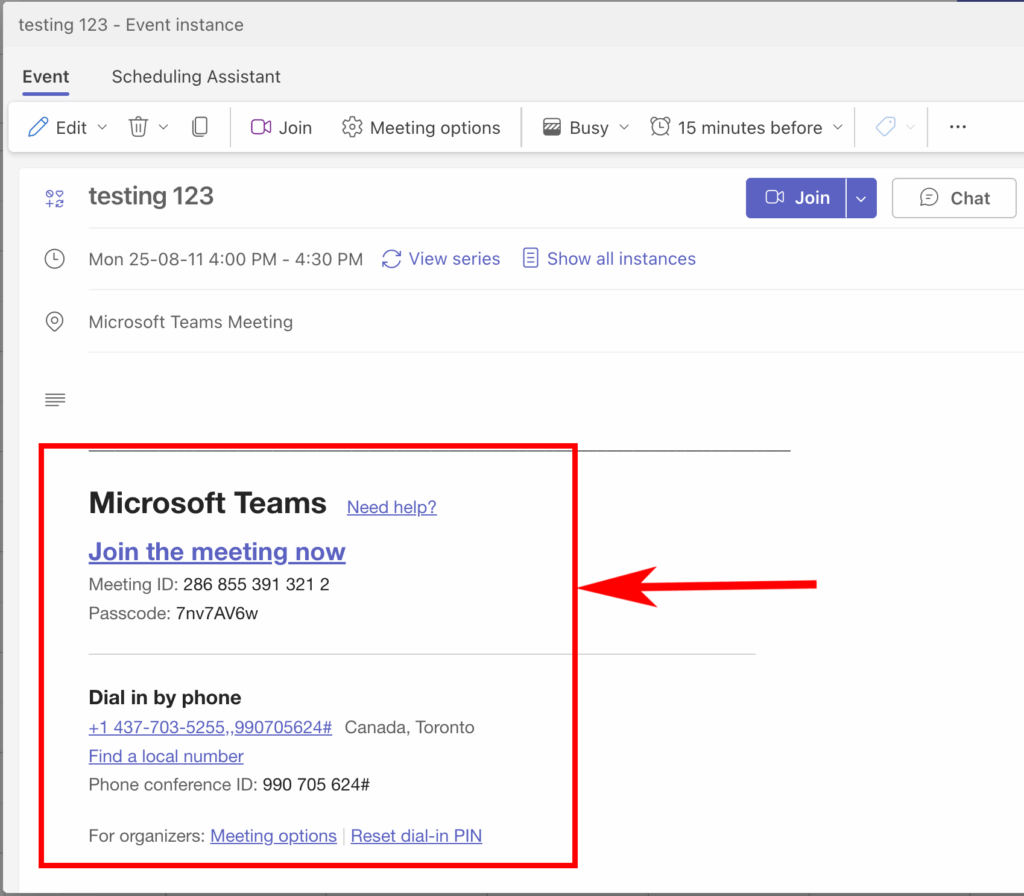
- Paste the link in your Moodle.unbc.ca course home page, Moodle announcements, in an e-mail, chat, etc.
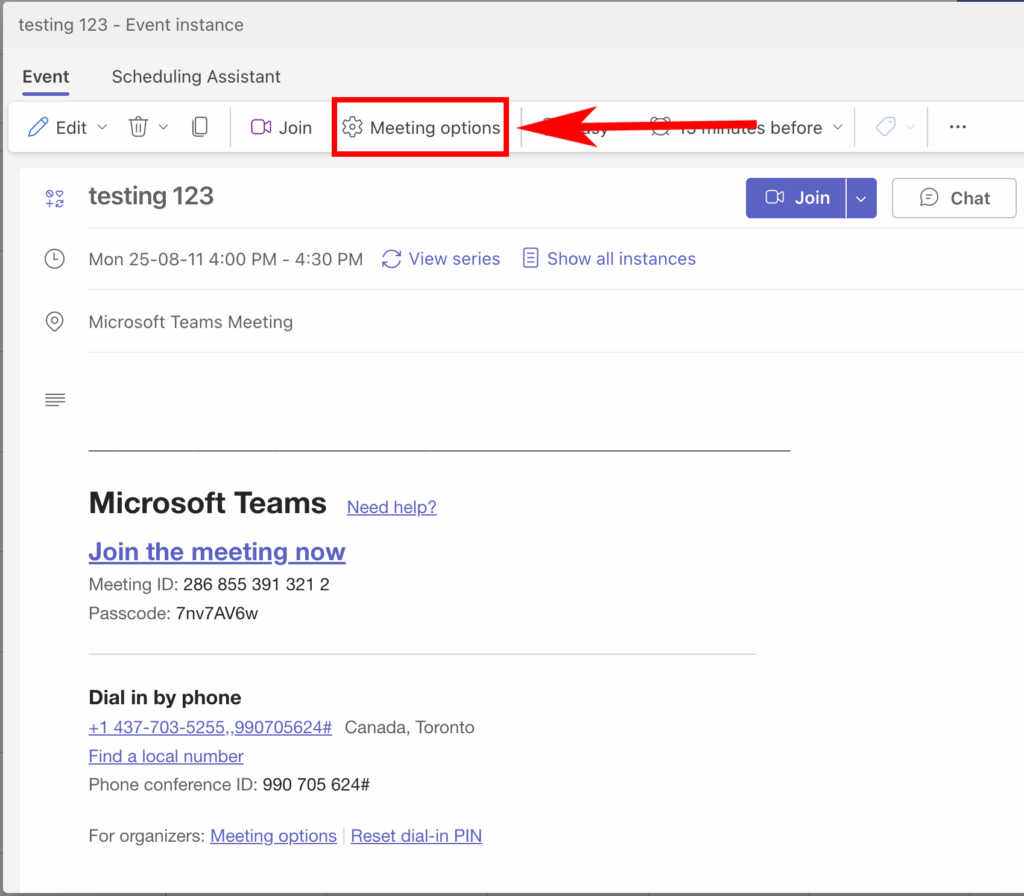
If you need to get back into the Meeting Options to adjust settings, click on the event to edit it in the Teams app or Outlook Calendar, and click on “Meeting Options”.
Option 2: Schedule Teams Meeting Using Microsoft Outlook
- Open Outlook (desktop or web).
- Go to the Calendar.
- Click “New Event” or “New Meeting.”
- In the meeting window:
- Add a Title, Date/Time, and optionally invite attendees.
- Click the Teams Meeting toggle (should say “Teams Meeting added”).
- Click “Send” to schedule.
🔗 To Share the Meeting Link:
- Open the event in your calendar (the Calendar can be found both within Microsoft Teams or Outlook).
- Copy the Teams Join Link from the body of the invite.
- Share that link where needed.
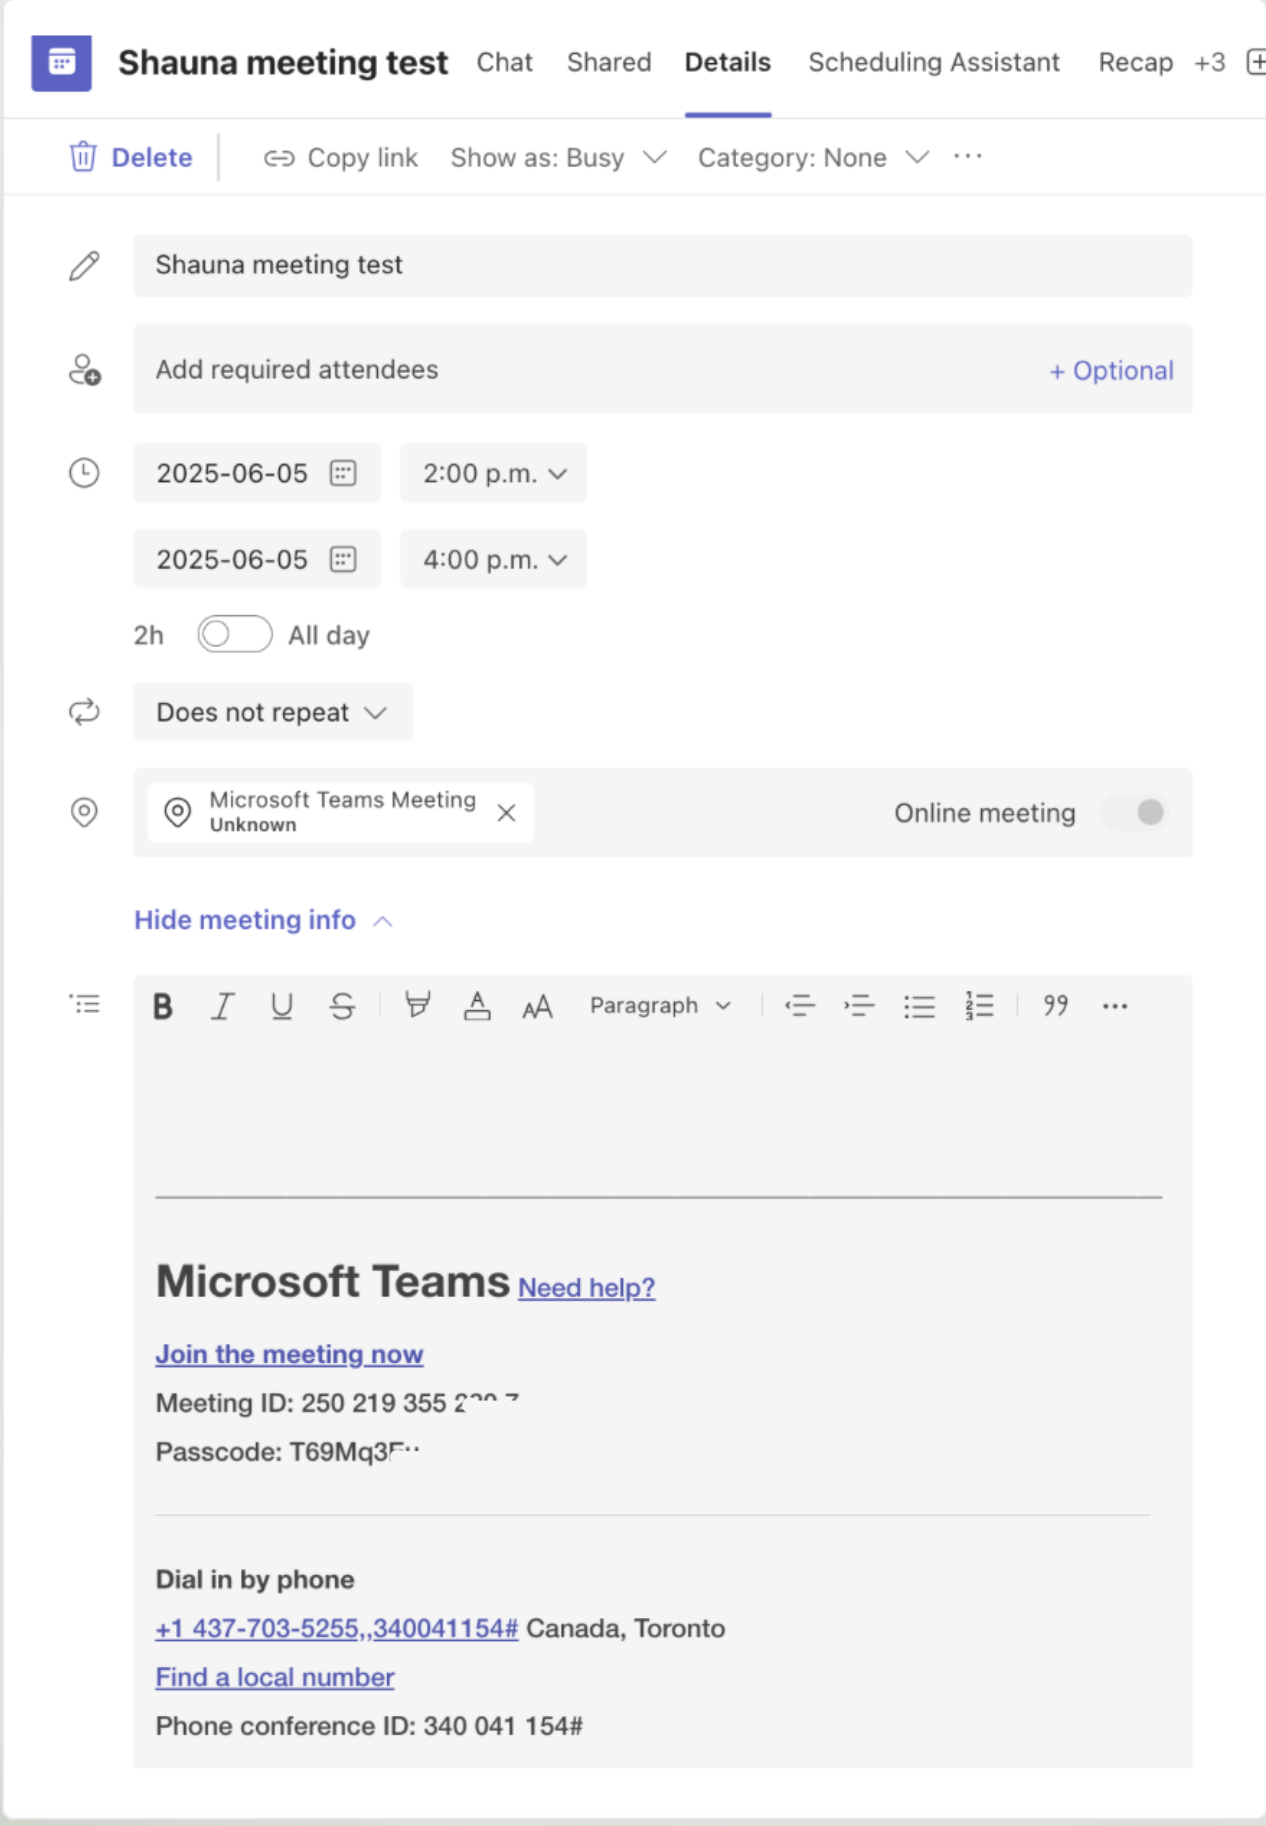
The meeting info will be at the bottom – copy this and send to students via Moodle Announcement, e-mail, or post link in the course.
Notes:
- You do not need to invite everyone via email — you can create the meeting for yourself, then just share the link with students & co-instructors.
- For recurring meetings, select “Repeat” in either Teams or Outlook and set the frequency. See instructions below.
Recurring Meetings for a Semester
- For recurring meetings, select “Repeat” in either Teams or Outlook and set the frequency.
When scheduling the Teams meeting, or if already created, click on it in Teams or Outlook Calendar to edit the meeting:
-
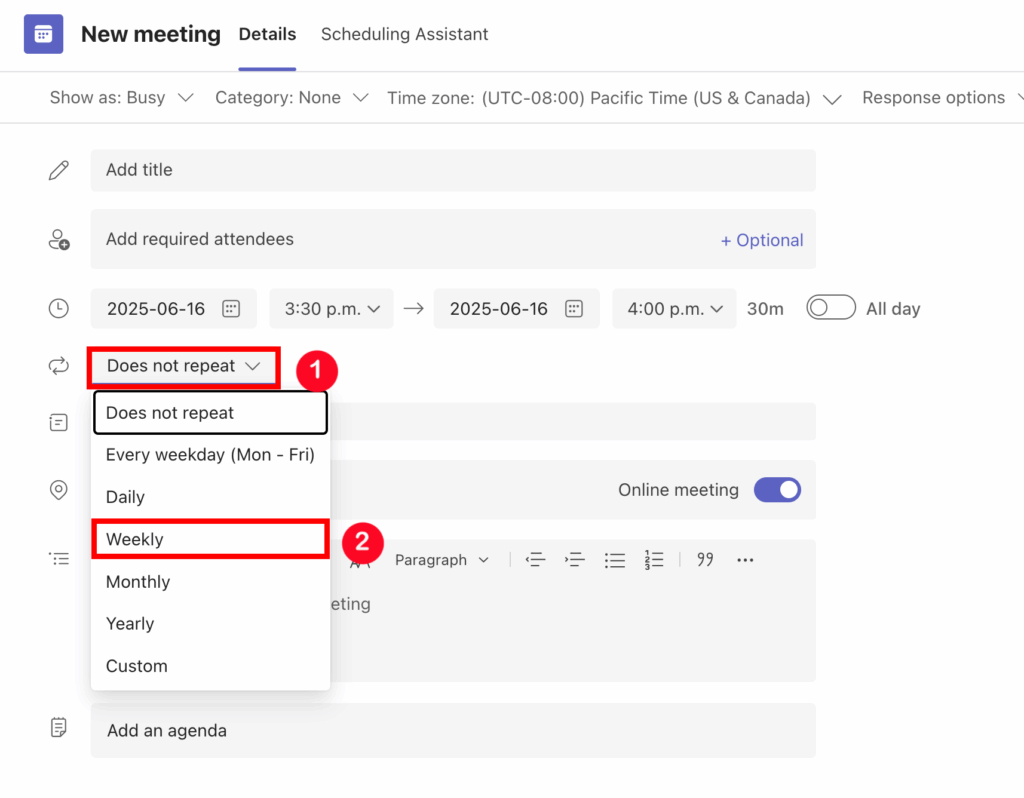
Use the “Does not repeat” dropdown menu in the meeting setup to select a Weekly or Custom recurrence frequency
-
This saves time and creates static links for students to join the meetings (one link that is good for the whole course)
Inviting Students and Teaching Assistants
There are several ways to invite students and TAs to your Microsoft Teams sessions. Choose the method that best fits your course setup and communication preferences.
Option A: Add your TA or Students to Required Attendees box (for very small classes)
-
Open your scheduled meeting in Teams Calendar or Outlook Calendar
-
Click “Meeting Options” (either in Teams or via Outlook calendar invite)
- Add “Required Attendees” by name/e-mail to the meeting

4. This will send them a meeting invite via e-mail.
Option B: Share the Meeting Link (Recommended for Large Classes)
Best for: Posting on Moodle or sending via email to all students.
Steps:
-
Schedule your meeting in Teams or Outlook (see earlier section)
-
After saving, open the meeting in your Teams calendar
-
Click “Copy meeting link” or select the meeting link text and copy it (Control/Command + C)
-
Paste the link into:
-
Moodle course site (e.g., in a “Weekly Class Meeting” label to the course home page)
-
A group email to students via the Moodle Announcements in your course
-
Your course syllabus
-
Tip: Label the link clearly (e.g., “Click here to join our weekly lecture – Wednesdays @ 2:30 PM”)
Joining a Meeting (Instructors and Students)
Whether teaching live classes, holding office hours, or meeting with colleagues, Microsoft Teams makes it easy to schedule or join online meetings.
1. Joining a Meeting
You can join a Teams meeting in several ways:
| Method | Steps |
|---|---|
| Via Calendar Invite | Click the “Join” button in your Outlook or Teams calendar invitation. |
| Via Meeting Link | Click the link provided by the organizer (e.g., in an email or Moodle). |
| Via Teams Calendar | Open Teams > Go to Calendar > Click the meeting > Select Join. |
Tip: Join 5–10 minutes early to check audio, video, and screen-sharing settings.
Recommended Permissions and Roles
To manage your class effectively and ensure a secure, smooth experience for everyone, it’s important to understand and configure permissions and roles within your Teams meetings and class Teams.
Each participant is assigned a role:
-
Organizer: The person who created the meeting (usually the instructor)
-
Presenter: Can share content, manage breakout rooms, admit people from the lobby, mute others
-
Attendee: Can participate, but cannot manage meeting settings or share content (unless promoted)
Recommended Setup for Class Meetings
| Role | Assign to | Why |
|---|---|---|
| Organizer | Instructor (automatically assigned) | Full control of meeting settings, recordings, and options |
| Presenter | TAs, co-instructors | Allows co-hosting, screen sharing, breakout room management |
| Attendee | Students | Prevents accidental screen sharing or disruption |
How to Set Roles Before the Meeting
Step-by-step:
-
Open your scheduled meeting in Teams Calendar or Outlook Calendar
-
Click “Meeting Options” (either in Teams or via Outlook calendar invite)
- Add “Required Attendees” by name/e-mail to the meeting
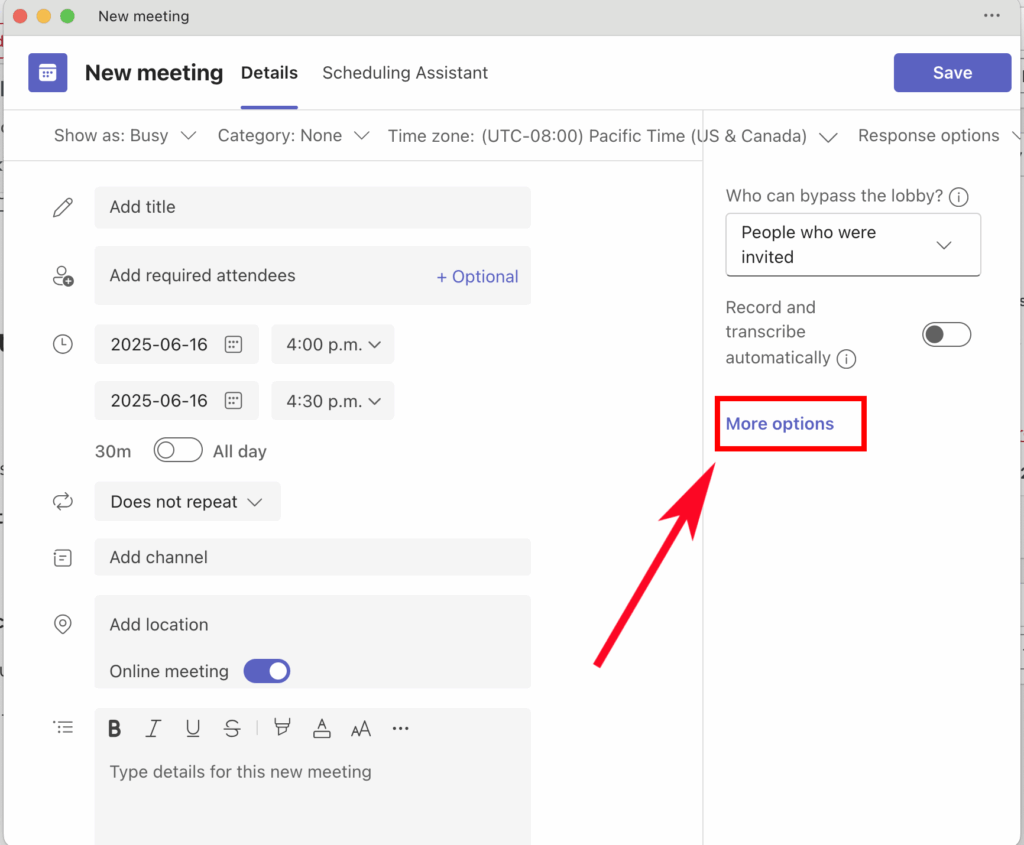
4. Then click on “More Options”
5. Click on the “Search for Participants” box and select the invitees who are your co-Instructors/Presenters/TA’s
-
-
Add your TAs or co-instructors/organizers
-
Students will default to attendees
-
- Tip: If the name of your co-Instructors/Presenters/TA’s does not appear in the box above, go back into the Meeting Schedule settings and add them as “Required Attendees” first
Promote a TA to a Co-Host or Presenter
How to Change Roles During a Meeting
If needed, you can promote or demote participants during a live meeting:
-
Click People button along the top if the Teams meeting window

-
Hover over a name
-
Click More (⋯) > Choose:
-
Make a presenter
-
Make an attendee
-
Meeting Settings
There are some additional meeting options in the advanced section.

Meeting Access Options
Here you can select the waiting lobby settings. If the lobby is turned on (which it is by default at UNBC) you can let invitees bypass the lobby and join the meeting without an Instructor/TA/Co-organizer having to let them in.
Participation Options
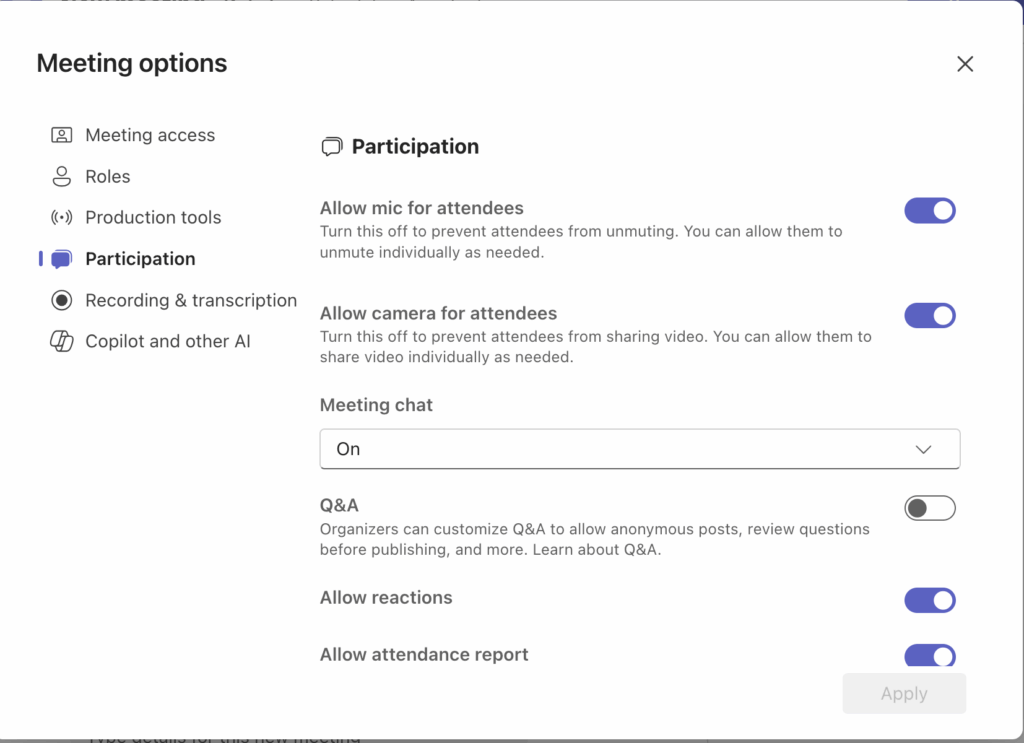
Here you can enable or disable the mic for participants. We recommend leaving the mic enabled for all attendees.
Recording & Transcription
Here you can enable automatic recording of your class or meeting – as soon as you join the meeting, it will start recording. Recording stops when you leave the meeting.

