9 Common Operations
Face and Edge Jointing
The jointer is used for preparing solid wood, making faces flat and true. As solid wood dries from the green (wet) state, it shrinks and changes dimension unequally in the radial and tangential plane. It may have inherent stresses that are released as it it cut to rough size. Face jointing the stock will remove bow, cup and twist from the boards. Edge jointing will straighten the stock, removing crook and kink. Edge jointing will also machine a known angle between the face and edge, for square stock at 90° but also at any angle between 45° and 90° by adjusting the angle of the fence. The face of the board should be jointed first, then the edge can be squared to the face.
Procedure for face jointing
- Determine which face (if any) is concave, it should be placed down on the table. This will be the most stable arrangement, allowing for the piece to be jointed without shifting or rocking on the tables.
- Begin to move the piece into the cutterhead with a hand over hand motion, remembering to lift your hand over the cutterhead and not run it directly over while on the workpiece.
- Apply light pressure on the piece at the start of the cut, enough to keep it in contact with the table. Avoid excessive pressure as this will cause the piece to deflect and spring back after the cut is complete.
- As soon as a sufficient amount of stock is on the outfeed table, transfer the downward pressure to just behind the cutterhead on the outfeed side of the cut. This ensures the part of the stock that was just-cut references the outfeed table. The result will be a flattening of the stock.
- It may take multiple passes to flatten the entire face. The number of passes is determined by the depth of cut per pass, and the amount of defect in the stock.
- Continue jointing until the entire face has been surfaced. Often, listening to the machine will tell you when you have made a full pass.
- With boards with excessive defect such as twist, finesse is required to achieve satisfactory results. The twisted board will have two opposing corners contacting the table, these should be passed over the cutterhead to remove the twist. The piece must be balanced on the two corners while jointing, without rocking.
- You may place paper or veneer shims under the corner not contacting the table at the trailing end of the board to help stabilize it. They will come loose as the end passes over the cutterhead, but do not pose a kickback hazard. Use only thin commercial veneer or paper for this purpose.
Procedure for edge jointing
In most cases, the concave edge is placed down on the machine table for stability. However, in some cases it may be desirable to have the convex edge contacting the table, such as when selecting for grain direction or to remove defects.
- Ensure the fence is set to the desired angle. Use an engineer’s square for 90° or a sliding T bevel or digital inclinometer for angles.
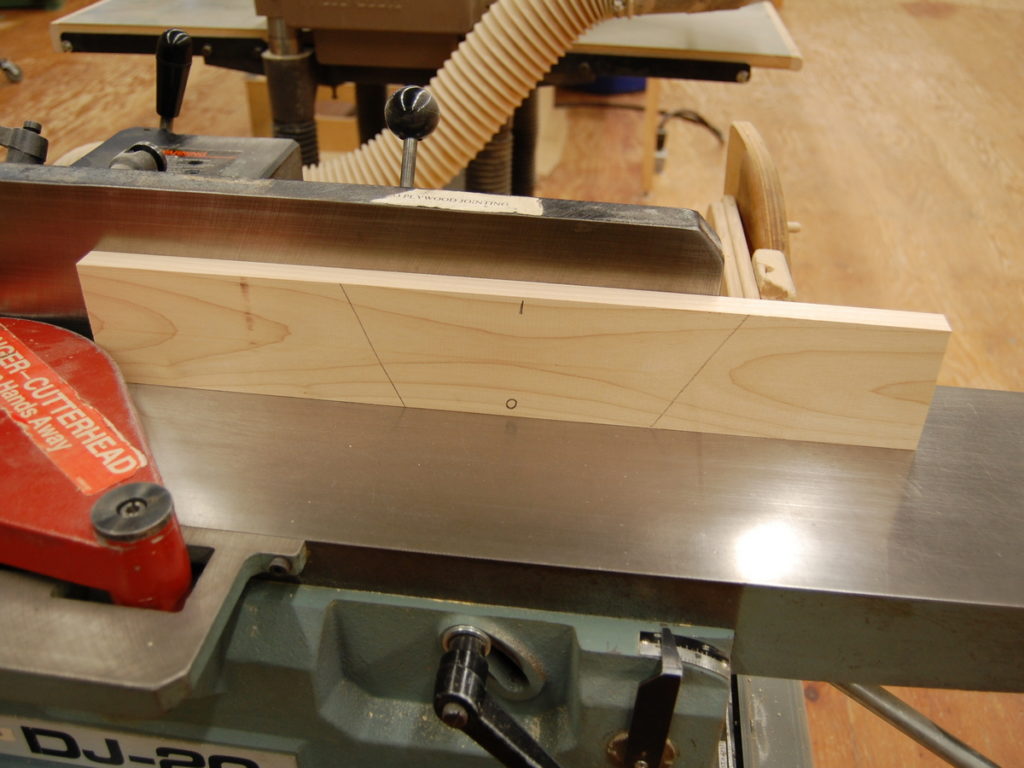
- Place the edge to be jointed on the machine table, and the jointed face against the fence. It is important the jointed face is placed against the fence, not facing away.
- Apply pressure on the face of the workpiece to keep it tight to the fence as you begin the cut, at the same time as applying downward pressure to keep the piece tight to the table. The reference surface for edge jointing is the fence, not the bed of the jointer.
- Use your hands or a push block to keep the piece in contact with the fence as you pass it into the cutterhead. Remember to lift your hands over the cutterhead as you progress through the cut, never place your hands directly over the cutterhead.
- As soon as a sufficient amount of stock is on the outfeed table, transfer the downward pressure to just behind the cutterhead on the outfeed side of the cut, while keeping the face in contact with the fence.
- Continue jointing until the edge has been surfaced.
- It may take multiple passes to joint the entire edge, as in face jointing.
Preparing edge joints for laminated panels
One of the most common operations performed on the jointer, other than surfacing faces and squaring edges, is preparing boards for an edge-glue lamination. There is a particular machining sequence to follow that will produce tight, well-fitting joints.
The pieces to be laminated should be surfaced two sides (S2S) to final thickness, plus a small machining allowance if they are to be planed or thickness sanded after glue up. The pieces should have reasonably straight edges and be ripped to rough width, with enough of a machining allowance added to joint the edges as well as trim the laminated panel to final size. Allow a minimum of 4 mm additional width per piece.
Set the pieces on the bench top, and arrange them for grain and appearance. Mark the face with an inverted ‘V’ across the width of the panel, as in the image below. This identifies the location of each piece in the panel so they may be easily put back in the correct order.
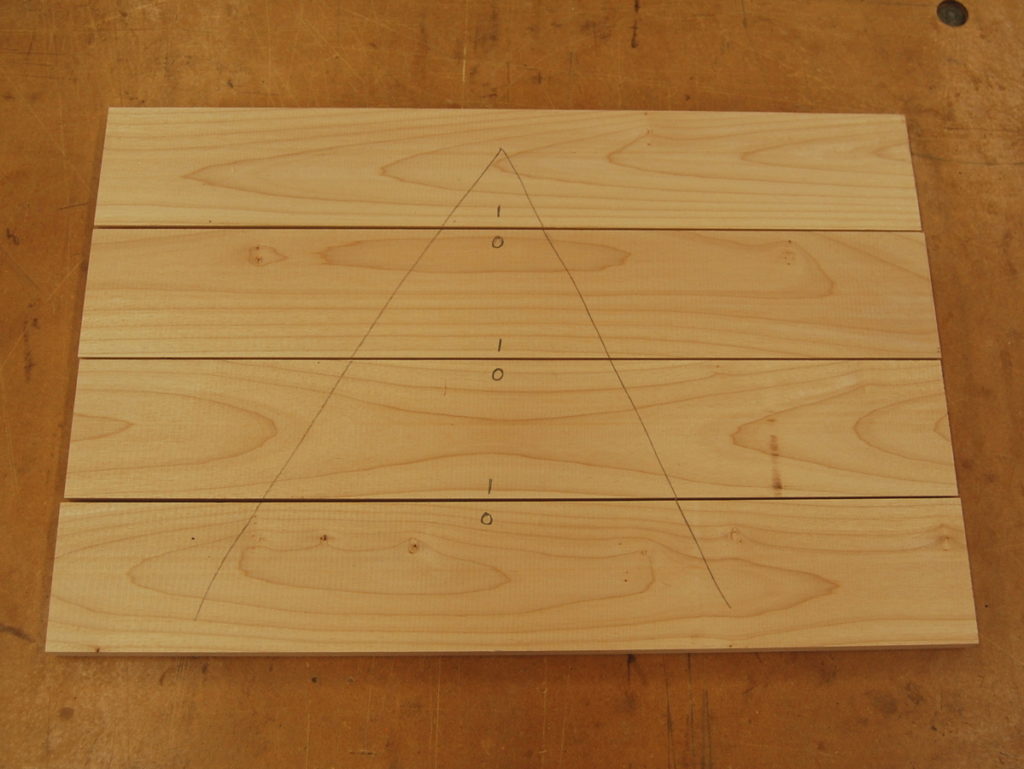
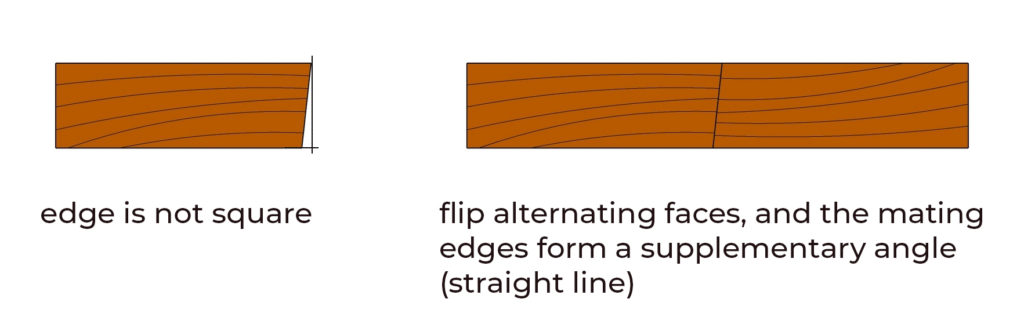
At each joint, mark the faces of pieces with an ‘I’ and an ‘O’. These letters stand for ‘in’ and ‘out’. Pieces with an ‘I’ will be jointed with that face against the fence, while piece with an ‘O’ will be jointed with that side facing out from the fence. This alternating of face in, face out ensures the panel will be perfectly flat as any amount the fence may be out of square is balanced by the next piece being flipped over. If the fence is out of square at all, and the faces are all run in the same orientation, the panel will take on a cambered (cupped) shape.
When jointing each piece, apply light pressure at the start of the cut, moderate to heavy pressure though the middle of the cut, and light pressure at the end of the cut. This technique helps to create a jointed edge with a slight concavity along its length which is desirable in creating a tight, ‘sprung’ joint. In some cases, the edge of the piece is convex, which can be difficult to joint straight or slightly concave. Try taking the high portion out of the centre by jointing a small amount out of the middle of the piece.
To perform this operation, have the end of the workpiece resting on the infeed table while holding the remainder above the cutterhead. You will need to pull the guard out of the way to begin the cut. Starting about a quarter of the way in from the front end of the piece, carefully lower the piece on to the cutterhead and joint the middle until a quarter of the distance from the end. Hold the piece firmly on the table, turn off the jointer and allow it to come to a complete stop. Increase the depth of cut slightly, and re-joint using the technique for a sprung joint. Removing material in the centre portion before taking a final pass usually results in a sprung joint.
When preparing surfaces for glue joints, ensure the knives are sharp. Dull knives create a burnishing effect as the knives strike the surface (as opposed to cut) and decrease joint strength. Ensure pieces are run slowly on the last pass to reduce the scalloping effect of the circular cutterhead, this ensures better wood to wood contact which most adhesives require.
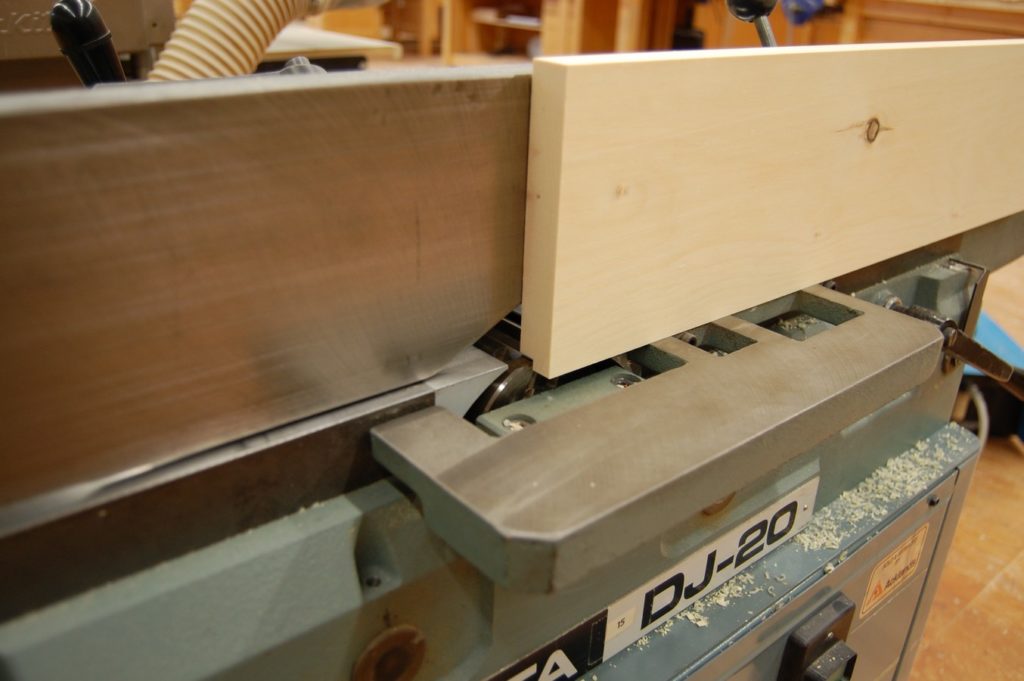
Jointing a bevel or chamfer
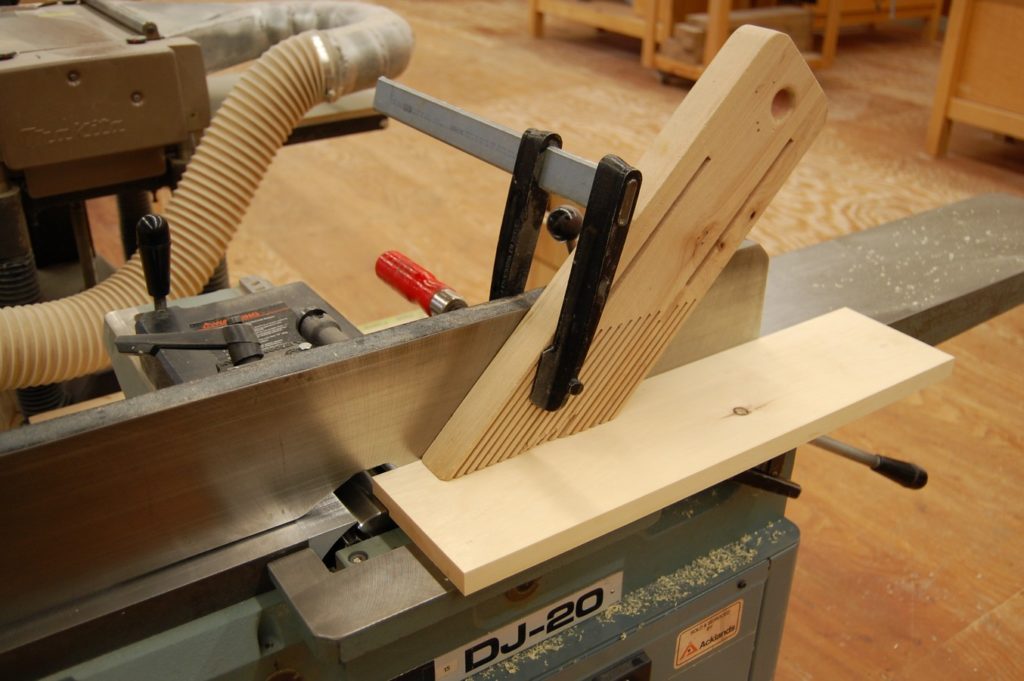
Locate and loosen the tilt lock handle on the fence. Set and lock the fence to the desired angle using an adjustable T bevel or a digital inclinometer. When angled, the fence should be tilted away from the cutterhead if possible. This provides more clearance for the operator between the cutter and the work, and visibility is improved. However, with the fence tilted this direction, the workpiece has a tendency to slide down away from the fence. An edge guide block may be clamped to the table to prevent this.

The fence may also be angled so it forms an acute or closed angle with the table. Tilting the fence this direction snugs the work into the fence and down to the table, so the piece does not have a tendency to slide away from the fence. The fence should be moved to the far left of the table so just enough of the cutter is exposed to make the cut. Use caution as your hands will be near the cutterhead. A guide or support block may also be clamped to the table for extra stability and safety.
Joint the piece using the technique for edge jointing. The first passes will remove only a small amount of material. Make repeated passes until the bevel is cut across the entire edge of the piece. Alternately, chamfers can be cut by setting the depth of cut and running the piece a set number of times over the machine. Always set up using a test piece to ensure the correct size.
Octagons can be made by chamfering a squared block on the jointer with the fence set at 45°. Use a support block clamped to the table as the bearing surface decreases in size as the chamfers are cut and the piece may become unstable.
Rabbeting
Unless the piece is narrow, as in an edge rabbet, the guard will need to be removed from the infeed table. The height of the infeed table sets the depth of cut. The width of the rabbet is determined by the distance from the fence to the edge of the knives. To cut a rabbet, keep the workpiece tight to the fence. Lower the infeed table with every pass over the jointer until the desired depth of cut is reached. Feather boards may be clamped to the fence to aid in keeping the work tight to the tables. If multiple pieces are to be rabbeted, each piece should be run before adjusting the depth of cut to ensure accuracy and efficiency.
In softwood for door and window jambs, some rabbets may be run in a single pass with a heavier depth of cut than would be acceptable for face jointing, as the width of cut is generally small. Lower the feed rate to reduce the danger of kickback. Not all rabbets can be run in a single pass.
When face rabbeting, a featherboard can be clamped to the fence to increase accuracy and safety. Always use heavy duty clamps and ensure they are securely attached with no danger of slippage.
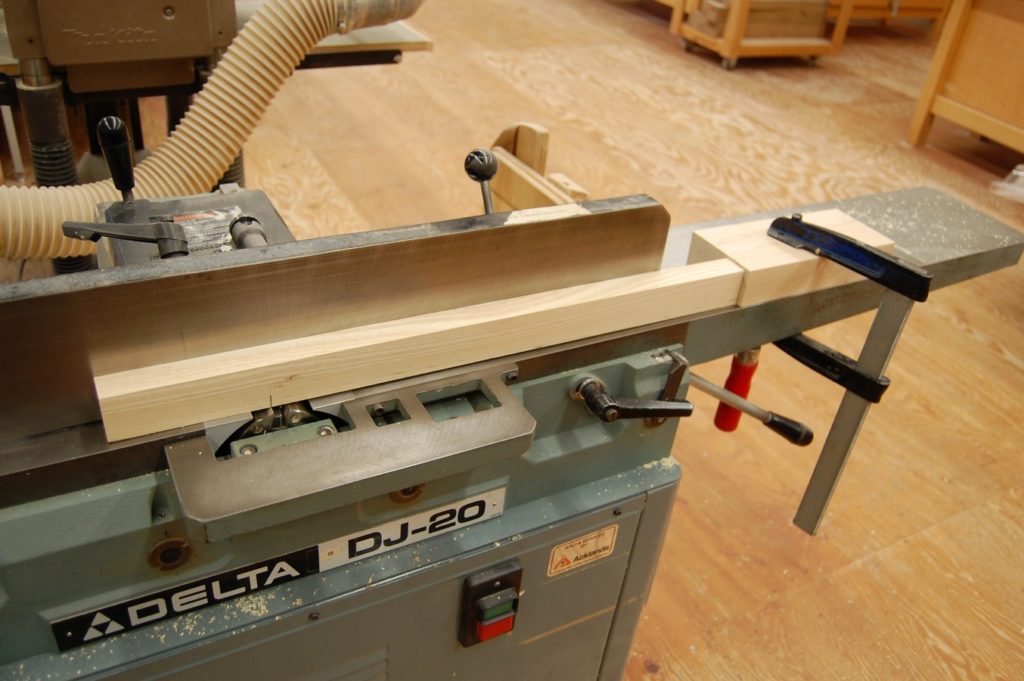
Jointing a taper
Tapered cuts can be made on the jointer by starting the cut part way down the length of the workpiece. This is accomplished by slowly lowering the piece onto the outfeed table before running the remainder of the workpiece over the cutterhead.
- Lock out the machine.
- Set the depth of cut. Slight tapers can be cut in a single pass, while heavy tapers will require multiple passes.
- Mark the start of the taper on the workpiece, and position it so it is located where the knives begin cutting.
- Clamp the stop block to the fence or infeed table at the end of the workpiece.
- Place the end of the workpiece against the stop block.
- Hold the remainder of the workpiece above the cutterhead. With the machine running, carefully move the guard out of the way just enough to allow the workpiece to make contact with the cutterhead.
- Carefully lower the workpiece down on to the outfeed table. Use extreme caution as your hands will be lowering the stock directly in front of the cutterhead
- Use a hold down or push block to move the workpiece safely over the cutterhead to complete the cut.
- Repeat the tapering cut on multiple faces, and in multiple passes if required.
Recessing
A similar technique to tapering on the jointer can be used to cut a shallow recess in a workpiece. Mark the start and stop point of the relief. With the machine locked out, position the layout mark with the start of the cut. Set a stop block on the jointer fence at the end of the workpiece. With the jointer running and the end of the workpiece against the stop block, carefully lower the piece onto the cutter. Move the piece forward just past the halfway point. Hold the piece firmly in place on the table and turn off the machine. When it comes to a complete stop, remove the workpiece, turn it around and repeat the cut on the other end.
This technique will produce a recess with radiused ends and the middle slightly tapering toward the centre. The taper can be left as is or quickly straightened with hand tools. The center portion cut can be made straight on the jointer if the outfeed table is also lowered. However, the outfeed table must then be recalibrated. A better option if a perfectly straight recess is required is to use the router table and a straight bit.
