1 Table Saw Safety
Any tool can be dangerous, however the nature of the table saw and its mechanics creates a higher potential for accidents. A 10 inch saw with the blade at maximum cutting depth has 3 inches blade exposed above the table. The same 10 inch table saw turns at about 225 km/h, presenting a high potential for injury. Unguarded cutters are necessary for many joinery operations, increasing the potential for accidents. The table saw is prone to kickbacks; understanding the conditions that cause them will reduce the possibility of them occurring. Always use the appropriate prevention measures and safeguards.
Guidelines for Safe Ripping
- Keep your hands away from the saw blade at all times, and use all appropriate guards and splitters.
- Use a push stick if the rip fence is set for a 6 inch / 150 mm or less cut.
- Always use the correct blade for the material and type of cut you are performing.
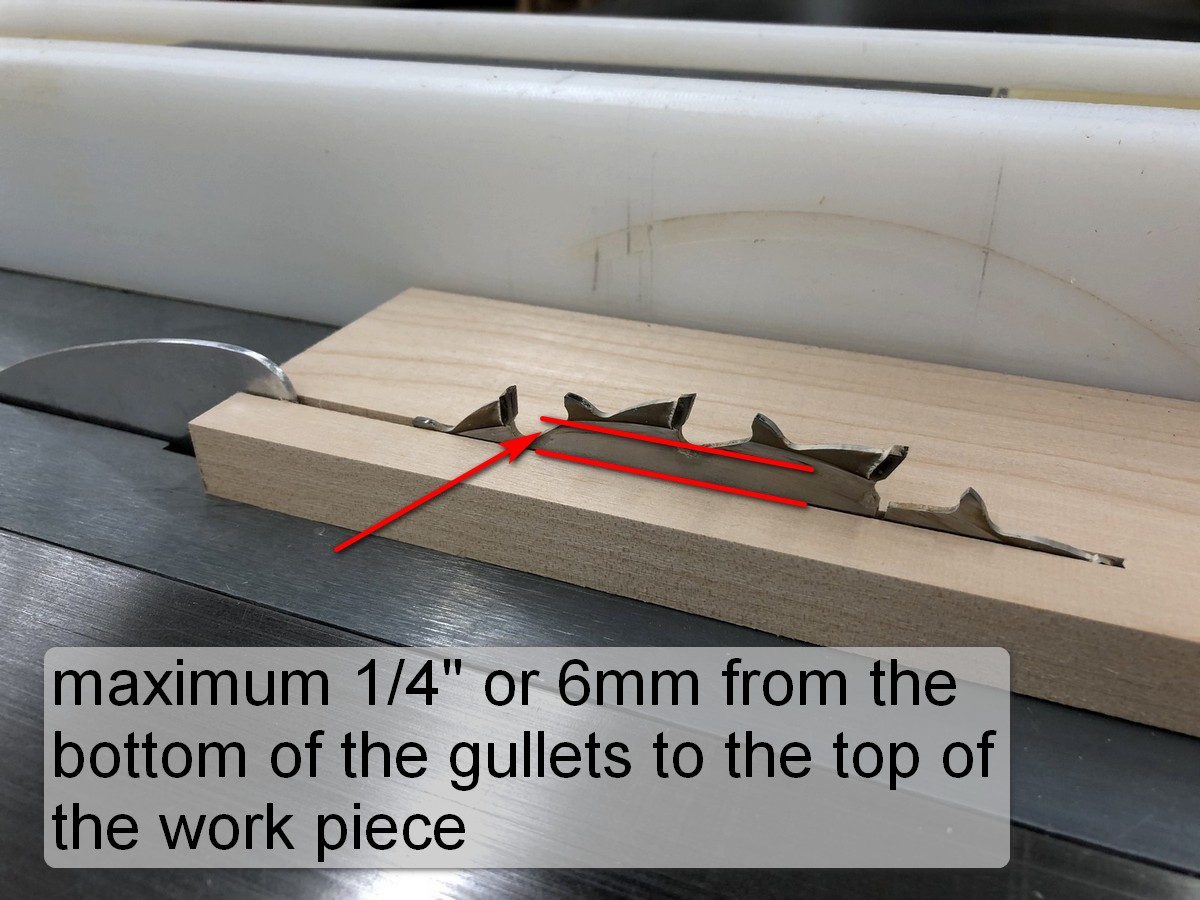
- Set the blade to the correct height, with the gullets no more than 6 mm or ¼ inch above the surface of the material.
- Use an appropriate feed rate. With thicker and/or denser stock use a slower feed rate to allow the saw to complete the cut. Feeding stock too quickly is dangerous.
- Feed the wood smoothly throughout the cut. Do not pull the work back out of a rip cut — it can catch the blade and kickback.
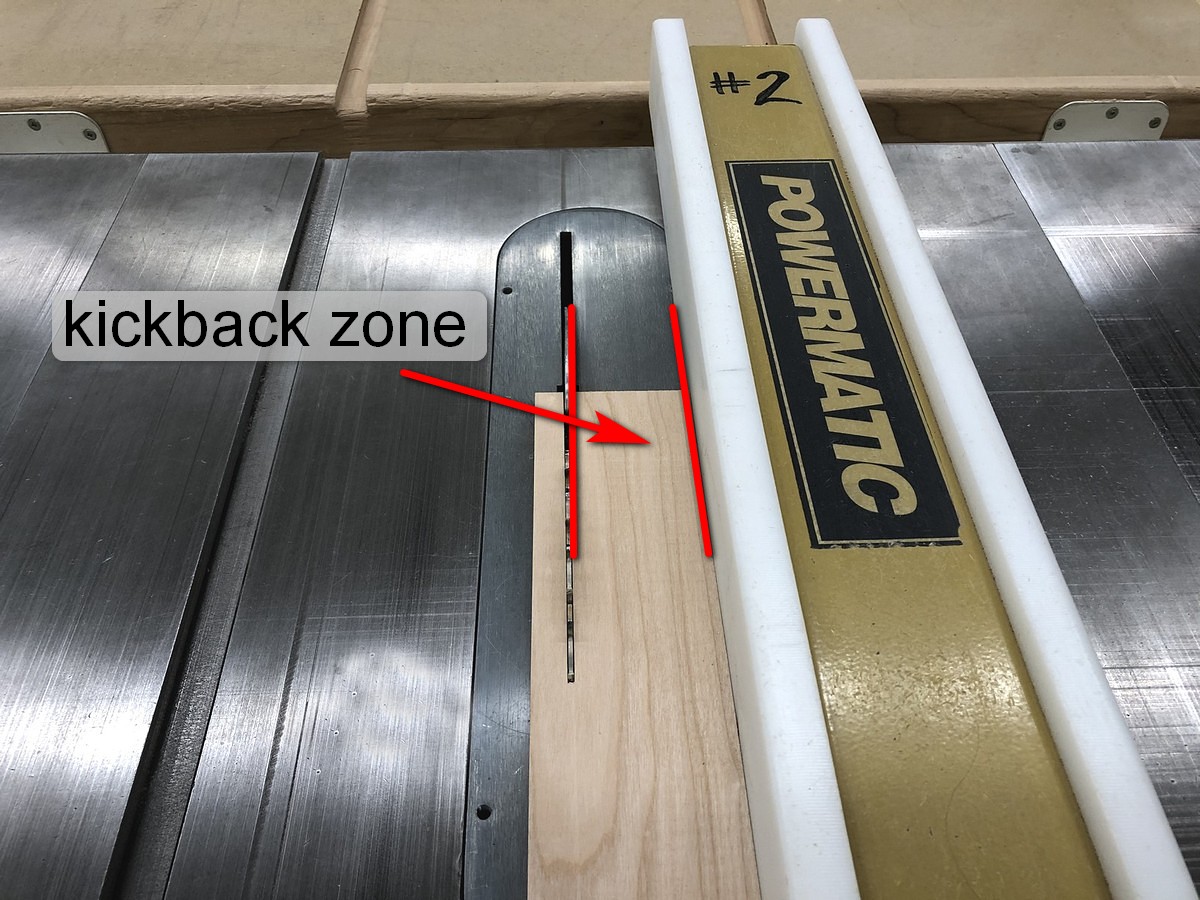
- Whenever possible, do not stand behind the workpiece in the kick back zone between the blade and the rip fence. Some operations such as cutting large pieces may require it.
- The material to be ripped must have one flat face and one straight edge. These flat and straight reference surfaces ensure the workpiece remains stable and in contact with the table throughout the cut.
- The material to be ripped must remain firmly in contact with the rip fence at all times. Stock losing contact with the rip fence and contacting the back of the saw blade just after the cut creates a high potential for a kickback.
- The length of the workpiece against the rip fence should be greater than the width of the cut. This length-to-width orientation creates stability as the material is pushed along the rip fence.
- Push the material through the saw until it clears the back of the blade. Failing to do so leaves the workpiece in the kickback zone.
- Do not use your left hand to push the offcut clear of the bade as you are cutting. If the piece kicks back, it can drag your hand through the blade.
- When the cut is complete, do not pick the workpiece up off the table and carry it over the spinning blade. If you drop it, it will kick back. It is acceptable to slide the piece on the table around the right side of the rip fence, then pick it up.
- Do not reach behind the blade unless it has come to a complete stop, the workpiece can catch and drag your hand through the blade.
- When ripping solid stock, be aware of knots, splits, or other defects in the material. Knots can come loose and be thrown back at the operator. Splits can be a clue for tension within a board that may close up and bind in the cut. When cutting these types of materials, a face shield is recommended. An alternative method is to use a bandsaw to cut the stock to rough width before using the table saw to cut to an accurate size.
- When moving around the shop environment, never walk behind a table saw that is being used for ripping. If there is a kickback, you will be in the path of the projectile.
Also see Common Operations: Ripping
Guidelines for Safe Crosscutting
- Keep your hands away from the saw blade at all times, and use all appropriate guards and splitters.
- Always use the correct blade for the material and type of cut you are performing..
- Set the blade to the correct height, with the gullets no more than 6 mm or ¼ inch above the surface of the material.
- Use an appropriate feed rate. With thicker and/or denser stock use a slower feed rate to allow the saw to complete the cut. Feeding stock too quickly is dangerous.
- Use a fence, either the mitre gauge or a shop-made crosscut tray. A mitre gauge should be used with an auxiliary fence to adequately support the work. This also gives a cleaner cut as it creates zero clearance to the blade. A crosscut tray can better support larger work pieces. Shop-made trays can also provide zero clearance on the bottom and back of the cut. They are easier to set up for cutting multiple parts with a stop block than a mitre gauge.
- Hold or clamp parts that are trapped between the stop block and the blade throughout the entirety of the cut. Any piece that is trapped between the fence and the blade has the potential to kick back.
- Use a wooden pencil with an eraser as a hold-down when crosscutting small parts with a stop block.
- Clear small offcuts before they accumulate, they can vibrate into the back of the blade and kick back. Let the saw come to a complete stop before removing them.
- Never use the rip fence with the miter gauge or crosscut tray at the same time. You can use a stop block attached to the rip fence, if the offcut can freely spin between the blade and fence.
Also see Common Operations: Crosscutting
Understanding Kickbacks
A kickback occurs when material that is being cut is suddenly driven backwards by the spinning saw blade. This happens when the energy the blade usually puts into cutting is transferred to the workpiece as motion. There are several reasons why this might occur.
Trapped workpiece
When using the rip fence during a typical ripping operation, material is trapped between the right side of the blade and the fence. If the workpiece contacts the back of the blade after the initial cut is made, the blade can pick up the work and propel it backwards. This can occur any time the material being cut is trapped between the spinning blade and something else, usually the fence when ripping, or a stop block when crosscutting. Another situation where the work can unexpectedly contact the back of the blade occurs when tension in the wood is released and the kerf closes in as it is being cut. Using a splitter or riving knife prevents this type of kickback by preventing the work from contacting the back of the blade.
Riding up on the blade
When material is fed too quickly, it can ride up on the saw blade and lose contact with the table. This creates an unstable workpiece that may unexpectedly catch the blade, especially as it comes back down on to the table. A contributing factor to this type of kickback is sometimes using the incorrect blade for the type of cut, or a dull blade. Using a fine tooth crosscutting blade for ripping is particularly dangerous.
Blade height
Setting the blade too low can be a contributing factor to a kick back. If the saw blade is set low in relation to the work piece, more teeth are engaged in the cut, requiring more power from the saw to complete the cut. The saw is more likely to slow or stall, and can contribute to a kick back. More teeth in the cut requires more force be applied by the operator to push the wood through the saw, which also decreases the safety of the operation.
The direction of force the saw teeth exert on the workpiece also changes in relation to blade height. When the blade is set low, the force is directed in a more forward direction, toward the operator. The operator must work harder to keep the work in contact with the table. When the blade is set high, the direction of force increases in a downward direction, into the table. The cut requires less operator force.
The common belief is that with less blade exposed, the cut is safer as there will be less chance of severing a body part. However, it is important to understand how the forces and power requirements change with different blades heights. Work Safe BC recommends that the bottom of the gullet on the saw blade clear the top of the workpiece by no more than 6mm or ¼ inches.
Underpowered saw
An underpowered saw can slow down during heavy cuts. As the blade slows, it can catch the workpiece and propel it backwards. If the energy is not put into cutting, it is transferred to other forms, namely motion in the form of a kickback. Thin-kerf saw blades were designed for use on saws with less powerful motors such as contractor saws to compensate for lack of power. When using a thin-kerf blade and a splitter or riving knife, ensure the kerf is large enough to allow the workpiece to pass the splitter without binding. Some splitters are designed to work with typical 1/8″ or 3 mm saw blades only.
The space that is left by the saw blade as it removes the wood.
