8 Use of the Jointer
Safety rules
As the cutterhead is exposed in use, the jointer must be used with caution and only by trained operators. Observe the following safety guidelines for the jointer.
- Never run your hands directly over the cutterhead while on the surface of a workpiece. Lift and place them, or use a push block.
- Do not place your hands within 150 mm or 6″ of the cutterhead at any time.
- Do not place your hands within 150 mm or 6″ of the leading edge of the board.
- Use a push block or stick at the end of the cut, especially when face jointing.
- Do not joint thin stock (less than 12 mm or 1/2″).
- Do not joint material that is shorter than 300 mm or 12″.
- Do not edge joint stock that is less than 20 mm / 3/4″ wide, and use a push block designed for narrow stock.
- Only remove the spring loaded guard for rabbeting operations, and replace it immediately after use.
- Do not joint excessively knotty or defective stock. It could break apart while jointing.
- Do not joint end grain.
- Do not pull a workpiece back out of the machine, it can grab and kick back.
- Jointing a heavy cut increases the potential for kickback, always check the depth of cut before starting, and reduce the depth of cut for wider stock or dense hardwood.
- Feed the work at a rate that it does not reduce the speed of the cutterhead.
- Reset the depth of cut to 1 mm / 1/32″ – 1/16″ after using the jointer.
- Do not wear loose fitting clothing or jewelry. It can be become tangled and pull you into the cutterhead.
- Follow all general machine safety rules.
Stock preparation
Material to be jointed should first be cut to rough length and rough width. Where rough stock is quite bowed or cupped, cutting it to the smallest size possible while still leaving a machining allowance will help to preserve thickness and width. Smaller pieces to be jointed should be left in multiple lengths to safely machine, and cut to size after jointing and planing. With all pieces to be jointed, ensure the ends have been trimmed free of defects such as splits or checks. This also ensures staples and paint are removed prior to machining. Do not joint plywood as the adhesive is very abrasive and excessively dulls the knives. Never place stock on the floor where it can pick up grit and small particles that will dull and damage the tooling.
Machine sequence
The jointer is the first machine used in bringing rough stock to an accurate piece, ready for joinery or further machining. Surfacing four sides, or S4S is a common step in almost all solid lumber machining. The steps should be completed in this order:
- Joint a face side.
- Joint an edge square to the face side.
- Plane to final thickness (using the thickness planer).
- Rip or plane to final width (using the table saw or thickness planer).
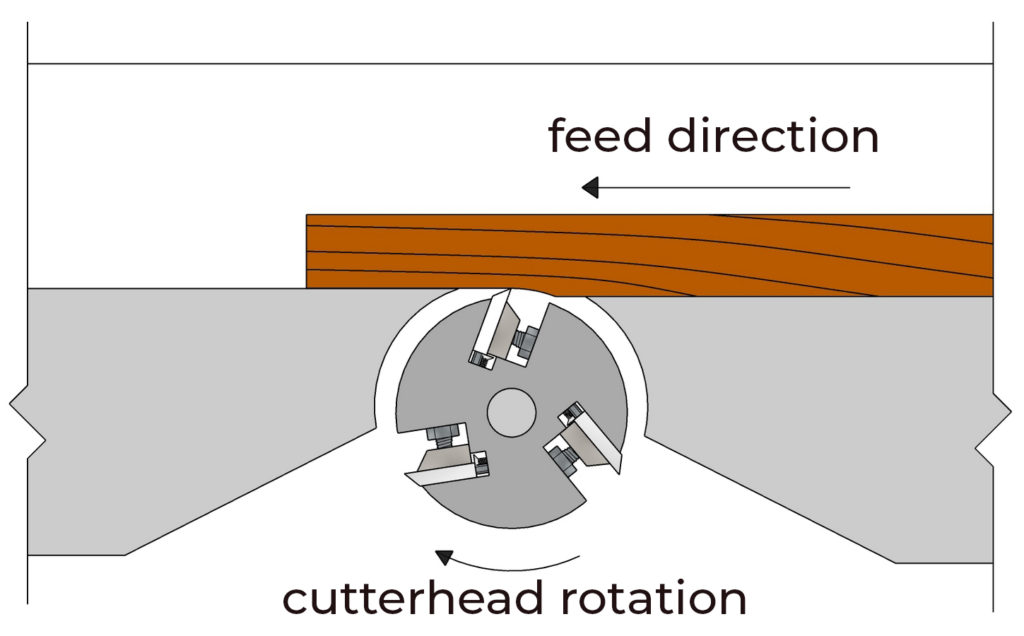
Grain orientation
When selecting the direction of feed, grain orientation must be checked to ensure the wood fibres are smoothly sheared and not lifted up. The grain on the board should be running from the top left to the bottom right when viewing the side of the board to be jointed. Another way to visualize this is the grain on the board should be running up away from the operator when viewing the side of the board to be jointed. If the grain reverses, slow the feed rate significantly when jointing against the grain. This helps to prevent tear out and usually achieves a better cut. The areas around knots always have reversing grain and the knots are harder end grain, reduce the feed rate to improve the quality of cut.
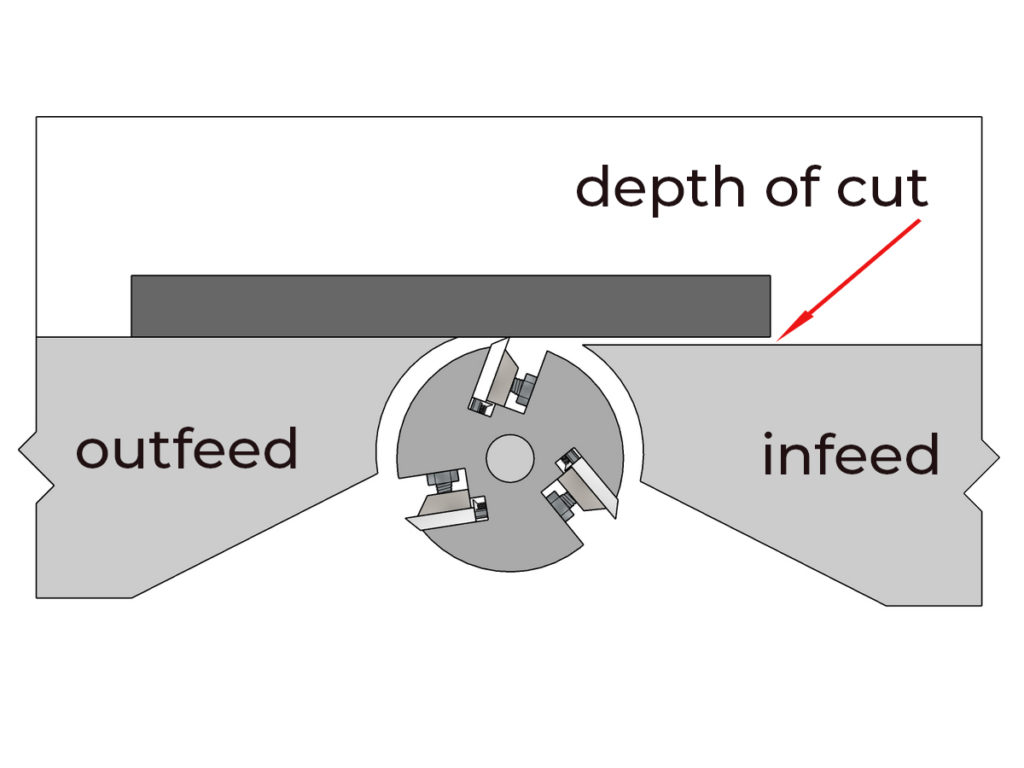
Depth of cut
The depth of cut is set by adjusting the height of the infeed table. It can be checked by locking out the machine and placing a straight edge on the outfeed table that overhangs the infeed table. The distance between the ruler and infeed table is the depth of cut.
Safe operation of the jointer requires setting the correct depth of cut. Consider the total volume of material that is being removed in a single pass. Observe the following guidelines:
- Remove no more than 2 mm or 1/16″ in a single pass. In rare cases, you can remove up to 3 mm or 1/8″ when edge jointing narrow softwood.
- When face jointing wide stock, the depth of cut should be reduced. Or, the wider the cut, the less should be taken off in a single pass.
- Reducing the depth of cut will usually increase the quality of the cut.
- Reducing the depth of cut will usually result in less tear out.
- When jointing dense woods, the depth of cut should be reduced.
Feed rate
Unlike a hand plane, the jointer cuts with a rotating motion. While a quick glance may show the jointed surface to be flat, upon closer inspection it is clear it is made up of many small curved surfaces made by the rotation of the cutter while the stock is moving. These peaks and valleys are known as mill marks or machine marks, and show up as striations across the surface. If the stock is fed quickly, the mill marks left are larger. When several passes will be required to surface a workpiece, it is acceptable to use a faster feed rate on the initial passes to quickly remove material, then a slow feed rate on the last pass. The slower rate on the last pass will produce a much higher quality of cut.
Having a high quality of cut is particularly important when edge jointing boards that will be laminated. Most adhesives require wood to wood contact, the large peaks and valleys left by a fast pass over the jointer will produce unacceptable results and could result in joint failure.
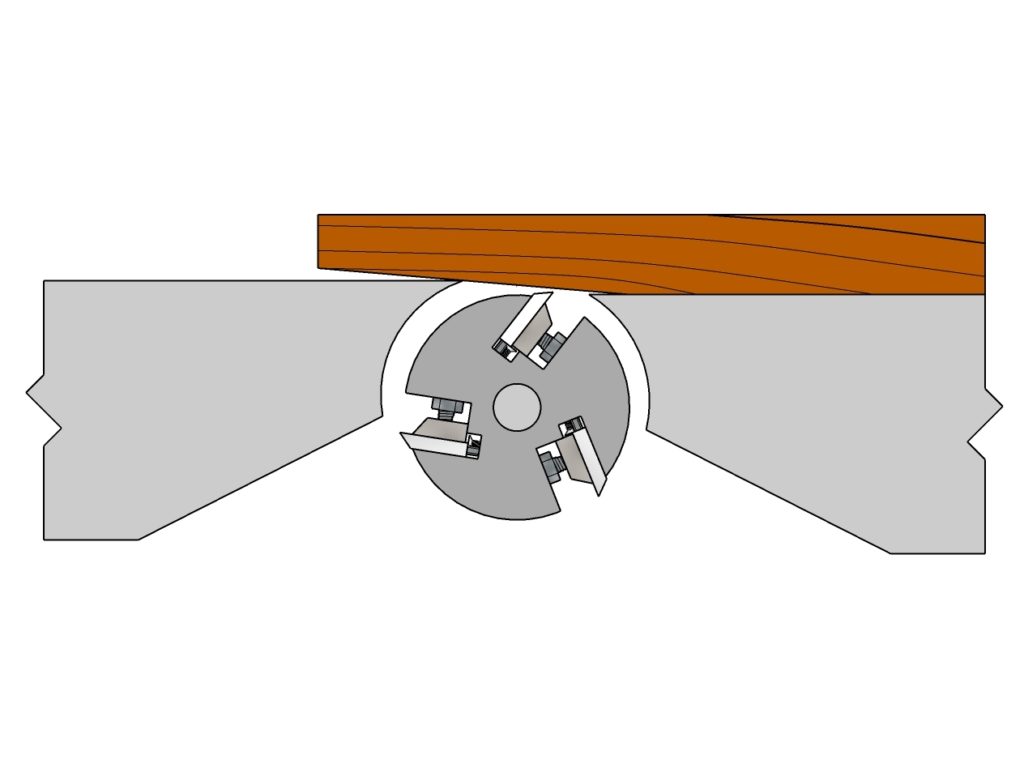
How the jointer works
When passing material over a jointer the cutterhead removes points of the wood that are high. The just-machined wood references on the outfeed table and is kept in the correct plane as the remainder of the board is jointed. Passes are repeated until all of the surface has been surfaced.
For the jointer to work properly, it is critical that the height of the outfeed table is set exactly to the height of the knives at the highest point in their rotation, minus a tiny amount to account for the peaks (mill marks) that are left on the surface by the knives. It is these peaks that reference on the outfeed table. A straightedge placed on the outfeed table will just touch the edge of a knife when it is rotated to top dead centre. Problems arise when the outfeed table is either too high or too low in relation to the knives at their greatest depth of cut.
Outfeed table too high
If the outfeed table is set too high, the workpiece gradually rides up on the outfeed table as the cut progresses. A taper is cut instead of a consistent amount of material being removed from the surface being jointed. If the jointer consistently stops cutting toward the end of the workpiece, the outfeed table is too high.
If the jointer is to be used for trimming and sizing, it is imperative that the outfeed table be in perfect alignment to prevent tapering cuts.
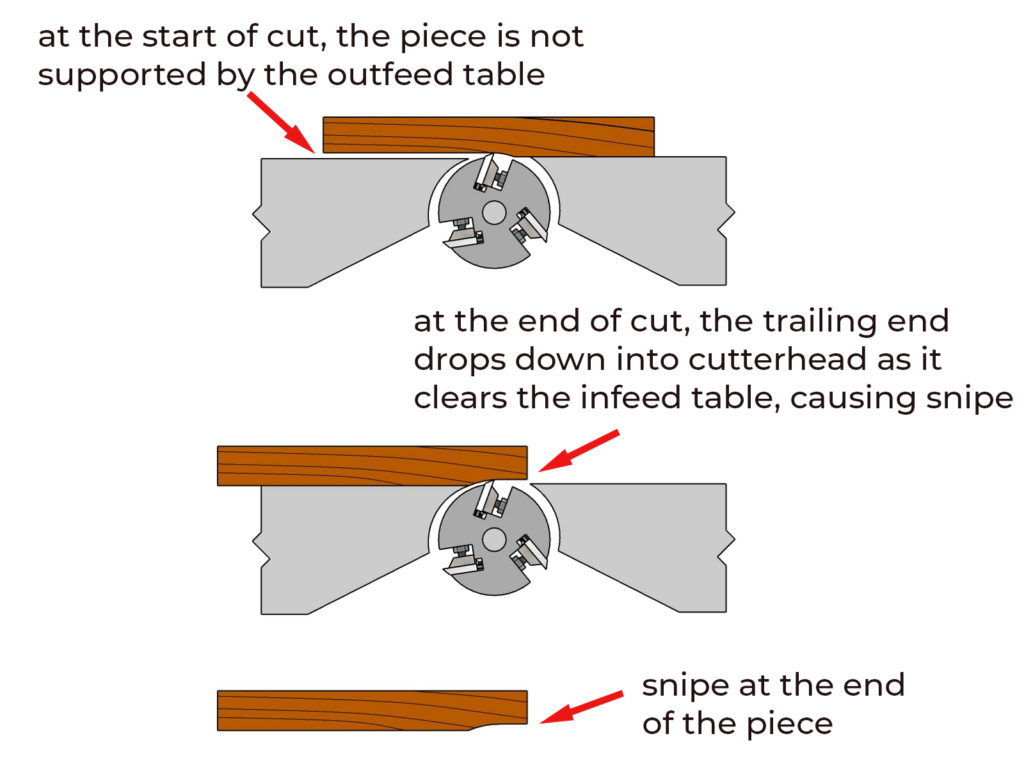
Outfeed table too low
If the outfeed table is too low, at the end of the cut as the workpiece clears the infeed table, it drops down on to the cutter head and snipes the end of the board. A severe snipe can cause a kickback as the wood is suddenly dropped into the cutterhead. A small or moderate snipe is an issue when edge jointing boards for lamination, as wood to wood contact is lost at the ends of the panel.
Procedure for face jointing
Follow these steps for safe and accurate face-side jointing:
- Place the cupped or concave side face down on the infeed table. This provides the most stability as it is jointed. It will usually be the sapwood side of the board.
- Determine grain direction, and the orient the board so knives will be cutting with the grain.
- Using light pressure, advance the board into the cutterhead. Once the board is supported by the outfeed table, keep moderate pressure on the outfeed table just behind the cutterhead. Maintain this pressure throughout the cut.
- Never pass you hands directly over the cutterhead while face jointing. Even though the cutterhead is covered by the work piece, potential for kickback or the workpiece shattering exists. Lift and place your hands over the cutterhead.
- Do not push down excessively on the infeed side of the cut. The workpiece will deflect, then spring back when the cut is complete. The face will look and feel smooth, but will not be flat.
- Use a push block hooked on the end of the workpiece to safely finish the cut.
- For shorter or thin boards, use a push block throughout the entire cut for safety.
For boards that have twist, locate the corners that make contact with the table. Focus pressure on these high points for the first pass or two until the board makes contact with the table without rocking. Use a push block to keep your hands away from the cutterhead at all times.
The number of passes required to surface a piece depends on how out of flat it is to start with, and the depth of cut. Every piece is different; a relatively flat piece can be surfaced in a single pass, while larger pieces with more bow, cup or twist can take several passes. It is best to take several light passes than one heavy one for safety and quality of cut.
Procedure for edge jointing
Follow these steps for safe and accurate edge jointing:
- Choose the edge with the least amount of defect (such as wane or grain run-out) to joint.
- If possible, joint the edge that is concave. It will be stable on the table and not rock.
- Place the jointed face against the fence.
- Place the thumb of your left hand on the top edge of the piece, and use your fingers to keep the face tight against the fence. Your thumb prevents your hand from slipping off the face of the board.
- Use your right hand on the end of the piece to provide forward motion, and keep the face against the fence.
- If the stock is narrow, use push sticks to guide it over the cutterhead.
- Observe the same guideline for maintaining pressure as in face jointing.
