18 Common Operations
The bandsaw is a versatile tool that is capable of performing a wide variety of operations, from cutting fine curves to resawing large timbers. Different bandsaws are manufactured that are better suited to some work than others; large bandsaws are usually used with wide blades for straight ripping and resawing, while small bandsaws are fitted with narrower, finer blades capable of cutting shapes and curves. Many woodworking shops will have more than one type of bandsaw, each set up for different cutting operations.
Bandsaws can be used for the following operations: ripping, resawing, crosscutting, bevel cuts, circle cutting, curve cutting, and pattern cutting.
Ripping
Freehand ripping
Ripping on the bandsaw can be done freehand, or without the need for an edge guide. It is used when a smaller bandsaw lacks a fence or there are only a few pieces to be cut, or when the bandsaw is being used to straighten an edge. Freehand ripping is used to trim the edge of a board out of plane with the existing edge for the purpose of favorably aligning the grain when performing rough break-out.
When freehand ripping, it is useful to mark the line of cut on the workpiece to aid in sawing a straight line. This can be marked with a straight edge and pencil. or for longer pieces with a chalk line. A chalk line is particularly useful when ‘straightening’ the grain to the edge of the board.
When freehand ripping, use one hand to guide the stock just ahead of the blade, while using the other hand at the end of the workpiece to guide and steer it though the cut. Your forward hand will act as a fence to achieve a straighter cut.
Guided ripping
As on the table saw, a fence can be an aid to ripping, and is necessary for performing repeated, accurate and efficient cutting. Bandsaw fences do not have scales, a tape measure or ruler is used to set the distance between the fence and the blade. On raker-type blades, use the tooth that is closest to the fence to set the distance. Always wait for the saw to come to a complete stop before bringing a measuring device up to the blade. Once the fence is set to the correct distance, the piece can be guided through the blade. When making narrow cuts, use a push stick to aid in pushing the stock past the blade. The push stick can be used on either side of the blade, pushing either the workpiece or the offcut. Unlike a table saw, there is no kickback danger due to the work being trapped between the fence and the blade. In some cases, it may be easier to lay the push stick horizontally on the table to guide the work. If the push stick will be cut by the blade, it should be kept in contact with the table to prevent the force of the blade from slamming it down on the table.
Adjusting for lead, checking for drift
Also see set-up and maintenance for more information on adjusting for drift.
Lead
If a bandsaw blade becomes duller on one edge, it will cut more aggressively on the sharper side, to cut a straight line, the workpiece needs to be angled relative to the blade, compensating for the duller side of the cut. When cutting freehand, the operator adjusts the angle of the workpiece as it is cut, if a fence is being used, the fence should be adjusted to the blade, or the blade should be repositioned on the wheel. To correct lead, the blade can be dulled slightly on the sharper side by using a honing stone, or the blade can be replaced.
Drift
As the position of the blade forward and back on the crowned wheels can vary when it is installed, the angle of the teeth changes slightly relative to the fence. The rip fence needs to be checked when a new blade is installed and periodically throughout its life to ensure proper alignment with the blade, this is called checking for drift.
Resawing
The most efficient and safest tool for resawing is the bandsaw. While there are models manufactured just for this purpose, any bandsaw can perform resaw cuts. Bandsaws are well suited to resawing as they have the capacity to cut very wide stock, have thinner kerfs relative to other other machines, and don’t have a risk of kickbacks.
Resawing is cutting through the thickness of a board to make two or more thinner pieces. It is the technique used to create bookmatched panels, shop-sawn veneers, and plies for bent laminations.
Wider blades with a small TPI are are well suited to performing resaw cuts. The wide blade reduces deflection, increasing the accuracy of the cut, while a small number of teeth in the cut makes for efficient, quick sawing through wide stock and clears the sawdust without packing the kerf and overheating. For wider resaw cutting, a slower feed rate may be necessary.
When resawing, a standard rip fence or a resaw pin (also know as a pivot block) may be used. Before attempting resaw cuts, ensure the blade is perfectly square to the table, and that either the fence or resaw pin is square to the table. If they are not, there can be significant runout over the width of the cut.
When using a fence, it is important to ensure the fence is properly set to the blade with little drift. If using a resaw pin, the operator accounts for lead by steering the workpiece through the cut, keeping the cut parallel to the blade. When clamping the resaw pin on the bandsaw table it is important to line-up the highest point of the curve in the pin with the very tips of the blade since that is where the cut is occurring. If you were to line the resaw pin up with the centre of the blade, for example, the pivoting would not work to guide the blade through for a parallel cut.
Crosscutting
Rough crosscutting and mitring cuts can be made on a bandsaw, but are better suited to other machines, such as the table or mitre saw. They can be made freehand, or with the use of the mitre gauge.
Bevel cuts
Bevels and angled cuts can be made on the bandsaw by tilting the table. The blade remains stationary. With the table tilted, the material can have a tendency to slide on the table, putting lateral pressure on the blade. Good material control is necessary. Depending on the make of saw, the factory blade insert may need to be removed and replaced with a shop-made insert that will allow for the blade to run at an angle. If a tight-fitting, thick insert is left in the saw and the table tilted, it will bend and damage the blade.
To set-up for a bevel cut, locate the lock under the table, release it and tilt the table to the desired angle before locking the table in position. A sliding T bevel is useful for setting the angle. Straight bevel cuts can be made using the fence or a resaw pin, or freehand. Freehand bevel cuts are an efficient way to shape curved parts without the construction of jigs, as would be necessary with other methods. When making curved bevel cuts, it is important to keep the workpiece rotating so the radial line of the curve is perpendicular to the blade.
Circle cutting
A circle cutting jig for the bandsaw uses a centre point mounted on a sliding strip to vary the diameter of circles which can be cut. The radius of the circle is simply set by measuring the distance between the centre point and the bandsaw blade, and fastening the sliding strip in that position.
Underneath the auxiliary tray there is a wooden strip which fits in the mitre slot of the bandsaw table. This strip enables the tray to be moved in and out of the saw. The circle cutting jig will only work properly when the front edge of the saw blade is exactly even with the centre point. For this reason, a stop block is fastened to the front of the auxiliary tray to stop the tray at exactly the place where the centre point and blade edge are even. If the tray goes in too far, the jig will cut on a spiral inwards and if the tray does not go in far enough the cut will spiral outwards.
To use the bandsaw circle cutting jig a piece of wood is mounted on the centre point with the tray off of the saw. The auxiliary tray is then slid into place with the bandsaw running. The track on the bottom of the tray guides the tray and wood for a straight cut. The tray will stop when the stop block makes contact with the front of the saw table top. At this point the wood will have a saw kerf leading in from one edge. With the tray in this position the wood is rotated around the centre point until it returns to the original position. The tray can then be carefully backed away from the saw blade and removed from the machine. Once the wood is clear of the blade the scrap material may be lifted off the circle removed from the centre point. If more circles are to be cut, another blank of wood may be placed on the centre point, and the sequence repeated.
Curve cutting
With the correct blade, bandsaws excel at cutting curves and irregular shapes. The tightness of curve that can be cut is directly related to the width of the blade, the narrower the blade, the tighter the radius that can be cut. The other factor is the set of the teeth. Blades with more set will cut curves easily, while blades with little or no set will not perform these cuts. The greater the set, the tighter the radius the blade will cut.
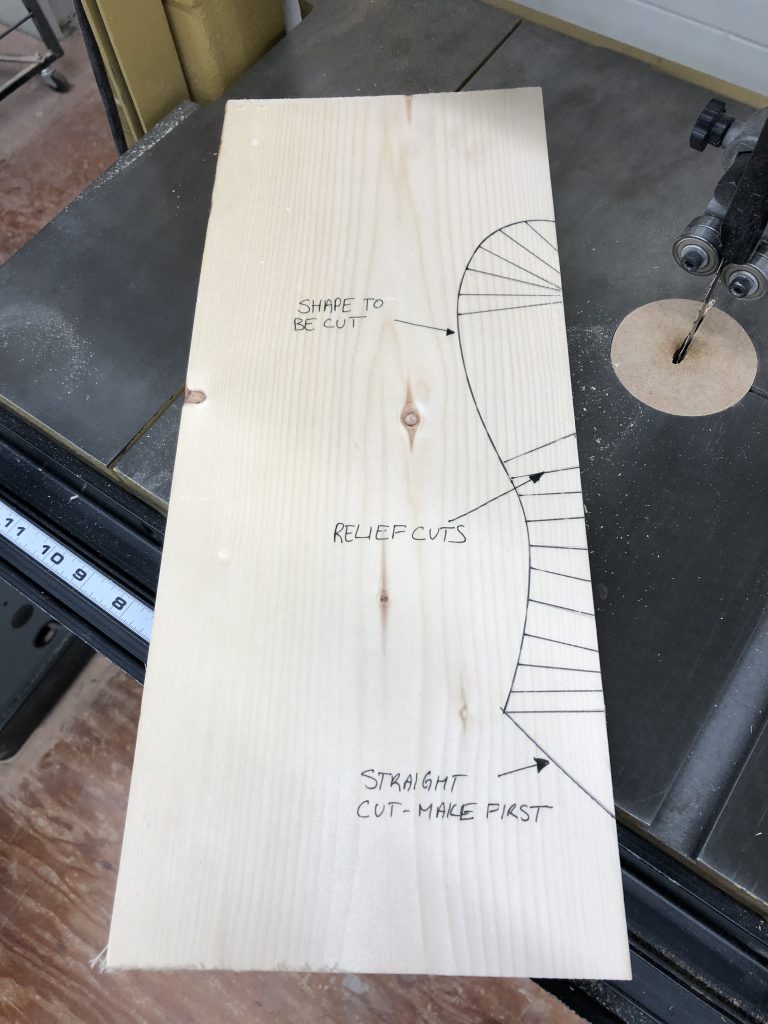
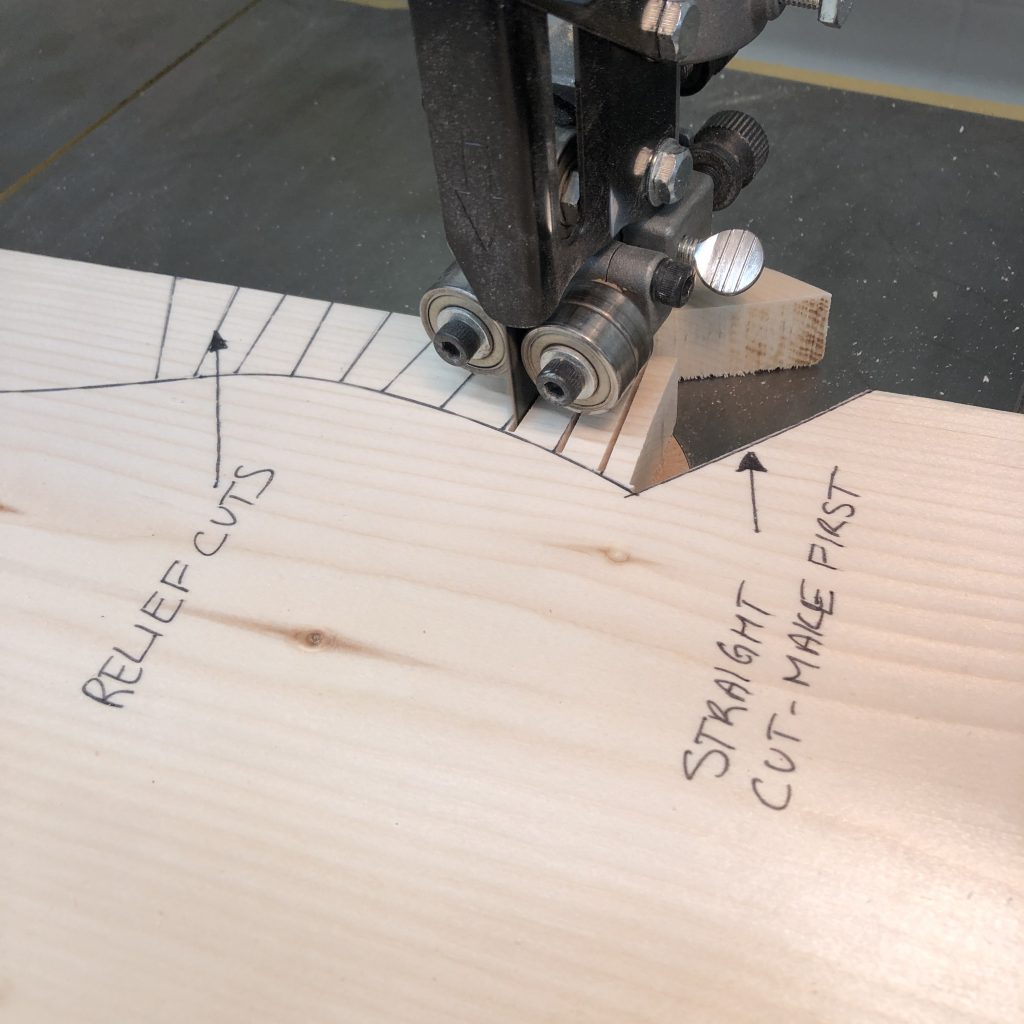
When cutting curves, use the widest blade that will handle the radius of the cut. This will result in a fairer, smoother curve requiring less clean-up. If the back of the blade rubs on the kerf, the blade is too wide for the given radius. For tighter curves, or when narrower blades are not available, relief cuts (straight cuts) should be made which allow the waste to break away and prevent the blade from binding in the cut. Relief cuts should be short, as the workpiece will have to be backed out of the cut. When backing the blade out of any cut, there is the potential to pull the blade off the wheel. Avoid backing out of long and curved cuts. Pay close attention to the position of the blade, ensure it is aligned with the kerf as the workpiece is backed out.
A resaw pin type of guide can be used on the bandsaw to cut parallel curves. Starting with a curved workpiece, set the distance from the pin to the blade the required distance. Run the curved edge along the resaw pin, pressure against the guide pin allows a curved cut to be made parallel to the original edge.
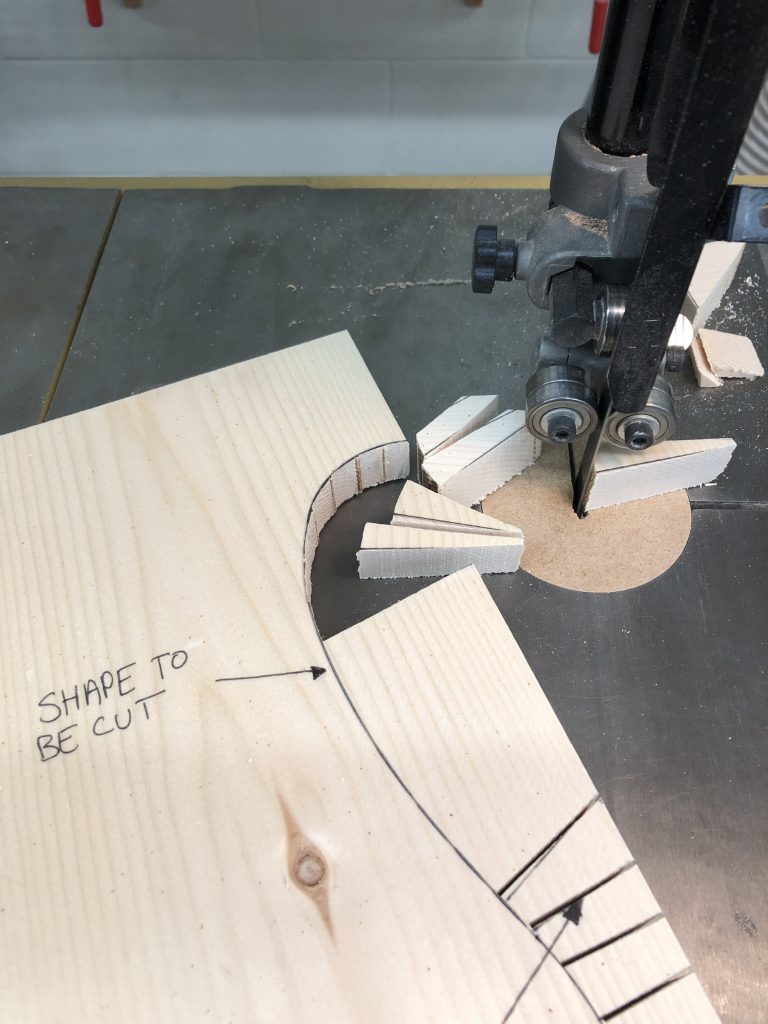
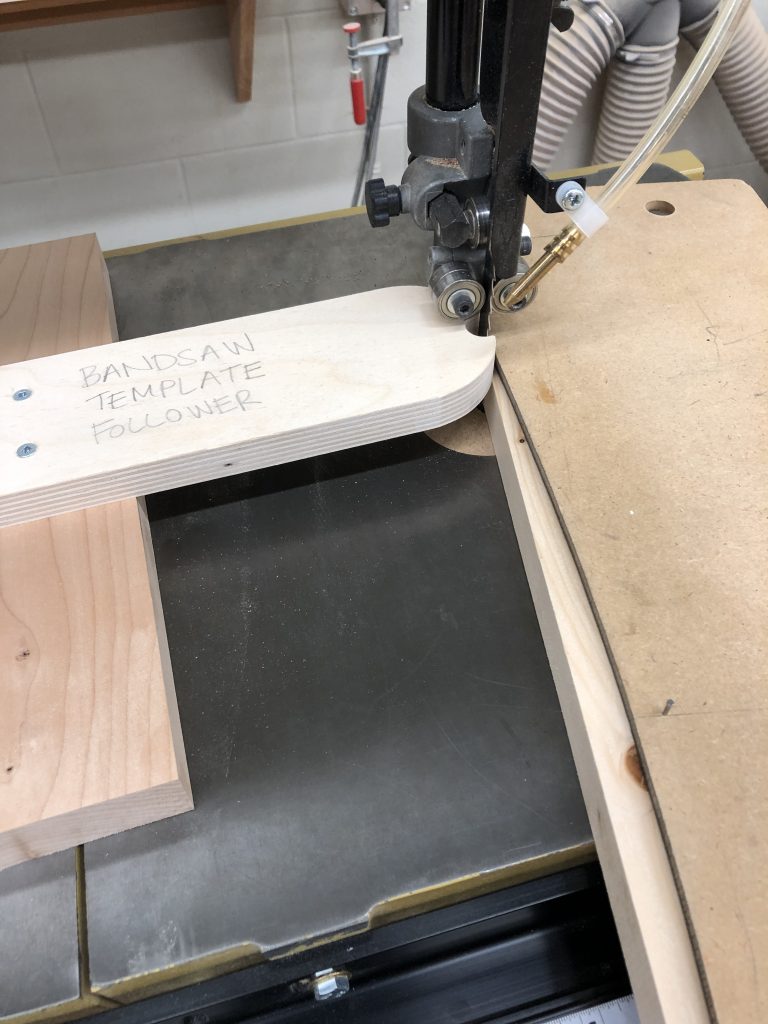
Pattern cutting
A template can also be used to make repeated identical cuts on the bandsaw.
A curved or straight pattern is fastened to the underside of the wood to be cut with a small finishing nail or double-sided tape. The template is run against an auxiliary guide which is clamped to the bandsaw table. This guide is made to fit around the blade so that the edge of the guide is flush with the right side of the blade.
The auxiliary guide must be clamped to the bandsaw table on top of a spacer which is slightly thicker than the piece of wood being cut so the auxiliary guide won’t rub the off-cut of the piece being cut.

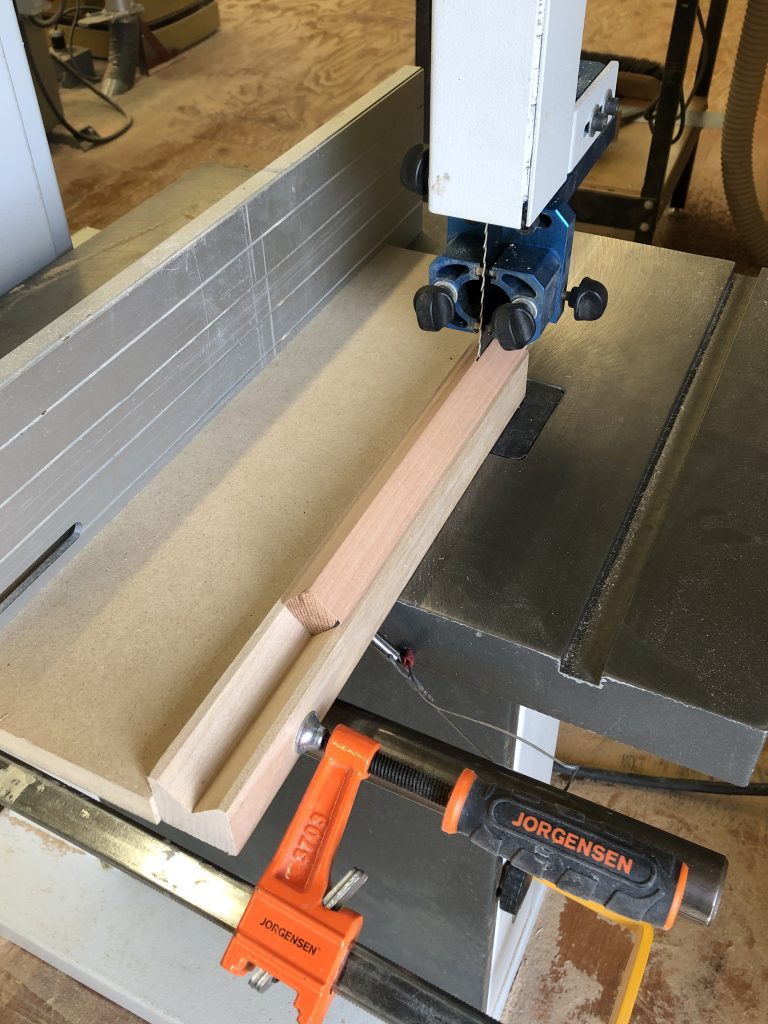
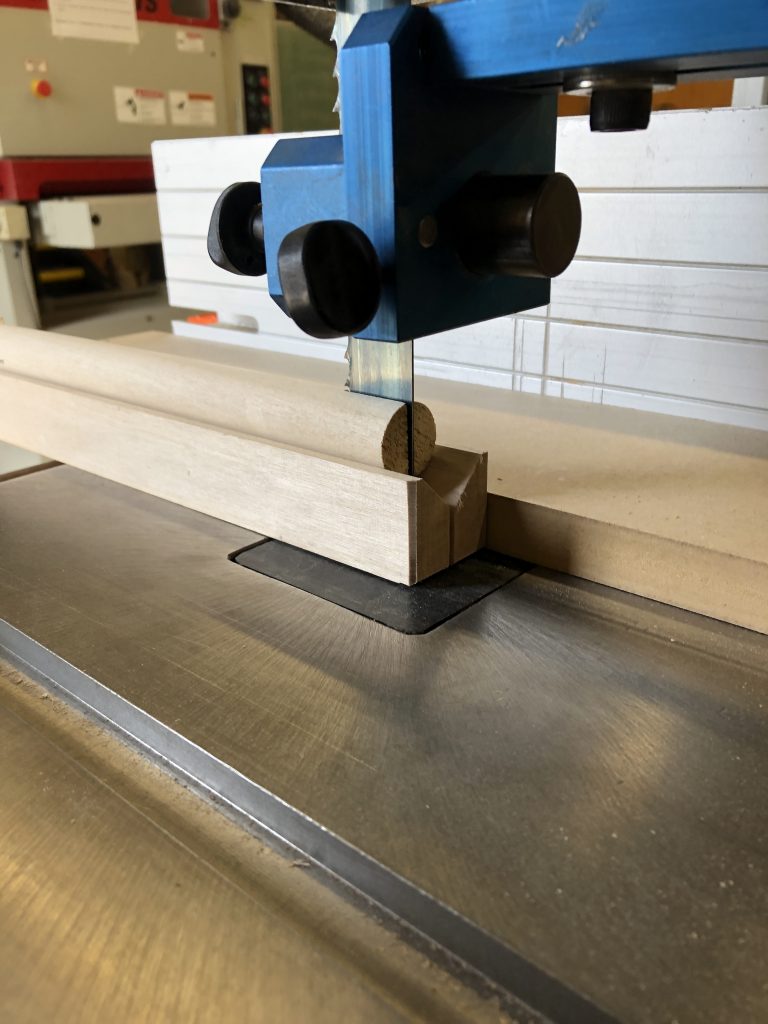
Cutting round and square stock using a V block
A simple V block allows for the cutting of round, square and rectangular stock. The block can be positioned to resaw material, producing half-round piece with round stock, or triangles or octagons with square stock. It can also be used for cutting slots for tenon wedges in round stock, as well as diagonal slots in square stock. Dowels and any round stock tend to rotate during a cut, causing the cut to be out of plane. To prevent this, a vertical splitter bar behind the blade can be added to prevent the piece from twisting during the cut.
The V block should be secured to the fence or to the table to prevent it from moving, and to set its position relative to the blade.