4 Common Operations
The table saw is the tool of choice for many basic ripping and crosscutting operations. Often, jigs and fixtures are used to increase safety, accuracy, and speed. A number of common table saw set-ups for both ripping and crosscutting operations described below.
Ripping operations
When performing ripping operations, the workpiece should always be positioned between the rip fence and the blade. Only in rare situations is the component being cut positioned to the left of the saw blade. Always positioning the work between the blade and the fence ensures all the pieces being cut will be the exact same width and have parallel edges. If the piece being ripped is narrow, it is acceptable to run a wooden push stick right through the blade with the work. The part being ripped should have one flat face and one straight edge. Follow all guidelines for safe ripping.
Ripping bevels (blade tilt operations)
Performing rip cuts with the blade tilted is a common operation. If the workpiece rises off the table, an increased hazard of kickback is present as the piece is constrained between the angled blade, table, and rip fence. Left-tilt saws are thought to be safer when performing this operation as the blade tilts away from the fence and therefore the work can lift slightly off the table with less potential for kickback. When ripping bevels on a right-tilt saw, move the rip fence to the left of the saw blade. It may feel awkward at first, but it is safer.
With either a left or right tilt saw, plan the cutting sequence carefully. Be aware that a sharp feather edge placed against the bottom of the rip fence can get jammed. Use a zero-clearance sub table to lift the work up if the saw has any clearance between the fence and the table. Also consider the size and orientation of the workpiece and offcut once the cut is completed. A 45° rip cut can leave little material supported by the table and it can have a tendency to fall into the blade. In some cases, you may need to leave extra width on the stock, cut the bevel, and then cut the piece to final width.
Tilted saw blades when both ripping and crosscutting can have a tendency to ‘pull’ the stock because of the direction of force acting on the work. For accurate cuts, it can be advantageous to cut the piece slightly oversized adding 1-2 mm, then trim to final size.
Using featherboards for rip cuts
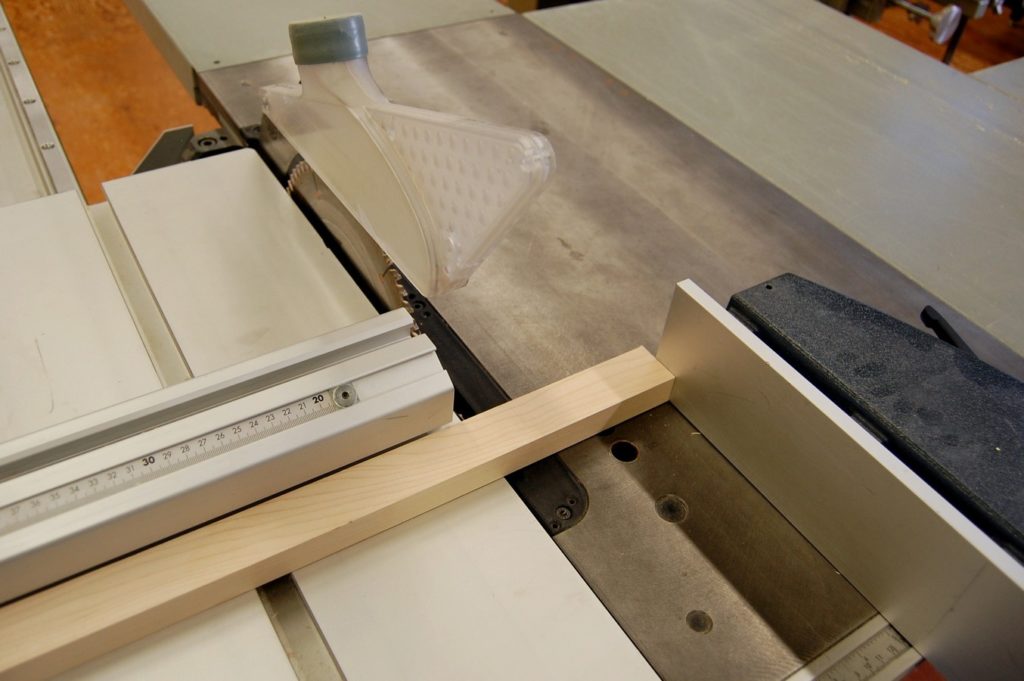
Featherboards are fixtures that help keep the stock being fed tight to the fence, and also help prevent kickback. They are used on numerous machines for both safety and accuracy. The flexible fingers keep tension against the material as well as preventing the stock from moving backward in relation to the direction of cut. Feather boards can be shop-made or purchased commercially. When ripping stock of a consistent width on the table saw, feather boards will keep the material being fed consistently tight to the rip fence, resulting in a cleaner sawn edge. Feather boards can also be clamped to the table saw rip fence to keep thin or light material from lifting off the saw table.
A featherboard is easy to make from a piece of hardwood. Do not use plywood as the fingers will break. A bandsaw can quickly cut the fingers. Create lay-out lines, then cut to the line by eyes, they do not have to be perfectly accurate. Featherboards can simply be clamped to the machine table, however in many cases they are easier to place and secure if some provision for affixing them using the mitre track has been planned into their design.
The featherboard should be located to apply pressure on the infeed portion of the cut. If it is placed adjacent to or behind the blade, it will cause the offcut to pinch the blade and potentially cause a kickback. The only situation where the featherboard can be located behind the blade is when the amount of stock being removed is less than the thickness of the blade, and therefore there is no offcut that would be forced into the saw blade.
Resawing
Resawing is cutting a piece through its width, as in a book match. Resawing of boards up to 6″ may be done on a 10″ table saw, although if available a band saw set up for this purpose is preferable. Use a rip blade in good condition. A thin kerf rip blade is desirable as it requires less force to push the piece through the saw, and the smaller kerf leaves more material in the workpiece. If the workpiece is much taller than the height of the rip fence, use a tall auxiliary fence for stability. Depending on the width of the piece and the hardness of the material, resawing may need to be done in multiple passes.
For resawing in two passes:
- Set the blade height to barely over one half the width of the workpiece. This will cause the blade to cut the piece in two.
- Set the rip fence to the desired width.
- If there is a splitter that is higher above the table than the height of the blade, remove it.
- Run the piece through the blade to make the first cut.
- Flip the workpiece end for end, so the same face is against the rip fence.
- Run the piece through a second time. As the cut progresses, it will detach if the depth of cut was set to just greater than half the stock width. Use caution throughout the entire cutting operation, but especially near the end of the cut as the two halves will separate. Use a push stick for narrow stock, and keep your hands clear of the blade at all times.
- Wider and denser stock should be run at multiple depth of cuts to lessen the possibility of kick back from heavy sawing, and reduce possible burning of the workpiece. For example, a 6″ board of softwood could be cut in four passes. The blade height would be 1 1/2″ for the first two passes, then increased to a full 3″ for the second and third passes.
- Another technique for resawing is to set the height of the blade to just less than half the width of the workpiece. The piece will be cut almost all the way through, leaving a small hinge. A chisel can be used to easily break the pieces apart. This technique helps maintain the stability of the workpiece throughout the entire cutting operation as it remains intact. The surface can be cleaned up by planing.
Ripping multiple thin strips:
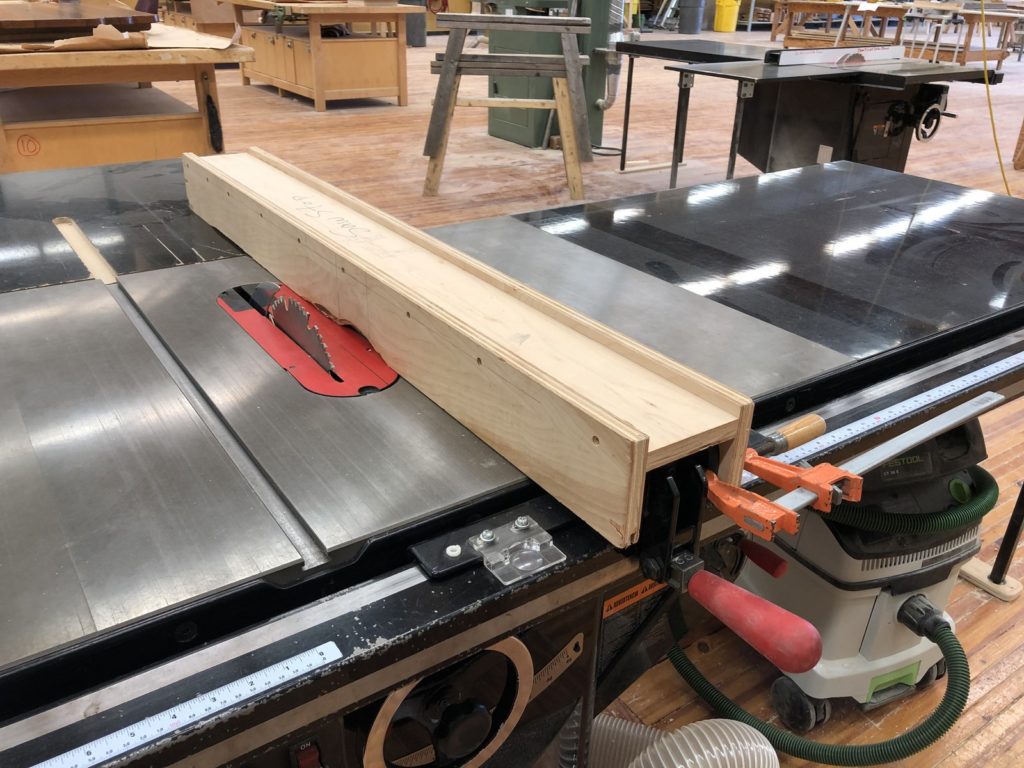
In certain situations when ripping very narrow strips, such as for edging, a fixture may be used that allows the part being cut to be cut on the left side of the blade. This is done to prevent the narrow piece from being damaged by the saw blade, especially as the cut is completed. These strips are often run through a thickness planer or sander for final sizing.
The fixture is set the desired distance from the left side of the blade. A blank with parallel, straight edges is brought up to the fixture (essentially a stop), the rip fence is then positioned to run the workpiece through at this distance. After each strip is cut, the rip fence is moved to reposition the blank to cut the next strip.
Zero clearance auxiliary rip fence
A sacrificial fence for the rip fence is useful for a wide range of operations. In many cases they increase safety and accuracy as well as save the fence from being cut by the blade. This type of fence may simply be a piece of plywood or MDF clamped to the factory fence, or it may be of a box-type that drops over a T style rip fence.
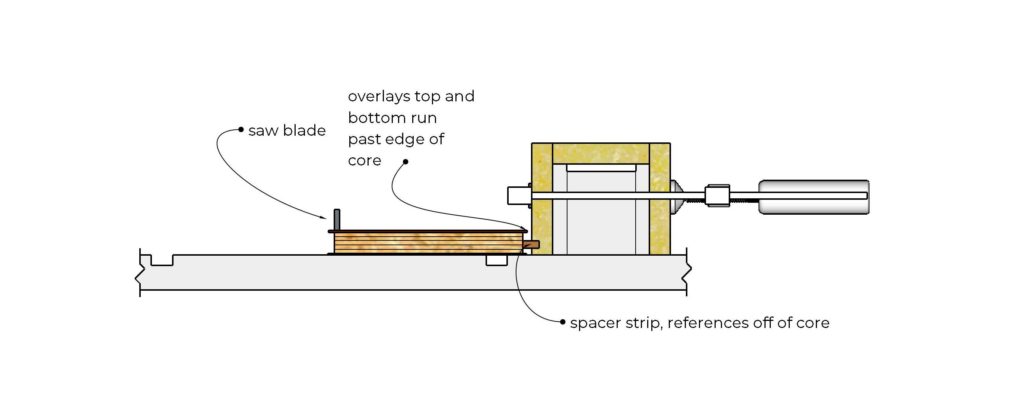
This fence is often used with dado blades for cutting rabbets. The dado is set up slightly wider than the desired cut, with the extra width buried in the fence. The workpiece is fed against the sacrificial fence. This is safer than trapping the workpiece between the rip fence and the dado cutting on the left edge, especially with a large dado set-up. This set-up eliminates the kickback hazard as the workpiece is not trapped between the fence and the blade.
To get the initial cut in the fence, the blade is lowered underneath the table, the saw started, and the blade slowly raised into the fence. Be sure of the fence position before performing this operation, you do not want to accidently cut into the rip fence.

A similar set up can be used to flush trim parts such as solid wood edging on plywood, if the sacrificial fence is stopped short of the machine table, and the left side of the saw blade is flush to the fence.
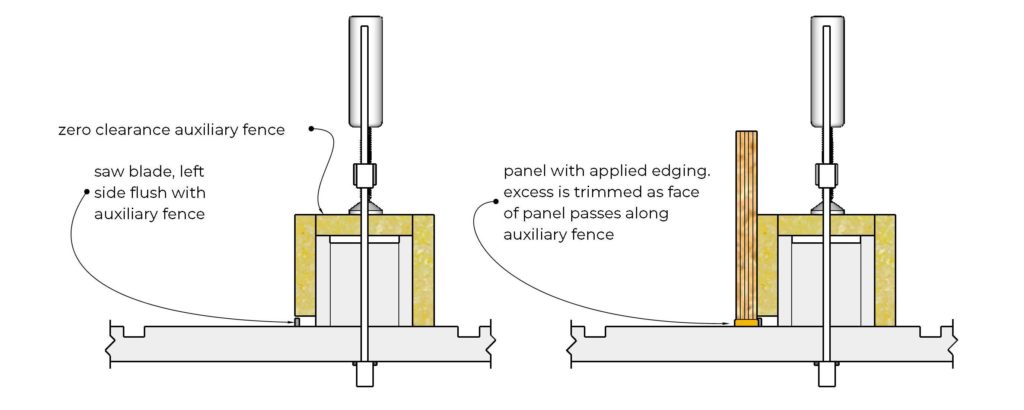
Yet another modification of this type of fence may be used to get a clean edge on a panel that has an overlay such as veneer of plastic laminate applied. Because the overlay overhangs the panel, the edge can not be run directly against the fence. By adding a thin strip to the auxiliary fence, the substrate can accurately reference the fence. This technique is also used on the crosscut fence of the panel saw for trimming large sheets.
Zero clearance for ripping thin stock such as veneer and plastic laminate
Thin material needs to be completely supported by the table to prevent tear-out and shattering. It can have a tendency to get caught on the area around the throat plate, as well as get caught under the rip fence. A thin piece of MDF can be used for zero-clearance. MDF is preferred as it is inexpensive and flatter than plywood. The MDF raises the piece to be cut to a higher position on the rip fence and prevents it getting caught underneath it.
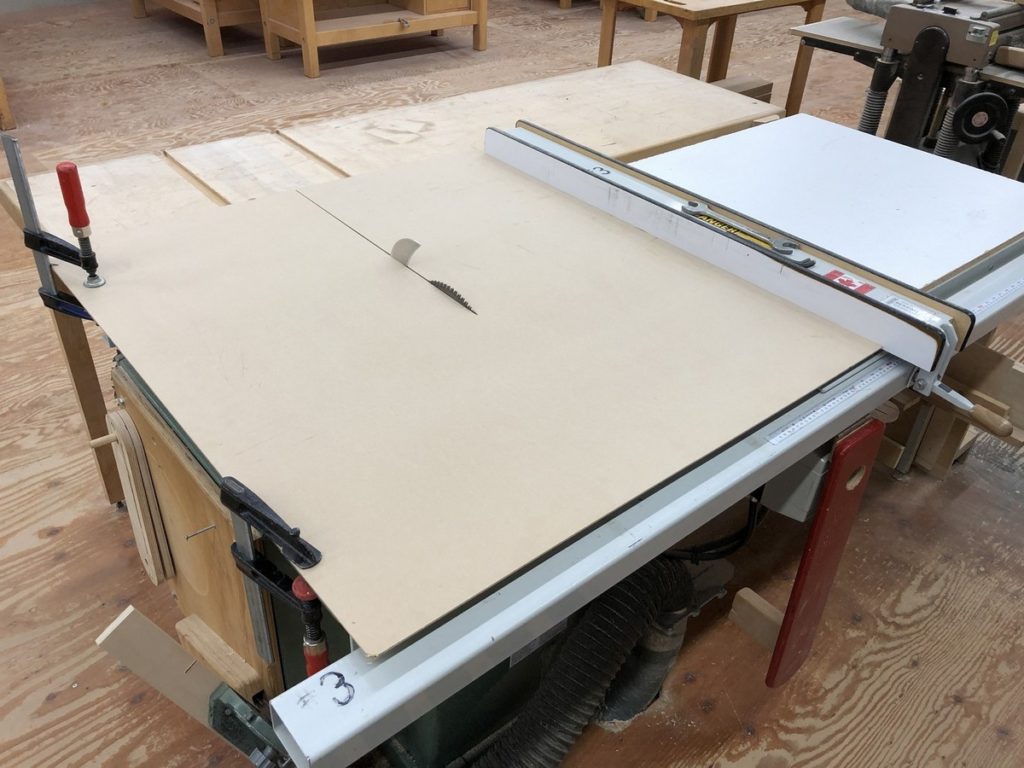
With the rip fence set, turn on the saw and run the MDF into the blade until it is positioned on the saw table. Turn off the saw and let it come to a complete stop while holding the piece in place. Pull the piece back a few millimeters to prevent the saw from catching it when it is turned on, then clamp it to the table to prevent if from shifting. For small pieces, a length of masking tape along the edge works well to secure it to the table.
Sliding carrier for ‘T’-style rip fences
When a workpiece must be oriented vertically as opposed to laying flat on the machine table, a method of safely and securely holding the work must be used. An example is cutting tenon cheeks on the table saw with a rip blade. A simple carrier can be used with the ‘T’ style rip fence for cutting tenons, beveling small table tops, and many other joinery operations.
As the faces of the ‘T’-style fence are parallel, a carrier can be made that uses the rip fence as a guide. If the carrier is built with a tall fence, it can support vertically oriented work pieces such as rails for tenoning. With the addition of a back stop, work may be held at exactly 90° to the blade.
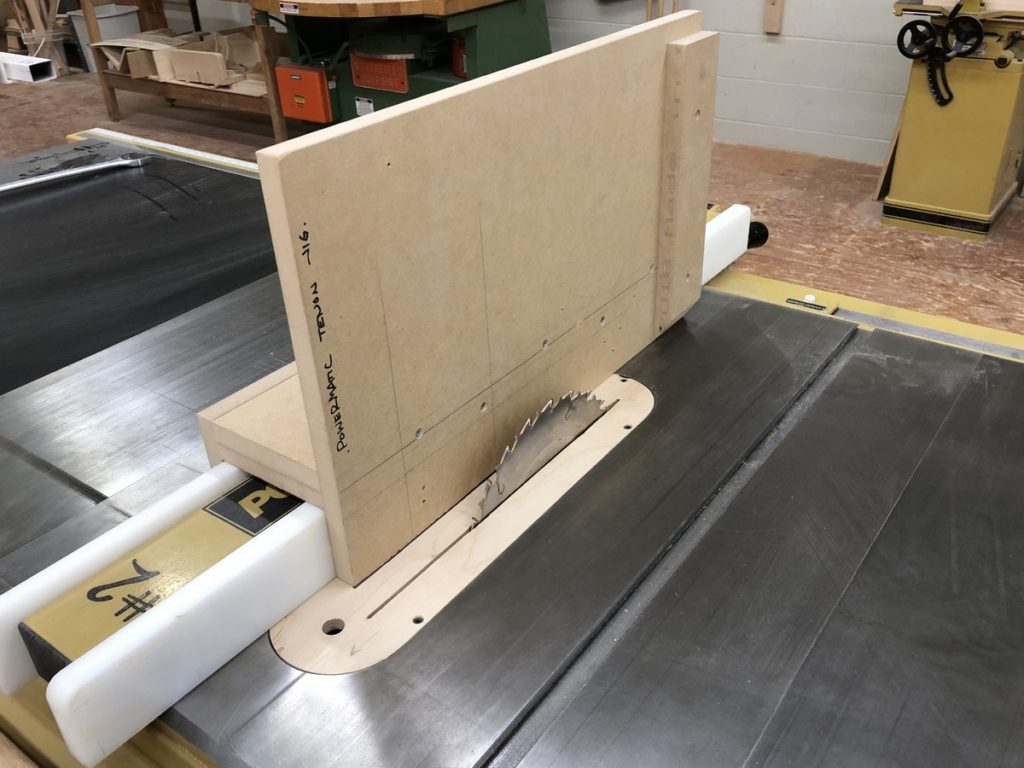
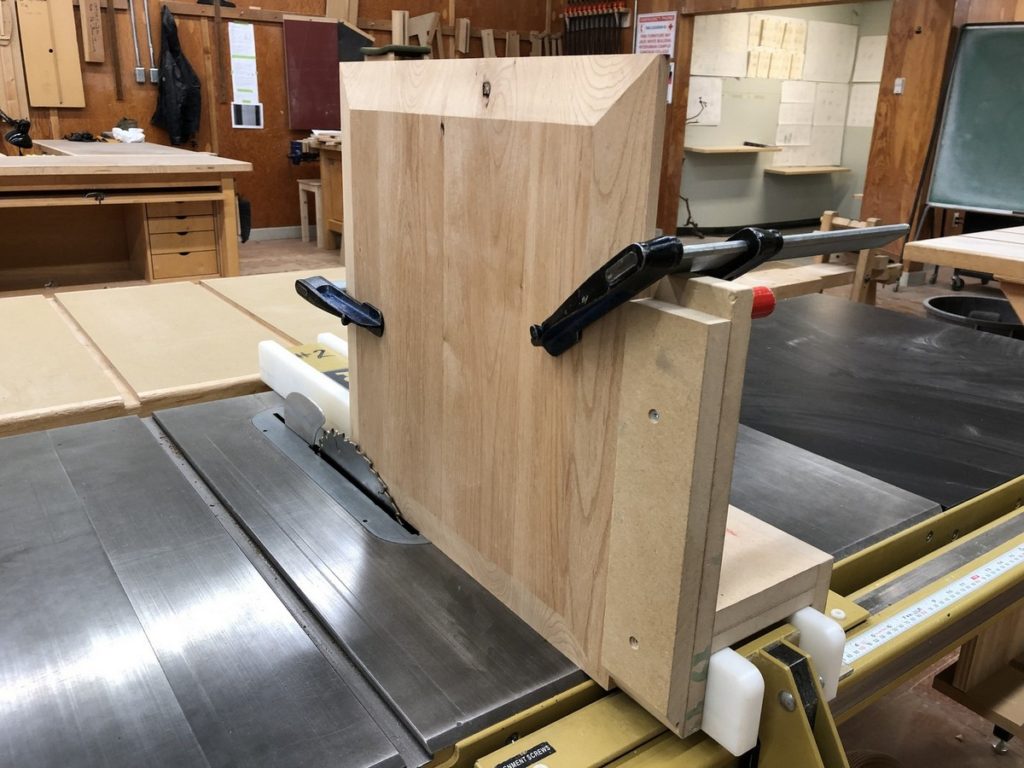
The carrier should be constructed of quality plywood or MDF. It is critical that it sits 90° to the table, and slide easily but without play. Clamps can be used to secure the work to the carrier, for multiple repetitive cuts toggle type clamps can be screwed to the jig.
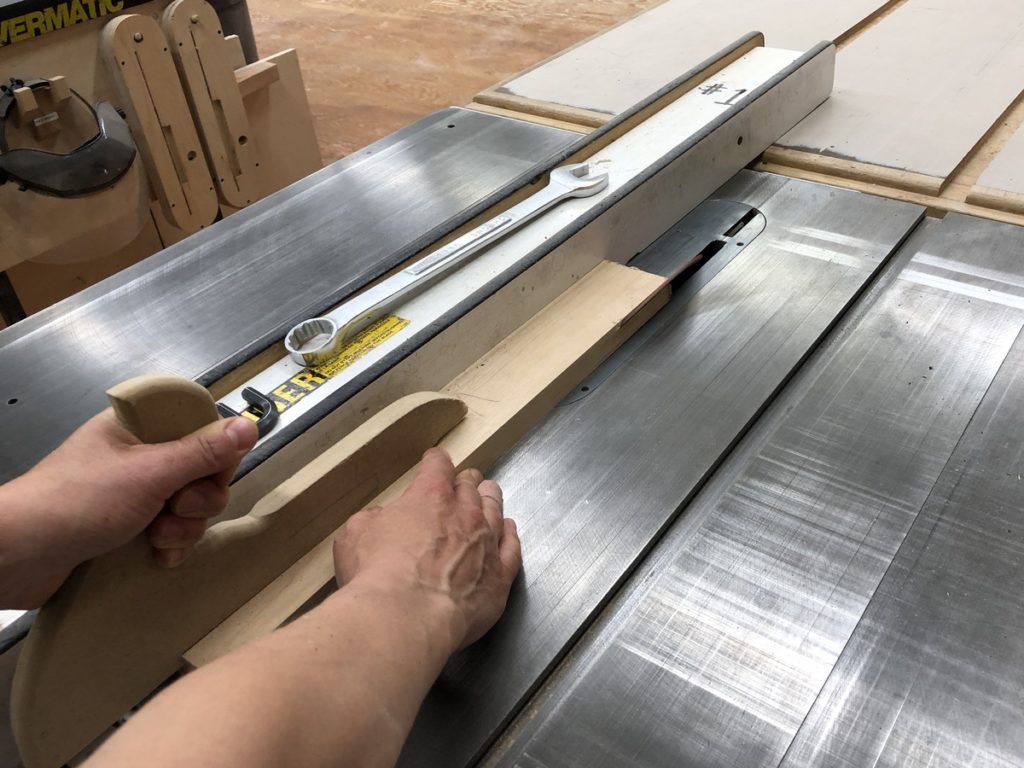
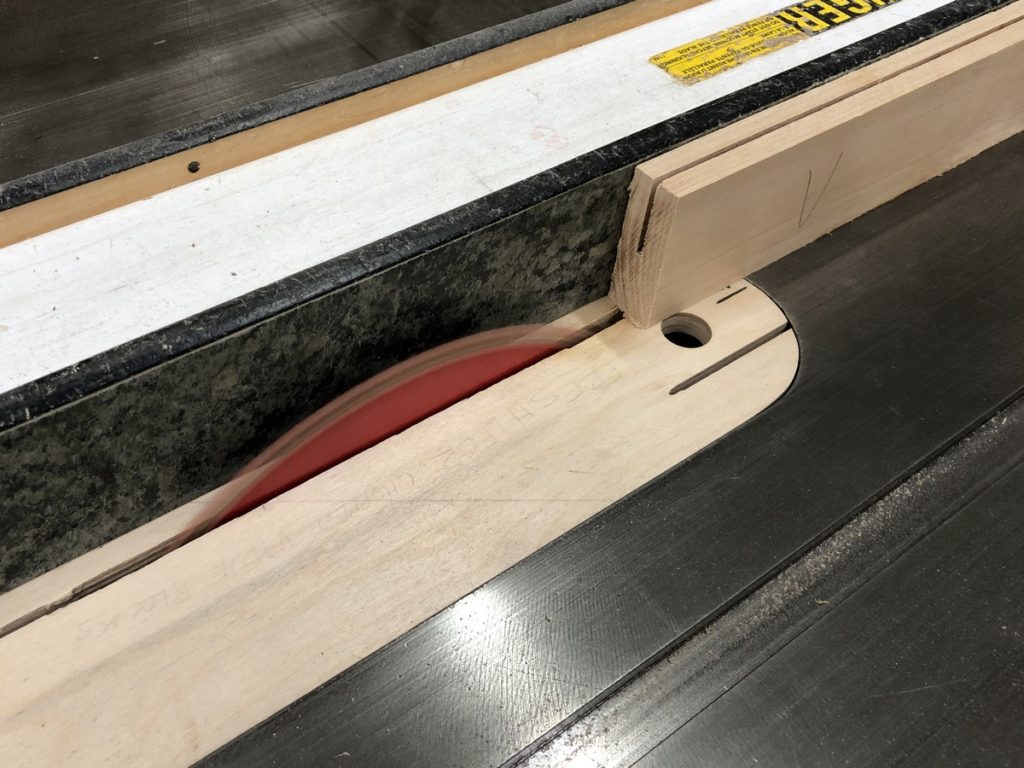
Tenoning jigs
While the above simple shop made carrier can be used for tenoning, dedicated jigs for tenoning can add functionality. Commercially manufactured models use the mitre slot to guide the carrier through the cut. They have adjustments on the jig to set the distance from the blade, some models have both a coarse and fine adjustment. They also have a tilt mechanism for cutting angled tenons. Adding a zero-clearance wood fence on the back prevents tear-out where the saw blade exits the cut.
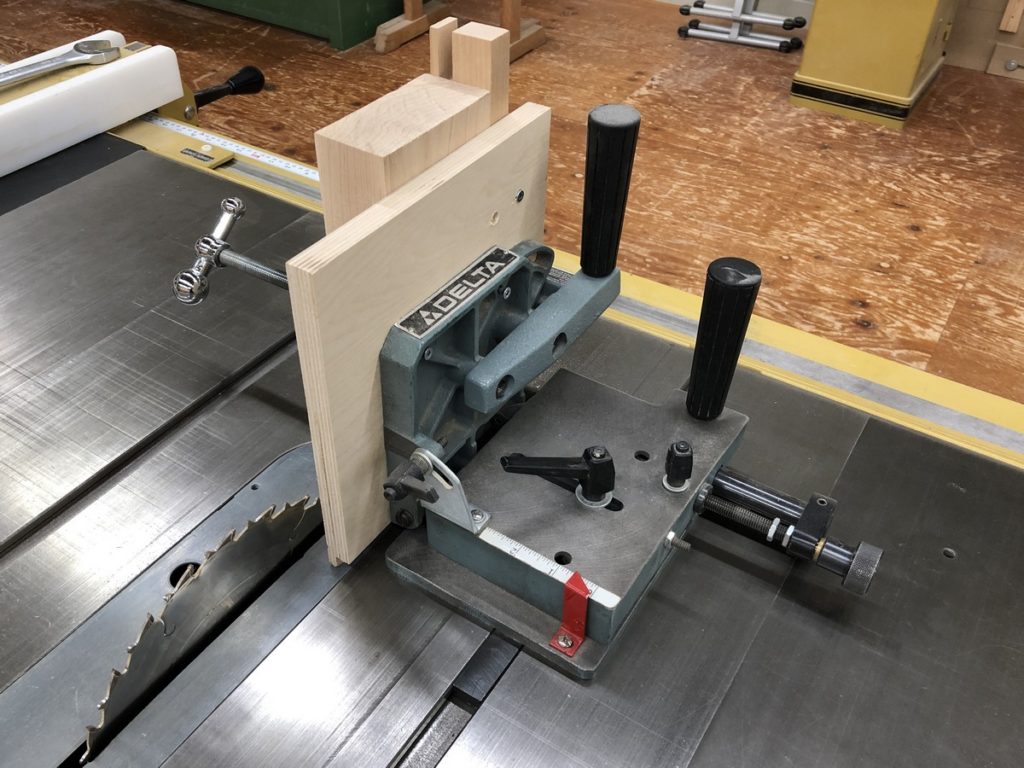
For centered tenons, the jig may be set so that rotating the workpiece produces the correct thickness of tenon. Alternately, a spacer can be machined to the thickness of the desired tenon plus the kerf of the blade. Keeping the same face of the workpiece against the fence, one cut is made with the spacer between the workpiece and the fence, and one cut without the spacer. Always check the tenon size on a piece of scrap. This method allows an accurate tenon size to be cut on pieces of different thicknesses, or to cut off centered tenons without the need to reset the jig.
Tenon jigs can be used for cutting more than just tenons. They work particularly well for cutting open mortises. Two outside cuts are made to define the mortise, then the waste in the middle can be removed by making multiple passes over the saw. The jig can also be paired with dado blades for cutting open mortises or slots in a single pass. Angled cuts on the ends of workpieces, such as for small wedges for through wedged tenons, can also be cut with the tenon jig.
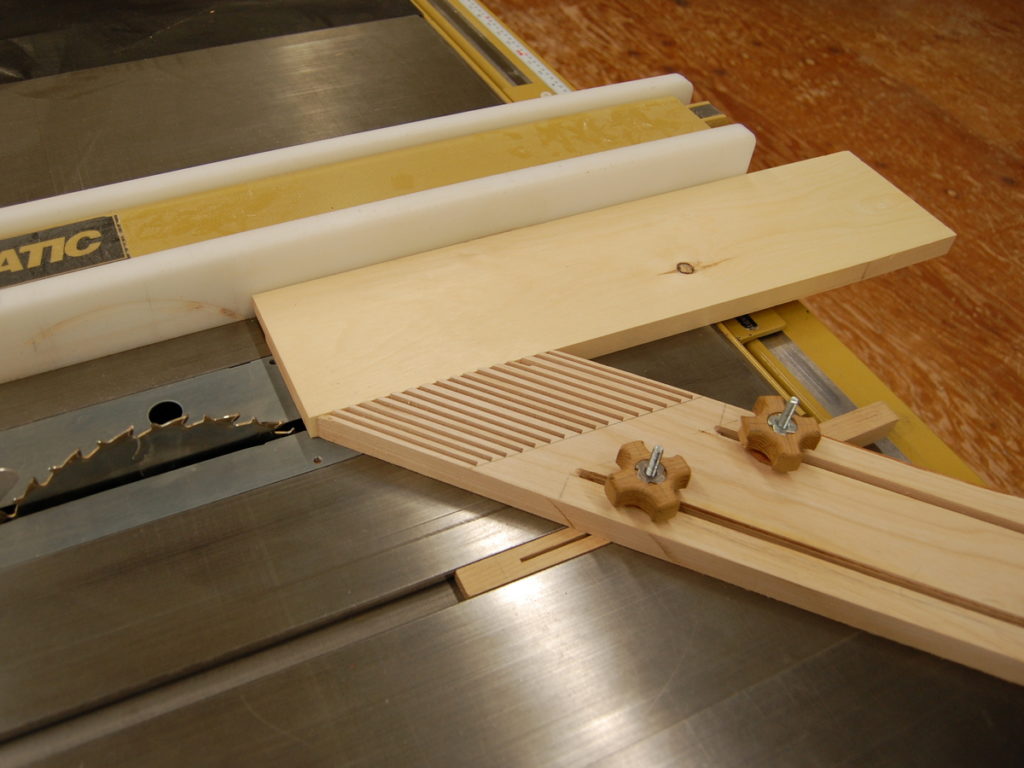
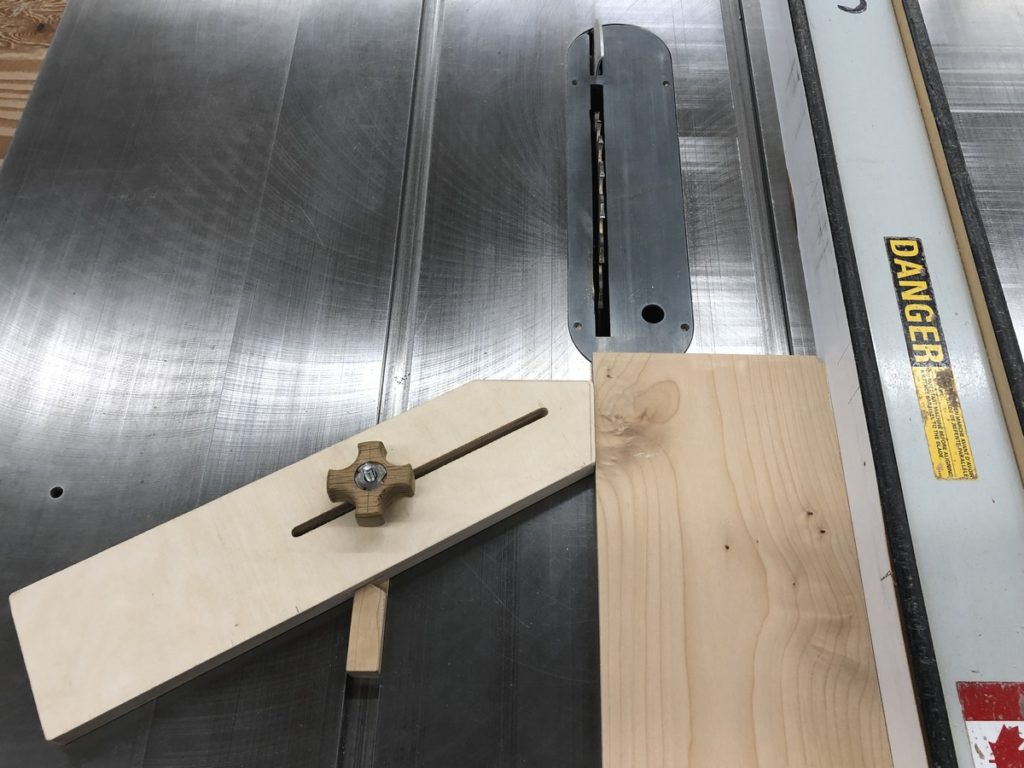
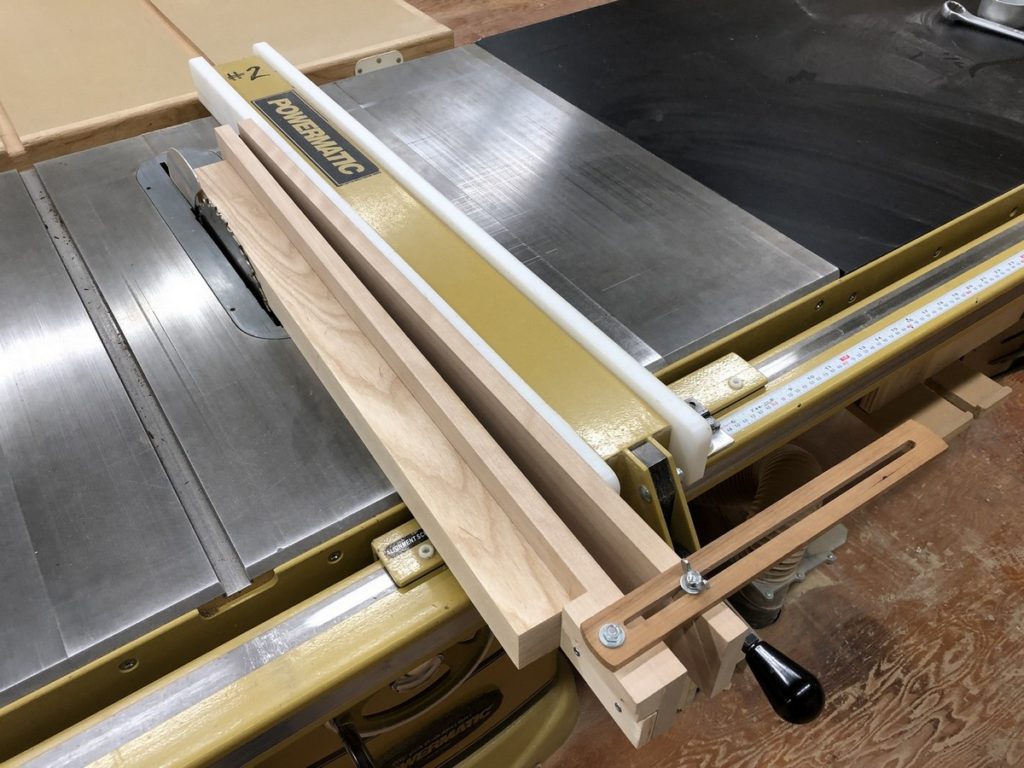
Tapering jigs
A taper jig is guided along the rip fence and simply holds the work at an angle to the blade throughout the cut. There are different types of taper jigs from simple, fixed angle jigs nailed together to adjustable manufactured models.
A simple taper jig can be made by attaching a fence and stop to a rectangle of plywood. These jigs are simple to construct and are useful for pieces that are commonly cut at the same angle, such as wedges, or in the case of a production run of parts that will be reproduced many times over. Toggle type clamps can be added to the plywood base to secure the workpiece which can improve the safety, quality, and accuracy of the cut.

For parts that require two tapers, such as a leg that is tapered on all four faces, the jig may be constructed so that one taper is set on either side of the jig. Once one set of tapers is cut, the jig is simply turned 180°.
Most adjustable taper jigs have two long faces with a hinge at the far end, and a clamp or bolt at the operator end for fixing the angle. The face of the jig the workpiece references should have a stop block to push the work though the cut. These jigs take some trial and error to set up, using the mitre slot as a reference can be useful as it indicates the path the blade will cut.
Crosscutting operations
Repeatable cutting of identical parts
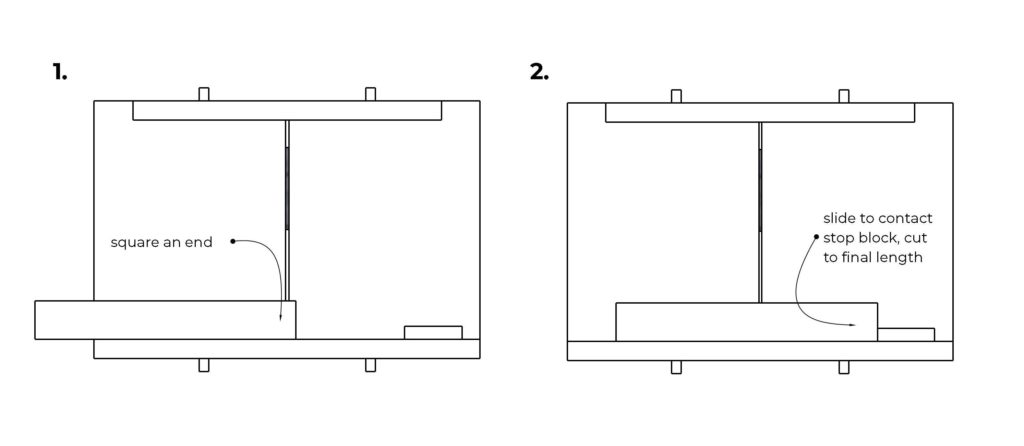
One of the most common table saw tasks is crosscutting multiple parts to an identical length. This is accomplished using the mitre gauge or a shop made crosscut tray. The crosscut tray has an advantage as the work is supported by the tray, reducing the chance of it slipping as it is carried through the cut, as well the tray can provide zero clearance cutting on the bottom and back of the cut. The crosscut tray is necessary for cutting larger parts as the mitre gauge is too small for this task. The mitre gauge is well suited for cutting smaller parts and for cutting angles.
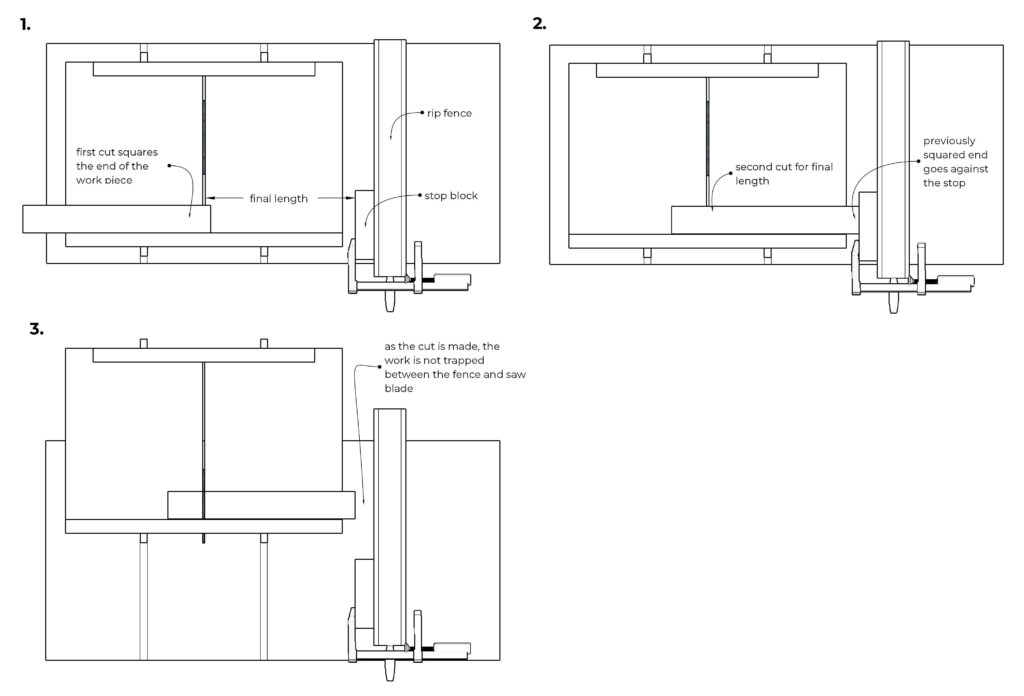
With either jig, a stop block is used for accuracy and speed. The part to be cut should first have one end squared before being set against the stop block for cutting to final length. Normally, the piece is squared on one side of the blade (usually the left) before being slid to the other side to be cut to length against the stop block. In this way, an efficient work flow is created. This process can be somewhat easier with a crosscut tray as it has a longer fence and is guided by both the mitre slots. The same workflow can be created with the mitre gauge if a sturdy auxiliary fence is added and the pieces are small.
If the parts to be cut are longer that the fence, the rip fence may be used as a movable stop if it is set up to provide clearance to the offcut. A block of wood is clamped to the rip fence well back from the blade. The block serves as the stop for the part being cut without trapping it between the blade and the fence. It is important that the block be of a thickness so that clearance for the offcut will allow it to spin freely if it catches the blade.
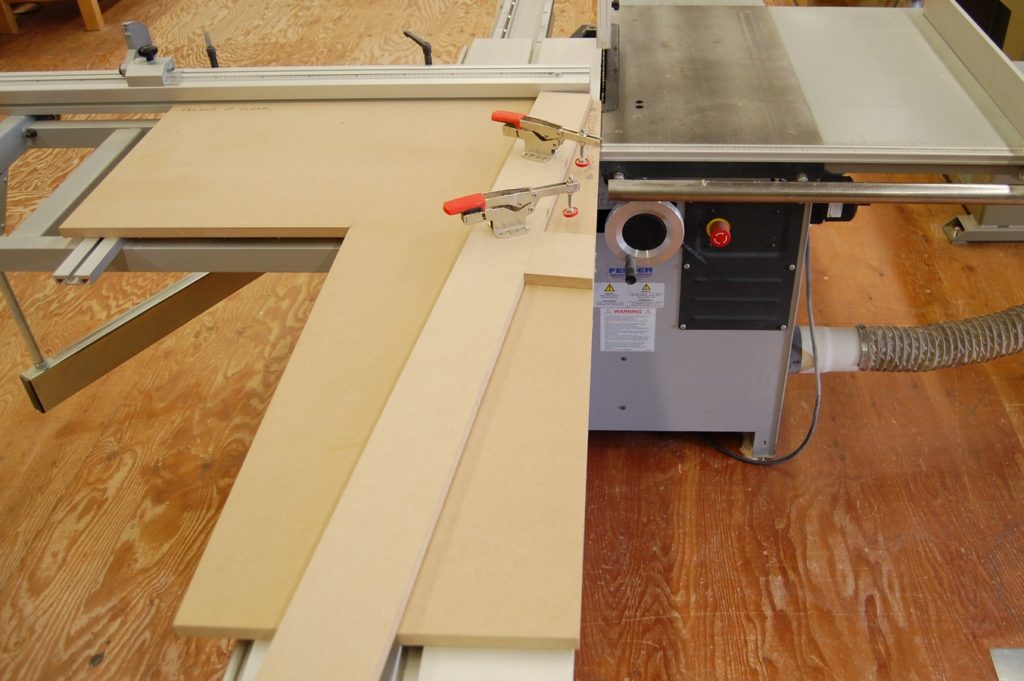
Face mitring accurate 45° angles
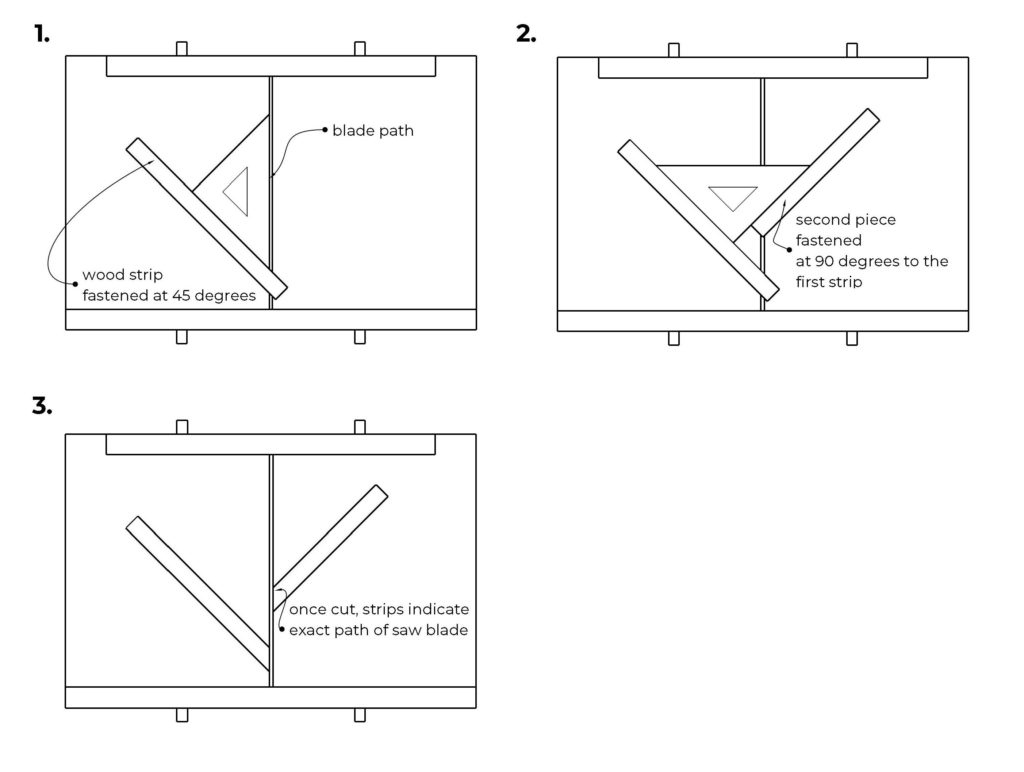
Adapting a sliding tray for cutting mitres across the face is done by first attaching a straight fence to the base of the tray at 45° to the saw blade path. Using a plastic drafting set square assists accuracy. Allow the wood to overhang the blade path to be trimmed later.
A second fence is fastened to the base of the tray at 90° to the first one, not at 45° to the other side of the blade. This concept of ensuring that fences are truly square with one another rather than aligning the second at 45°to the blade path will help make a better mitre joint.
The final remaining step is to trim the two fences by running the tray over the saw. The newly mitred ends of the fences will then give a very accurate location for the saw blade path. This enables workpieces which are marked with a sharp pencil to be lined up on either the inside or outside edge of the wooden fence strips. Gluing sandpaper on the fence edges will help prevent the wood slipping as it is cut. If you are making two or more boards the same length, a stop block will ensure accuracy and always result in a better fitting mitre joint.
End Mitring with the blade tilted
When mitring across the ends of a workpiece, as in cabinet and box construction, it is necessary to use the blade tilt on the table saw. A crosscut tray dedicated to this purpose can be useful if this type of cut is preformed often. It can also be done with a mitre gauge, however the crosscut tray has the advantage of supporting the work in a way that prevents it from sliding on the sat table. If the mitre to be cut has one half of the joint cut on the left of the saw, and the other half on the right side of the saw, the pieces will come together perfectly at 90°. This method ensures the angles will be supplementary. The only disadvantage of this method is one half of the joint will be cut face down, with the potential of tear-out at the toe of the mitre. However, installing a zero-clearance backer and using a sharp crosscut or combination blade can eliminate tear-out.
Sliding Table (Panel) Saw: Common Operations
Ripping
As with the cabinet saw, ripping is done with the rip fence to guide the work. However, the location of the crosscut fence can impede the offcut. It is important to move the sliding table forward so the offcut is free and the cut is complete before reaching the crosscut fence. This works well for smaller pieces. For larger, longer work, the sliding table can support the work and travel with the workpiece as long as the end of the piece being cut does not contact the crosscut fence.
With the location of the chassis on larger panel saws, ripping using the rip fence can be an awkward operation as the operator must stand to the left of the sliding table and a significant distance from the rip fence. Whenever possible, use the sliding table and crosscut fence for making wide rip cuts in panels. The rip fence can be set to the desired width of cut and be used as long as the fence extrusion is set about 50 mm before the leading edge of the blade. In this way, the offcut is free as the cut is complete and not trapped between the fence and the blade. To use the crosscut fence while using rip fence in this manner, they must be in perfect 90° alignment.
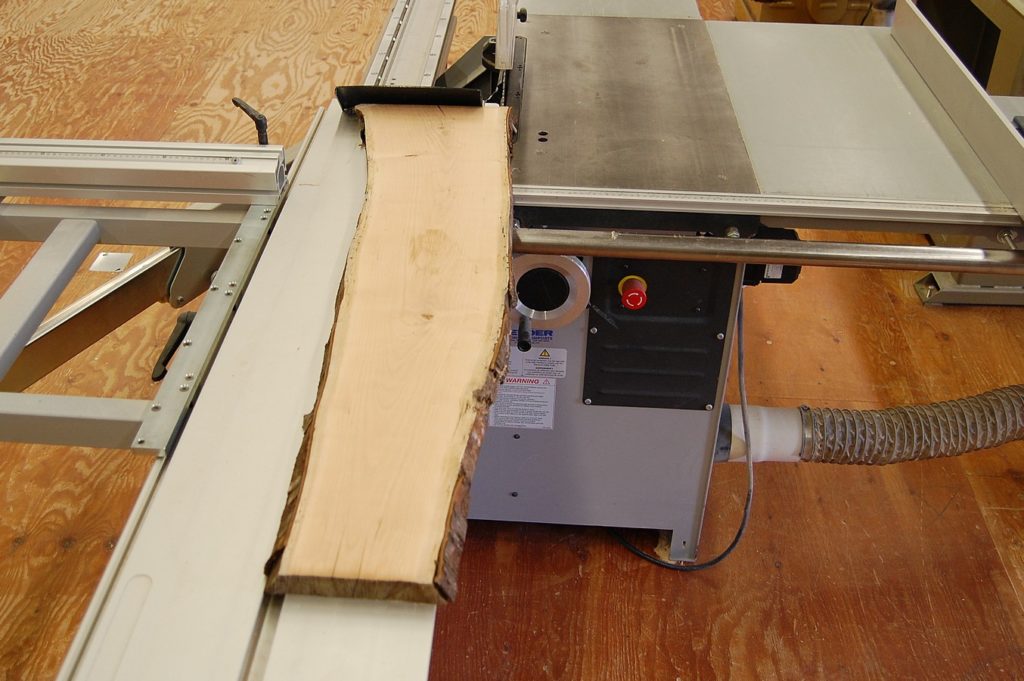
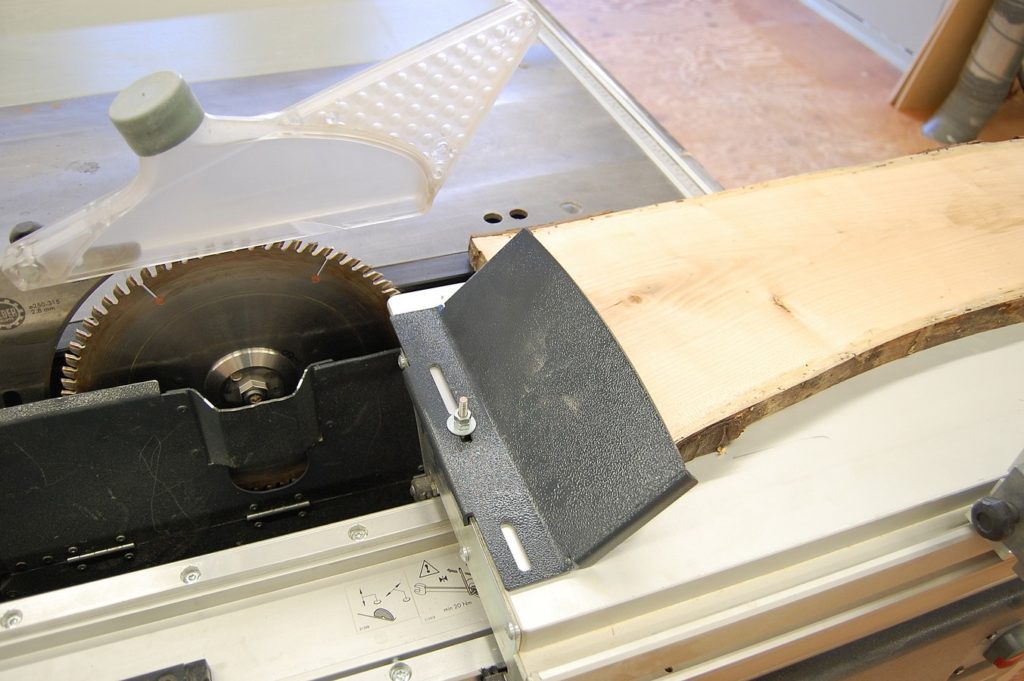
Straight line ripping
The sliding table saw may be used to easily cut a straight edge on long narrow stock. Solid lumber with severe bowing or natural edges can be straightened quickly and accurately. An accessory known as a wedge or shoe is included with many saws to stabilize and clamp the end of the workpiece for this operation. The shoe clamps in the mitre slot in the sliding table, when forward pressure is put on the workpiece it is held tight to the table. If a shoe is not available, a flip stop may be used to reference the work on the crosscut fence. Always use extreme caution when using the crosscut fence for ripping narrow pieces as there is little support. Use clamps or hold-downs if necessary. Always use the proper blade for ripping solid wood.
Crosscutting
With a long crosscut fence and flip stops, the panel saw is well suited for cut-off work. The procedure is different than on a cabinet saw as the workpiece is always on the same side of the blade. The flip stops make it possible to square an end and cut to an accurate final length on multiple parts. The rip fence can also be used as a stop for cutting parts to length, and is the preferred method when the pieces to be cut are short.
To crosscut multiple parts to length using the flip stop:
- Set the flip stop to the desired final length.
- Move the flip stop up and out of the way. Crosscut a small amount off of one end of the workpiece to square the end.
- Flip the stop down on the crosscut fence.
- Rotate the workpiece 180° so the squared end is against the stop.
- Cut the piece to length.
To crosscut parts to the same length using the rip fence:
- Set the rip fence to the desired length.
- Slide the aluminum extrusion back so the end is about 50 mm from the leading edge of the blade.
- Using the crosscut fence, square the end of the workpiece.
- Move the sliding table back so that the workpiece may be safely slid over the table and make contact with the rip fence. Use extreme caution if the scoring blade is in use.
- Hold the workpiece tightly against the crosscut fence and cut to final length.
- The part cut to length will be the ‘offcut’, and will be sitting on the table. Use caution when removing it from the saw, do not reach around the saw blade with your hand to retrieve it.
- It is acceptable to cut a small number of parts before moving them away from the blade. Power off the saw before clearing them, or use a stick to push them clear of the blade. Do not allow a build-up of parts as they may catch the blade and kick back.
- As you near the end of the piece being cut, it will become too short to safely reference off the crosscut fence. Either waste the end of the piece (if acceptable), or set the flip stop and cut the remainder as outlined above.
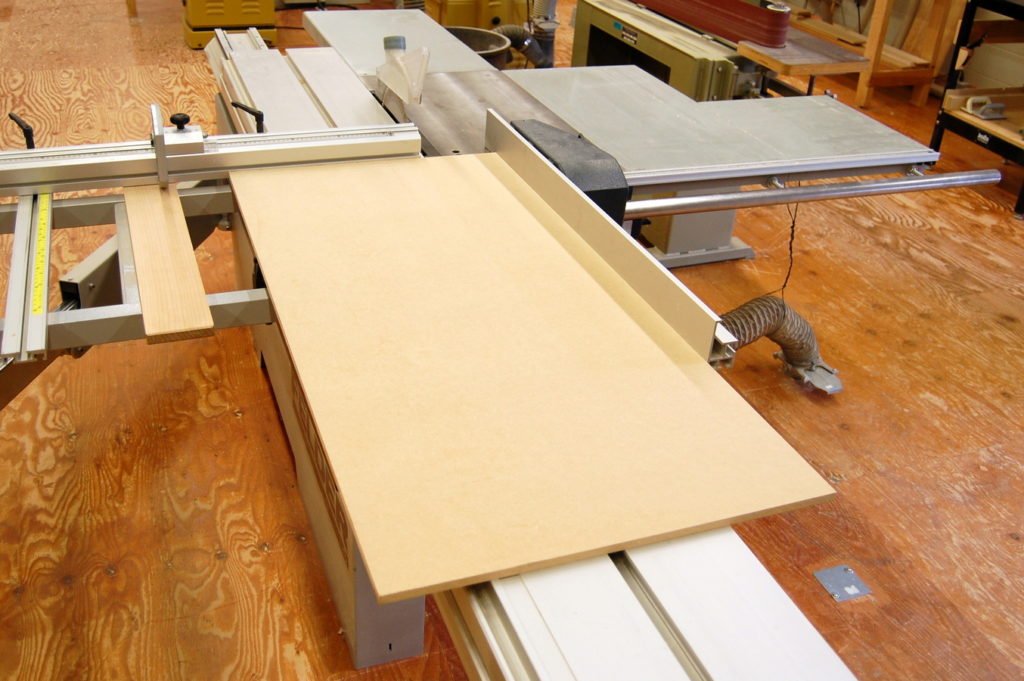
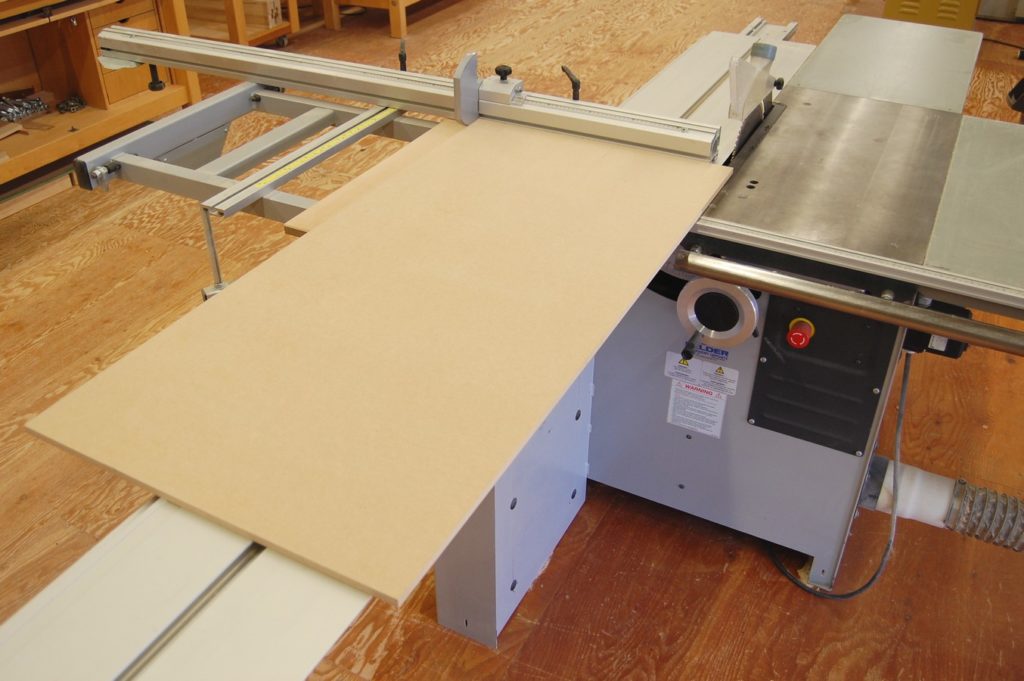
Cutting full sheets to size
While all types of machining operations can be done with the sliding table saw, this machine excels at quickly and accurately breaking down large panels and cutting to exact final size. Depending on the cutting plan and part sizes, the cutting sequence can vary. While factory edges are usually trimmed from the sheet first, in some cases it may be advantageous to do initial rips or crosscuts before cutting factory edges and to final sizes.
A typical cutting sequence on a 4′x8′ panel would be to trim the factory edge on one end and one edge first to square the sheet and obtain a clean edge. Then, using the rip fence and flip stops for accurate sizes, the sheet would be cut into parts. It is common practice to do the rip cuts first, cutting to final width before using the crosscut fence to cut to final length. Larger parts are usually cut out of the sheet first, and smaller parts are then cut out of smaller pieces and offcuts.
To square a sheet and remove the factory edges:
- Place the sheet with the long edge against the crosscut fence
- Trim about 3 mm off the end of the sheet.
- Rotate the sheet so the just-trimmed end is against the crosscut fence. Make sure it is tight to the fence or the panel will not be square.
- Trim off about 3 mm from the long edge.
- The sheet may now be cut using these clean, square edges for referencing the remaining cuts.
When cutting sheet goods with veneer, melamine or laminates, the scoring blade should be used to prevent tear-out on the bottom of the panel.
Zero clearance sub-table for tapering and angle cuts
A zero clearance sub-table affixed to the sliding table can be a versatile addition to the panel saw. Fences and toggle clamps or other hold-downs can be attached to this table that allow for a variety of tapering operations. Precise angled cuts can also be made. While the crosscut fence can be angled, the use of a sub-table allows for quick set-up and the use of fences and stop blocks that easily and safely position the work. Dedicated jigs for production work can be make that index off the mitre slot and can be quickly and accurately positioned on the saw.
The sub-table may be made out of MDF or a stable plywood such as Baltic birch. A wooden or plastic runner can be screwed to the sub-table to allow perfect positioning every time. The initial construction of the table should allow for material to be trimmed off the first time it is used, ensuring the sub-table is in perfect alignment with the blade.
The term jig is used to describe a device which somehow clamps work in place and provides a method of guiding the tool. A jig is a moveable device which brings the wood and the tool into contact in such a way only the correct cut is made.
Fixtures are firmly mounted devices which simply hold work in place while the worker guides the tool through the required operation. An example of a fixture would be a feather board for the table saw. The cut being made still requires skill to perform but the feather board assists by making the task safer and more accurate.
Two angles are called supplementary when their measures add up to 180 degrees.
