19 Set Up and Maintenance
All machines require set up to achieve accurate and repeatable results, and maintenance to keep them working properly. The following information will guide you through these tasks. Learning to properly set up and tune the machinery you use on a daily basis is important in keeping the entire shop efficient and productive.
Squaring the blade to the table
Raise the guide post well above the table. Loosen the table lock, tilt the table and ensure there is no sawdust between the table and positive 90° stop. Return the table to position and lock it. Using an engineer’s square or try square, check the angle of the blade to the table. If it is not 90°, loosen the table lock and adjust the angle of the table until it is square. Adjust the positive stop until it touches the table. You may need to tilt this table to adjust the stops, adjust and re-check until the positive stop is in the correct position.
Changing blades
- Back all guides completely off of the blade, above and below the table
- Remove the tension completely from the blade using the tension control handwheel or knob
- Remove the table pin
- Carefully pull the blade off of the upper and lower wheels, guiding it out of the table slot
- Coil up the blade
- Clean all dust from the interior of the saw, paying particular attention to the rubber tires on the wheels and the guides
- Inspect the drive belts for wear, replace if necessary
- Uncoil the new blade, being careful of the sharp teeth- leather gloves are recommended. Ensure you have adequate clearances around you
- Inspect the blade, making sure the teeth are pointing the right way. If they are not, turn the blade inside-out
- Carefully work the blade into the saw, feeding it though the blade slot and onto the tires. Try not to touch the teeth to the metal parts of the saw
- Take up some of the slack with the tension adjustment, until the blade is just-taught but able to be moved forward and back on the wheels
- Position the blade so it is as centered as possible on both the upper and lower wheels. This will greatly reduce any drift in the blade.
- Increase the tension to the recommended setting
- Carefully and slowly rotate the upper wheel by hand. Be extremely cautious when rotating the wheel by hand. There are pinch points in the saw that can badly damage fingers. Observe the blade, it should keep its position on the wheel, and not touch the guides.
- Incrementally adjust the tracking, if needed. It usually doesn’t need much adjusting, if at all, after the initial purchase and set-up of the saw. See “Adjusting the tracking” below
- Jog the saw by turning the saw on and shutting it off immediately. This will test the set-up of the machine, if it is off the machine will be powered off immediately, mitigating any damage. Make any necessary corrections to the tracking.
- Let the saw run for about a minute to ensure the blade is settled in and tracking properly
- Lock out the power, and set the guides above and below the table. See “Setting and adjusting the guides” section below
- Close all covers and replace all guards
- Re-connect power to the machine
- Jog the saw again, to test the guide set-up
- If the saw has a fence, it will need to be checked and adjusted for drift. See “Adjusting for drift” section below.
Most bandsaw blades have a break-in period where the cutting feed rate is slowed significantly to prevent premature breakage. Refer to the manufacturer’s blade specifications.
Blade tensioning
Band saw blades are tensioned according to their width, with wider blades requiring more tension that narrow ones. The tension scale on the saw corresponds with blade width. There are tension meters that can be purchased to measure blade tension, however they are not common in most shops.
It is important to maintain the proper tension for several reasons. If a blade is under-tensioned, it has a tendency to wander in the cut, producing inaccurate results. Straight cuts can be made with the blade at a lower tension as there is less lateral force on the blade. Higher tension has the effect of stiffening the blade in the cut. Having too much tension is also undesirable as it stresses and weakens the blade, resulting in premature failure. It is a best practice with a bandsaw to remove the tension from the blade when it is not in use. Some shops remove the tension at the end of the day. If the saw is sitting for long periods of time between uses, the tension should be removed. Some band saws have a mechanism that quickly and easily allows for the tension to be removed and replaced to the same setting.
If there is no scale or it is unreliable, the blade can be tensioned using the following method.
- Lock out the machine, and raise the guard about 150 mm or 6″ above the table.
- Apply moderate pressure on the side of the blade with your finger.
- The blade should deflect about 6 mm or 1/4″, but no more.
This method is not highly accurate. As you use the band saw you will get a feel for what proper blade tensions is. If the saw is being used for curved work and not performing well (wandering in the cut), try increasing blade tension slightly. A good starting point is to tension it to the next highest setting, for example, try tensioning a 3/8″ blade to the 1/2″ setting.
One of the most important operations that rely on proper tension is resawing. Larger saws can have resaw capacities that exceed 18″, these must have the blade properly installed and tensioned for successful outcomes. Resawing requires a higher tension that regular straight cutting. If the tension is inadequate, the blade deflects in the cut and tends to cut a curve in the workpiece. It is acceptable to increase the tension for resawing operations if the blade is wandering. It is important to note that the feed rate, sharpness, and tooth geometry can all contribute to poor cut quality when resawing.
Adjusting the tracking
It is necessary to check and adjust the tracking every time the blade is changed. This must be done with the machine locked out, it is never performed with the machine running.
- Lock out the machine.
- Open the covers to access the top and bottom wheels.
- Use your hand to slowly turn the upper wheel. Use extreme caution when doing this, as your fingers can catch on the parts of the saw behind the wheel and injure you. Be aware that the blade is also exposed and can still be hazardous.
- Observe the position of the blade on the tires. It should be riding on the top of the crown, in the centre.
- If the blade is favouring the front or back of the wheel, turn the tracking control adjustment a small amount while turning the wheel. You will see the blade move to the front or back.
- Adjust the tracking until the blade is running reliably in the centre of the wheel. Continue to turn the wheel a few times to confirm it is running in the same place.
It is important to note that the blade must initially be installed on the saw in the centre of the wheel. Blades that are badly installed cannot be fixed by adjusting the tracking. Lower the tension, reposition, then check the tracking again.
Adjusting for drift
The term drift refers to the alignment of the fence and mitre slot with respect to the cutting path of the blade. Because the position of the blade on the wheels, which are crowned, can vary, the teeth will angle slightly to the left or to the right if the blade is not centred. This potential change means the blade must be checked for alignment to ensure the blade is running parallel to the fence and mitre slot every time the blade is changed. Drift can also occur if the blade is dull, especially if the teeth are duller on one side than the other.
To check for drift, run a piece of scrap wood (it should have one flat face and one straight edge) along the fence and into the blade a few inches. Hold the wood in place against the fence and stop the saw. Look at the blade relative to the kerf. The back of the blade should not be touching the wood on either side of the kerf. It should be very close to parallel in the kerf along the width of the blade.
There are two strategies for dealing with drift. The first is to install the blade, and adjust the fence to the blade. This method works well as long as the mitre gauge is not being used, as this aligns the blade to the fence only, not the mitre slot. The second strategy is to install the blade carefully, ensuring that the centre line of the blade is exactly centered on the centre line of the wheel. The blade will track in the same place every time. It is preferable to use this method, as alignment of the mitre slot to the blade is important when the mitre gauge and other jigs that use the mitre slot are used on the bandsaw. The first time using this method, it may be necessary to set-up the saw by aligning the mitre slot in the table to the blade. This is done by loosening the table bolts, refer to the saw’s manual. This only needs to be done once.
To adjust for drift by positioning the blade, install the blade as centred as possible on the wheels. The centre line of the blade is halfway between the leading edge of the teeth and the back edge of the blade. The upper drive wheel is the place of critical alignment, the exact position on the lower wheel is less critical as the tracking adjustment on the upper wheel will bring the blade on the lower wheel into alignment. Align the fence parallel to the mitre slot, then check with a scrap of wood as described above. If the blade is not running parallel to the kerf, lock out the saw, back off the blade tension, reposition and re-tension the blade. Make test cuts until the alignment is correct.
To adjust for drift by adjusting the fence, locate the fence squaring adjustments. Loosen them off, and adjust the fence to make the blade parallel to the kerf. Tighten the fence, and re-check for drift. Keep adjusting the fence relative to the blade until the kerf and blade are in alignment.
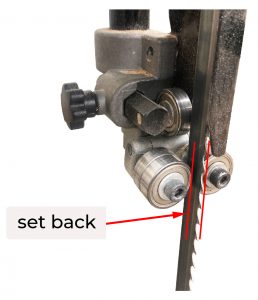
Setting and adjusting the guides
The exact procedure will vary depending on the type of guides on the saw, refer to the manual for your saw’s adjustments. In all cases, back off all the guides to start.
- Check the set-back. When changing between different blade widths, the guides will need to be adjusted so there is proper set-back between the side guides and the teeth. If the guides contact the teeth, they will be damaged and will also dull the blade. They should be set just back from the bottom of the gullets.
- Adjust the thrust bearings. The thrust bearing should not contact the back edge of the blade until material is fed into it. They should be set with a few thousandths of an inch clearance between the bearing and the blade, so that as the saw is running free, the bearing is not engaged. This increases the life of the bearing, and reduces heat due to friction. Remember to set the guides below the table.
- Adjust the side guides. The tolerances may vary depending on the type of guide, refer to the saw’s manual. In all cases, the guide should allow the blade to run freely, without drag. The closer the tolerance on the side guides, the more accurate the blade will track. Remember to set the guides below the table.
- Before powering the saw, carefully rotate the upper wheel to ensure the guides allow the blade to run easily through then. Check that the thrust bearing does not contact the back of the blade. Be extremely cautious when rotating the wheel by hand. There are pinch points in the saw that can badly damage fingers.
- It is recommended that the guides be checked for alignment often. Some bandsaw guides have a tendency to loosen or come out of alignment with use.
