PowerPoint Accessibility
Additional PowerPoint Tools
Consider the following tools in PowerPoint to enhance the accessibility of your presentations.
On this page:
Templates
Templates have pre-formatted fields such as “title” or “body” which are conveyed to assistive technology to provide context and structure.
Microsoft guide to finding accessible templates for Office products.
Do not insert additional text boxes. Change slide format using built-in tools. Navigate to Home > New Slide > Select new slide based on required style and format.
To create a custom layout, use Insert Placeholder via View > Slide Master > Insert Placeholder and selecting the appropriate content type.
Consider this Microsoft guide to customize slider masters for more information.
Slide Numbers
Accessible slide numbers are useful navigational aids for all users.
- Navigate to Insert
- Choose Slide Numbers
- Follow prompts and select Apply or Apply to All.
You can also add slide numbers to a Slide Master. To avoid possible reading order issues, add slide numbers as a last step.
Presentation Subtitles
PowerPoint has options for captioning your presentation. Read the Microsoft guide to presenting with automatic captions in PowerPoint (note that automatic captions are not accurate enough to fulfill a required accommodation). Use this method for an in-person presentation:
- Navigate to Slide Show tab and choose Subtitle Settings
- Set Spoken Language and Subtitle Language
- Leave subtitle position as Below Slide
Slide Transitions and Animations
- Avoid automatic slide transitions
- Use simple transitions in place of complex transitions
- Use simple animations
- Ensure content does not blink or flash more than 3 times per second
- Flashing and blinking content can cause seizures
Decorative Image Attribution
When adding an image attribution (copyright license etc.) to a decorative image, ensure the caption is also marked as decorative. If it is not, assistive technology would not announce the image, but would read the succeeding attribution text. This would lead the reader to believe they may have missed an important image.
To add a caption to a decorative image in PowerPoint:
- Move to Insert and select Insert Textbox.
- Place the textbox under the image and type your caption.
- Control (Command on macOS) and click, or click and drag over, the image and the textbox.
- Right-click the image and select Group > Group.
- Or, on the Home tab, select Arrange > Group > Group.
- Select your new group and copy (right-click > Copy or Control [Command on macOS] and c).
- On the Home tab, choose Paste > Paste Special.
- Choose Picture (PNG) and select Ok.
- Right-click on newly grouped image and select Edit Alt Text…
- Check Mark as decorative.
- Remove old image and textbox.
Notes
Notes can be accessible and provide additional information or context.
Notes is the best location for a transcript of your entire presentation (if applicable).
Notes can also be used to include extended descriptions of images and graphics.
If you are using the Notes field for speaker notes and do not wish to share your notes remove all notes before sharing.
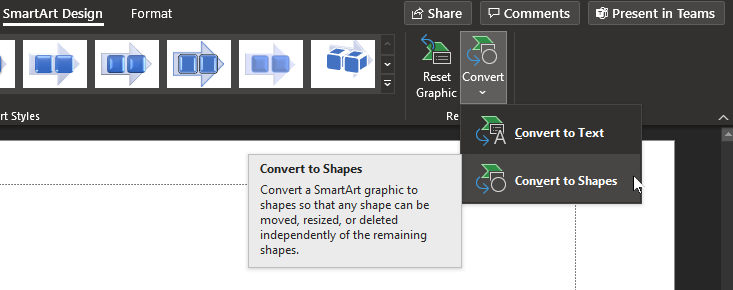
SmartArt
SmartArt can be an effective tool to make lists more visually appealing. To make SmartArt accessible, one additional step is required.
- Once you have created SmartArt, navigate to the SmartArt Design tab.
- Select Convert.
- Choose Convert to Shapes.
- Select the Shape Format tab.
- Choose Group > Ungroup.
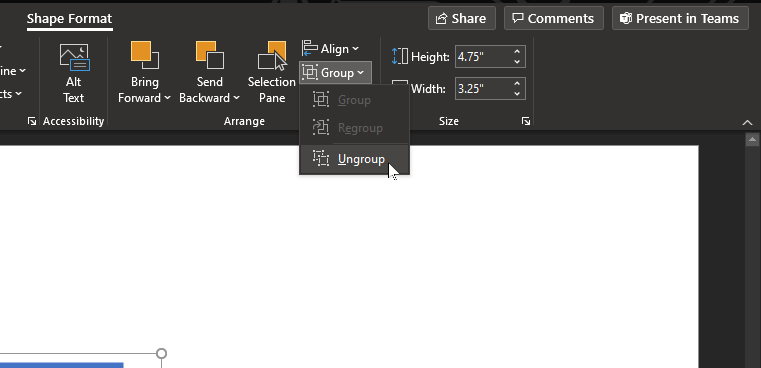
- This makes the objects independent and machine readable.
- Add alt text (the exact text included in the graphic) to each item.
- Note, some SmartArt will include an arrow or other shape behind the objects. Select such objects, right-click and choose Edit Alt Text… and chose Mark as decorative.
There is an additional method to make SmartArt accessible by providing a text alternative. Begin by making a list in plain text:
- Copy list content with right-click > Copy or press Control (Command on macOS) c.
- On the Home tab click Convert to Smart Art and choose your desired SmartArt design.
- Move to the Insert tab and select Textbox.
- Paste your plain text list from step 1 into the textbox.
- Move the textbox outside the slide frame.
- Verify textbox is read immediately after SmartArt in the Selection Pane (via Arrange on the Home tab).
- Right-click the SmartArt, select View alt text… and check Mark as decorative.
