Word Accessibility
Structure
Content that relies solely on visual styling to communicate purpose or function may exclude users of assistive technology. Assistive technology such as screen readers and text-to-speech tools require specific markup to convey meaning. For example, a proper heading should include larger, bolded font to stand out to sighted readers, but must be properly created to provide the equivalent meaning to all readers. Ensure headings, lists, and tables are created using the proper tools.
On this page:
Headings
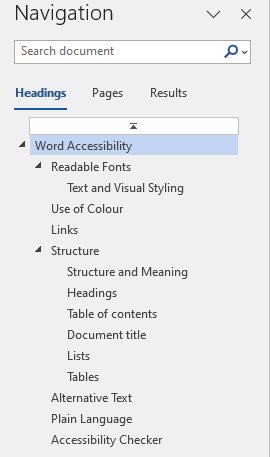
Structured documents are essential for assistive technology, but helps all readers navigate documents efficiently and understand relationships between topics. Brief but descriptive headings help all users navigate quickly to information they need, understand the purpose of various sections, and break up large blocks of text to increase readability.
Place the text cursor on the line of text you want to format as a heading and use the Word Styles gallery to choose the appropriate heading level.

You can also apply a heading style by pressing Control Alt (Command Option on macOS) 1, 2, or 3 to set heading 1, 2, or 3.
Begin with a heading 1 as the broadest, most important level, such as a title. Heading level 2 should be for major sections and heading level 3 as subsections of the preceding heading 2 and so on.
Headings must be in sequential order. Do not skip a heading level when increasing, e.g., do not go from a heading 2 to a heading 4. Heading levels can be skipped when decreasing, for example when a subsection of a heading level 4 concludes, you can skip back to a heading level 2 to introduce a new section. Any type of content can follow any heading level.
*Note, in Word the Title style should not be used as it only visual styling and does not convey meaning to assistive technology. Use a heading 1 for your title.
Click and drag headings to move heading and all text under that heading in the document.
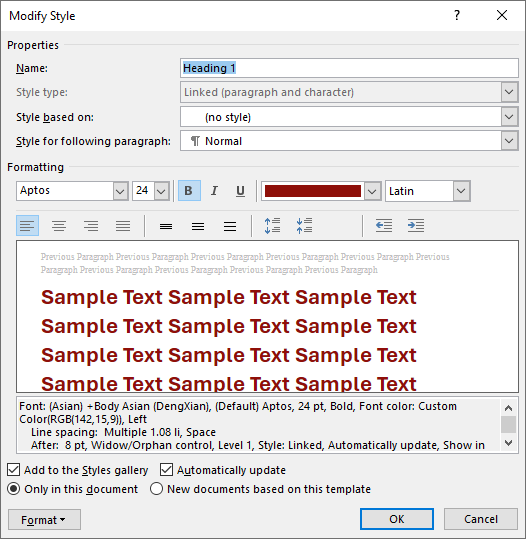
Modify the style, size, color, alignment, and spacing of the style. Select New documents based on this template to set the new style for all new documents. Click Ok when finished. You can also update heading styles by selecting text in your document, right-clicking on the appropriate heading in the Styles Pane, and choosing Update Heading to Match Selection.
Learn more about customizing or creating new styles in Word.
Word allows for multiple visual styles for the same heading level. However, use caution as visual consistency helps all users navigate and understand connections between sections.
Multiple Heading Styles
Use the same visual style for all headings of the same level. For example, all heading level 2s should have the same distinct style and all heading level 3s should have a distinct style and so on. However, there may be unique circumstances where a document will need multiple styles for the same heading level. For example, a sidebar with a coloured background may require a heading level 3 to have a different font colour than a heading level 3 that appears in the main body of a document. In Word, it is possible to create multiple headings of the same level with distinct visual styling.
To create multiple visual heading styles:
- Open the Styles gallery and click on Create a Style.
- Name the new style.
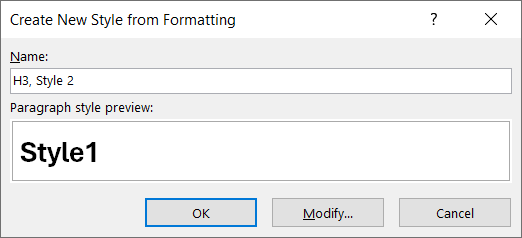
- Click Modify…
- In the Create New Style from Formatting window open Style based on: and choose existing equivalent heading level.
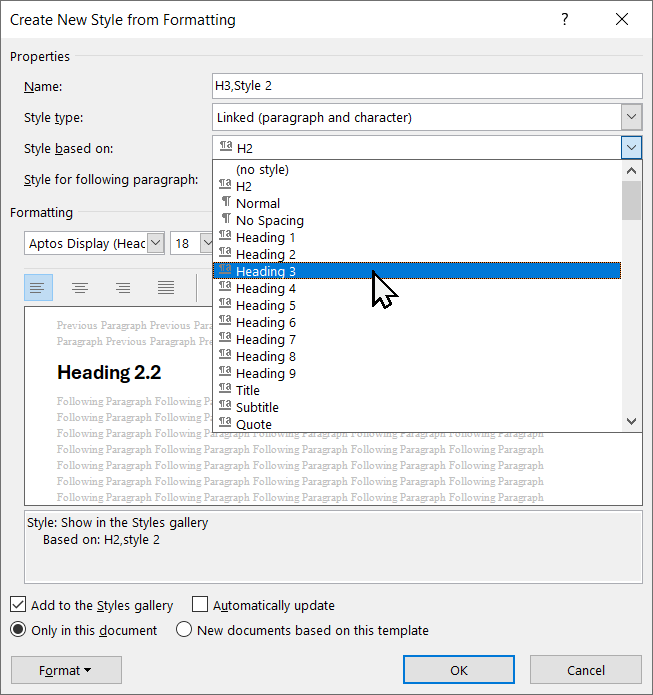
- Modify the style by setting font, size, and colour.
- Click Ok.
Do not drastically change the style as visual readers benefit from similar visual styles to understand hierarchy and document structure.
Learn more about customizing or creating new styles in Word.
Table of Contents
If your document is more than 8 pages, include a table of contents to provide an overview and assist users to skip to specific parts of a document.
To create a table of contents in Word:
- Navigate to the References tab.
- Select Table of Contents.
- Choose your desire table of contents style or select Custom Table of Contents to customize the look and feel.
- Word will use the document’s heading structure to automatically generate a table of contents. Each entry in the table of contents links to the relevant part of the document.
- Headings added or updated after generating the table of contents will not be added. Right-click inside the table of contents and select Update Table or Update Field (depending on device).
Tables
Tables are useful for organizing data (data can be numbers or text). A table Properly built and formatted tables are accessible.
To insert a table in Word:
- Move to the Insert tab.
- In the Table group, choose Insert Table.
- Indicate number of columns and rows and press Ok.
- You can add columns and rows later.
Set a header row/column:
- Click anywhere in your table.
- Select Table > Table Design tab > click Header Row (and/or First Column, if column is a header) checkbox.
- Select Banded Rows or Banded Columns for a landscape document.
- Select the header row then navigate to Table Layout, select Repeat Header Rows to repeat headers across page breaks.
- Accessible tables in Word can only have one header row, one header column, or both.
Right-click on table and select Table Properties for advanced table options via the table properties dialogue.
In some instances it may make sense to add alt text to a table as a summary. To do so:
- Navigate to Table Properties
- Select the Alt Text tab
- Add a Title and a Description
- Click Ok
Table Best Practices
- Tables must have a header and/or column row.
- A concise, descriptive table title helps with context and organization
- Do not use nested, merged, split, or unnecessary blank cells
- Ensure cells have adequate padding and margins
- Do not use coloured cells or text alone to indicate meaning
- Do not use tables with invisible borders to format layout
- Office accessibility checker does not note table errors
- Click in the top left cell, then use the Tab key to see ensure your table reading order is logical and consistent
Learn more about creating accessible tables in Word.
Tables are for data, not structure
A table is a systematic arrangement of numbers, words, other data organized into sets of rows and columns. Tables are used to show relationships between data.
Tables should never be used to create a desired layout, such as using an invisible table to create columns. Word has a built-in tool to create columns.
Columns
Use the Columns tool to create column layouts in Word. Type content in Word and navigate to Layout and select Columns.
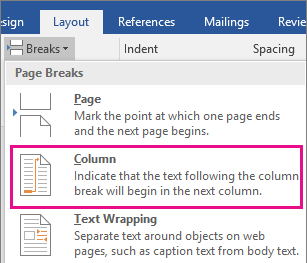 Choose the desired number of columns. It is recommended to create and format content before applying column layouts to avoid excess work and potential issues. Word will automatically apply columns breaks, but it is possible to manually insert column breaks.
To learn more about columns in Word, read columns dialog box and adjusting column widths on the Microsoft Support website.
Do not use invisible (without cell borders) tables to create columns. These will be read as tables to assistive technology and confuse users.
Text boxes
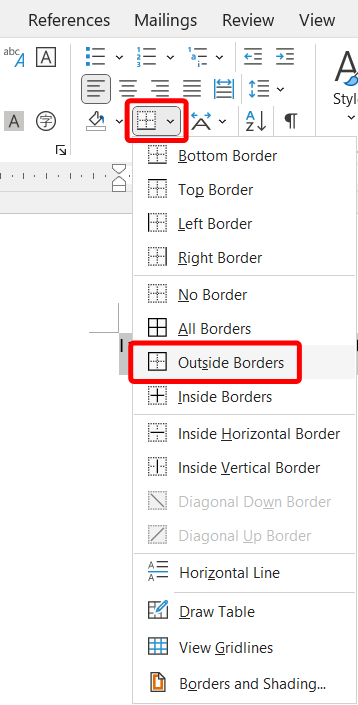 Do not use single cell tables to create a text box; tables are for data, not layout. To create an accessible text box, use border tools. Select the text and on the Home tab, select Borders and choose Outside Borders. Choose Borders and Shading to customize the appearance of the text box, including shading, shadows, colours, and line style.
Word’s Insert > Text box can be used to create textboxes provided it is anchored to a paragraph. This means that wherever the anchor is placed the text box will be read before that paragraph. Word for Windows has predefined text box styles, but text boxes can be customized in appearance and location. Ensure you select Fix Position on Page in the Shape Format > Wrap Text menu.
To place the anchor:
- Click and drag the anchor icon and place it beside the paragraph the text box is to be read before.
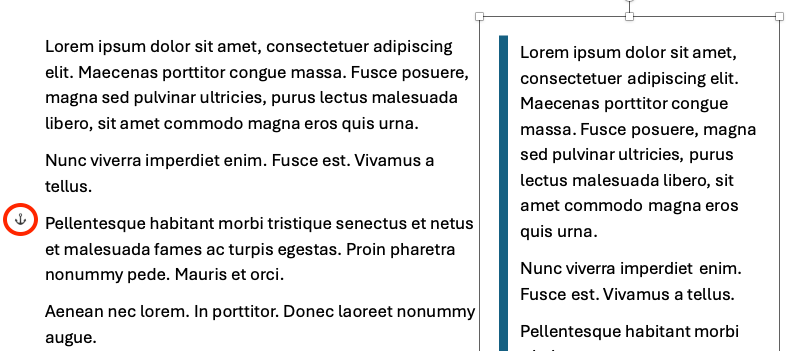
- Place the anchor as the absolute last step in the process to ensure proper reading order.
- Verify reading order by navigating to the Review tab and opening Immersive Reader. In this view, verify the textbox appears in the desired sequence.
Lists
Use the list tools to create lists. Creating lists using asterisks or dashes will not inform assistive technology that the content is part of a list. Lists are useful for steps in a process or grouping items. It is important that everyone is made aware of the presence of a list.
- Use bullet lists for unorganized lists
- Lists where the sequence is not important
- Use numbered lists for items where sequence is important
- Such as steps in a process
To create a list in Word:
- On the Home tab.
- Select Bullets, Numbering, or Multilevel List.
The dropdowns accompanying each style offer more list options and customization. - To verify a list has been properly created: Press Enter after a list item and a new bullet or number should automatically appear on the next line.
Additional Structure
To ensure accessible structure avoid repeated tabs, spaces, or returns. Instead:
- Change spacing before and after paragraphs via Home > Line Spacing Options.
- Manually create a line break by pressing Shift and Enter.
- Of repeatedly pressing Enter, use Insert > Page Break.
- Of repeatedly pressing Tab or Spacebar, navigate to Home > Increase/Decrease Indent or use the indent markers on the horizontal ruler (View > Ruler).
The use of code (HTML attributes, PDF tags, XML, etc.) to distinguish content by meaning, not appearance. For example, a <h1> heading tag creates both a visual and coded navigation waypoint whereas increasing the font size and bolding simply makes regular text appear larger.
Information presented in a grid format of rows and columns, generally to show a relationship between sets of data
