PDF Accessibility
Advanced PDF
Ensure you have Acrobat Pro DC installed on your device as Acrobat Reader lacks the necessary features to make PDFs accessible. Save after every change made following the instructions below as Acrobat cannot undo many actions.
On this page:
Manual Tags
View unmarked content:
- Open Tags pane.
- Open Options menu.
- Select Find.
- Select Unmarked Content from drop down menu.
- Select Search Document or Search Page.
- Select Find.
- Unmarked content will be highlighted in the document with a pink border.
- Tag content as needed.
- Select Next in dialog to move to next unmarked content.
Delete empty tags:
- Open Tags pane.
- Open Options menu.
- Select Delete Empty Tags.
If your document has no tags, you must first generate a Tags Root
- Open Tags pane.
- Select Options menu.
- Select Create Tags Root.
Create tag from selection:
- Open Tags pane.
- Choose Selection tool.
- Click and drag over the desired content.
- Select the Options menu in the Tags pane.
- Choose Create Tag from Selection.
- Select tag Type from drop down and select Ok.
Edit tag type
- Open Tags pane.
- Right-click on tag.
- Select Properties.
- On Tag tab, choose appropriate tag in Type: menu.
To locate a tag in the document, select the tag in the Tags pane. A pink outline will appear around the content in the document.
To locate a tag in the Tags pane:
- Choose the Selection tool.
- Highlight the content in the document.
- Select the Options menu in the Tags pane.
- Choose Find Tag from Selection.
- The tags tree will expand to show the highlighted tag.
Types of Tags
Container elements are the highest level elements used to provide hierarchical grouping and structure of other elements.
In a PDF, the containers are:
- <Document> the root element is the highest level container.
- <Part> can be used for a chapter or page to group other elements.
- <Div> is a generic element to group others.
- <Art> is the article element used to group a distinct section within a larger element.
- <Sect> is the section element used to group elements within a larger element.
To add heading tags:
- Open the Tags pane.
- Use the Selection tool to highlight the heading in the document.
- Open the Options menu in the Tags pane and select Create Tag from Selection.
- Select the appropriate tag from the drop down menu (Heading Level 1 through 6) and select Ok.
- Remember to use a nested, hierarchical heading structure without skipping any heading levels.
<P> should be used for all regular text that is not a heading.
To create a <P> tag:
- Choose the Selection Tool.
- Highlight the paragraph.
- Select the Options menu in the Tags pane.
- Select Create Tag from Selection.
- Select Paragraph from the drop down and choose Ok.
PDF lists have the following tags:
- <L> List
- <LI> List item
- <Lbody> List Body
- <Lbl> Label
To tag a list:
- Open Tags menu.
- Highlight the number or bullet (not the list item text, just the number or bullet point).
- Open the Options menu and select Create Tag from Selection.
- Select Label from drop down and press Ok.
- Select the contents of the first list item (not the number or bullet, just the text of the item).
- Open Options menu and select Create Tag from Selection.
- Select List Item Body from drop down and press Ok.
- In the Tags pane, right-click the Tags Root and select New Tag.
- Select List Item from the drop down menu and press Ok.
- Drag and drop the Label and List Item Body tags as children of newly created List Item tag.
- Repeat steps 2 through 10 for remaining list items.
- Right-click Tags Root and select New Tag.
- Choose List from drop down menu and select Ok.
- Hold CTRL(CMD on macOS) and click all of the List Item tags (created in step 10).
- Drag and drop as children of List tag (created in step 13).
- Double check the order of the tags match the visual order of the document.
To add link text:
- Highlight link text.
- Right-click and select Create Link…
- Choose options such as Link Action and Appearance.
- Choose Next.
- Enter URL in field and choose Ok.
- Open Tags menu.
- Open the Options menu and select Find.
- Choose Unmarked Links from the drop down menu.
- Select Search Page or Search Document radio button.
- Press Find.
- The first untagged link will be outlined in pink.
- Select Tag Element button.
- Select Link from drop down and press Ok.
- A <Link> tag and Link – OBJR tag appear in the tags tree.
- Select the Link tag in the Tags pane.
- Use the Selection tool to highlight the link text in the document.
- Open the Options menu in the Tags pane and select Create Tag from Selection.
- The link text and Link – OBJR should both now be tagged as children of the Link tag.
To add footnotes and references:
- Reading Order Tool.
- Draw a box around the superscript or link text.
- Click Reference or Note button.
- Begin from step 2 above.
Set the language of your PDF using File > Properties > Reading Options. Setting the language of the document and its parts tells assistive technology which language to expect and speak.
However, if the language of part of the document is in a different language or multiple languages you must specify the language of those parts. For a <Sect> or entire <P> you can set the language property. For something smaller than a <P> you will have to tag the content in <Span> and then change the language of that <Span> tag.
- Open the Tags Pane
- Right-click the relevant tag and select Properties
- In the dialog window, select the Tag tab, choose the appropriate Language from the dropdown and then select Close
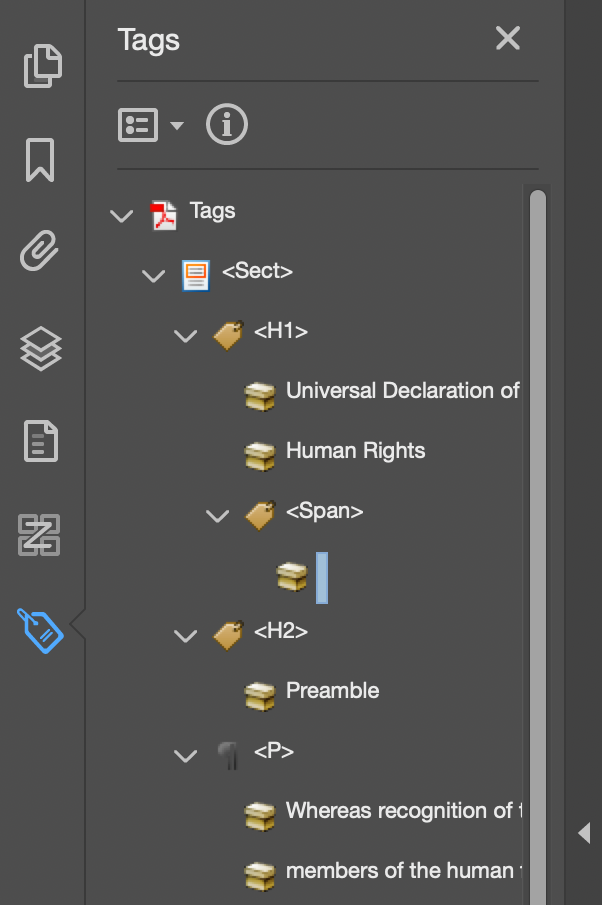
To change the language of one sentence:
- Within a previously tagged <P> open the Tags pane and then Options menu.
- Select New Tag… and choose Span from the drop down and select Ok.
- In the document, highlight the text with the language change.
- Right-click the newly created <Span> in the Tags pane.
- Select Create Tag from Selection.
- Drag and drop the <Span> to the correct order in the Tags tree.
- Right-click the <Span> tag and select Properties.
- On the Tag tab, select the Language from the drop down and choose Close.
Images:
- Open the Order pane.
- Open the Options menu and select Show reading order panel.
- Click and drag to draw a box around the image and select Figure in the Reading Order Panel.
- Open the Tags pane.
- Right-click on the Figure tag and select Properties.
- On the Tag tab, enter alt text in the Alternative Text field.
A table of contents is exceptionally helpful for longer documents and is a recommended practice for any document longer than 5 pages. Each line of the table of contents should link to that point of the document.
To create a table of contents:
- Highlight link text.
- Right-click and select Create Link…
- Choose Go to a page view.
- Choose Next.
- Move to document location and choose Ok.
- Open Tags menu.
- Open the Options menu and select Find.
- Choose Unmarked Links from the drop down menu.
- Select Search Page or Search Document radio button.
- Press Find.
- The first untagged link will be outlined in pink.
- Select Tag Element button.
- Select Link from drop down and press Ok.
- Repeat with each line of the table of contents.
- Create a TOCI tag for each line.
- Tags pane > New Tag > Table of Contents Item > Ok.
- Move each link and link text tag into each TOCI tag.
- Highlight the first table of contents line.
- Right-click the first link tag in the Tags pane and choose Create Tag from Selection.
- Repeat with each line move down the tags tree of link tags.
- Create an empty Table of Contents tag.
- Right-click tags root > New Tag > Table of Contents > Ok.
- Hold Control and click to select all TOCI tags and drag and drop under TOC tag as nest children.
- Verify order.
- Set table of contents title as an H1.
- Highlight “Contents” or “Table of Contents” or whatever text precedes the table of contents.
- In the Tags pane, select the Options menu, choose Create Tag from Selection.
- Choose Heading Level 1 and select Ok.
- Place <H1> tag above the table of contents, at the same hierarchy level.
Bookmarks are also essential to PDF accessibility. They do not require tagging. To add bookmarks:
- Select the Bookmarks button on the left.
- Move in the document to where you would like to place a bookmark.
- Use the Selection tool to select the area of the page to be bookmarked.
- For example: click an image or highlight text.
- Use the New bookmark button in the Bookmarks pane.
- Ensure bookmarks are in logical order.
Read more about PDF bookmarks.
If you want screen readers to ignore certain content, such as decorative images, you must mark those items as Artifacts.
To mark objects as an artifact:
- Open Reading Order Tool.
- Click and drag zone around element.
- In the Reading Order Tool select Background/Artifact button.
- This removes the item from the tags tree.
Or use the tags pane:
- Open the Tags pane.
- Right-click the content, not the tag icon, in the tags tree.
- Select Change Tag to Artifact.
To show artifact tags:
- Navigate to the Tags pane and select the options menu.
- Choose Find…
- Select Artifacts in dropdown (selected by default).
- Choose Search Page or Search Document.
- Select Find.
Note: InDesign often exports excess tags. In Acrobat, use the Preflight tool to remove them:
- Under Tools, choose Print Production.
- Select Preflight.
- Select the wrench icon and under Document select Mark all non-structure elements as artifact.
- Click Fix.
Tables
Tables in PDFs require special attention to ensure they are accessible.
PDF Tables need the following tags:
- <Table>
- <TR> table row
- <TH> table header
- <TD> table data
To tag a table properly, you must designate:
Header cells:
- Use the Selection tool to select the first header cell.
- Open the Options menu in the Tags pane.
- Select Create Tag from Selection.
- Select Table Header Cell from drown down menu and select Ok.
- Repeat above steps for all header cells.
Data cells:
- Use the Selection tool to select the first data cell.
- Open the Options menu in the Tags pane.
- Select Create Tag from Selection.
- Select Table Data Cell from the drop down menu and select Ok.
- Repeat for all other data cells.
Row tags:
- Create the number of required empty row tags. There needs to be a <TR> table row tag for each table row, including header row.
- In the Tags pane, open the Options menu and select New Tag.
- Choose Table Row and select Ok.
- Hold Shift and click to select all cell tags in the first row.
- Drag and drop into the first Table Row tag (created in step 13), nested as children.
- Repeat for all rows.
Table tag:
- Create a Table Tag.
- In the Tags pane, open the Options menu and select New Tag.
- Choose Table and select Ok.
- Hold Shift and click all the <TR> table row tags.
- Drag and drop into the Table tag (created in step 19), nested as children and in logical order.
- For complex tables or to add context, provide a description of the table in the Alternative Text field by right-clicking the Table tag, selecting Properties, and moving to the Tag tab.
Complex Tables
Tables with split cells, merged cells, or cells that span multiple rows or columns can be difficult for assistive technology to interpret. Best practice is to create simple tables even if you can create a complex table that technically adheres to accessibility standards. To make tables accessible:
- Open the Order pane.
- Select the menu and choose Show reading order panel.
- Select the table and select Table Editor button on the Reading Order panel.
- Right-click on spanned cell and select Table Cell Properties…
- If it is a header ensure Header Cell radio button is selected.
- Use the Scope: dropdown to select the appropriate designation (Row, Column, or Both).
- In the Attributes section enter the Row span and Column span to indicate the number of rows or columns spanned by the merged/spanned cell.
- Click Ok and Yes to any warning messages.
Javascript
You can add Javascript to PDF. This may prove useful for certain forms.
To create fillable text fields that include existing lines for printing and filling by hand, use one of the following methods to ensure accurate text entry.
To create a multiline text field:
- Create a multiline text field spanning all lines on form.
- Right-click > Properties.
- Format tab.
- Select Custom in Select format category menu.
- Custom Format Script.
- Use Edit button to open Javascript editor.
- Paste:
- var field = event.target;if (field.value == field.defaultValue) {field.fillColor = color.transparent}else {field.fillColor = color.white}
- Press Ok.
- Press Close.
To create a single line text field:
- Create a text field for each line.
- Select first text field.
- Right-click and select Properties.
- Move to Appearance tab and set an absolute font size (minimum 11).
- Move to Options tab and uncheck Multi-line and Scroll long text.
- Move to Format tab.
- Select Custom in Select format category menu.
- Custom Keystroke Script.
- Use Edit button to open Javascript editor.
- Paste:
- if ( event.fieldFull || event.willCommit ) this.getField(“*name of nextfield to continue in*”).setFocus();
- Repeat 3-8 for each subsequent field, ensuring target field is named correctly.
You may also wish to include a clear fields button:
- Add a visible text label reading “Clear Form”.
- Place button in form next to “Clear Form”.
- Select All Properties link.
- On General tab type a unique name (“Clear form”) and tooltip (“Click to clear all form fields”).
- On Appearance tab set font size to 14.
- On Options tab navigate to Behaviour dropdown and choose Push.
- Under State options and select Up.
- Type “Clear form” in Label field.
- Navigate to the Actions tab.
- In the Select Trigger drop down, choose Mouse Up.
- In the Select Action drop down, choose Run a Javascript and press Add button.
- In the Javascript editor, paste:
- var MyTitle = “Clear Form Confirmation”;var MyAlert = “Clear all form fields?\n\nThis action cannot be undone. Proceed?”;if (app.alert({cMsg: MyAlert, nIcon: 1, cTitle: MyTitle, nType: 2}) == 4){this.resetForm();}
