Assistive Technology User Guides
Magnifiers

On this page:
ZoomText

ZoomText Magnifier/Reader is a magnification and reading program tailored for low-vision users. ZoomText enlarges and enhances your computer screen, echoes your typing and essential program activity, and automatically reads content. ZoomText can be controlled by mouse, keyboard, or voice commands.
Setup
Open ZoomText before any other programs such as web browsers or document software.
When ZoomText opens, the ZoomText toolbar appears.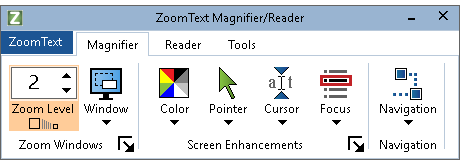
Navigate menus using the mouse or keyboard:
- Alt z opens the menu.
- Arrow down for help, configurations, and settings.
- Go to Preferences.
- Check Start ZoomText automatically when Windows starts checkbox, if desired.
- Users can also enable ZoomText to run on login screen.
- When making changes to settings, navigate to ZoomText > Configurations > Save As Default, or press Alt z > c > s and Enter.
- Go to Command Keys for a searchable list of keyboard shortcuts.
- At any point press Esc to close menus.
Press Tab to move focus between menus, tabs, and controls.
Use Arrow keys (left, right) to move between tabs and controls.
Enter on any control to toggle on/off and/or open associated menu.
Caps lock Control u brings ZoomText toolbar to front.
Caps lock Control Enter disable/enable ZoomText without closing ZoomText.
Or select ZoomText menu on toolbar and select Enable ZoomText or Disable ZoomText.
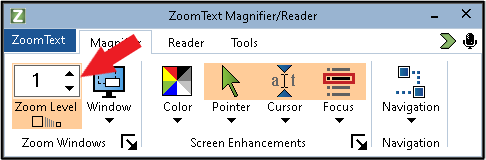
To set zoom level 1 as default on startup:
- Set zoom level to 1
- Click ZoomText
- Select Configurations
- Click Save As Default
Magnifier Tab
The Magnifier tab has a number of tools and options, including:
Zoom Level
Mouse: Click up or down arrow to zoom in or out
Caps Lock Shift + Mouse scroll wheel to zoom in or out
Keyboard:
Caps Lock Up arrow zoom in
Caps Lock Down arrow zoom out
Caps Lock Enter toggles between 1x zoom and current zoom level
Window
Window > One Monitor select zoom mode (full, overlay, docked, lens, line)
Caps Z to cycle through zoom modes
Freeze View to capture a screen so you can zoom without any changes occurring
Color
Caps lock c to toggle on and off
Color enhancements (Color > Settings for options)
Select Scheme to change mode (invert, yellow on black, black and white, etc.)
Pointer
Caps lock p to toggle pointer enhancements on or off.
Pointer enhancements (size, color, customize by selecting Pointer and moving to Settings)
Cursor
Caps lock r
Additional modes available under Cursor > Scheme
Cursor enhancements (Cursor > Settings for options)
Focus
Caps lock f
Highlight focused object, change via Focus > Scheme
Navigation
Settings for where ZoomText zooms and reads from, how ZoomText follows mouse or keyboard focus
Reader Tab
ZoomText also includes a powerful screen reader. While not as interactive as JAWS or NVDA, ZoomText can read the entire context of the screen and has numerous options for reading text and documents aloud.
Press Alt r to move to Reader tab of ZoomText toolbar to view various settings such as keyboard and mouse echo (audio feedback of words read or highlighted content) as well as different reader modes.
Deactivate, change, and add new voices in the Voice menu.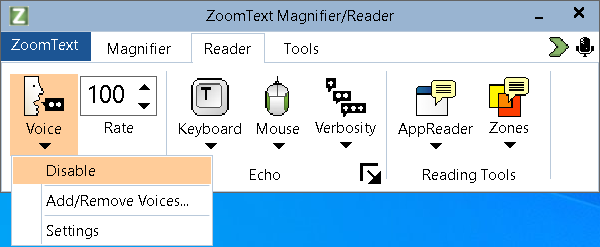
Adjust voice speed by changing the number above Rate.
AppReader
Caps Alt r launches AppReader in mode selected on toolbar.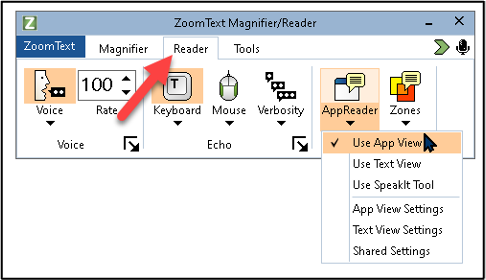
Caps Alt a launches App view. App view reads text in the document or webpage open with a ringed highlight of what is being read.
Press Caps Alt Left click to begin reading from mouse pointer.
Press Control to pause reading and Enter to resume.
Left arrow moves to previous sentence and Right arrow moves to end of current sentence.
Press Escape to stop AppReader.
When reading, press Tab to switch to Text View. Text View opens the content being read in new window with customized contrast. Press Control Alt t to open Text View.
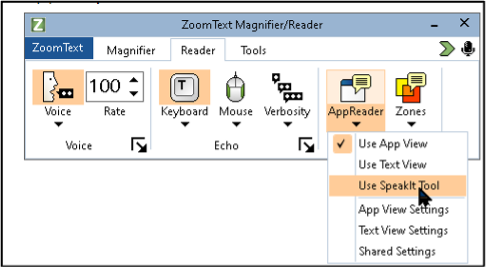
SpeakIt allows users to click on a word, image, icon, or other element and have ZoomText read the content. On the Reader tab, click AppReader, and select Use SpeakIt Tool or press Caps Lock Alt s.
SpeakIt also allows users to highlight text to be read. When SpeakIt is active, click and drag over text to have it read aloud. Press Escape before selecting new text to be read. Note: SpeakIt does not visually indicate what is being read word by word like App View and Text View do.
Background Reader allows users to highlight text and hear it read aloud in the background while completing other tasks. To use Background Reader:
- Highlight text
- Press Caps Lock Control b or navigate to the Tools tab and select Background Reader.
Tools
Navigate to the Tools tab or press Alt t.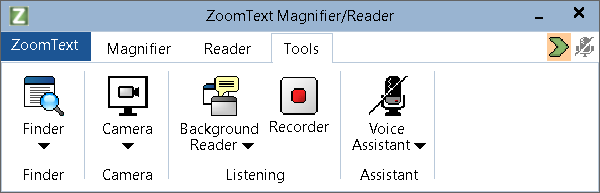
Finder allows user to find, search, and list results. Activate with Caps Control f.
Camera allows users to hold up a document to your webcam to have it zoomed on screen. Activate by pressing Caps control c. Accompanying toolbar has zoom and colour options.
Background Reader allows users to highlight text and hear it read aloud in the background while completing other tasks. To use Background Reader:
- Highlight text
- Press Caps Lock Control b or navigate to the Tools tab and select Background Reader.
Recorder can create audio files of text you have copied to windows clipboard. You can listen to the audio later or on a different device.
Voice Assistant allows users to give ZoomText command using their voice. Press Caps Alt Spacebar or click microphone icon in top right of ZoomText toolbar. On the Tools tab, select Voice Assistant > Getting Started to set up Voice Assistant.
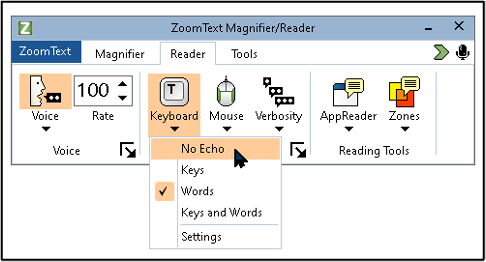
By default, ZoomText will read back what is typed. Select Reader > Keyboard > No Echo to turn this off.
Links
Complete ZoomText user guide
Complete list of ZoomText keyboard shortcuts
Android
![]()
Visibility Enhancements
- Navigate to Settings > Accessibility.
- Select Visibility Enhancements.
- Choose High contrast or Large display.
- Select Magnification and toggle Magnification shortcut to On.
- Use two fingers to move zoom window around screen.
- Tap two arrow icon in bottom right to toggle full screen zoom.
- Tap the Accessibility shortcut in the bottom right and select Magnification to turn off.
- Select Screen zoom.
- Use slider to change size of items displayed on screen.
- Select Font size and style.
- Drag slider to change default font size.
- Select default font style.
- Use Bold font toggle to make all font bold.
- There are other settings on the Visibility Enhancements menu.
Windows
![]()
Magnifier
- Open Settings and select Ease of Access (Accessibility in Windows 11).
- Select Magnifier in the sidebar.
- Alternatively, press Windows Control m to quickly open the magnifier menu.
This menu allows users to change zoom levels and increments and to start magnifier automatically.
To activate Magnifier press Windows + (this may be function/fn ? on laptops).
Press Windows = to zoom in and Windows – to zoom out.
Windows Esc turns off magnifier.
Magnifier offers three views: Full Screen, Docked, and Lens. Change views in the magnifier menu or, when Magnifier is running, press Control Alt m to cycle through views, Control Alt l to switch to Lens, Control Alt f for Full Screen (hold Control Alt Space to temporarily reset zoom level), or Control Alt d to switch to Docked view.
View additional information about Windows Magnifier.
Display Settings
- Navigate to Settings > Ease of Access.
- Choose Display from the sidebar.
- Use the Make text bigger slider to increase text size.
- Select a percentage under Make everything bigger to increase the size of everything on screen.
- Navigate to Settings > Ease of Access.
- Choose High contrast in the sidebar.
- Toggle Turn on high contrast and choose a theme.
- Choose Color Filter in the sidebar.
- Toggle Turn on color filter and select a colour filter to use.
- Check Allow the shortcut key to toggle filter on or off.
- Windows Control c to toggle default colour filter on/off.
Mouse Pointer and Text Cursor in the Ease of Access menu have options to make cursors easier to see.
macOS
![]()
macOS has a built-in magnifier tool. To enable:
- Navigate to System Settings > Accessibility > Zoom
- Toggle Use keyboard shortcuts to zoom on.
- Keyboard shortcuts:
- Command Option 8 toggles zoom on/off
- Command Option = zooms in
- Command Option – zooms out
- Keyboard shortcuts:
- Or, toggle Use trackpad gesture to zoom on and use the listed instructions to zoom.
In the same menu users can change the zoom style from Picture-in-picture which displays a small zoomed box that follows the cursor, Full screen zooms the entire screen, and Split screen which anchors a window at the top of the screen that zooms where the cursor is.
The Advanced… menu has more options and tweaks available.
Users can select Use scroll gesture with modifier keys to zoom checkbox to use the trackpad or scroll wheel to zoom. The default modifier key is Control.
Finally, toggle Hover Text on and users can hold Command and macOS will zoom text under the cursor. Options… allows users to change modifier key and zoom level/text size.
Some users may wish to increase the zoom of the entire macOS display. To do so:
- Navigate to System Settings.
- Select Displays.
- Choose level of zoom desired between Larger Text and More Space.
Make text and other items on the screen bigger on Mac.
iOS

Zoom
- Navigate to Settings > Accessibility.
- Choose Zoom.
- Toggle Zoom on.
- Tap with 3 fingers to toggle Zoom on and off.
- Drag with three fingers to move around screen.
- Select Zoom Region to switch between Full Screen Zoom or Window Zoom.
Zoom in on the iPhone screen – Apple Support
Display & Text Size
- Navigate to Settings > Accessibility.
- Choose Zoom.
- Select Display & Text Size.
- Select Larger Text.
- Toggle Larger Accessibility Sizes on.
- Drag the slider to adjust the size.
- Customize other options such for contrast and colour invert.
Change the font size on your iPhone, iPad, and iPod touch – Apple Support
Magnifier
- Open the Magnifier app.

- Swipe down on screen and type “Maginifier.”
- Zoom in and out with slider or swiping up and down in viewfinder
- Tap screen to focus
- To freeze the current view, tap shutter button (concentric circles, bottom centre) or press one of your volume buttons
- There are various tools, including:
- Adjust brightness, change contrast, turn on flashlight, apply colour filters
Use Magnifier on your iPhone or iPad – Apple Support
Browser Tools
Chrome
![]()
Page Zoom
Zoom in: Control (Command on macOS) and =
Zoom out: Control and –
Reset to actual size: Control and 0
The zoom settings can also be accessed by the View menu on the toolbar (macOS) or under More on Windows.
Chrome will remember your zoom level on a specific webpage. Simply zoom to your desired zoom level and when signed in on your device the page will load to that zoom level. To reset default zoom to 100% follow these steps:
- Select More > Settings
- Click Privacy and security > Site Settings
- Click Additional content settings > Zoom levels
- Click X (Remove zoom level) to reset default zoom to 100%
Default Fonts
- Select More > Settings
- Select Appearance
- Font Size allows users to set font size
- Additional options are available under Customize fonts
- Minimum font size
- Default font styles
Additional information on customizing Chrome.
UI Options Plus
UI Options Plus is a Chrome extension that provides many visual customizations in one interface. Use the scrollbar or left and right arrows to move between tools. The following options are available:
- Zoom – uses Chrome browser zoom up to 500%.
- Letter spacing – up to 2x website default.
- Word spacing – up to 4x website default.
- Line spacing – up to 3x website default.
- Syllables – Divides words by placing a dot between syllables.
- Contrast – Offers multiple combinations of background and text colours.
- Right-click to select – Allows users to select text block by right-clicking on any part of it.
- This may help users employ text-to-speech software on a specific bit of text and/or assist with copying.
- Selection highlight – Allows users to change the default colour when highlighting text.
- Text-to-speech – Toggle this tool to use text-to-speech on highlighted text. Click the Play button to hear text.
- Reading mode – Toggle reading mode to simplify the page and remove distractions like ads or sidebars (note: this could break the layout of some pages).
- Table of contents – This tool generates a table of contents for the page using the page’s heading structure.
- Enhance inputs – This toggle makes link and button text larger, bold, and underlined.
Customizations can be changed by clicking left or right arrows, entering a numerical value in the textbox, or toggling setting on or off.
To reset all customizations to default, right-click the extension icon and choose Reset.
Edge
![]()
Page Zoom
To zoom in: Press Control (Command on macOS) and =
To zoom out: Press Control and –
To reset to actual size: Press Control and 0
Additionally, open Settings and more button and click the + or – on the Zoom line of the menu.
Default Fonts
- Navigate to Settings
- Select Appearance from the sidebar
- Navigate to Zoom
- Select Page zoom dropdown to set default zoom percentage
- Navigate to Fonts
- Select Font size dropdown to change default font size.
- Select Customize fonts for additional options.
Firefox
![]()
Page Zoom
To zoom in: Control (Command on macOS) and =
To zoom out: Control and –
To reset to actual size: Control and 0 or click the x% icon in the address bar
Or, hold Control (Command on macOS) and scroll up (with mouse wheel or two fingers on trackpad) to zoom in and scroll down to zoom out.
Firefox allows users to zoom text only (Navigate to View menu > Zoom > Zoom Text Only). Use the same keyboard shortcuts as above. Keep in mind, this may break the layout and functionality of a webpage.
More information about zooming in Firefox.
Via Settings > General under Language and Appearance changed the Default Zoom for all pages using the dropdown menu. Read the Firefox Font size and zoom guide for more information.
Default Fonts
To set minimum font size:
- Navigate to Settings and move to the Language and Appearance section.
- Under Fonts and Colours, select Advanced… button.
- In the Minimum Font Size drop-down select the minimum size in pixels for text.
- Uncheck Allow pages to choose their own fonts, instead of their selections above.
- Click Ok.
Read more about Firefox minimum text size options here.
To override page font styles:
- Open Settings.
- Under Language and Appearance > Fonts and Colours, select Advanced.
- Set the various fonts you would like to use.
- Uncheck Allow pages to choose their own fonts, instead of their selections above.
- Click Ok.
Firefox guide for overriding page fonts.
Default Colours
Firefox allows users to set default colours for text, backgrounds, and links.
- Navigate to Settings
- Under Language and Appearance, select Colours button.
- Set your specified colours for each and then select the Override the colours specified by the page with your selections above dropdown and set to Always.
More information on overriding page colours.
Safari
![]()
Select Safari > Preferences in the menu bar or press CMD and , to open Safari preferences.
Page Zoom
To zoom in: Command and =
To zoom out: Command and –
To reset to actual size: Command and 0
Safari also offers options to zoom text only however this often breaks the layout and functionality of webpages.
Minimum Font Size
- Safari > Preferences…
- Advanced Tab
- Check Never use font sizes smaller than and set size in drop down box.
Set defaults for current site
- Select Safari from the menu bar
- Select Settings for [current website]
- You can select Use Reader when available and set default zoom with Page Zoom
Website specific settings can be amended or removed later via Safari > Preferences > Websites
To set defaults for all webpages:
- Navigate to Safari on the menu bar
- Select Preferences
- Move Websites tab
- Select Page Zoom from sidebar
- In the bottom right, choose a default zoom percentage using the dropdown menu beside When visiting other websites:
- The same process can be used to use Reader View when available by navigating to Reader in the sidebar and selecting On in the When visiting other websites: dropdown.
Learn more about customized settings for websites in Safari
