Assistive Technology User Guides
Note-taking and Transcription

On this page:
Note-taking Strategies
Few people have been taught how to take notes. Unfortunately, instructing students how to take notes is no one’s responsibility. If a student does not understand how to take and interpret notes, no amount of technology or accommodation will be useful. Langara’s Academic Success Centre has resources, workshops, and tutoring that may assist students with note-taking
Consider these free tools for note-taking:
Microsoft Word (Select File > New/New from Template > Notes)
Google Docs (File > New > From document gallery > Class notes)
Popular note-taking methods include:
Outline notes are bullet points that mimic the organization of the material or presentation.
Cornell notes organize material using a template (Word, Google Docs Template).
Sentence notetaking involves writing a sentence for each point and organizing material once the overall structure is clear.
Mapping is a visual style that emphasizes major concepts and connections between ideas. Consider MindMeister, Inspiration or OneNote.
Boxing is a visual style that organizes material with boxes around each subtopic.
Learn more about notetaking strategies.
Note-taking Software
Record and Transcribe
One method for notetaking is to record audio and transcribe the recording later. While this does not allow students to correct and annotate the transcript in real-time, it may be a better solution for students that struggle with focus. This method is also better suited for lectures and presentations as the recorder can be placed near the speaker or presenter.
To record audio:
- On a digital recorder, press the record button to begin capturing audio.
- Users should familiarize themselves with additional features such as sound modes and recording levels.
- To record audio on a smart device:
- Use an audio recording application.
- Voice Recorder is the default app on Samsung devices and Recorder is the default on Google devices.
- Voice Memos is the default app on iOS, iPadOS, and macOS.
- Voice Recorder is the default app for Windows.
- Begin recording.
- Use an audio recording application.
- When done recording, press Stop. Then transfer the recording to a computer. For a digital recorder, use the included connector and for a Smart Device consider cloud storage (such as OneDrive, iCloud, or Google Drive) or emailing the audio file to yourself.
Dragon Naturally Speaking can transcribe .wav, .mp3, and .m4a file types to text.
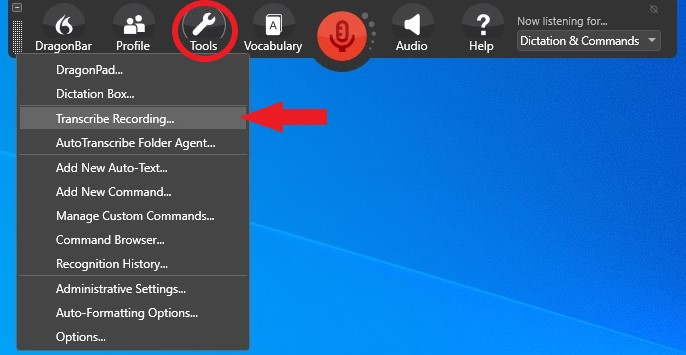
- Open Tools menu and select Transcribe Recording.
- Choose file and select Transcribe.
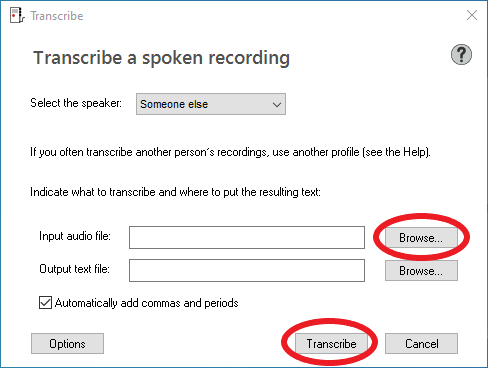
- If the recording is of someone else’s voice, select Someone else in the Select the speaker menu.
- By default, the Output text file location will be the same as the Input audio file location.
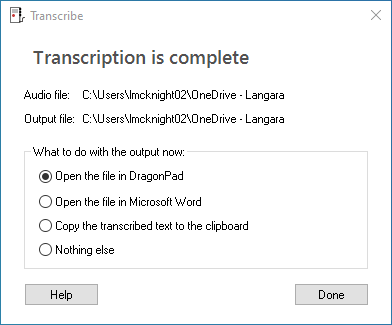
- Wait for the transcription process to complete. Dragon creates a text file that can be opened in DragonPad or Word or saved for later as an .RTF text file.
Watch a demonstration of Dragon’s transcription tool (video, 2:01).
Transcribing recorded speech with Dragon.
Visit Dragon Watch and Learn for videos of common Dragon features in action.
The web version of Microsoft Word offers an excellent transcription tool. To transcribe audio, you must have a .wav, .mp4, .m4a, or .mp3 file format.
- Open a new Word document in the web platform (https://www.office.com/launch/word?auth=2).
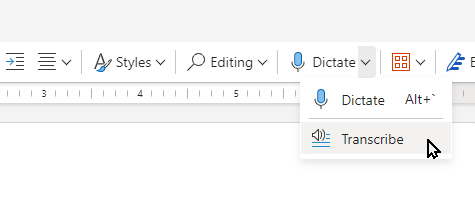
- On the Home ribbon, select the arrow below or beside Dictate and choose Transcribe.
- Select the Upload audio button.
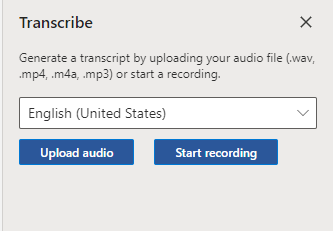
- Choose your file and select Open.
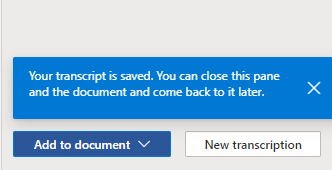
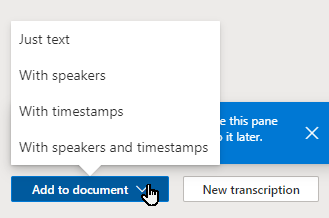
- When the process is complete, you can edit the transcript and add it to your document with various features such as speaker labels and timestamps.
Note: users can transcribe 300 minutes per month.
Official Microsoft documentation on transcribing your recordings with Word web version.
How to dictate speech into Word on all platforms.
Dictate your notes in OneNote.
Transcribe your recordings with Word web version.
Live Note-taking and Transcription
An increasingly popular technology-based notetaking solution are live transcription and notetaking platforms. These tools record and transcribe audio in that users can amend and annotate in real-time.
As the audio is recorded by the user’s device, these solutions may not work in large lectures or noisy environments due to space between speaker and microphone, background noise, and echoes. Live transcription options work best for small meetings, seminars, or group work.
Glean
Glean (formerly Sonocent) is a notetaking application that can transcribe audio to text. Glean is available as a web application and mobile app.
To use Glean to take notes and transcribe audio:
- Sign in to Glean
- Select New Event
- Click the red dot Record button.
- As Glean is recording you can add notes, headings, or attachments. Your interactions will be noted at the time in the recording.
- When the presentation is over, click Transcribe Audio.
- Click Transcript.
To use Glean to transcribe pre-recorded audio:
- Sign in to Glean.
- Select New Event.
- Open the Event Options menu in the top right of the window.
- Select Import Audio and choose file.
- Click Transcribe Audio.
- Click Transcript.
- Select Text.
- Highlight text and copy to Word document or select Post to post transcribed text to Glean Event and automatically saved.
Notta
Notta is a notetaking application.
To use Notta to take notes and transcribe audio:
- Login to Notta.
- Select Record an Audio.
- Click Add Notes to add a timestamped note.
- Click Stop.
- Select Download to export the recording and/or transcript in various formats.
To use Notta to transcribe pre-recorded audio:
- Login to Notta.
- Select Import Files.
- Once transcription is complete, open the file from the Notta Dashboard.
- Make edits, add notes, and export in various formats.
Otter.ai
Otter.ai is a speech to text transcription application available as a web application, Chrome extension, and mobile app.
To use Otter to take notes and transcribe audio:
- Sign in to Otter.
- Click Record.
- Otter will open a new conversation and begin recording.
- Click on any transcribed text to add a comment.
- Select Stop Recording when you are finished. The audio recording and transcribed text will be available for review and export.
To use Otter to transcribe pre-recorded audio:
- Sign in to Otter.
- On the Otter dashboard, select the Import button.
- Drag and drop your file or select Browse files.
- Wait for transcription process to complete.
- Select Go to transcript.
- The audio file can be played and the transcript can be edited for accuracy.
- The transcript can also be manipulated, annotated, and highlighted.
- From My Conversations the transcript can be exported.
