Media, webconferencing, and lecture recording
Kaltura Meetings: Meetings Tools
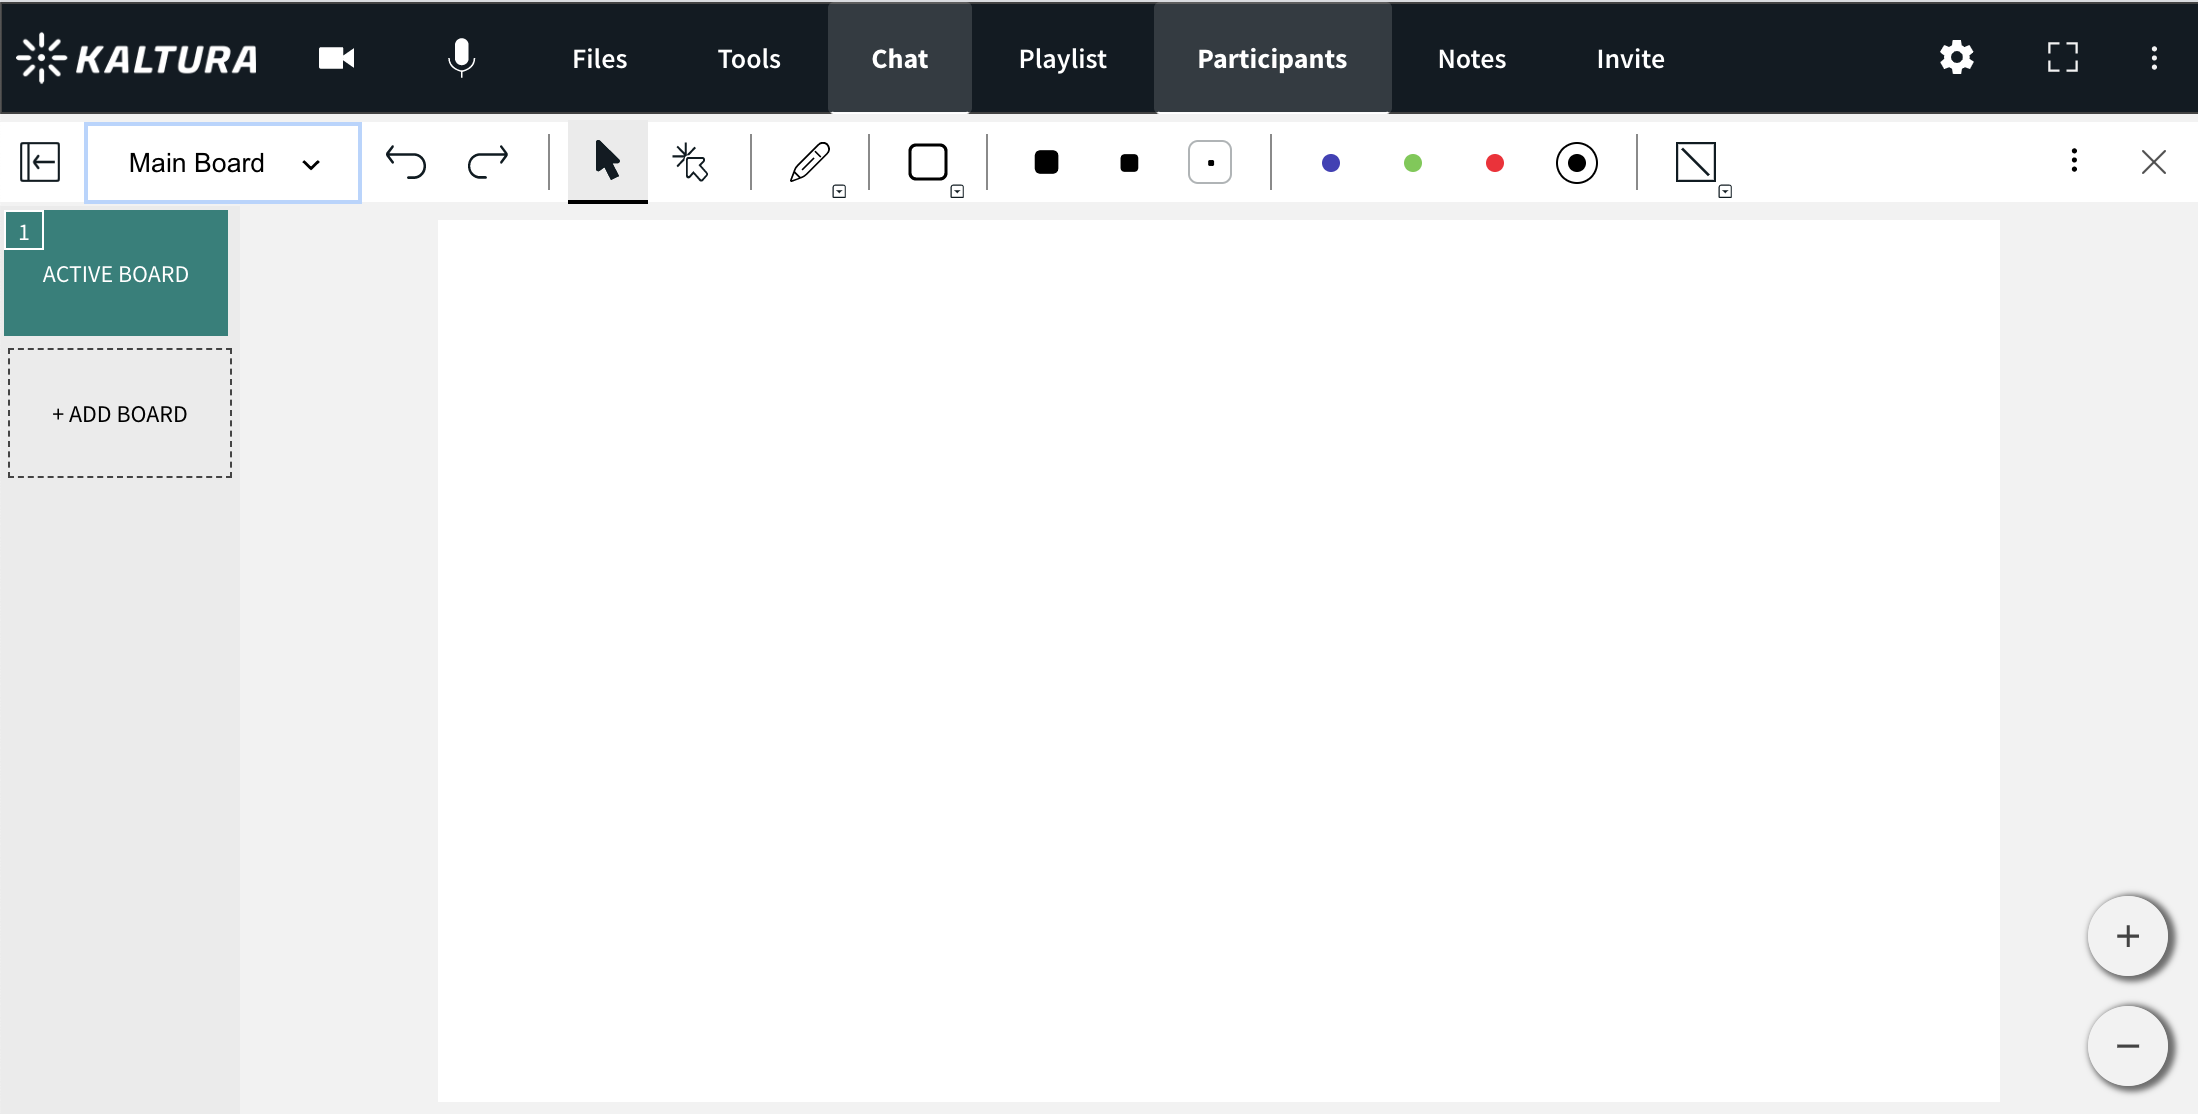
Draw On Your Kaltura Digital Whiteboard
This article describes how to collaborate with your participants in real time on the Kaltura Live Room Digital Whiteboard.
The Kaltura Live Room Digital Whiteboard is a perfect tool for collaboration, brainstorming, and language learning.
Display Your Digital Whiteboard
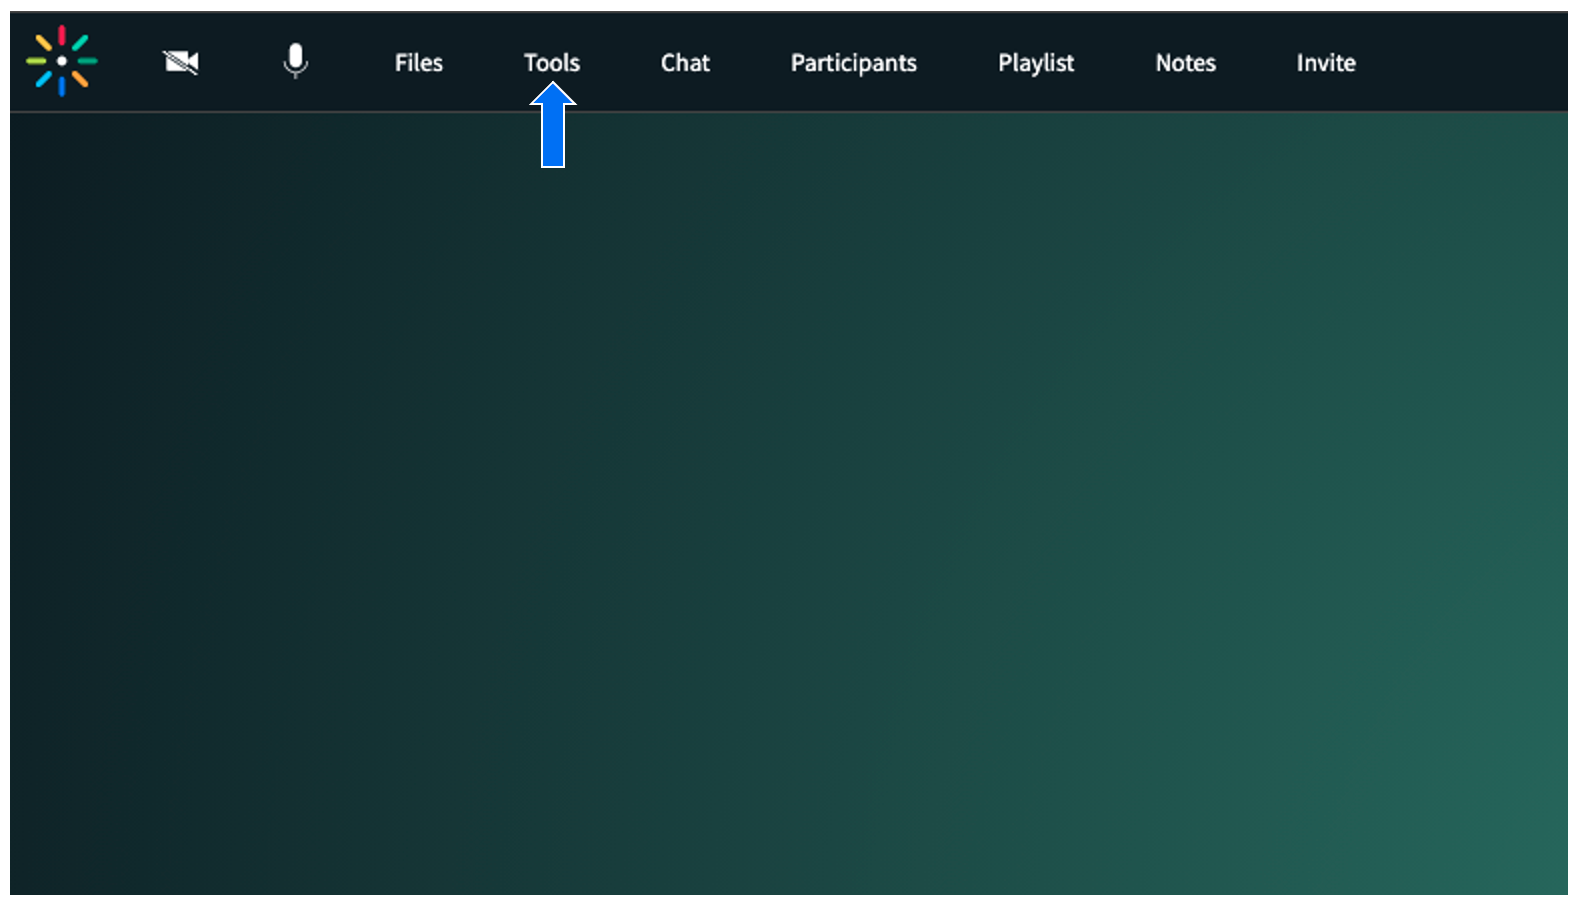
- Click Tools.
- Select Whiteboard.
💡Instructors/Moderators can add additional boards as needed by simply clicking +Add Board in the thumbnail tray to add a new board to the whiteboard.
Create Additional Whiteboard Pages
- Your whiteboard drawings are automatically saved and remain from session to session – unless you delete them.
- Each whiteboard can support up to 50 pages.
- Use the right and left arrow keys to navigate to next or previous boards (available to Instructors/moderators only).
Whiteboard Tools
Use Cursor

Use Laser Arrow

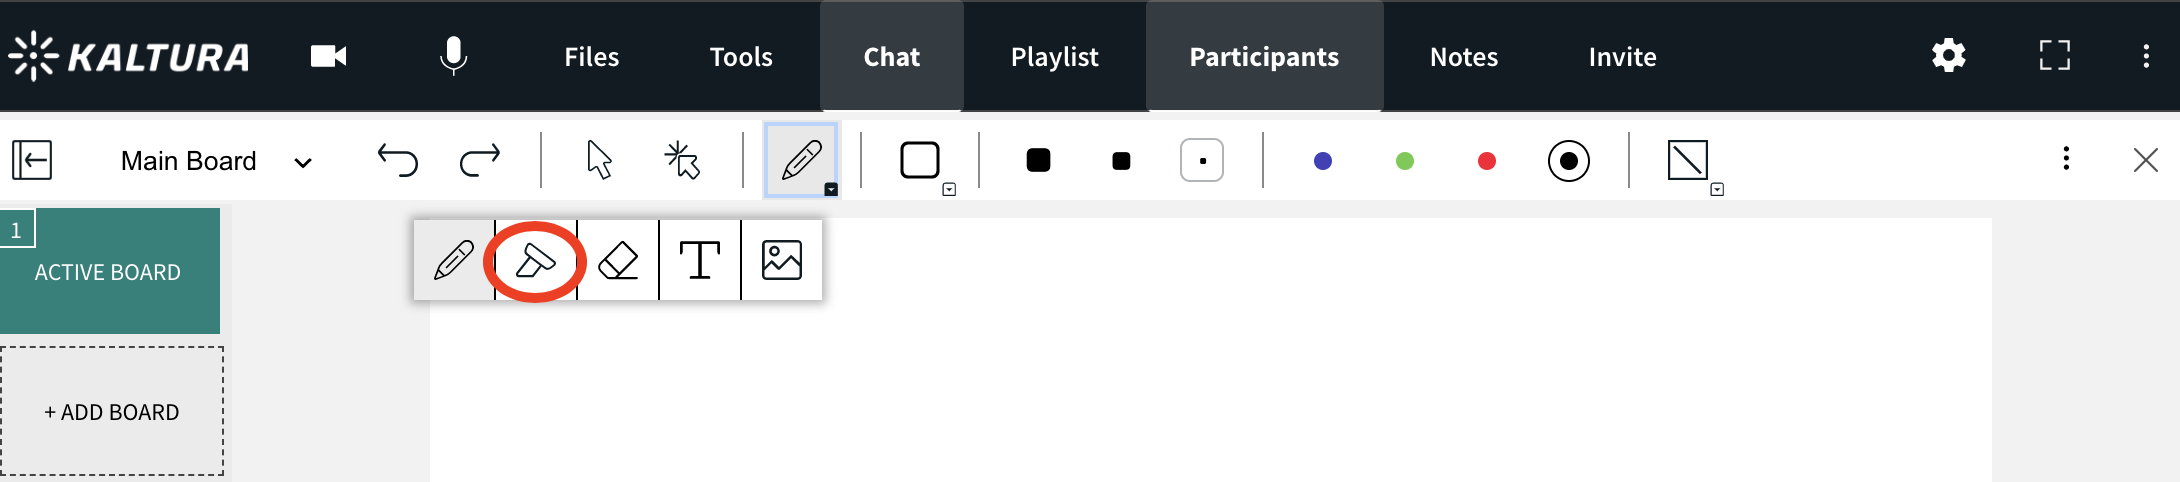
To Free Draw/Use Pencil
- Select the Pencil icon.
- Click & drag your cursor to draw.
💡Use a touch screen device or USB trackpad to more accurately write equations, music, and more.

To Highlight
- Click the Pencil icon to reveal a drop down.
- Select the Highlighter icon.
- Click & drag your cursor to highlight text on the whiteboard or slide.
To Type
- Select the Text icon.
- Click the whiteboard where you want your text box to be.
- Enter in your text.
- Click outside of the text box to post it.
💡Edit text by double clicking text you posted on the whiteboard.

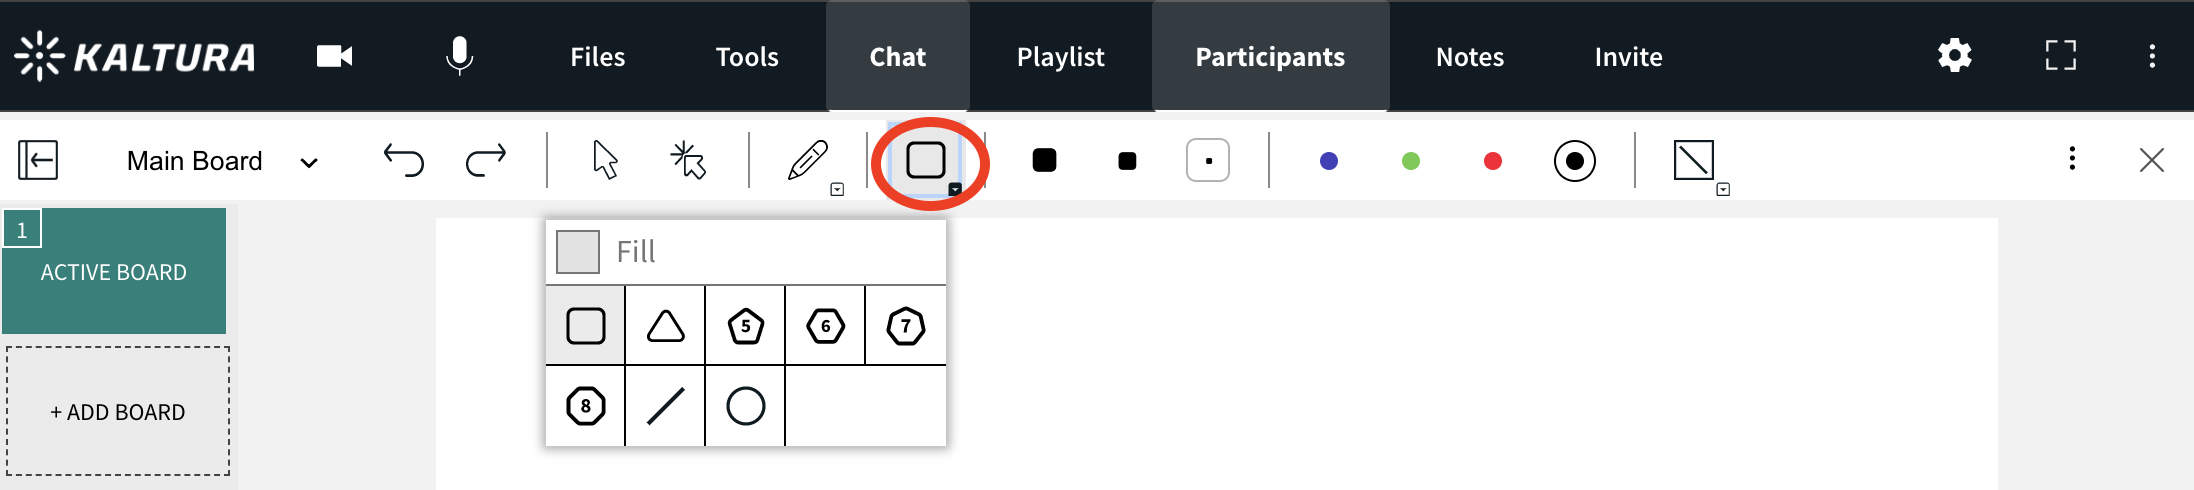
To Draw Shapes
- Select the Square icon.
- Click the selected Square icon to display a menu of shapes: Circle, Right Triangle, Equilateral Triangle, Square, Pentagon, Hexagon, Heptagon, Octagon, Polygon, Line, Single Headed Arrow, Double Headed Arrow.
- Click and drag your cursor to draw the shape.
💡To fill in a shape, click the Fill box before selecting the shape and the shape will be filled with color.
Undo or Redo
- Click the Undo or Redo arrows to undo or redo previous marks.
- Undo and Redo applies to up to the last 10 edits committed by you – not by others. Meaning, you cannot undo edits or actions by other participants.
- Undo and Redo apply to the current session only. You cannot undo or redo marks from previous sessions.

Set Backgrounds

Formatting Tools
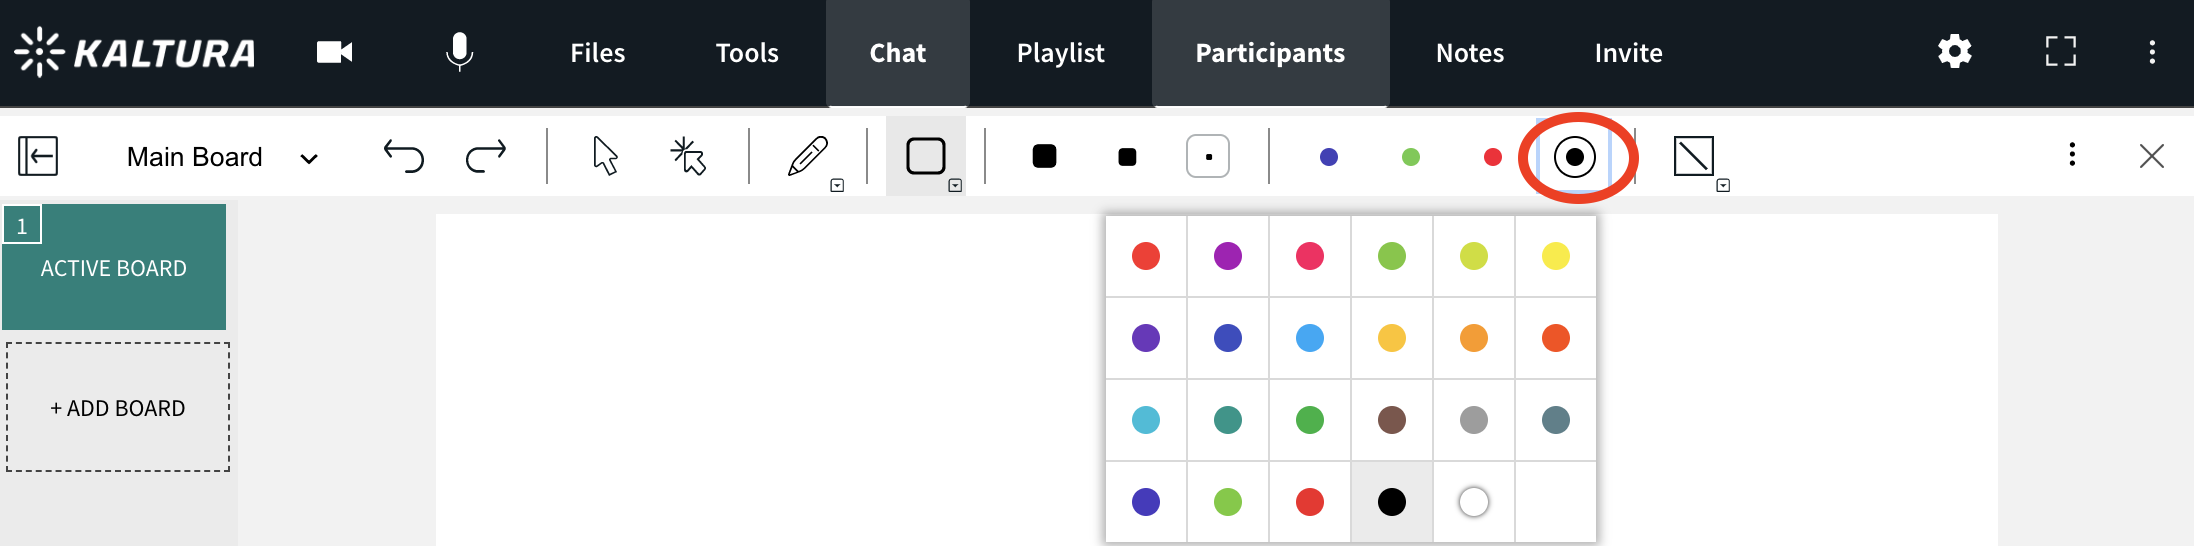
To Change Color
You can select a color and apply it to the marks you draw. You can also change the color of marks you already drew.
- Select the Cursor tool Or select the mark you want to change the color of.
- Click the color you want to apply.
To Adjust Line Thickness
Adjust the thickness of Free Draw, Eraser, Highlighter, Shapes by simply selecting the thickness to apply the thicker or thinner line.

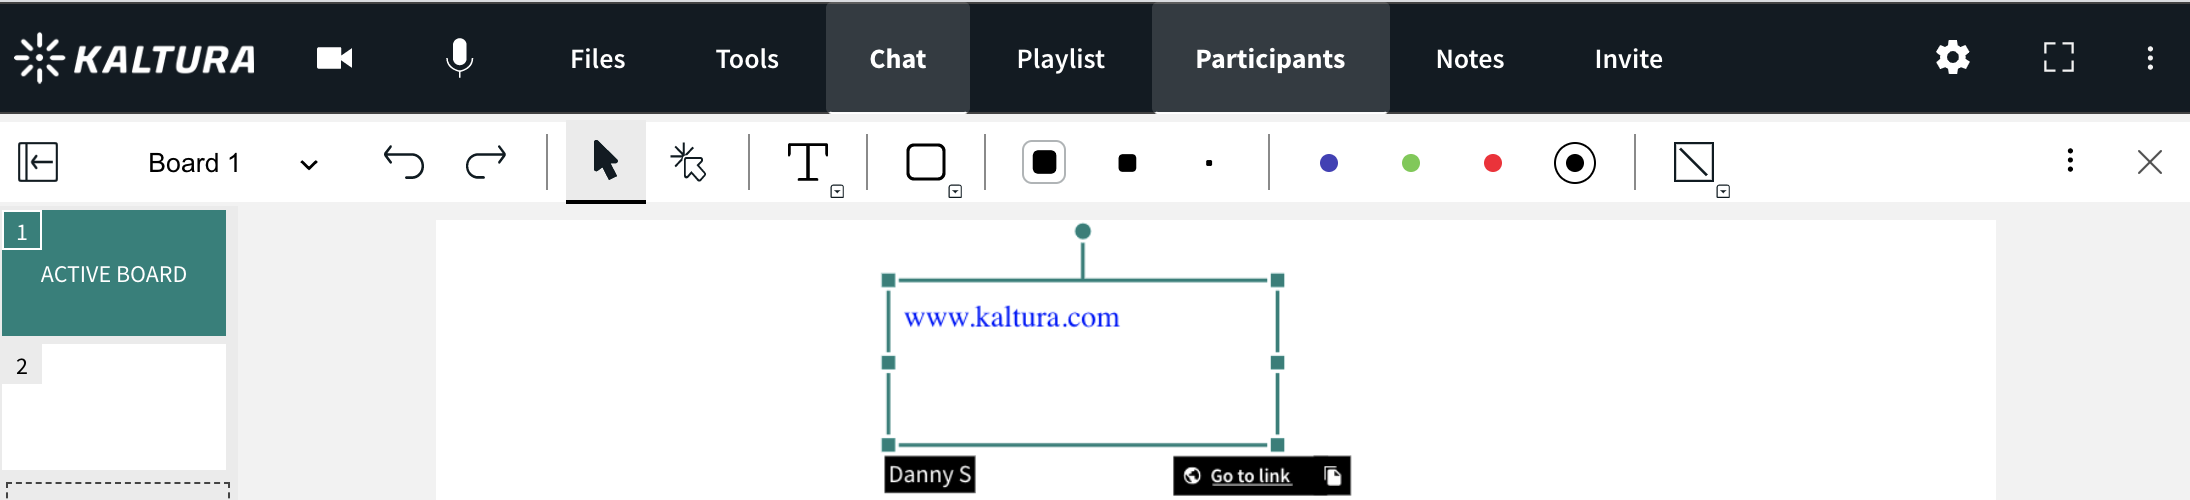
Create Clickable Links
You will now be able to type in a weblink and allow participants to click on it.
- Select the Text tool
- Type in a web address OR Copy/paste a link
💡Participants will be able to click on the link and be brought to that page.
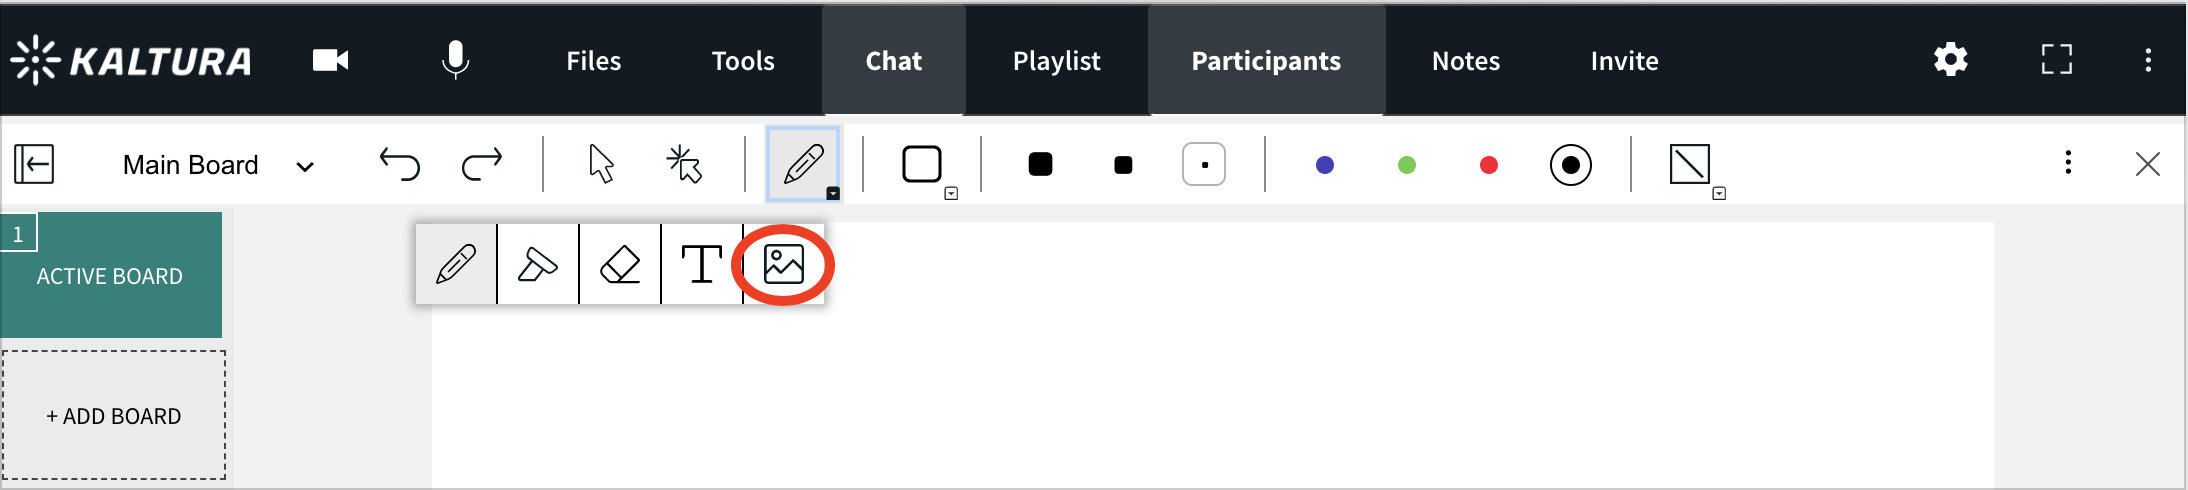
Add Images
Instructors/Moderators can upload images to their whiteboard.
- Click the Pencil Icon to reveal the drop down bar.
- Select the Image icon.
- Click an image or document previously loaded from your content management system or Click +Add Icon to search your desktop for a new image.
- Click Add.
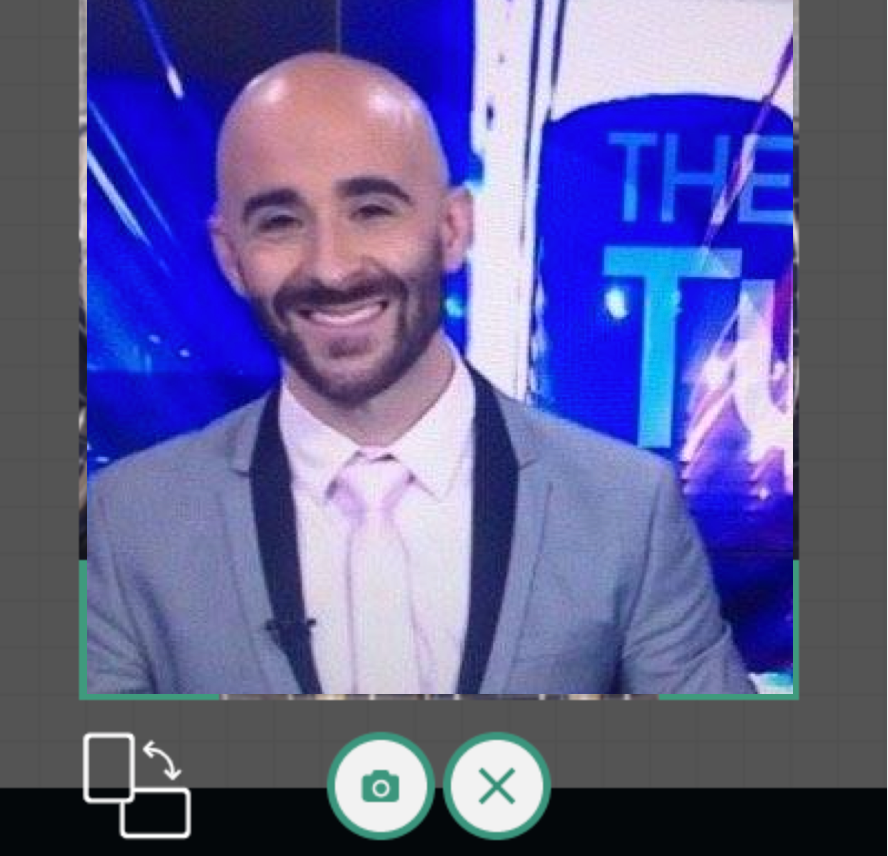
Take a Snapshot
- Click the camera icon
- Frame yourself and click the camera button below to take the picture.
💡The picture is automatically placed on the whiteboard.

Delete or Erase Drawn Objects
To Delete Specific Marks
Participants can only delete marks they draw.
- Select the Cursor tool.
- Select the object you want to delete.
- Hit the Delete key on your keyboard.
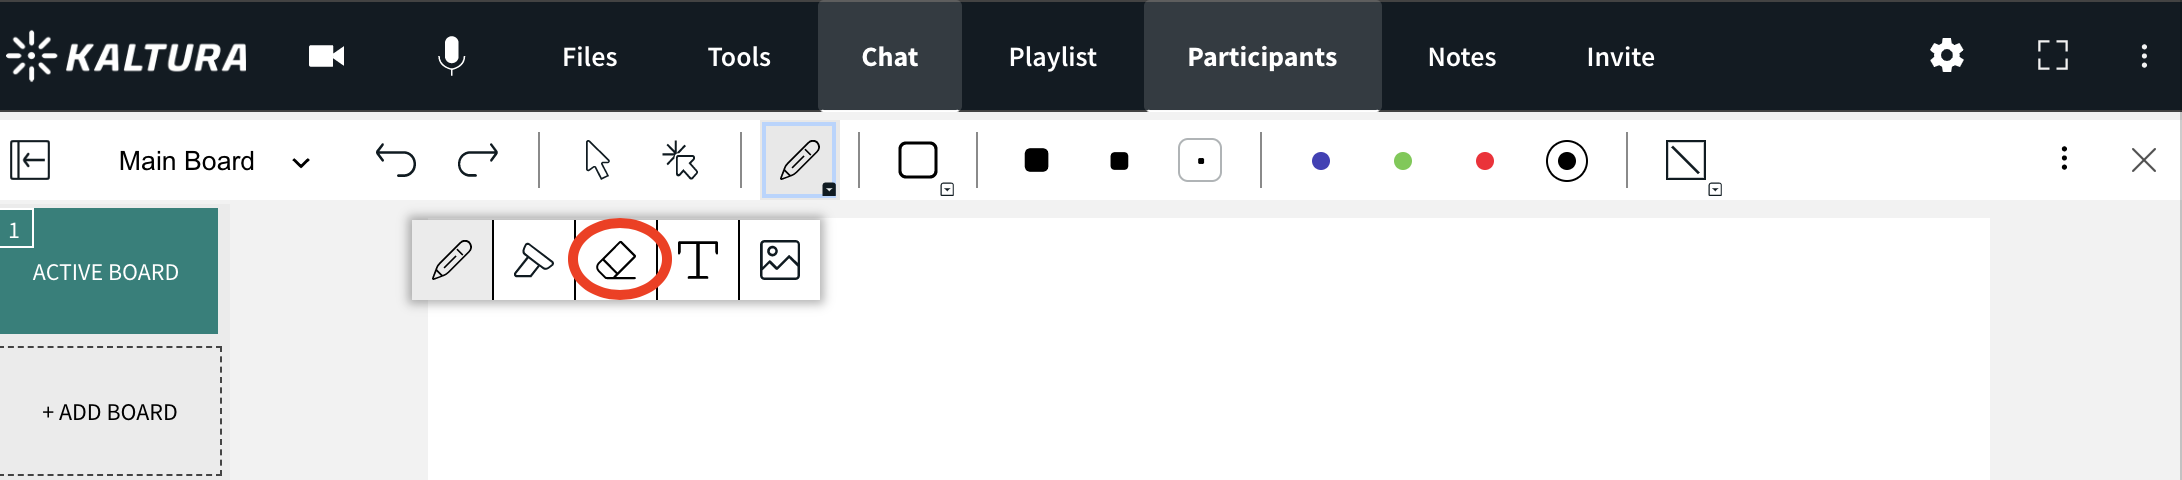
To Erase Drawn Objects
- Select the Eraser icon,
- Click & drag the eraser over whiteboard marks you want to erase.
Exporting/Saving Whiteboards
You can save individual whiteboards to your desktop.
1. Click the 3 dot dropdown in the top right corner of the whiteboard.
2. Click Export Whiteboard.
💡You can then upload the file to your File Management System from your desktop.

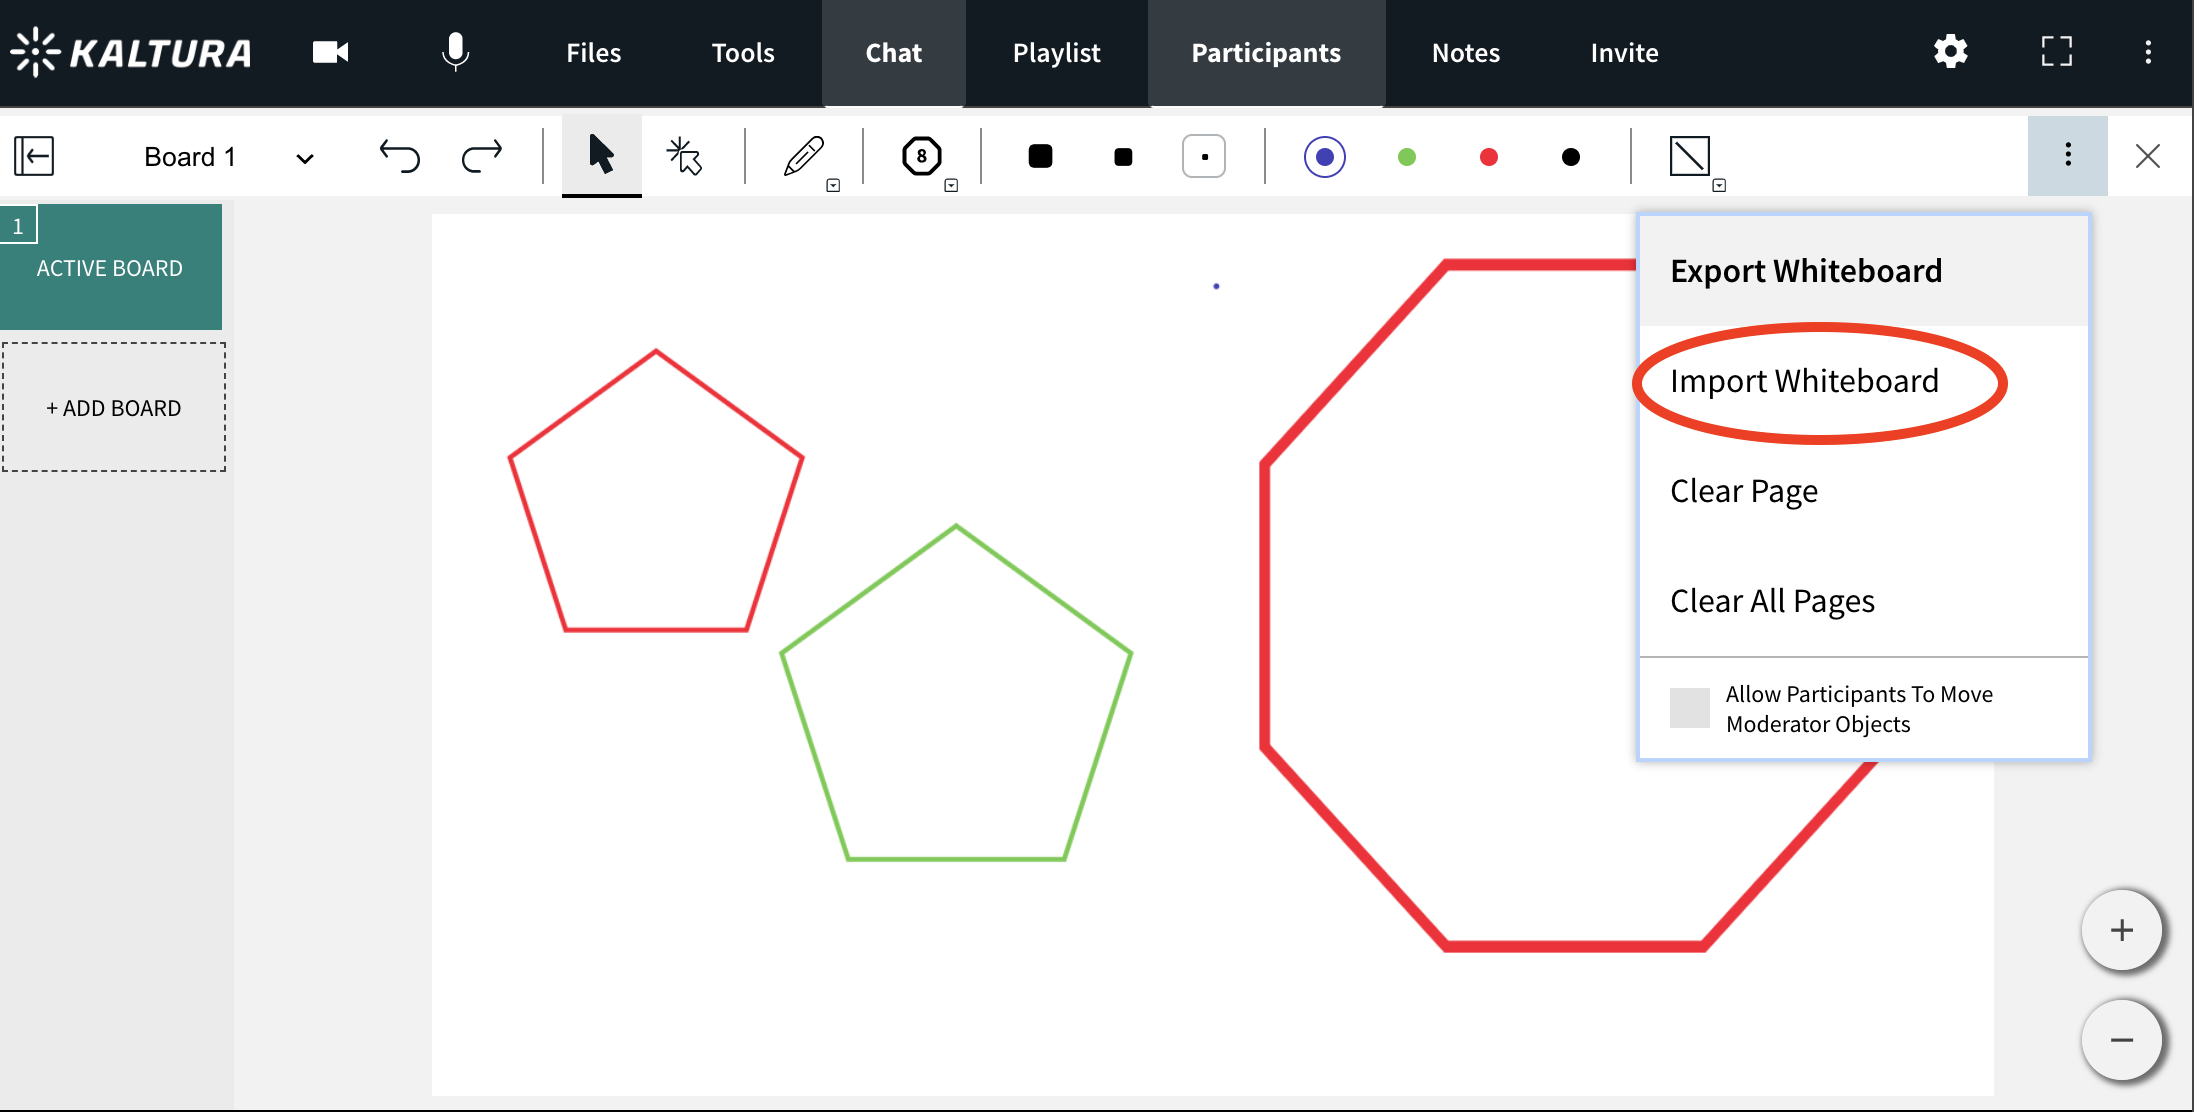
Importing/Uploading Whiteboards
You can import previously exported whiteboards
- Click the 3 dot drop down menu in the top right.
- Click Import Whiteboard.
- Search your desktop for a previously saved Kaltura formatted whiteboard.
- Click Ok.
💡Instructors will be able to upload a Kaltura formatted whiteboard to another room, and have access to work on that whiteboard in the new room.
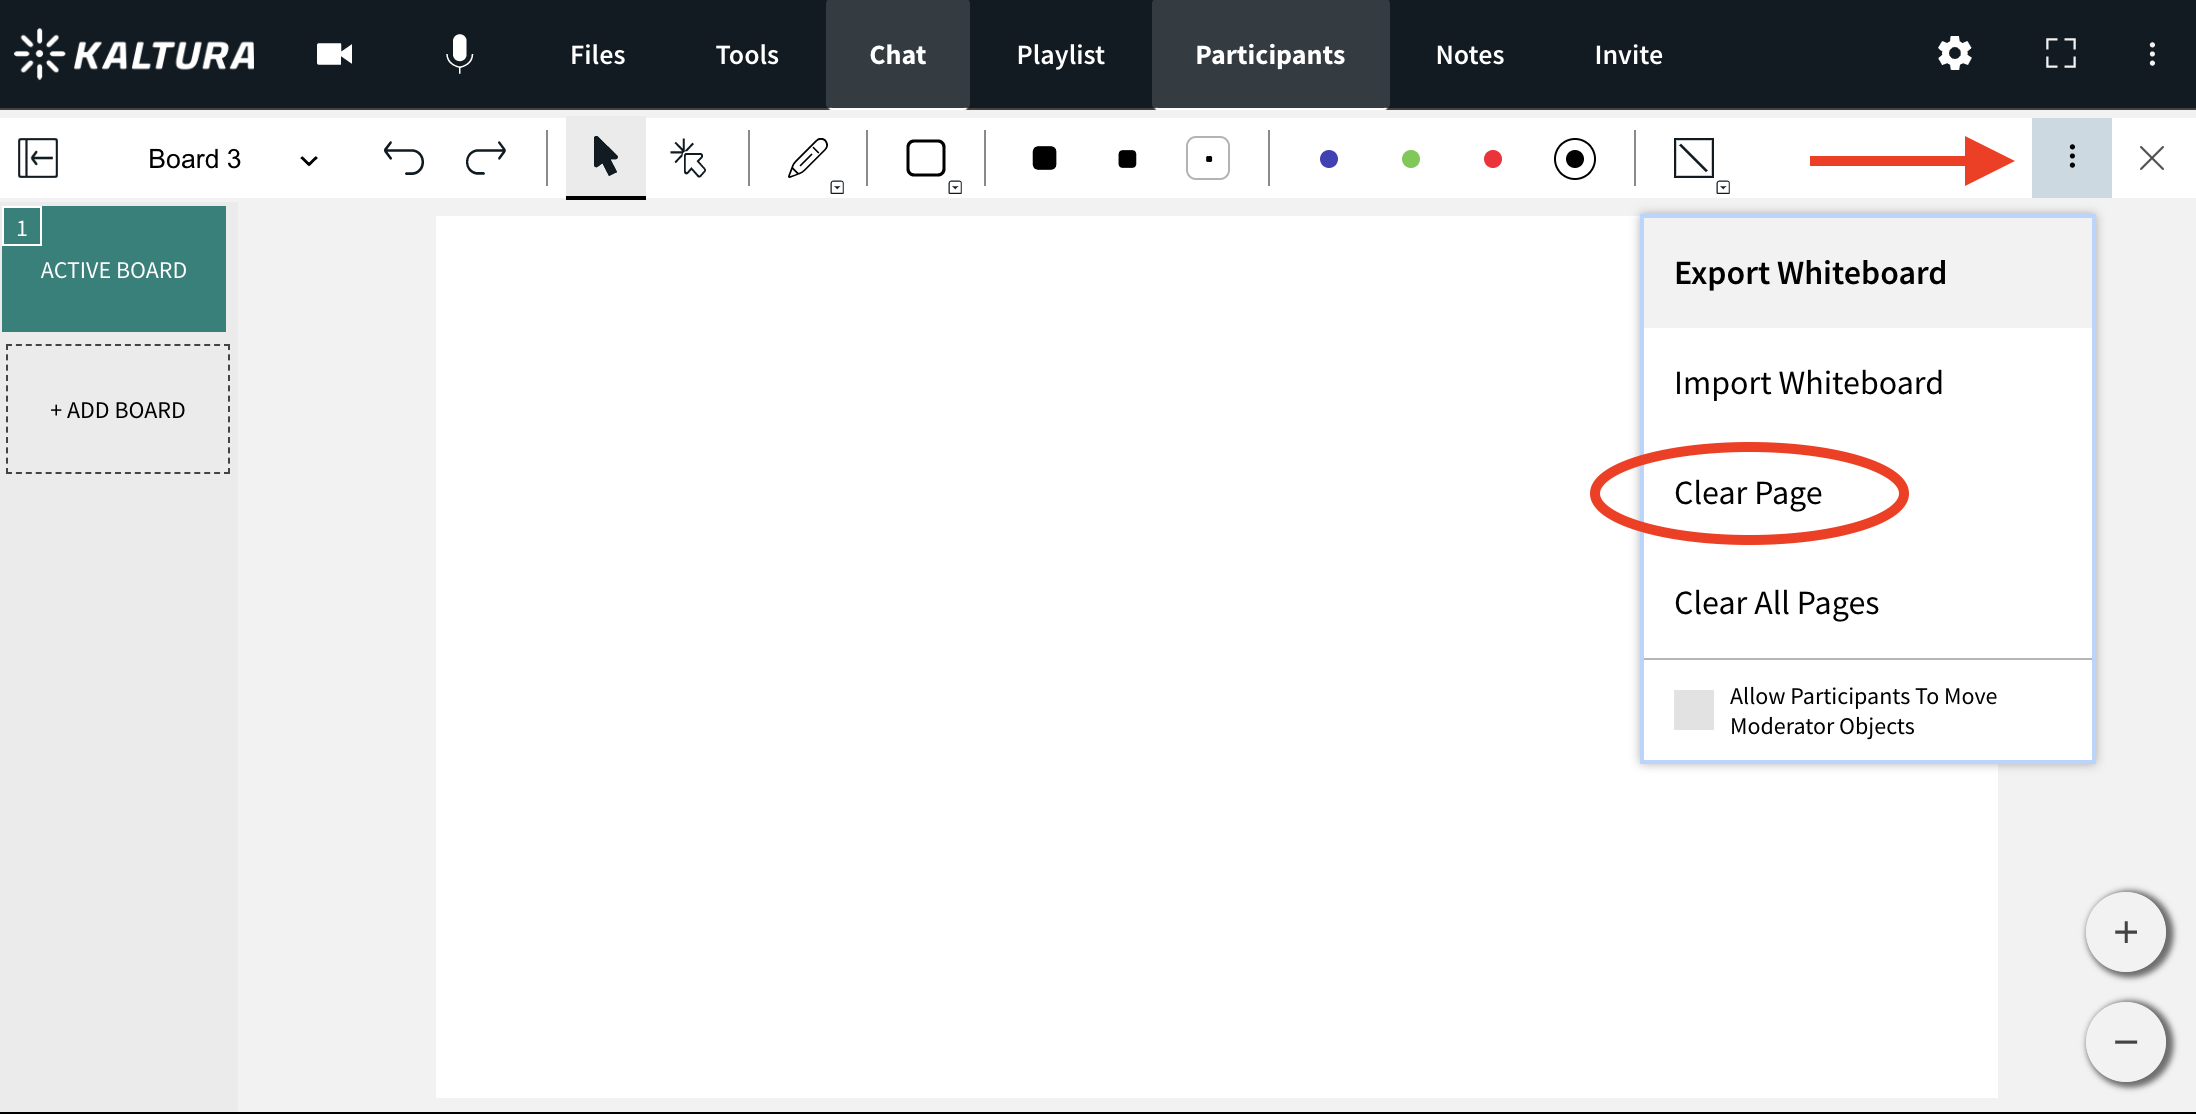
To Clear Page
Clearing the whiteboard is only an option for Instructor/moderators.
- Click the 3 dot menu in the top right of the whiteboard.
- Select Clear Page.
- Click Ok to in the Confirm Delete pop-up.
To Clear All Pages
Resetting the whiteboard deletes all boards in the whiteboard and all marks on them. The process cannot be undone!.
- Click the 3 dot menu in the top right of the whiteboard.
- Select Clear All Pages.
- Click Ok to in the Confirm Delete pop-up.
Allow Participants to Move Moderator Objects
Check to allow guests to move objects that the moderator draws on the whiteboard.
Dismiss/Close Whiteboard
To dismiss the whiteboard, click the x in the top right of the stage or select another app/file to display. Dismissing the whiteboard does not clear it. The whiteboard marks are saved in the room until erased.
Annotate Your Shared Files As You Discuss ThemThis article describes how to collaboratively annotate your shared files with other moderators during your live session.
Annotations are persistent from session to session. Your marks are automatically saved as long as you do not delete them. All non-video and audio files can be annotated when shared in the room: presentations, PDFs, images, documents and spreadsheets.
Turn on/off Annotations
By default, annotations are hidden when displaying a file.
- Play a file.
- Click the pencil icon in the bottom right of the content to enable annotations.

Cursor
Laser Arrow
Use the laser arrow to enable your participants to track your cursor as it moves along the whiteboard.
Each participant has their own laser pointer identified by their first name to help you identify who is using the laser pointer.
Free Draw
- Select the Pencil icon.
- Click & drag your cursor to draw.
Use a touch screen device or USB trackpad to more accurately write equations, music, and more.
Highlight
- Select the Highlighter icon.
- Click & drag your cursor to highlight text on the whiteboard or slide.
Type
- Select the Text icon.
- Click the whiteboard where you want your text box to be.
- Enter in your text.
- Click outside of the text box to post it.
Edit entered text by double clicking text you posted on the whiteboard.
To Draw Shapes
- Select the Square icon.
- Click the selected Square icon to display a menu of shapes: Circle, Right Triangle, Equilateral Triangle, Square, Pentagon, Hexagon, Heptagon, Octagon, Polygon, Line, Single Headed Arrow, Double Headed Arrow.
- Click and drag your cursor to draw the shape
Polygon
Undo or Redo
- Click the Undo or Redo arrows to undo or redo previous marks.
- Undo and Redo applies to up to the last 10 edits committed by you – not by others. Meaning, you cannot undo edits or actions by other participants.
- Undo and Redo apply to the current session only. You cannot undo or redo marks from previous sessions.
Supported Files
Delete or Erase Drawn Objects
To Delete Specific Marks
Participants can only delete marks they draw.
- Select the Cursor tool.
- Select the object you want to delete.
- Hit the Delete key on your keyboard.
To Erase Drawn Objects
- Select the Eraser icon.
- Click & drag the eraser over whiteboard marks you want to erase.
To Clear The Board
Clearing the whiteboard is only an option for moderators.
- Click the 3 dot menu in the top right of the whiteboard.
- Select Clear This Board.
- Click Ok to in the Confirm Delete pop-up.
To Reset The Entire Whiteboard
Resetting the whiteboard deletes all boards in the whiteboard and all marks on them. The process cannot be undone!
- Click the 3 dot menu in the top right of the whiteboard.
- Select Clear All Boards.
- Click OK to in the Confirm Delete pop-up.
Share Your Screen
Share Your Screen Via Firefox
- Click Tools.
- Select the Desktop Share option.
- Choose what you would like to share:
- Your Entire Screen – Default option. If you have multiple screens, then you can choose which screen you want to share. This option offers the greatest flexibility in that you can move around different applications and windows and your participants will see everything. Because of that, it does offer the least control on what you are sharing at a given moment.
- Application Window– See a list of applications currently running on your computer. Select the Application you want to share to share only a view of that application. The application cannot be hidden or minimized to share it.
- Firefox Tab– Choose a specific browser tab you want to share.
- Click Allow.
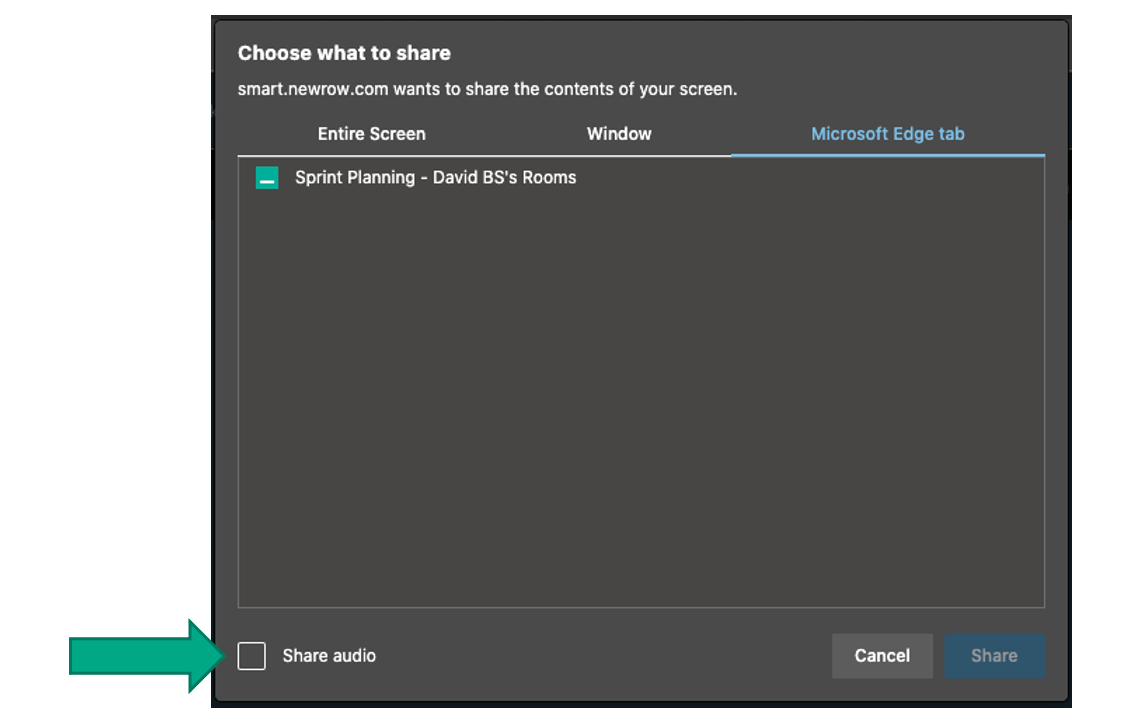
Share Your Screen Via Chrome
- Click Tools.
- Select the Desktop Share option.
- Choose what you would like to share:
- Your Entire Screen – Default option. If you have multiple screens, then you can choose which screen you want to share. This option offers the greatest flexibility in that you can move around different applications and windows and your participants will see everything. Because of that, it does offer the least control on what you are sharing at a given moment.
- Application Window– See a list of applications currently running on your computer. Select the Application you want to share to share only a view of that application. The application cannot be hidden or minimized to share it.
- Chrome Tab– Choose a specific browser tab you want to share.
- Click the Share button.
-
It is now possible to share audio while sharing screen via chromium based browsers (Google chrome and MS edge). To share your audio simply check the “Share audio” check box at the bottom left corner of the screen sharing source menu. Windows supports audio sharing for all screen share options mentioned above, while mac supports it only when sharing browser tabs.
Stop Sharing Your Screen
There are a few ways to stop sharing your screen.
- Click Stop Sharing in the extension footer bar.
-or- - Click the Stop Sharing button in the top left of the stage.
-or- - Click x in the top right of the stage.
Record Your Live Session
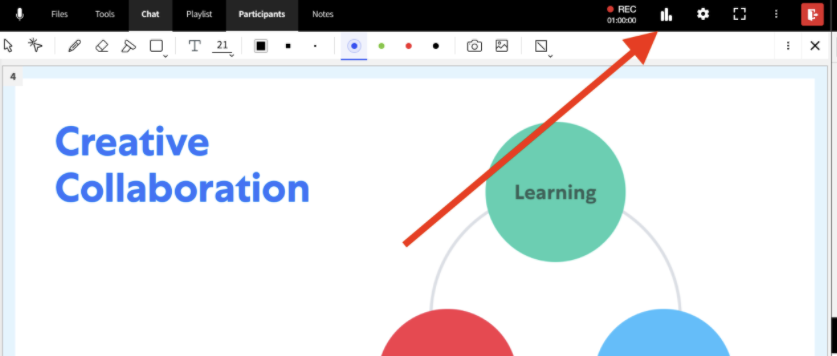
Start Recording
The recording option can be accessed by instructors or moderators.
- Click Tools.
- Select the Recording option.
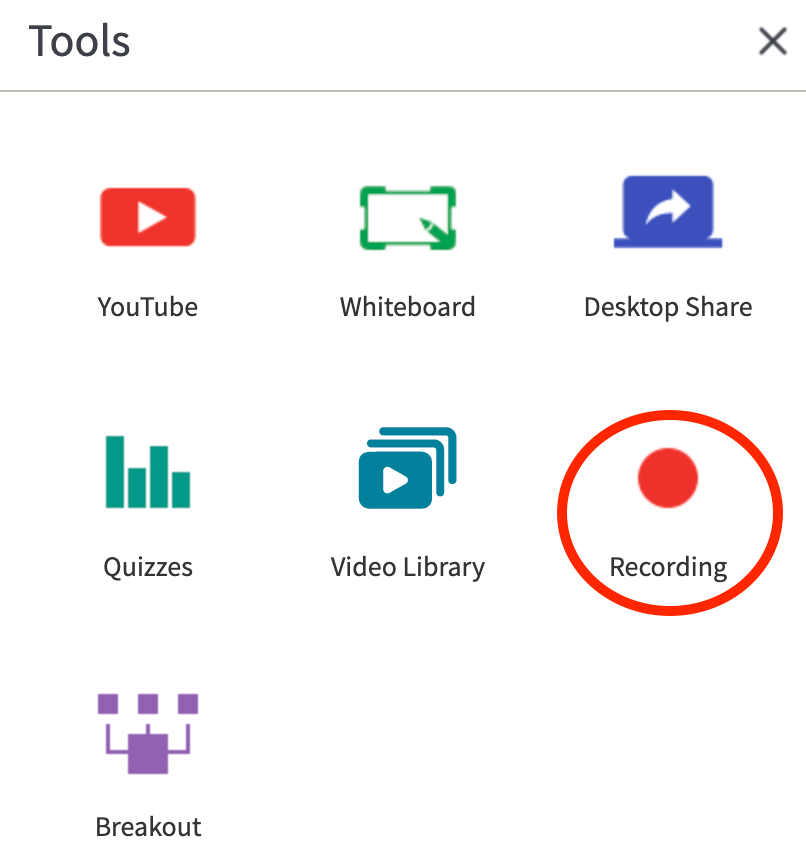
- Choose your preferred recording duration.
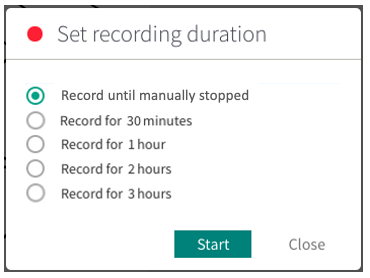
- Click Start.
A recording may take up to 1 minute to initialize. You will see an indication that recording is initializing and all participants are notified when the recording starts.
💡Recording automatically stops when the set duration expires, or, when the session ends. However, 2 minutes before your recording expires you will be prompted to see if you want to extend your recording time by 30 minutes.
When you select the “unlimited” recording option the recording will stop if :
- a moderator stops it from within the room.
- the session ends.
- the maximum recording length of 5 hours has been reached.
If needed, you can start a new recording immediately after stopping the previous one.
Stop Recording
Recording automatically stops when the set duration expires. You can choose to stop recording before the set duration expires.
- Click the recording indication in the upper bar or click Recording in Tools.
- From the confirmation pop-up, click the Stop Recording button. The recording is stopped and you will be notified when your completed recording file is available for viewing.
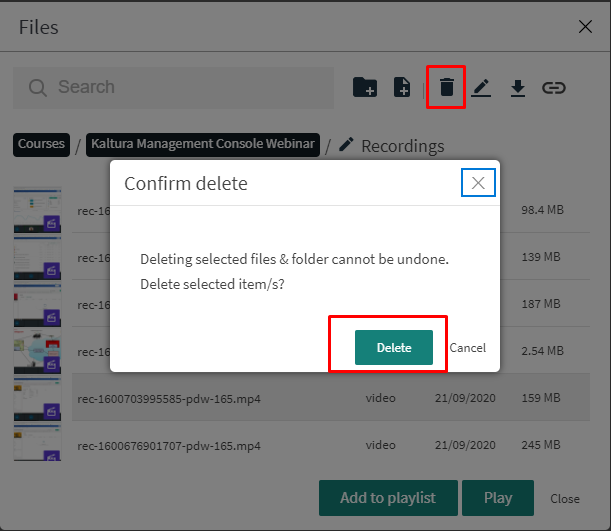
Delete Recording
- Click Files.
- Click the Recordings folder.
- Select the recorded file you want to delete.
- Click the Trash icon.
- Click Delete to confirm the deletion action.
Deleting a file cannot be undone.
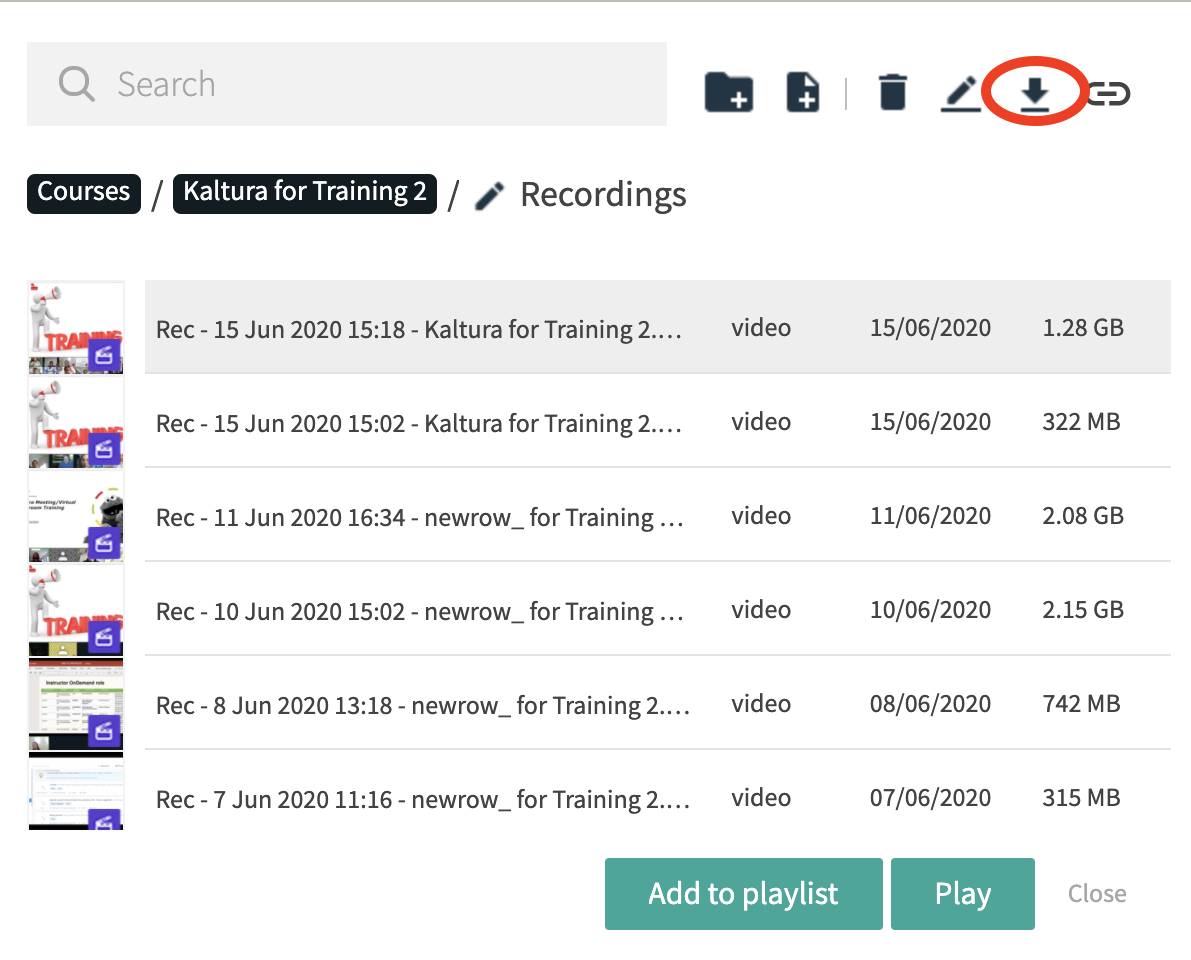
Download Your Recording
When recording stops, your recorded file is processed and automatically added to Files in a folder called Recordings. Each recording file is named by default with the following convention: Rec – DATE & TIMESTAMP – NAME OF COURSE. You are now ready to download your recording.
- Click Files.
- Click the Recordings folder.
- Select the recorded file you want to download.
- Click the Download icon that appears next to the search bar.
💡Recordings are download to an mp4 format.
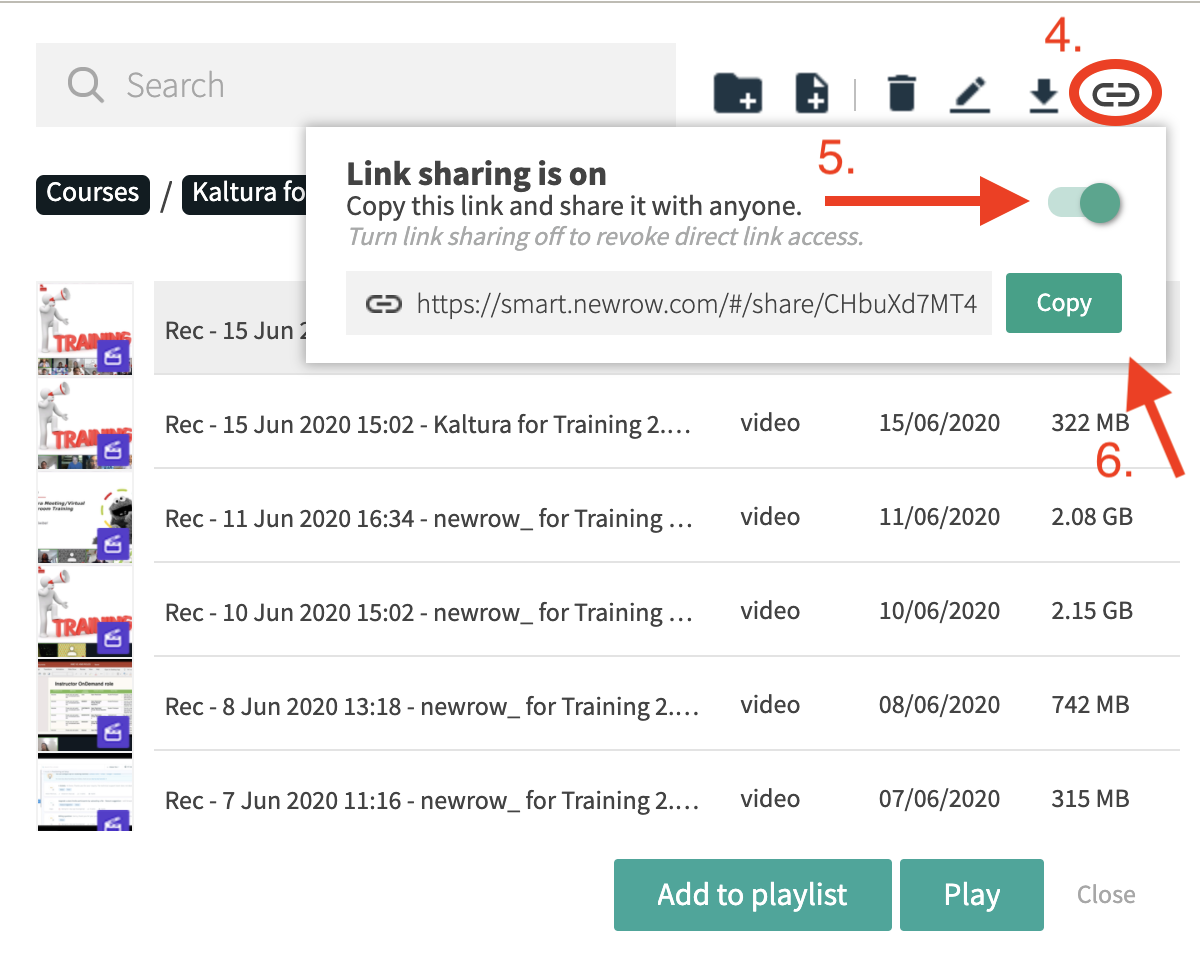
Share a Link to Your Recording
When recording stops, your recorded file is processed and automatically added to Files in a folder called Recordings. Each recording file is named by default with the following convention: Rec – DATE & TIMESTAMP – NAME OF COURSE. You are now ready to share a link to your recording.
- Click Files.
- Click the Recordings folder.
- Select the recorded file you want to download..
- Click the Link Sharing icon.
- Toggle link sharing to the right to reveal a web link.
- Click the Copy button to copy link to send to participants.
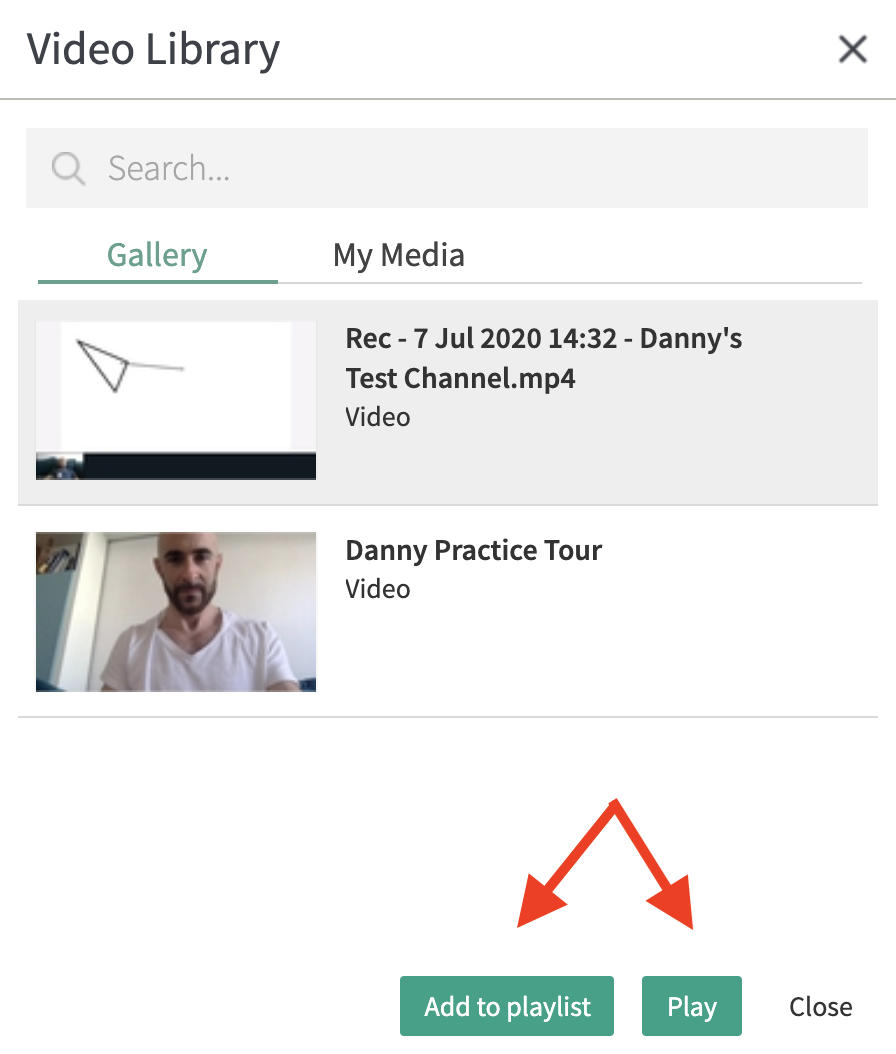
Share Your Recordings From Media Gallery
Completed recordings are automatically published to Media Gallery within 10-15 minutes after the live session.
- Click Tools.
- Click Video Library.
- Click on the recording.
- Click Add to playlist to play later or Play.
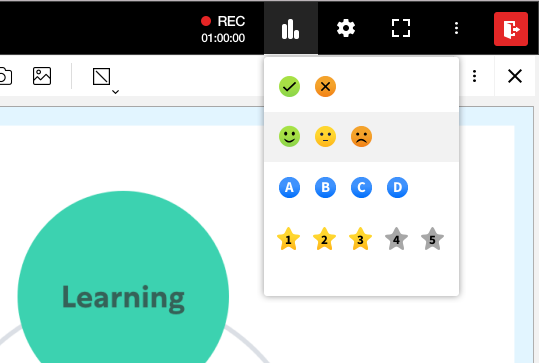
Quick Polls in your Live Room
Quick polls provide an awesome way to get structured, real time feedback from participants without the need to set anything up beforehand. You can simply ask the question yourself or launch one of these Quick Poll Templates.pdf first before launching your quick poll.
Host/Moderator ExperienceLaunch a Quick Poll
- Select the Quick Poll icon.
- Select your preferred poll type that best fits the question you asked to launch the poll.
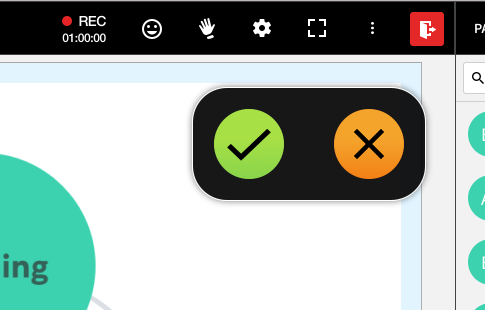
- Green check / red x – for yes or no questions, agree or disagree
- Happy/neutral/sad – to get a snapshot on how participants feel about the topic
- A/B/C/D – for multiple choice polling
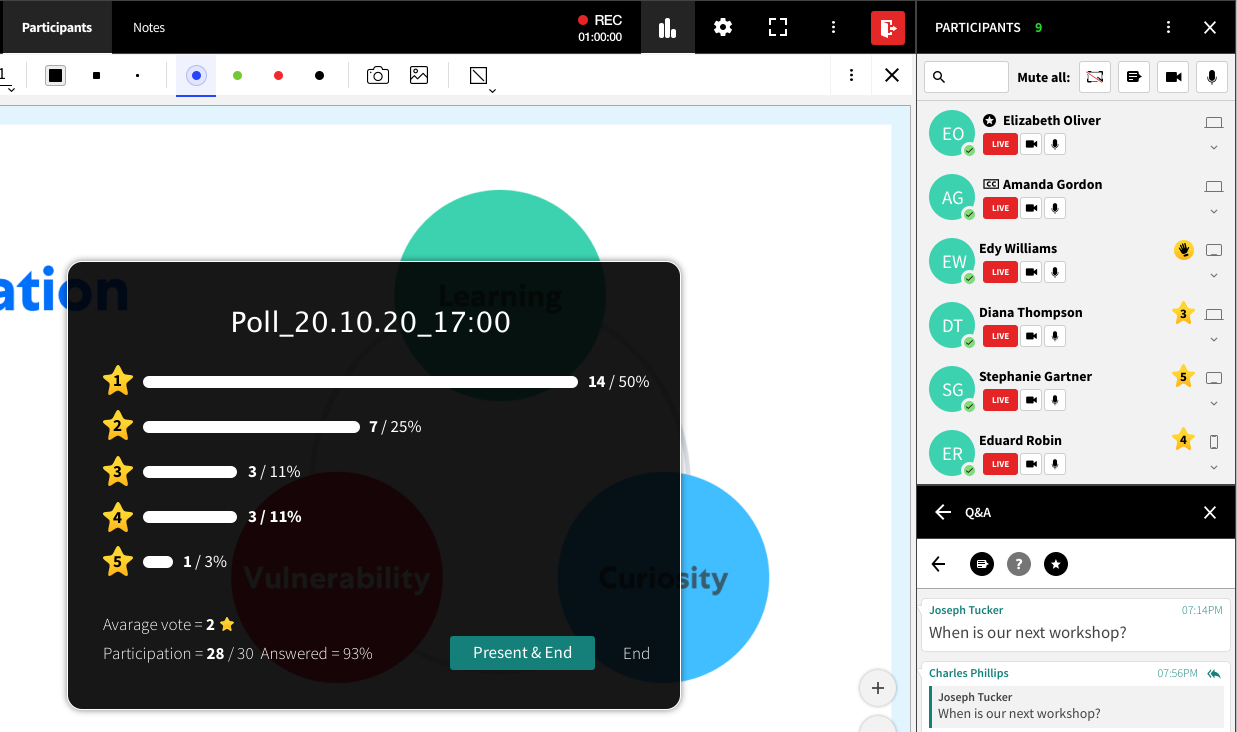
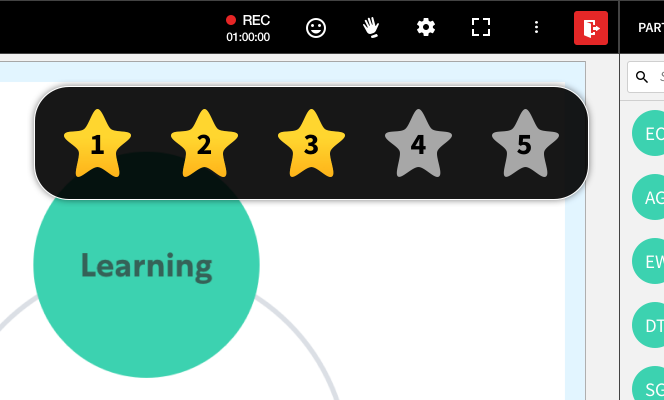
- 1/2/3/4/5 – for Likert scale polling
That’s it. After selecting the poll option the poll launches for the participants. They see the reply options and are able to click their response.
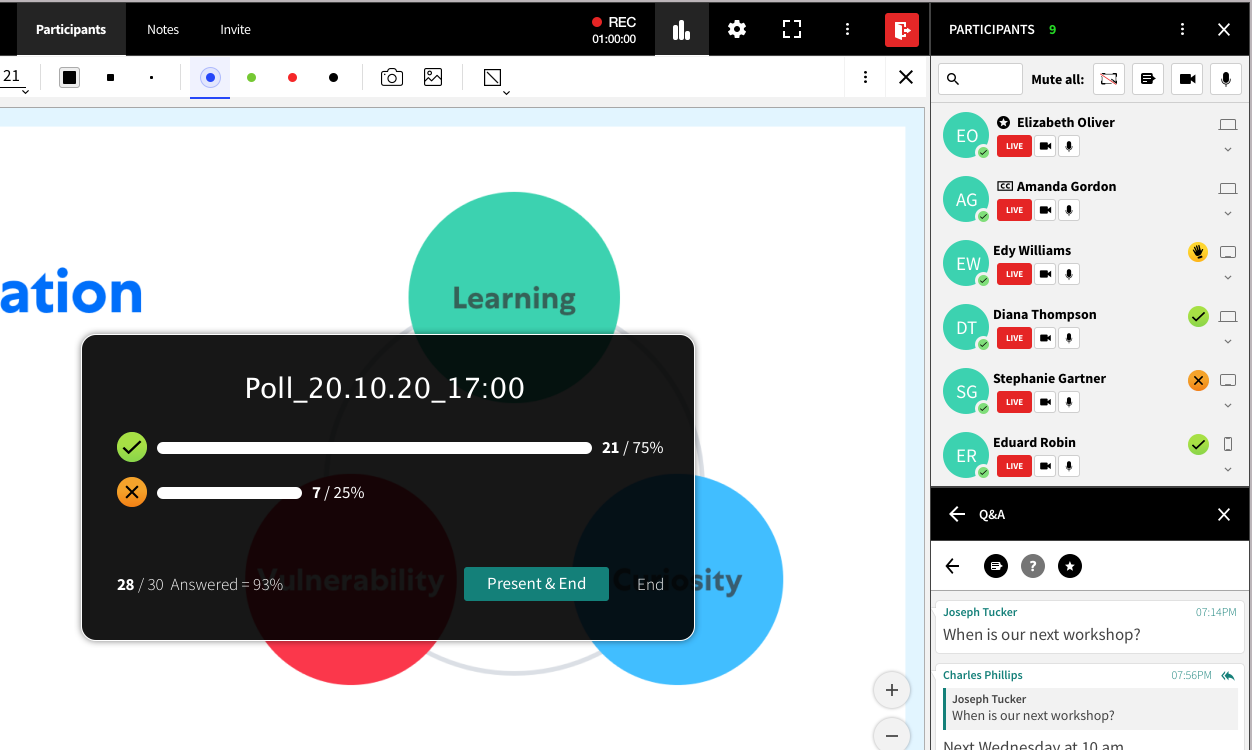
See Real Time Poll Results
Hosts/Moderators see poll results coming in as participants respond to the poll. Results display as aggregated results with %’s on the number of participants that have started a poll as well the percentage reply distribution and indications of what each participant selected in the participant list as well as on their webcams.Yes/No Quick Poll Example
Likert Scale Poll Example
When you are ready to end the poll, you can decide whether or not to share the aggregate results or not. Participants do not see what other participants have answered and do not see the results of the poll at an aggregated level unless the poll is shared.Share Results
Sharing results also ends the poll.
- Click Share Results in the quick poll.
- Quick poll results are now visible. Dismiss the poll by clicking the x.
End a Poll without Sharing Results
Click End to stop the poll without sharing the results.Participants’ Experience
Participants are able to reply to polls that are launched by the moderator. Participants do not see what other participants reply to the poll and only see aggregate results if they are shared by the moderator.Reply To Poll
Click the answer option in the poll that best reflects your response to the question posed by the moderator.
Yes/No Quick Poll Example
Likert Quick Poll Example
If the moderator shared the quick poll results, then participants can see the shared results.Accessing Results After the Session
All your quick polls statistics and results can be reviewed and exported through session stats pages in your Kaltura Meetings’ rooms management site. For more information about viewing Quick Polls’ statistics, see Kaltura Meetings – Accessing and Reviewing Quick Poll Results.Quick Poll Settings
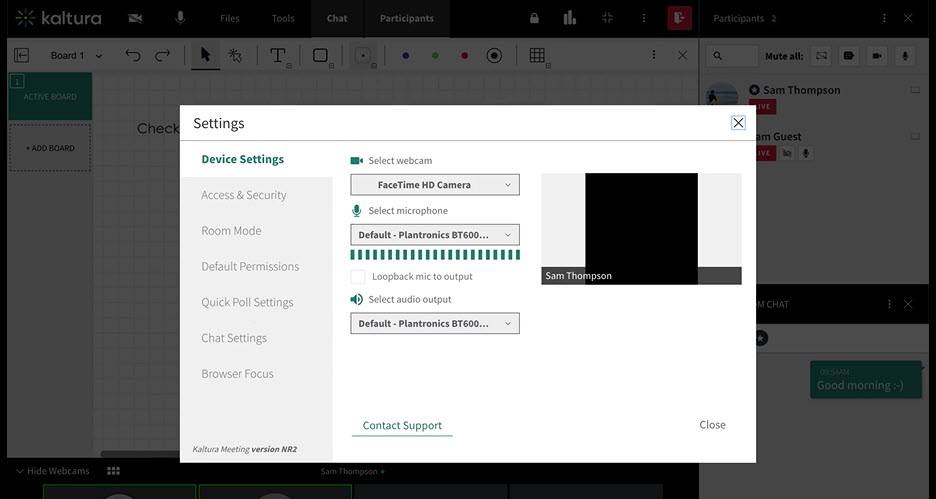
- Click the Settings icon and choose Settings.
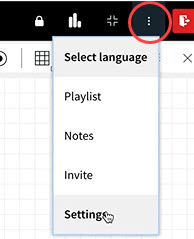
- The Settings window (Device Settings tab) displays.
- Click Quick Poll Settings tab.

- To perform an anonymous poll (the user responses from which are hidden not only from students, but also from you, the Admin/Teacher), select Anonymous Mode. Only an aggregate view of results will be displayed. This setting may be useful if you are performing a poll, for instance, on how students rate your teaching skills. You would not want to see specific user responses for such a poll.
- Choose your target audience. To perform a poll to which only participants/students can respond (and not teachers/hosts), select Non Moderators Only. To perform a poll to which all participants except the person launching the poll can respond (which is the default setting), select All Participants But The Triggering Host.
- Click Close.
Live Assessment With Real Time Quizzing
Create Quizzes For Live Assessment
- Select Tools.
- Choose Quizzes.
- Click the + button.
- Select the Quiz Name field and enter in a name for your quiz.
- Select the type of quiz, Multiple Choice, Multiple Answer or Open Questions.
- Enter in your question and answer text.
- Enter in text in the the New Answer field to add answer options. Each question can have up to 6 answer options.
- As you enter question text, a field displays to add a new question.
- Click the paper clip to attach files such as images or video to each of your questions.
- Make sure to select one answer for Multiple Choice or more with Multiple Answer! You must choose a correct answer for each question. Note: Open question will not have a clickable answer.
- When done, click Save.
Conduct Live Assessment In Your Session With Quizzes
- Select Tools.
- Choose Quizzes.
- Select the quiz you want to publish.
- Click the Start Quiz button. Starting the quiz publishes the quiz in the live class. Each learner is prompted to start the quiz and you will see live results as they come in (*This does not apply to Open Questions, which are not scored automatically).
Edit Existing Quizzes
- Select Tool.
- Choose Quizzes.
- Select the name of the quiz you want to edit.
- Make your changes.
- Click the Save button.
Breakout Rooms
Planning a Breakout Session
Breakout Rooms allow you to split the audience into smaller groups to enable a variety of activities including better collaboration, increased interaction, and deep diving into different subjects to name a few.
Kaltura offers a range of features aimed at enriching the breakout experience. Starting and controlling a breakout session is a simple task.
This article walks you through the process of planning a breakout session.
Planning a Breakout Session
To open the Breakout Rooms Manager
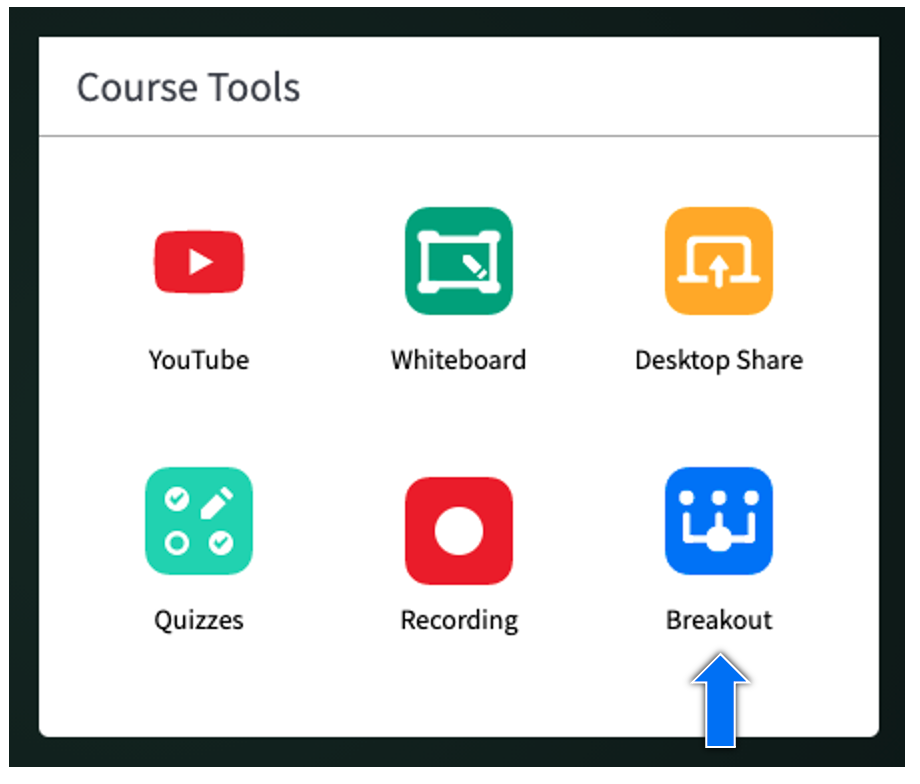
- Open the Breakout Rooms Manager from the Tools Menu.
- Click the Breakout Rooms icon to open the Breakout Rooms Manager window.
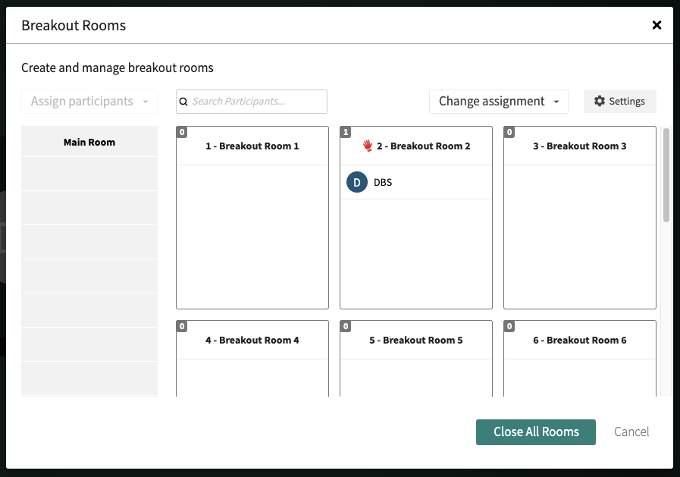
The Breakout Rooms Manager Window
In the Breakout Rooms Manager window all functions needed to prepare your breakout session are available, including the ability to create, rename and delete rooms, several ways to assign participants to specific rooms, set user’s permissions for the breakout session, search for specific participants, add a session timer and other functions.
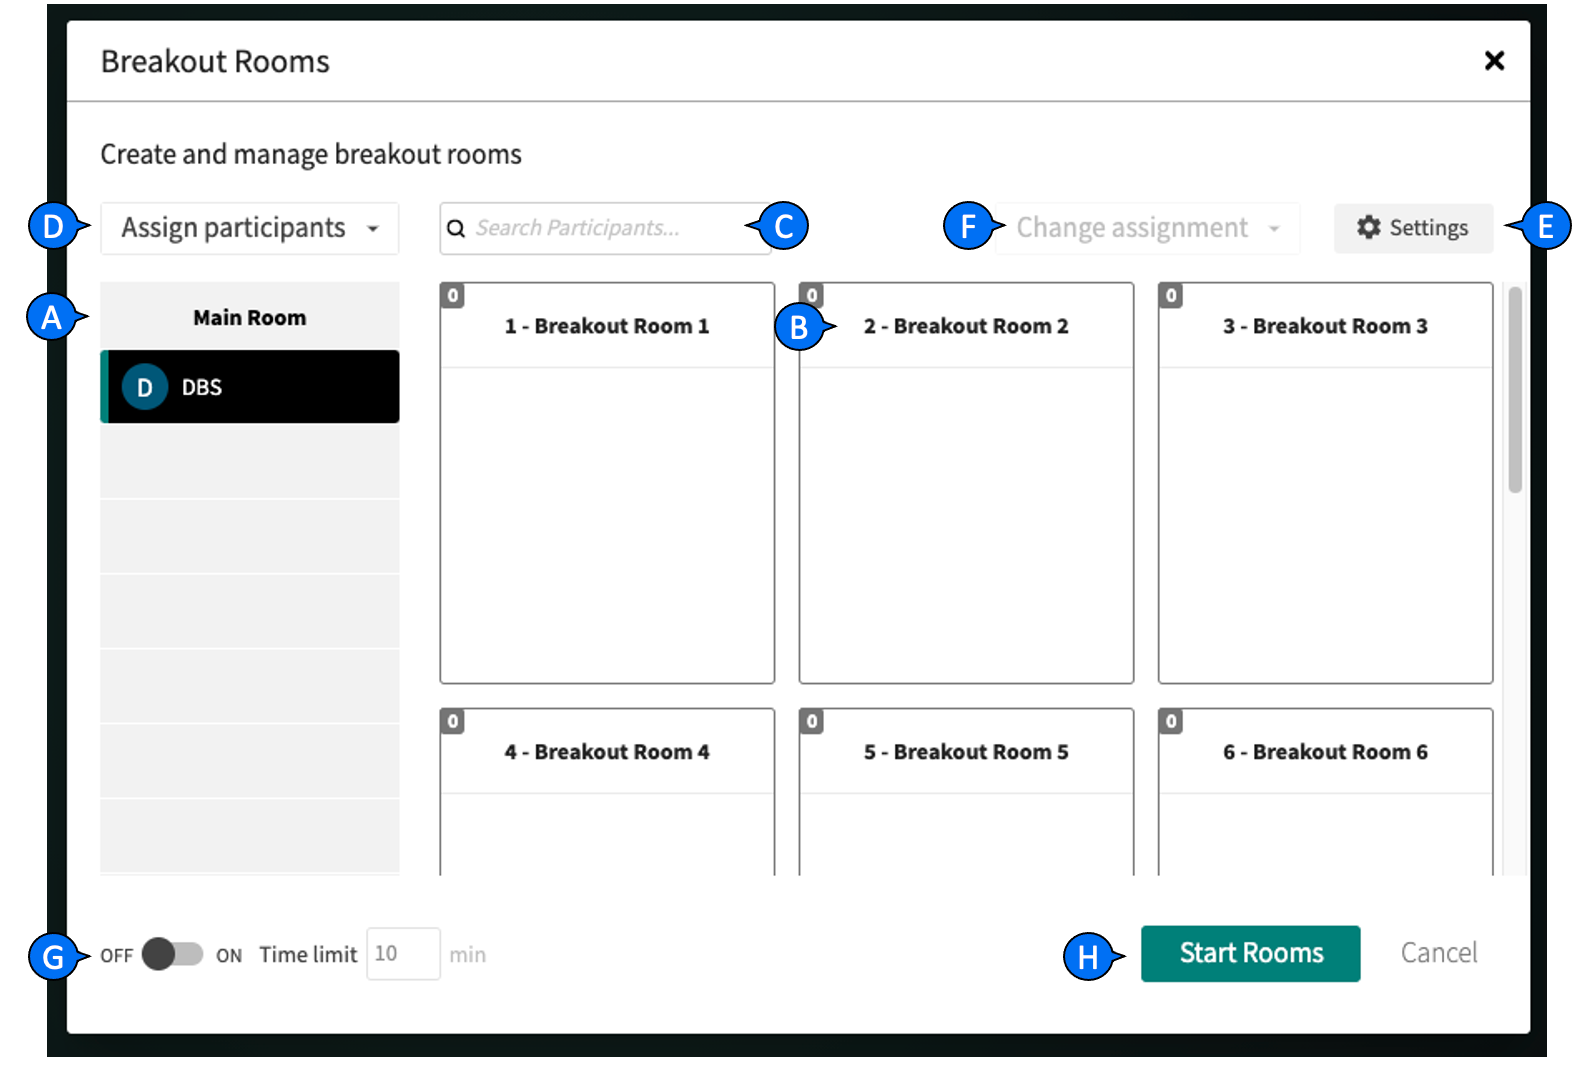 A. Main room’s Participants’ List – participants listed here are assigned to the main room.
B. Breakout Rooms’ Participants’ lists – participants listed in each of the room’s lists are assigned to that specific room and will be moved into that room as soon as the breakout session starts.
C. Search Participants – typing 2 or more characters triggers a name search among all the participants assigned to any of the rooms. Rooms that do not contain participants with the matching search term will be hidden from the list.
D. Assign Participants – opens a drop down menu offering different options for automatic participants’ assignment to rooms.
E. Breakout Rooms Settings Menu – access to participants’ permissions, and breakout rooms data clearing options
F. Change Assignment – Opens a drop-down menu offering different ways to alter current participants assignment to rooms.
G. Time Limit – allows to add a timer to the breakout session and to add time to the current session.
H. Start Rooms – Starts the breakout rooms session, triggers participants’ assignment into the rooms, and starts the timer.
Assigning Participants to Breakout Rooms
Kaltura offers several ways to assign participants to breakout rooms. You may:
- manually assign participants by hosts
- have participants choose the breakout room,
- automatically assign participants
- by the number of rooms
- by the rooms capacity
- by uploading a pre-assignment participants’ list
Manual Assignment
Hosts may assign participants to breakout rooms by dragging participants’ names between different rooms’ participants’ lists in the Breakout Rooms Manager window. Names may be dragged and dropped one by one, or by multi-selection, in groups. Right clicking selected names will open a context menu with all breakout rooms’ names, clicking a room name will assign selected participants to the selected room.
Hosts may allow participants to assign themselves to breakout rooms of their choice by checking the ‘Room Switching’ permission in the Settings menu of the Breakout Rooms Manager.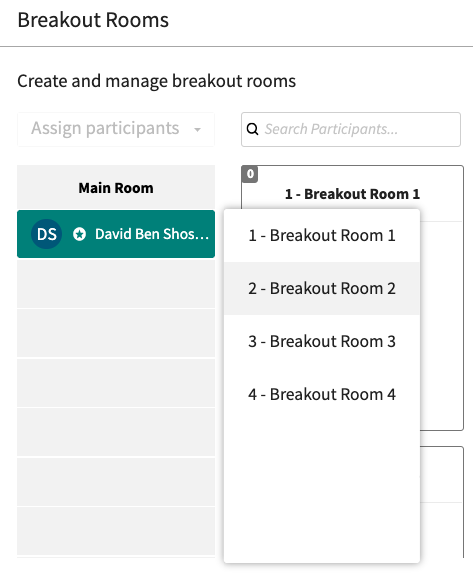
Automatic Assignment
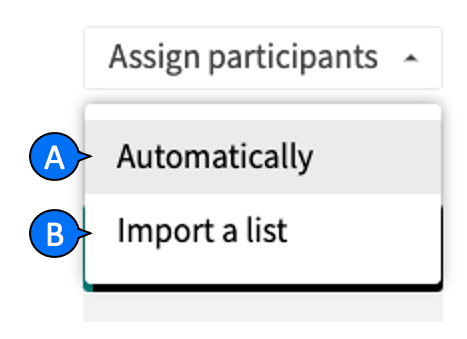
Clicking ‘Assign Participants’ opens the following dropdown menu. Note, that these options are not available during an active breakout rooms session.
A. choosing to assign participant automatically opens the following window:
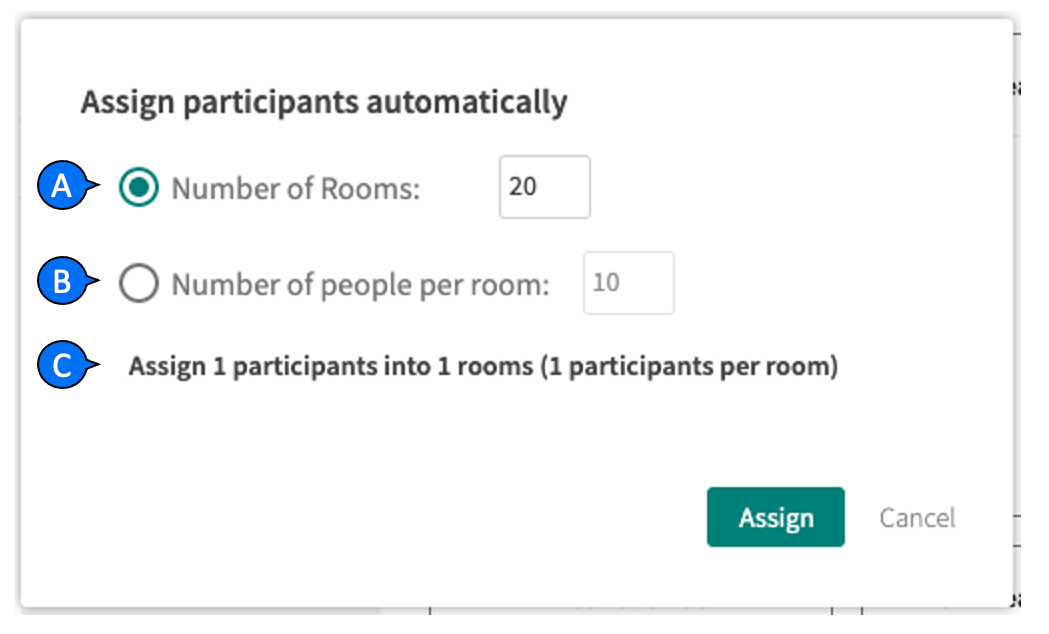
A. Assign participants by number of rooms – Participants will be assigned as evenly as possible into the number of rooms typed into the data field. Some of the rooms may end up with up to one participant more than other rooms, depending on the ability to evenly divide the number of participants by the chosen number of rooms. The number of rooms is limited to 100.
B. Number of people per room – Chosen number of participants will be assigned to each of the rooms, missing rooms will be created accordingly. The remaining participants if any, depending on the chosen number will remain assigned to the main room for manual assignment.
C. This line provides a preview of the assignment resulting from the options selected above.

B. Assign participants by uploading a pre-assignment list – This option allows hosts to prepare a CSV file of breakout rooms assignments, using participants email addresses or using participants’ names. Uploading the CSV file before launching the breakout session will assign all matching participants found in the main room into their pre-assigned breakout rooms as listed in the CSV file. You may also set rooms’ names through the CSV file.
The following are samples of the expected CSV format for pre-assigning breakout rooms and participants:

RoomName1,RoomName2,RoomNAme3email1_room1@email.com,email1_room2@email.com,email1_room3@email.comemail2_room1@email.com,email2_room2@email.com,email2_room3@email.comemail3_room1@email.com,email3_room2@email.com,email3_room3@email.comNames are not case sensitive, but should be formatted as – FirstName LastName.
Changing Room Assignments
Kaltura offers several ways to alter participant’s rooms assignments including manual reassignment by hosts or by the participants themselves, if set in the participant’s permissions, as well as a couple of automatic re-assignment methods.
Clicking ‘Change Assignment’ opens the following drop-down menu from which you may choose how to re-assign participants in breakout rooms before or during an active session.
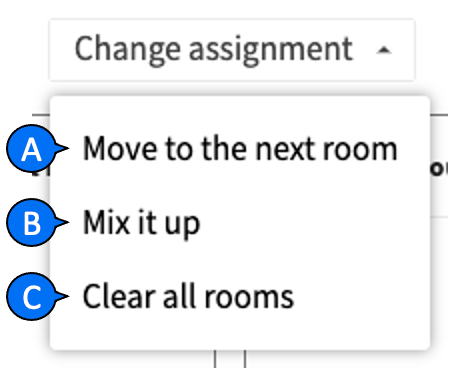
A. Move to Next Room – This triggers a “Round Robin” switch that moves all participants from room #1 into room #2, participants from room #2 into room #3, and so on. This mode allows hosts to assign different subjects to different rooms and make sure all subjects were covered by all the participants.
B. Mix it Up – Randomly re-assign participants into the different rooms.
C. Clear all Rooms – This option re-assigns all participants from the different rooms back to the main room. Note: this option is disabled during an active breakout rooms session.
Changing assignment options are available both before and during an active breakout rooms session.
Loading Files Into Breakout Rooms
A host can prepare breakout rooms for a session ahead of time by entering the breakout rooms, uploading materials, and preparing playlists for the breakout users ahead of time.
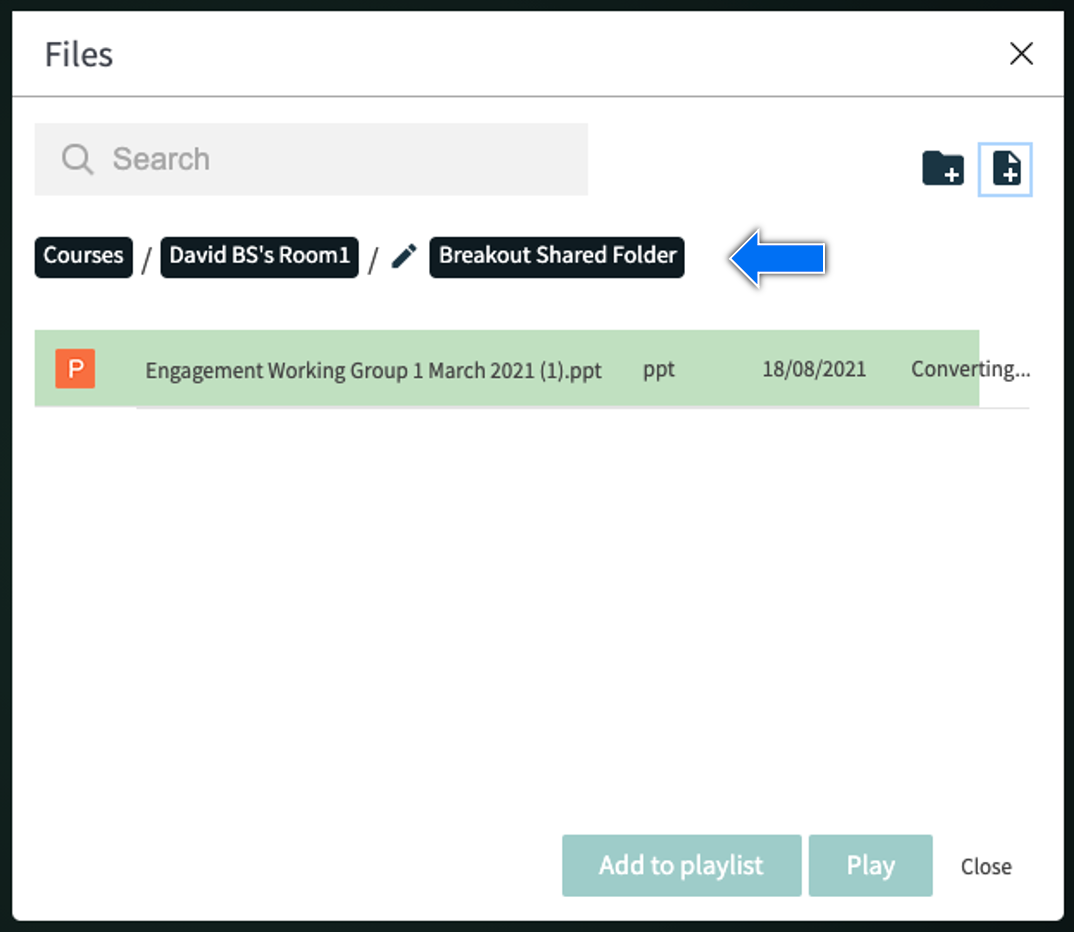
Hosts may also use the “Shared Breakout Folder” to upload materials that can later be accessed by users in all the breakout rooms.
- Click Files in main room.
- Click Breakout Shared Folder.
- Add files to this folder to be accessible by participants in breakout rooms.
The Breakout Rooms Settings Menu
The Settings menu is divided into two sections:
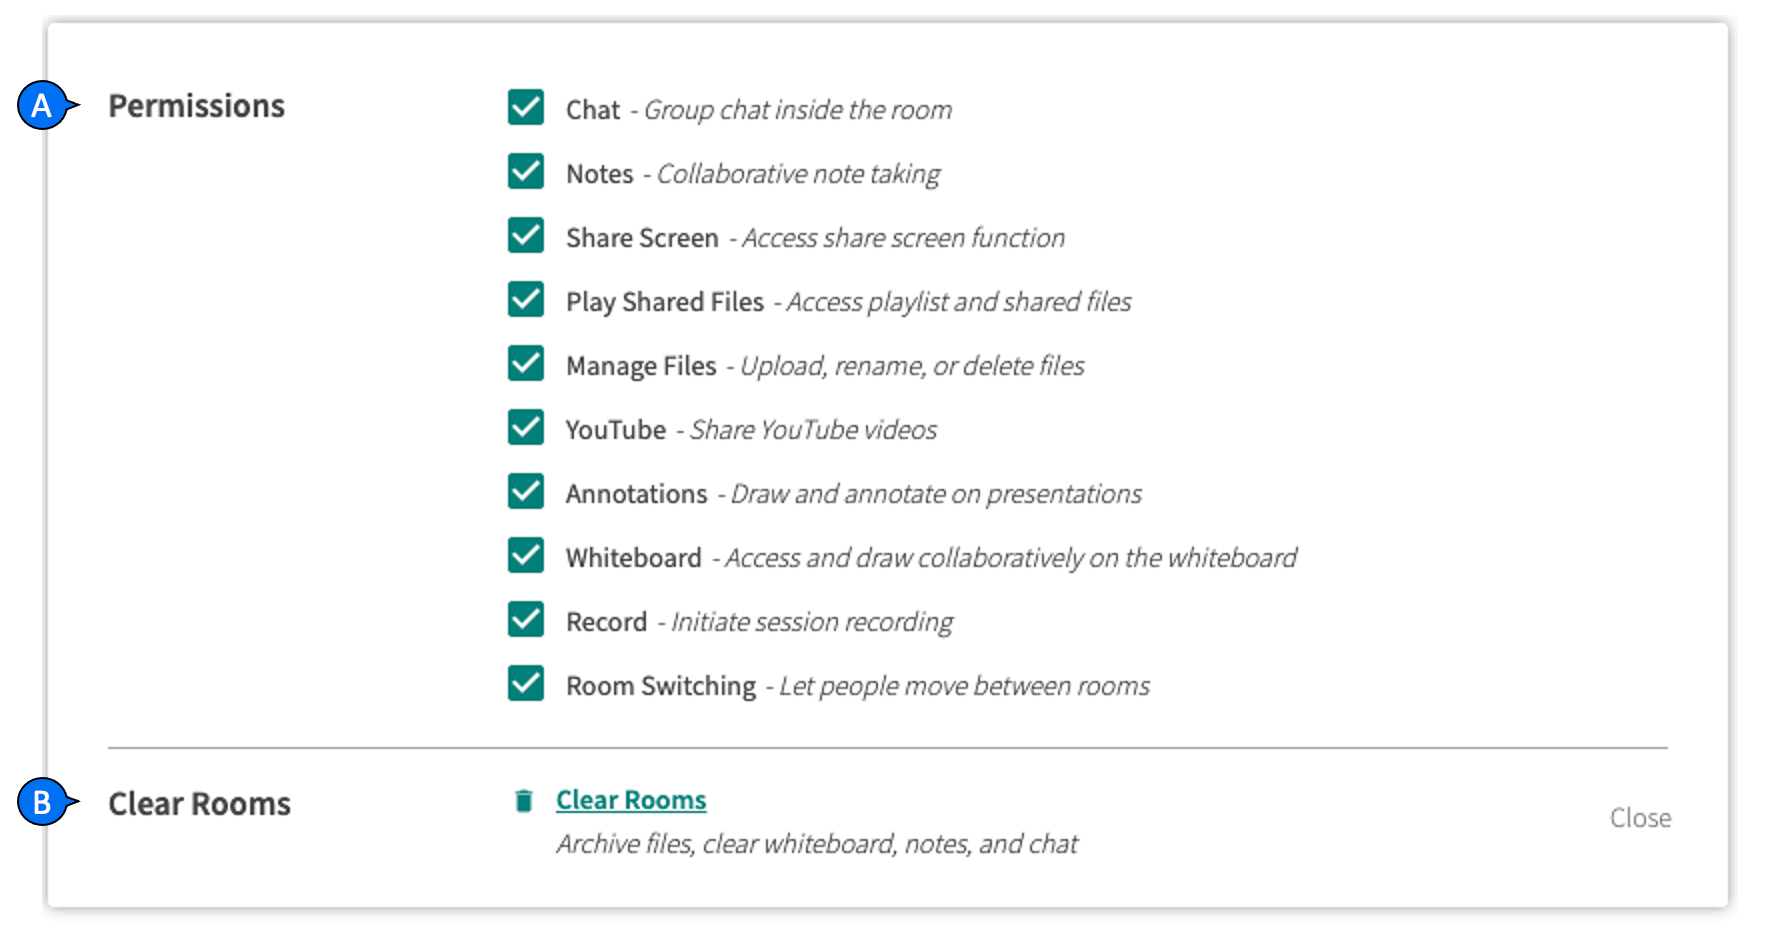
A. Permissions – allows the host to pre-set permissions participants will have within the breakout rooms.
- Chat – Allows access to the group chat within breakout rooms.
- Notes – Collaborative note taking
- Share Screen – Access share screen function
- Play Shared Files – Access the files menu, add files to the playlist and play files on stage within the breakout room
- Manage Files – Upload, rename, or delete files
- YouTube – Play YouYube videos on the breakout’s room stage
- Annotations – Draw and annotate on presentations
- Whiteboard – Access and draw collaboratively on the whiteboard
- Record – Initiate and end breakout room session recording
- Room Switching – Let people move between rooms
B. Clear Rooms – Allows to clear all breakout rooms and return participants to the “new room” condition. All files that were saved within the different breakout rooms are archived in the archive breakout rooms folders named after the archive date, while the “Current Breakout Folder” will be empty.
Note, that the “Shared Breakout Folder” remains untouched upon clearing breakout rooms.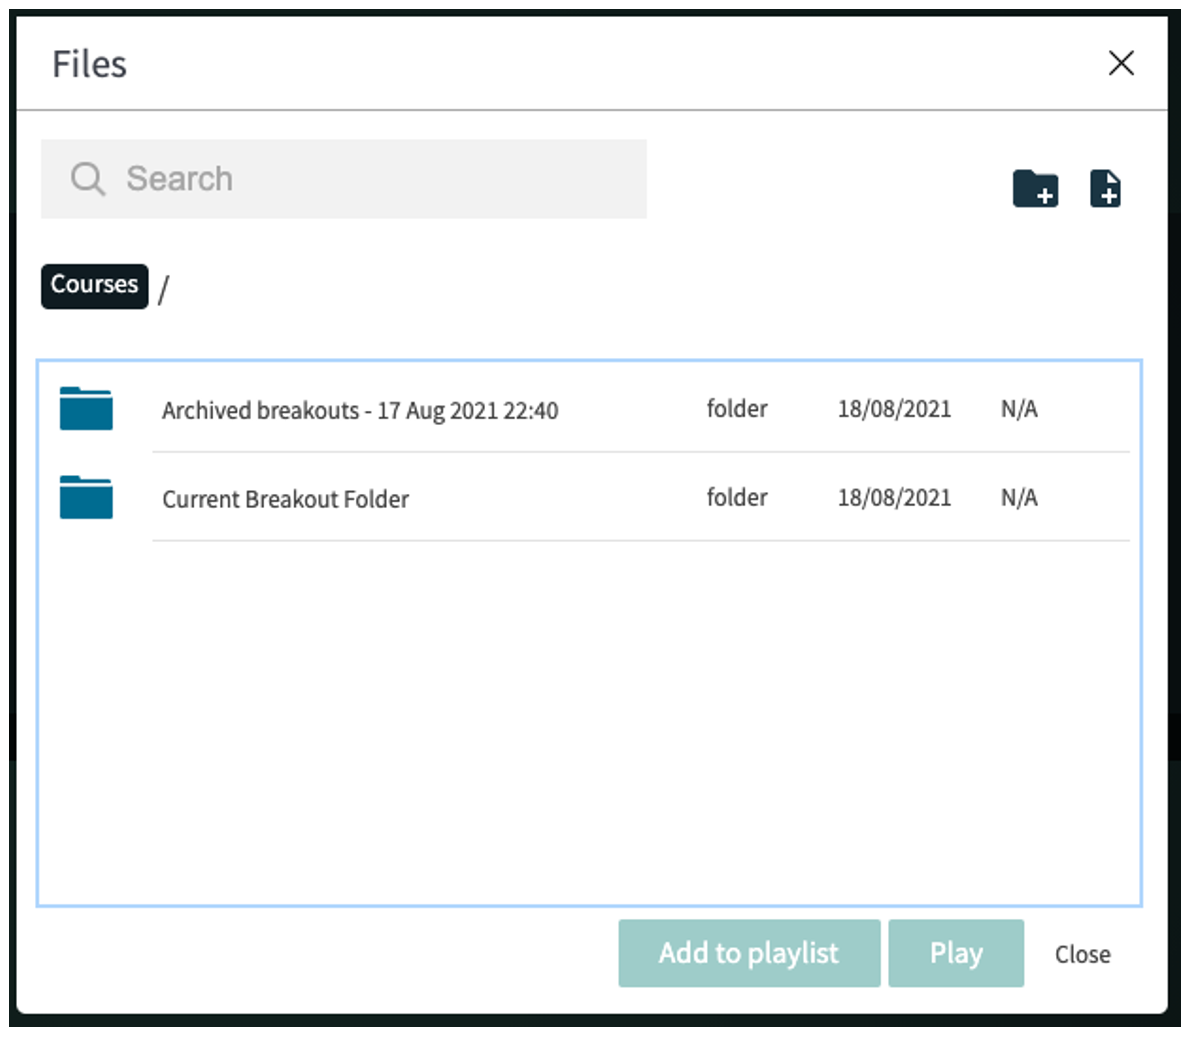
Note: Participants that were given moderator’s rights before the breakout session has started will remain moderators throughout the breakout session and will not be affected by participants’ permissions as set in the breakout rooms setting menu. Also, these permissions will not affect participant’s permissions within the main room during the breakout rooms session.
Managing a Breakout Session
Once the breakout rooms’ session starts, a light blue, management ribbon is displayed on top of the host’s screen. The banner’s options allow easy access to all the main Breakout Room Manager’s functions.
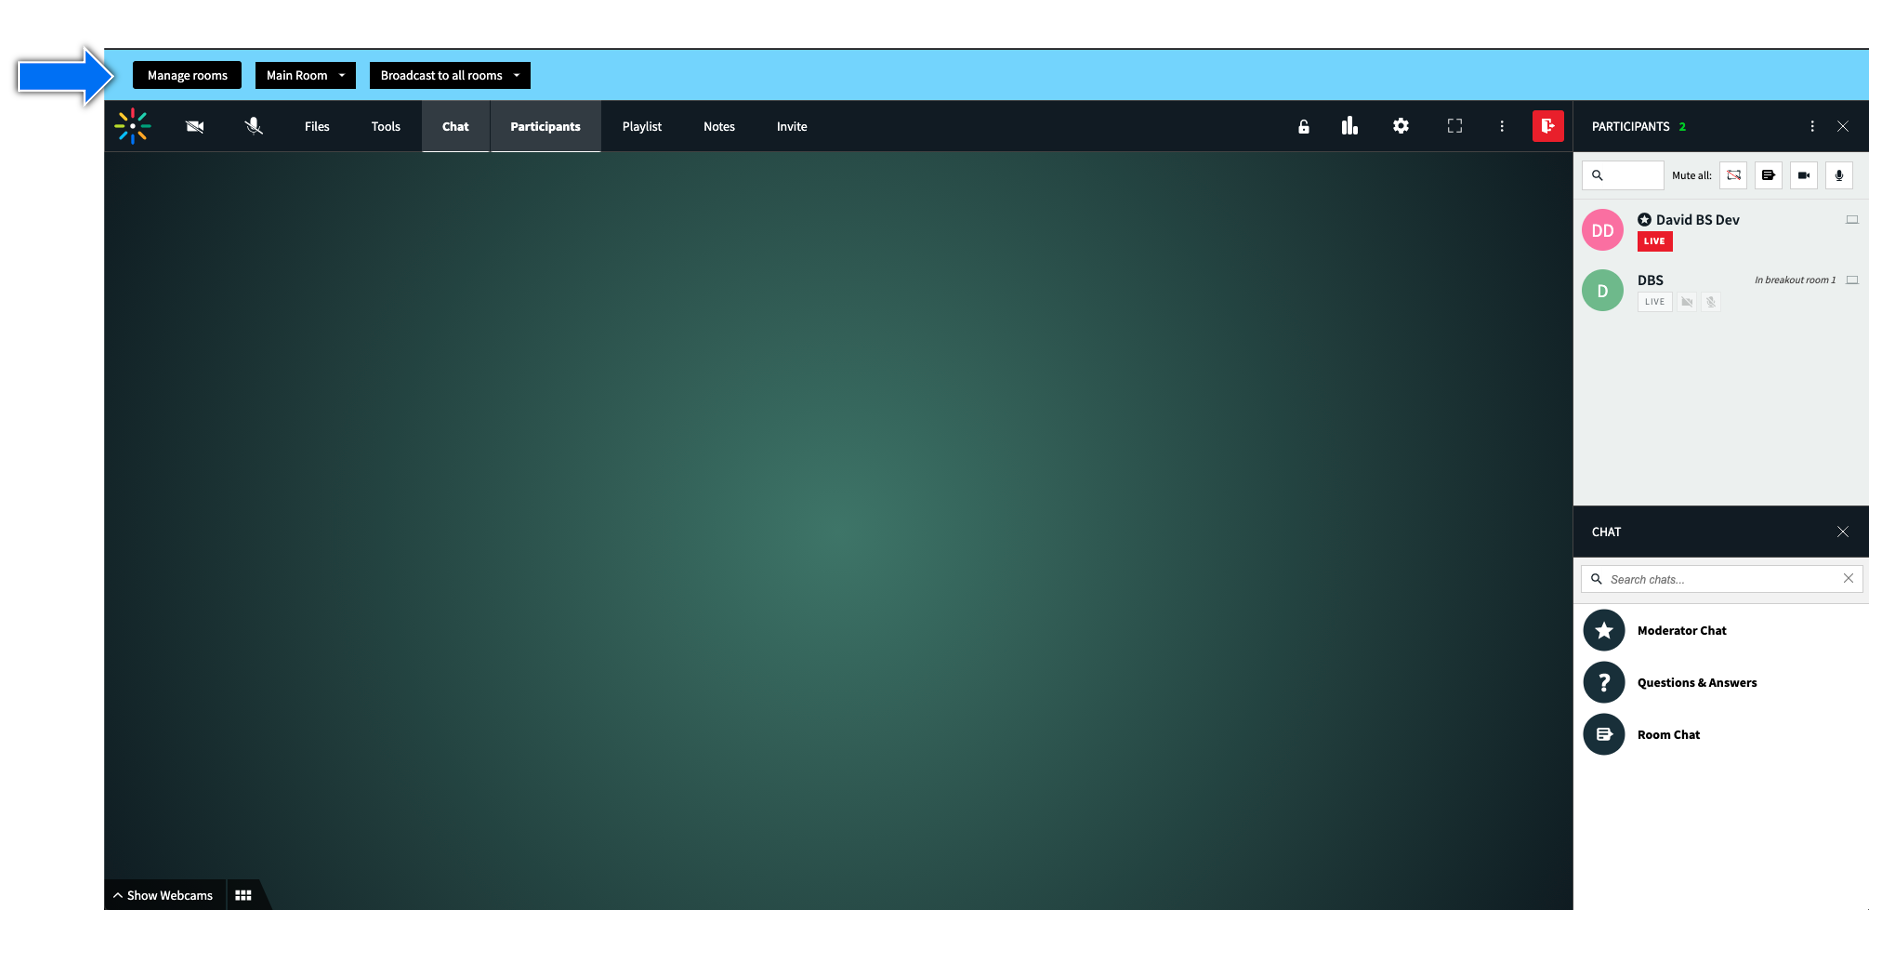

A. Manage Rooms – opens the breakout rooms manager from anywhere.
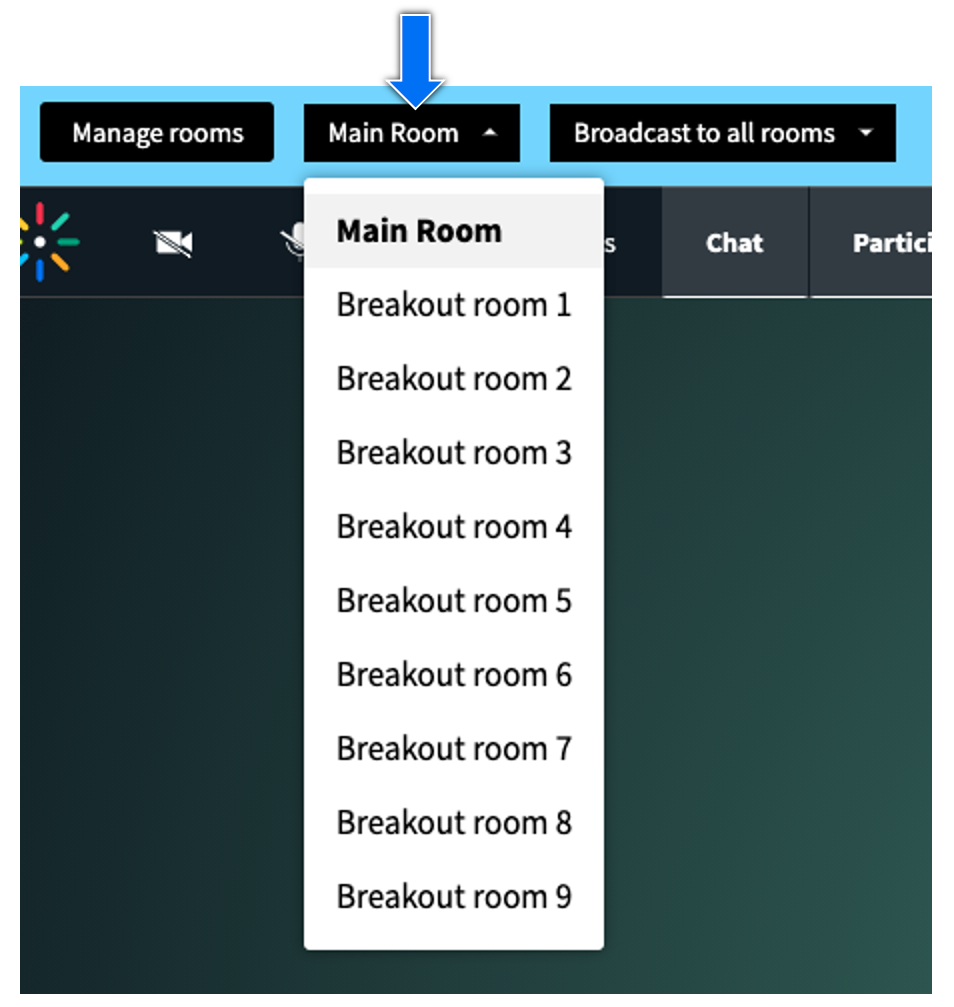
B. Main Room – the dropdown menu provides options for hosts to move between all active rooms, breakout rooms as well as the main room.
C. Call Host – (Optional) the dropdown lists all rooms with active host calls and allows hosts to reach these rooms with a click of a button. The Call Host option displays only if it was set .
D. Broadcast to All Rooms – allows for media and announcements broadcast from main room to all breakout rooms
E. Time Remaining – the Breakout Session timer that shows the time remaining to the current breakout rooms’ session, The Time Remaining displays only if a session timer was set.
Manage Rooms Button
The ‘Manage Rooms’ button opens the Breakout Rooms Manager window.
Main Room – Rooms Dropdown Menu
The Rooms dropdown menu allows hosts to move between all active rooms, breakout rooms as well as the main room.
‘Call Host’ Indication
Clicking the ‘Call Host’ indication opens a dropdown menu listing all rooms with active host calls and allows hosts to reach these rooms within the click of a button.
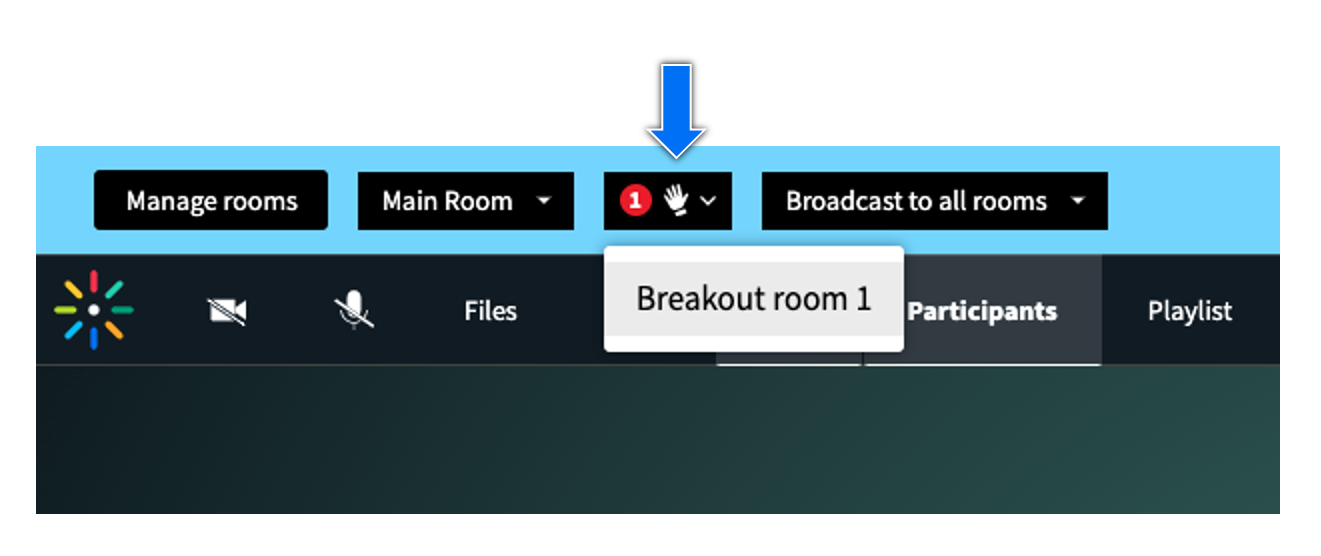
The ‘Call Host’ indication also displays in the breakout rooms manager window near the name of any breakout room with an active host call.

Broadcast to All Rooms
The Broadcast to All Rooms menu provides the ability to broadcast media and announcements from the main room to all breakout rooms.
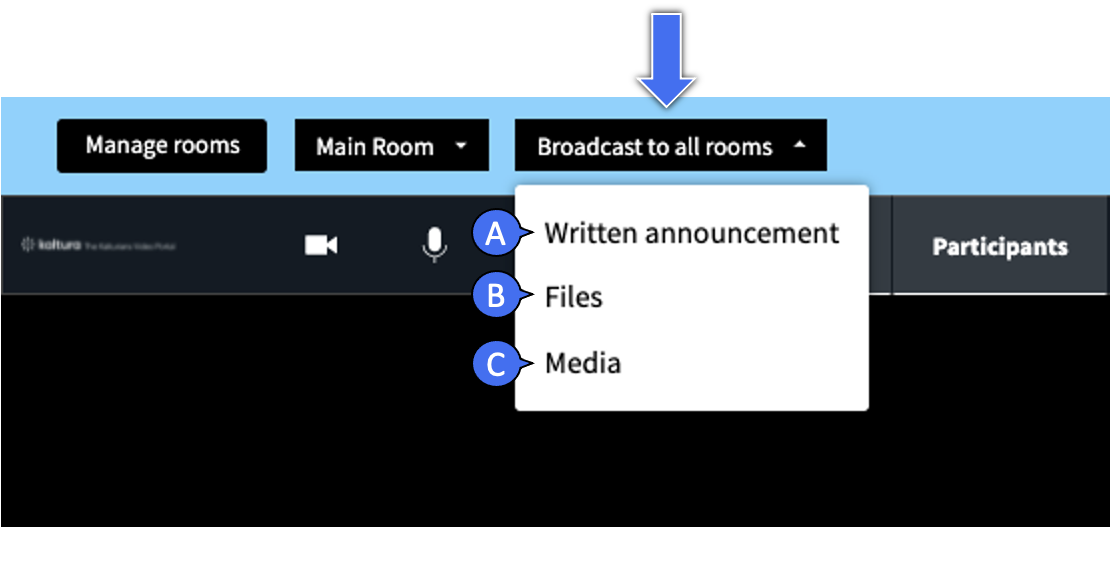
The following options are available:
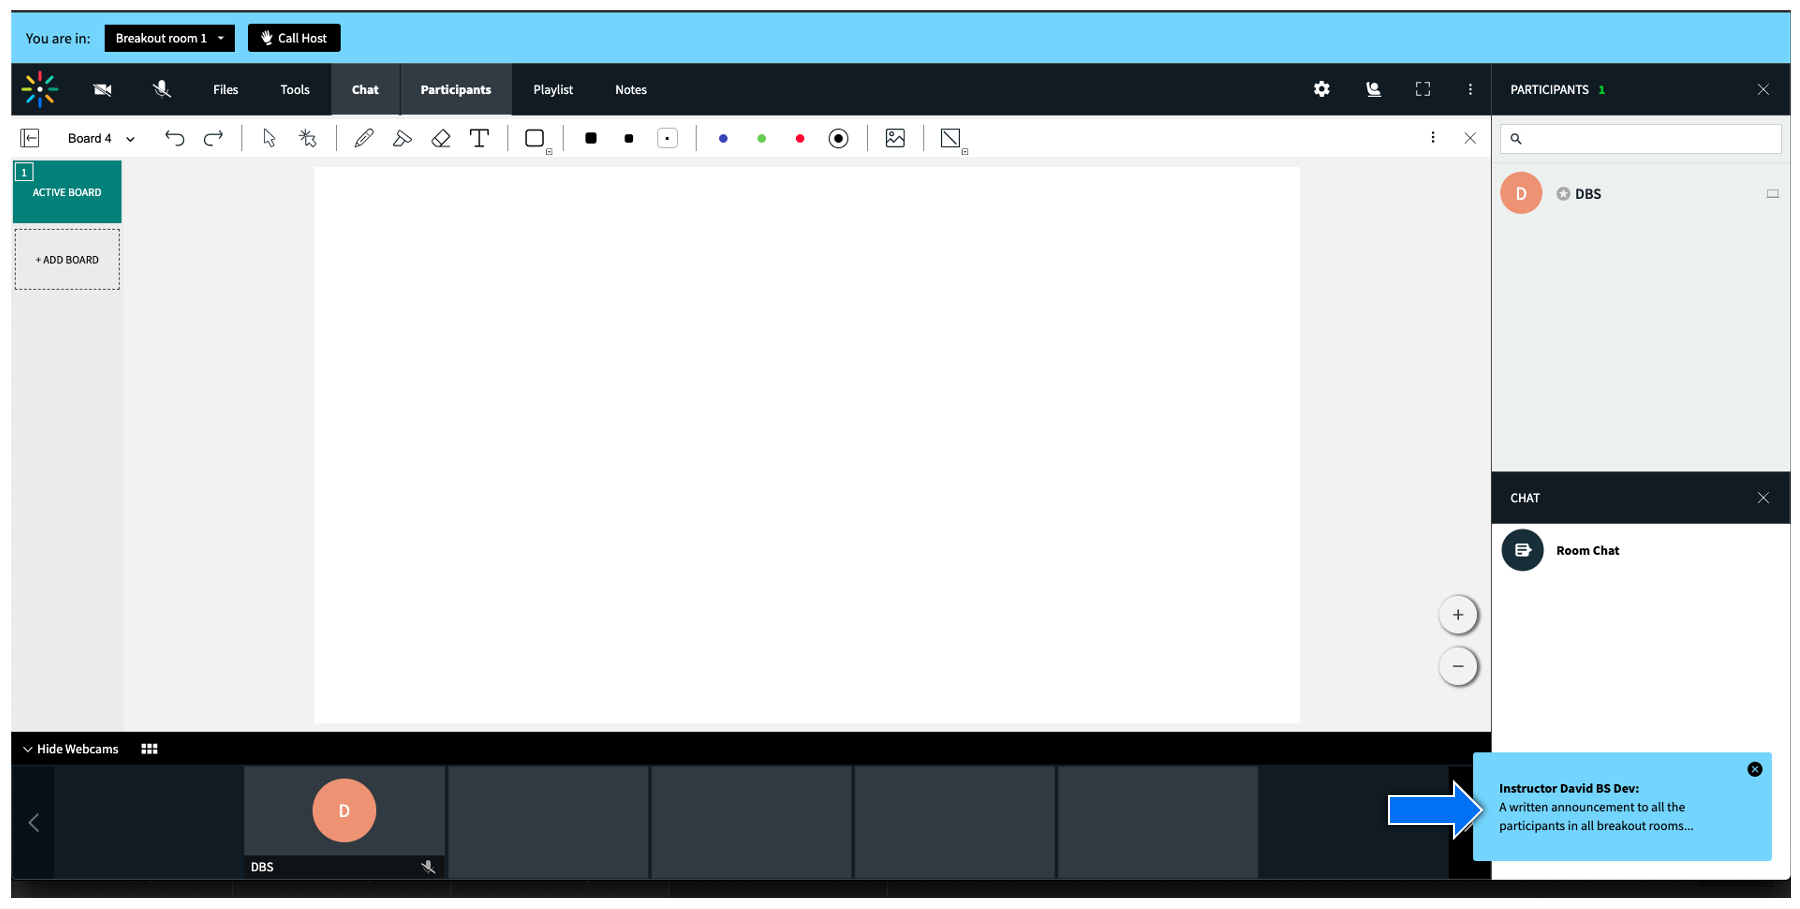
Broadcast a Written Announcement (A)
Typing a message in the ‘Written Announcement’ window broadcasts the announcement to all active breakout rooms.
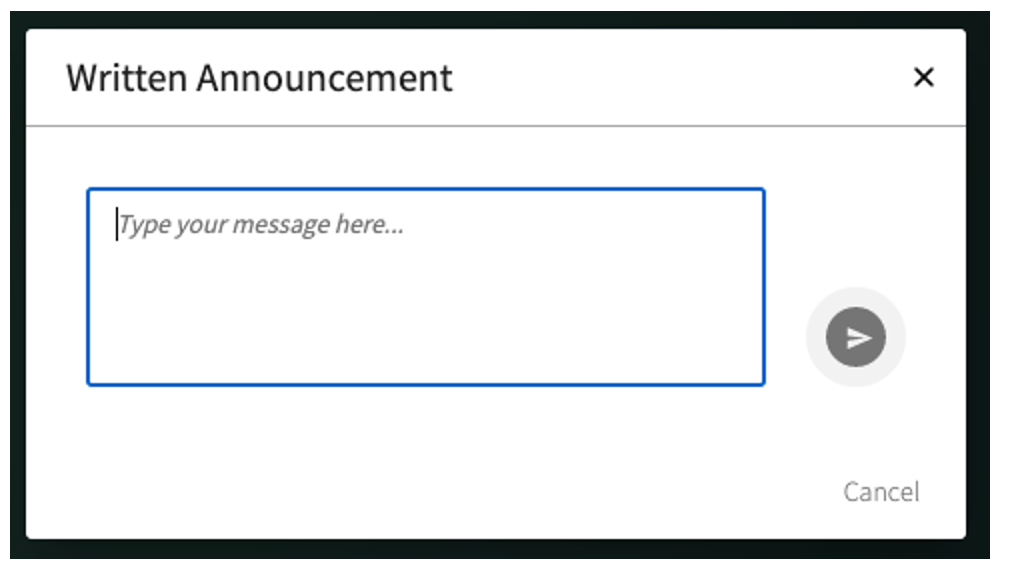
The message pops up from the bottom right corner of the window for all active users
Broadcast Files or Media (B & C)
Choosing the ‘Files’ or ‘Media’ options opens the Files browser or the Media Library browser, accordingly. Hosts can then choose files or media entries and play them on stage in all breakout rooms concurrently.
Breakout Session Timer
The breakout session timer shows the time remaining to current breakout rooms session if a session timer was set
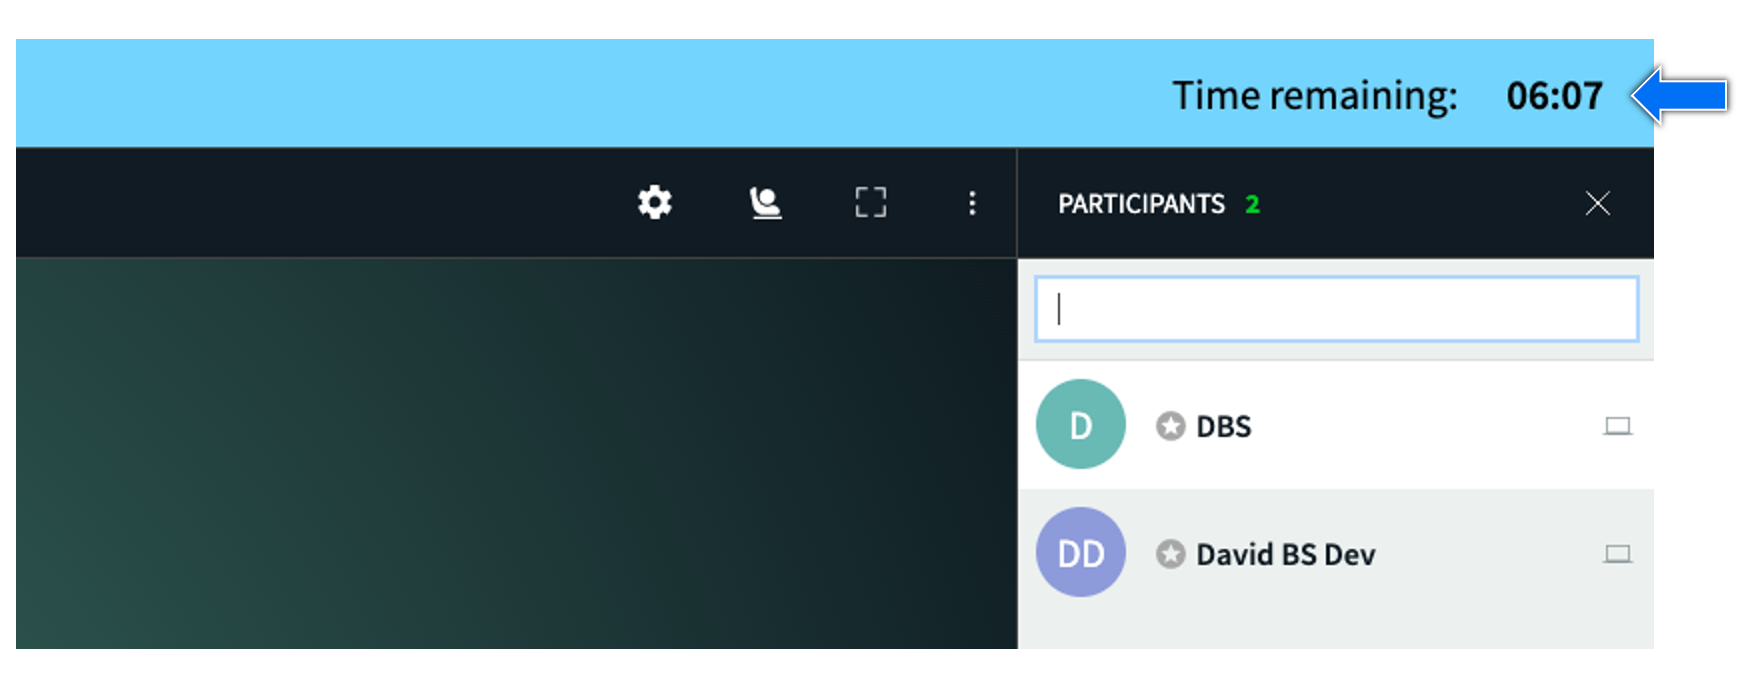
The timer may be extended by any number of minutes through the ‘Add Time’ function in the Breakout Rooms Manager window.
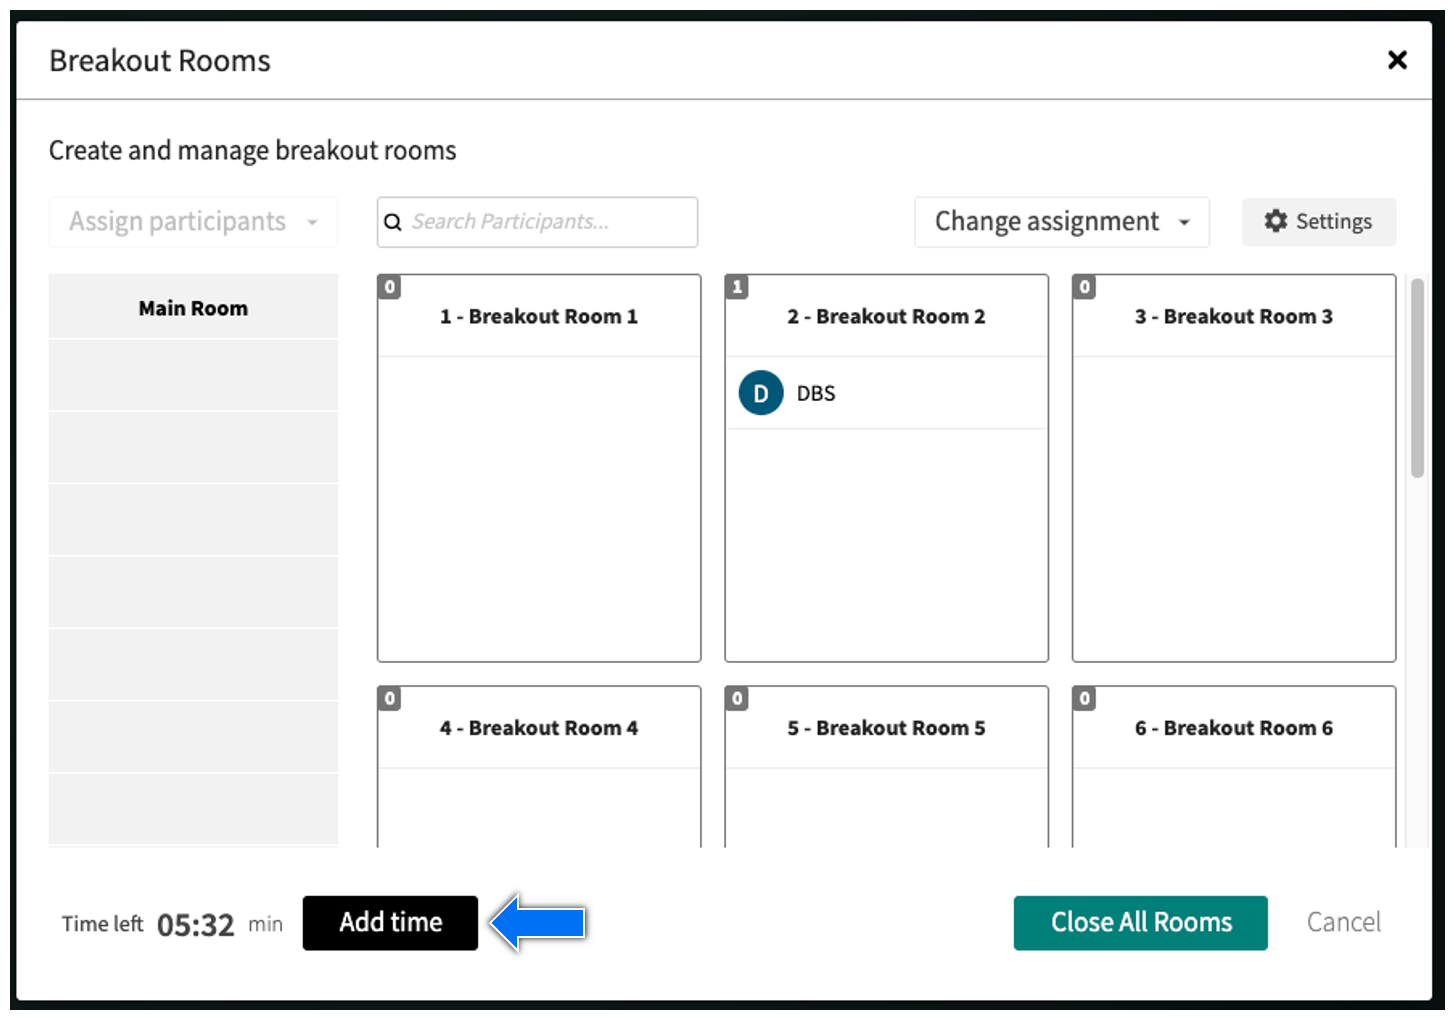
Click the ‘Add time’ button to open the time extension menu, and click ‘+’ and ‘-‘ to adjust the desired number of minutes. When ready = click the ‘Add’ button to apply the selected time extension to the active session.

- Click Stop Sharing in the extension footer bar.