Want to create or adapt books like this? Learn more about how Pressbooks supports open publishing practices.
Chapter 10. Tubes and Devices
10.6 Chest Tube Drainage Systems
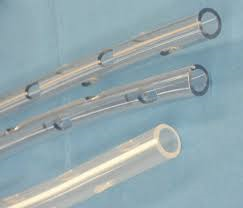
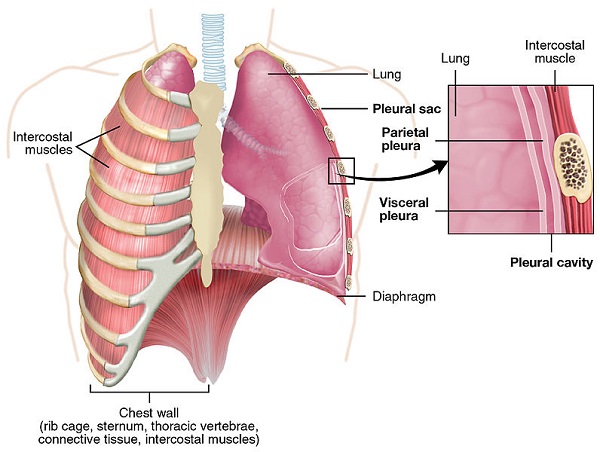
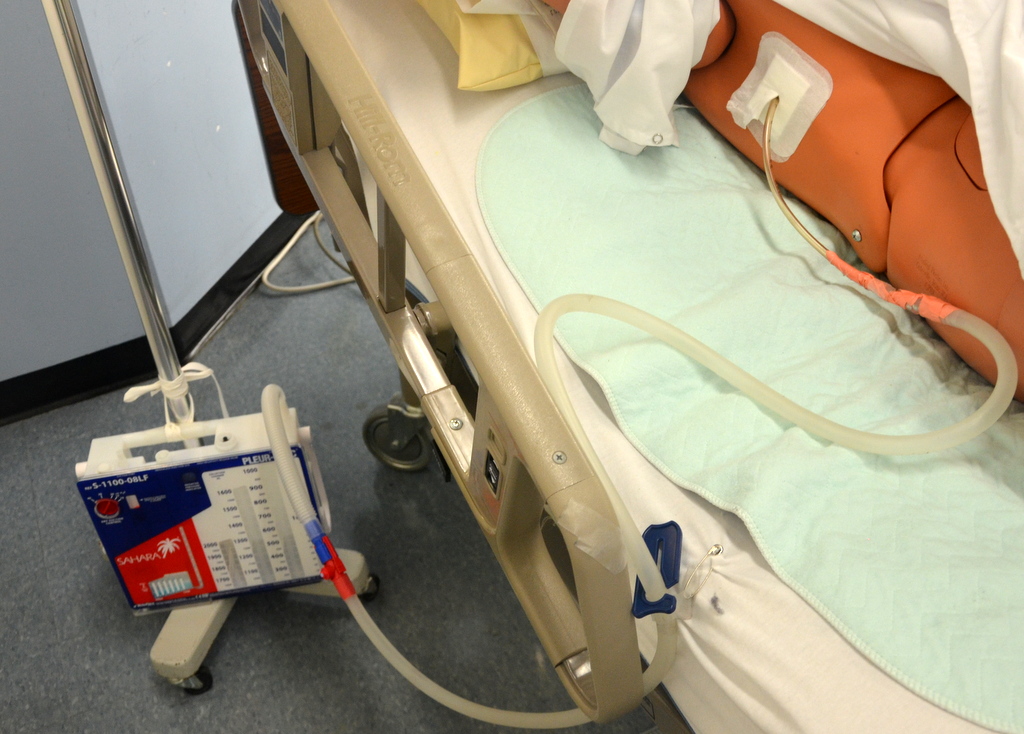
A chest tube, also known as a thoracic catheter, is a sterile tube with a number of drainage holes inserted into the pleural space (see Figure 10.8). The pleural space is the space between the parietal and visceral pleura, and is also known as the pleural cavity (see Figures 10.9). A patient may require a chest drainage system any time the negative pressure in the pleural cavity is disrupted and causes respiratory distress. Negative pressure is disrupted when air, or fluid and air, enters the pleural space and separates the visceral pleura from the parietal pleura, preventing the lung from fully expanding and collapsing. Small amounts of fluid or air accumulating in the pleural space are often absorbed by the body without a chest tube.
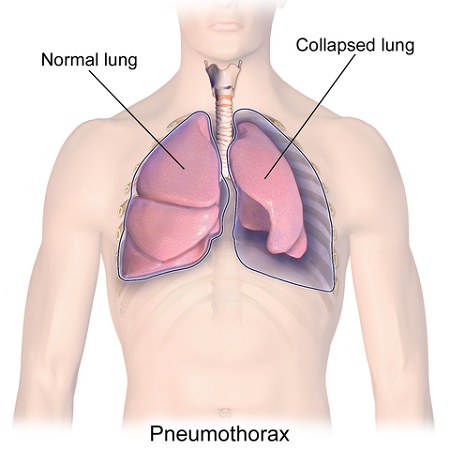
Figure 10.10 demonstrates a pneumothorax. A large amount of fluid or air cannot be absorbed by the body and will require a drainage system in order to optimize oxygenation (Bauman & Handley, 2011; Perry et al., 2018). Another type of chest tube called a Heimlich valve is discussed later in this chapter.
Figure 10.8 Chest tube samples; note the various holes
Figure 10.9 Chest wall structure; note the lung’s pleura
Figure 10.10 Pneumothorax
The location of the chest tube depends on what is being drained from the pleural cavity. If air is in the pleural space, the chest tube will be inserted above the second intercostal space at the mid-clavical line. If there is fluid in the pleural space, the chest tube is inserted at the fourth to fifth intercostal space, at the mid-axillary line. A chest tube may also be inserted to drain the pericardial sac after open heart surgery. These tubes are placed directly under the sternum and are referred to as mediastinal chest tubes (Perry et al., 2018).
Some conditions that may require a chest tube drainage system include (Bauman & Handley, 2011; Perry et al., 2018):
Pleural effusion
Pneumothorax
Hemothorax
Spontaneous pneumothorax
Tension pneumothorax
Traumatic pneumothorax (stab or gunshot wound)
Cardiac tamponade (accumulation of blood surrounding the heart after open heart surgery or chest surgery)
Chest Tube Drainage Systems
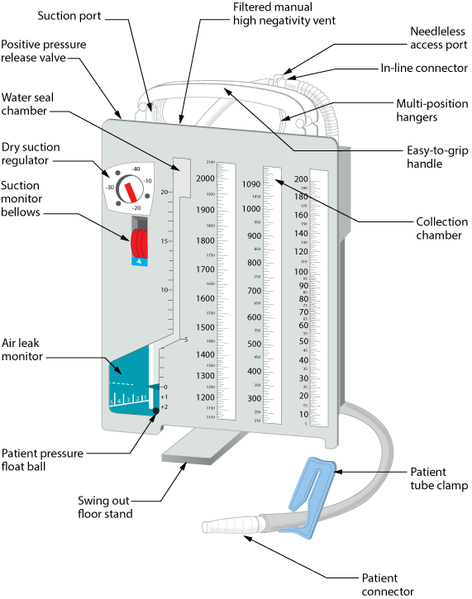
A chest tube is connected to a closed chest drainage system, which allows for air or fluid to be drained and prevents air or fluid from entering the pleural space. Because the pleural cavity normally has negative pressure, which allows for lung inflation and deflation, any tube connected to it must be sealed so that air or liquid cannot enter the space where the tube is inserted (Bauman & Handley, 2011; Rajan, 2013). In a chest drainage system, a water seal provides that protection. Chest tube drainage systems are sterile and disposable and consist of either two or three compartments (see Figure 10.11). The traditional chest drainage system typically has three chambers (Bauman & Handley, 2011; Rajan, 2013). Figure 10.12 illustrates how a chest drainage system works. Note how the three chambers are connected and the path that air (pneumothorax) or blood (hemothorax) would take if the chest tube were attached to such a system.
Figure 10.11 Chest tube drainage system with labelsFigure 10.12 Under water seal drainage system
Always review what type of system is used in your agency, and follow the agency’s and the manufacturer’s directions for setup, monitoring, and use. An explanation of the different chambers in is order:
Collection chamber: The chest tube connects directly to the collection chamber, which collects drainage from the pleural cavity. The chamber is calibrated to measure the drainage. The outer surface of the chamber has a “write-on” surface to document the date, time, and amount of fluid. This chamber is typically on the far right side of the system (Teleflex Medical Incorporated, 2009).
Water-seal chamber: This chamber has a one-way valve that allows air to exit the pleural cavity during exhalation but does not allow it to re-enter during inhalation due to the pressure in the chamber. The water-seal chamber must be filled with sterile water and maintained at the 2 cm mark to ensure proper operation, and should be checked regularly. Fill with additional sterile water as required. The water in the water-seal chamber may rise with inhalation and fall with exhalation (this is called tidaling), which demonstrates that the chest tube is patent. Tidaling can also be seen in the drainage tube that connects the patient to the chest drainage unit. Note the differences between dry suction systems and wet suction systems in terms of what bubbling means (see Table 10.4). Some chest drainage systems have a feature that allows for measurement of air leaks—the higher the number, the greater the air leak. The water-seal chamber can also monitor intrathoracic pressure (Teleflex Medical Incorporated, 2009). Some systems have dry seal technology that serves the same purpose (Teleflex, 2018).
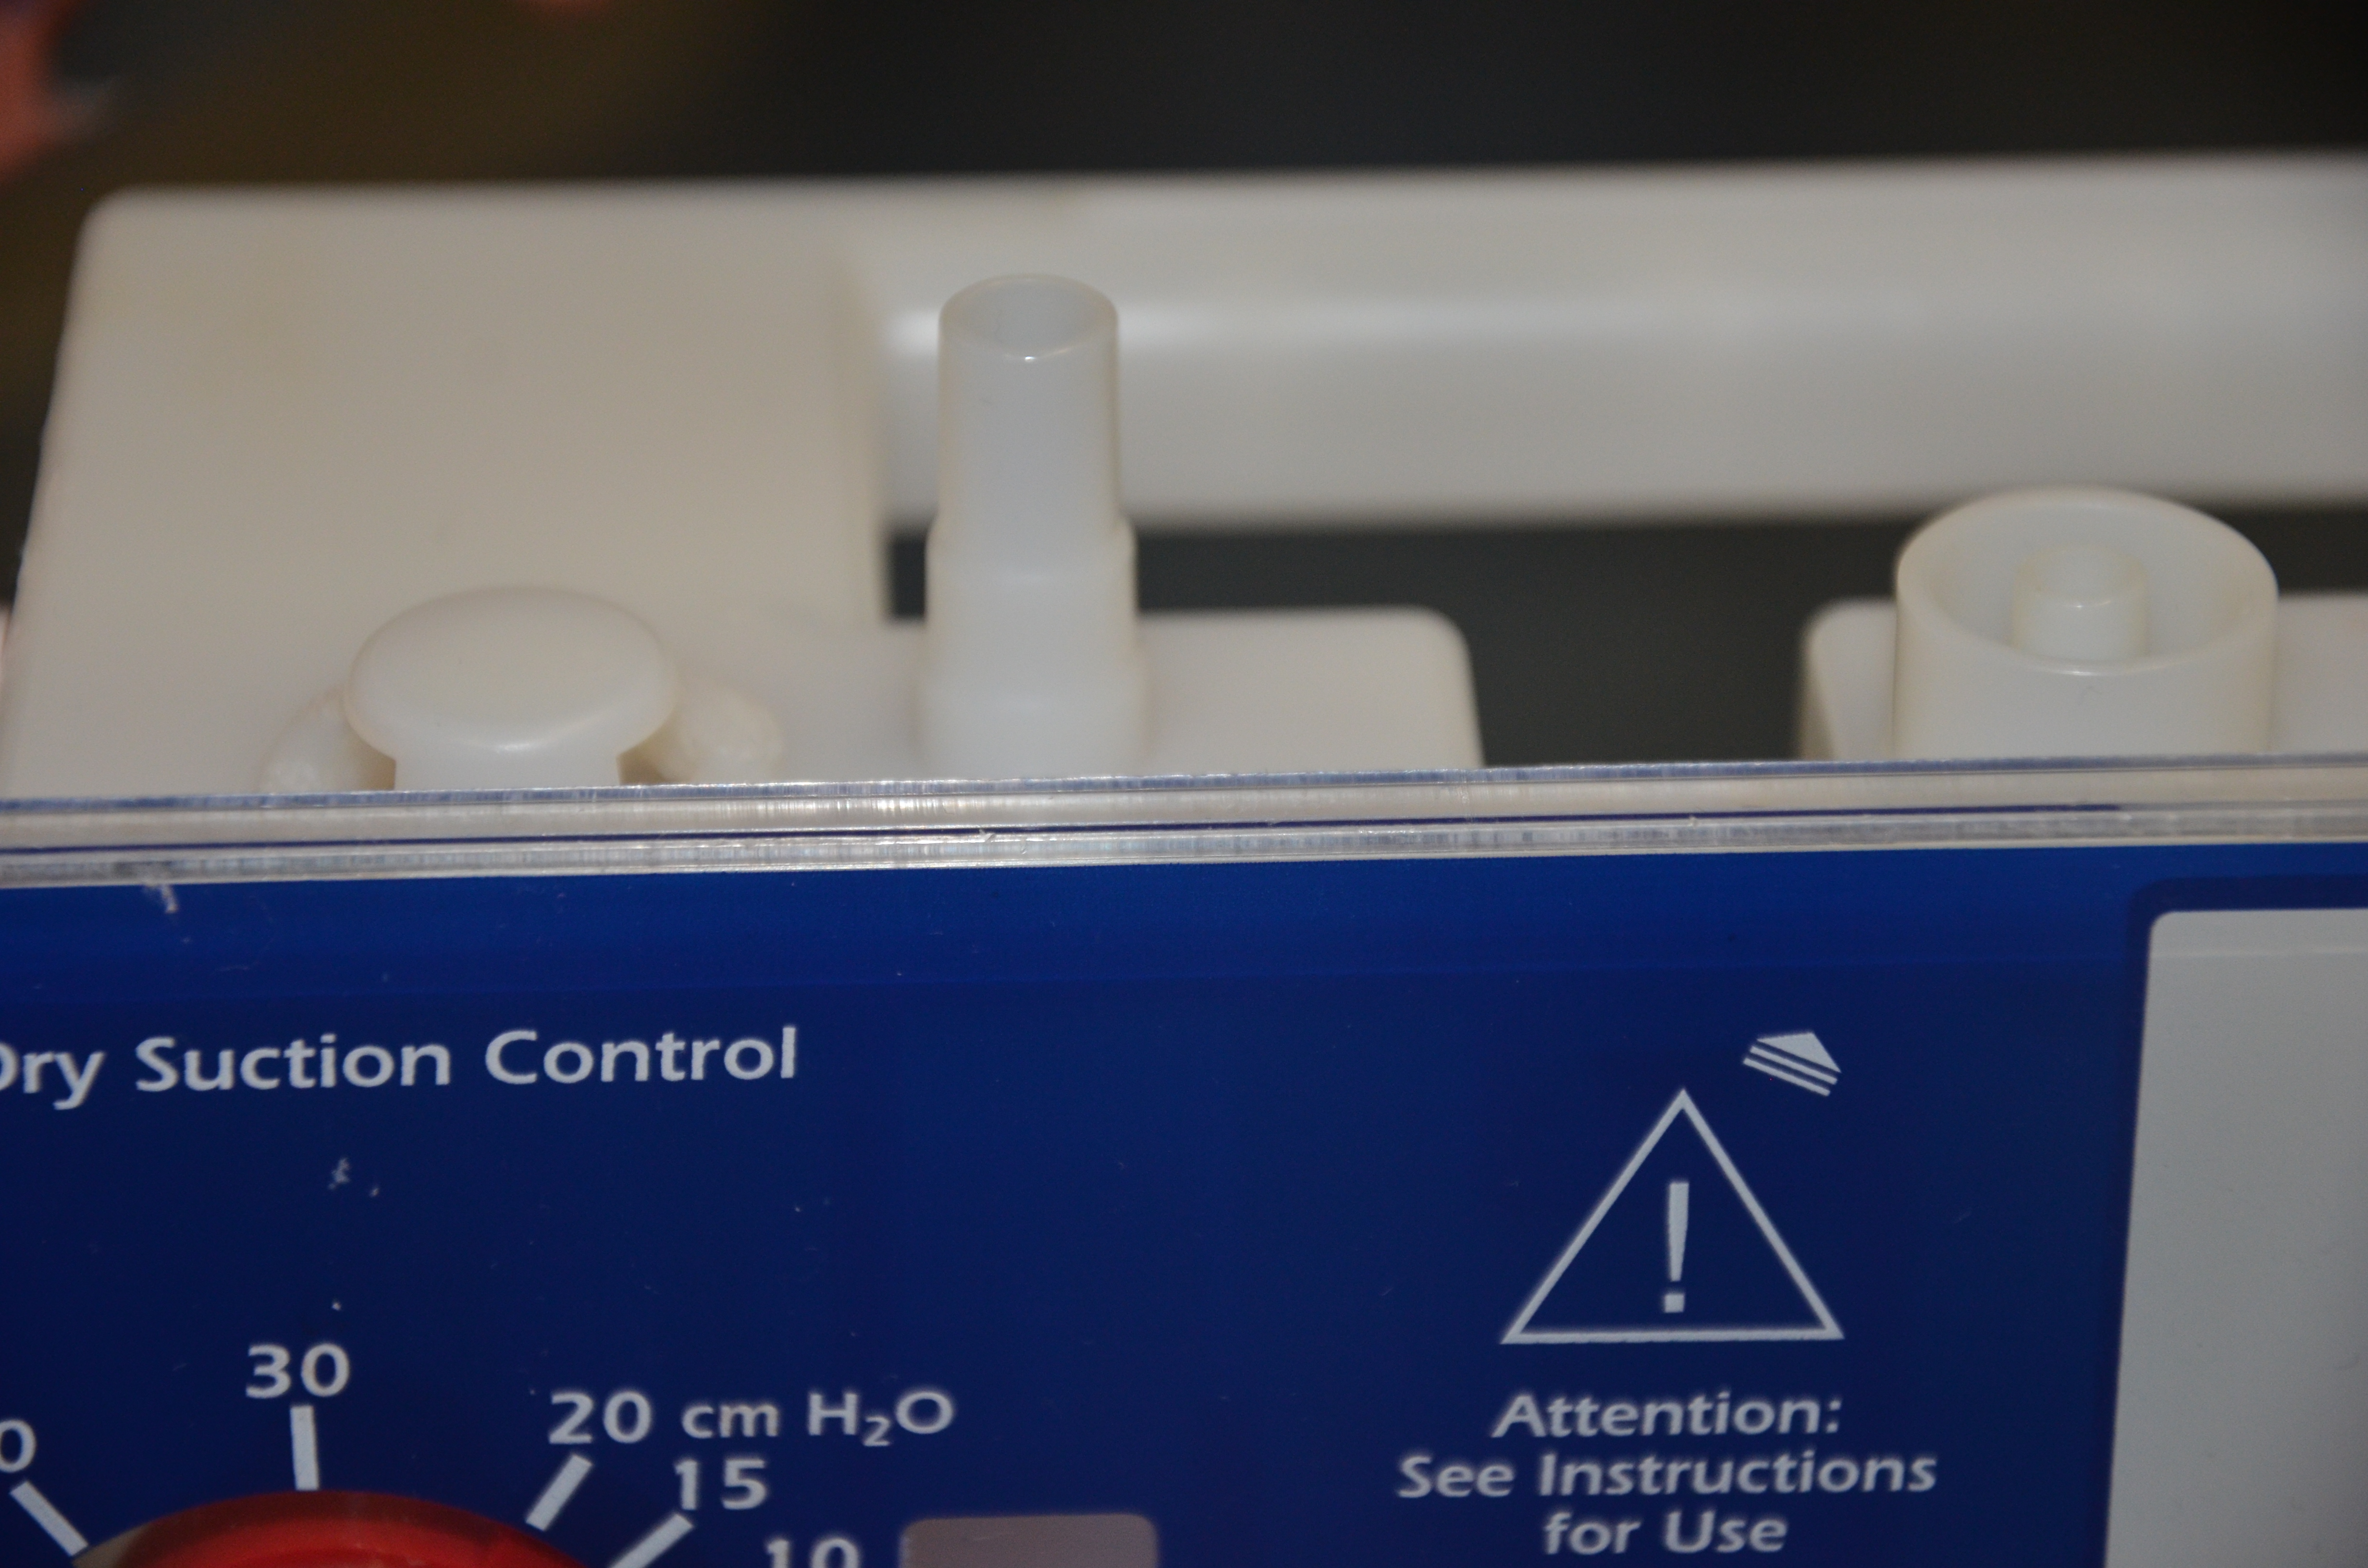
Suction control chamber: Chest drainage systems can function either via wet or dry suction. Not all patients require suction. If suction is ordered, knowing the type of drainage system you have and how it works will allow you to ensure it is working correctly (Teleflex Medical Incorporated, 2009).
In addition to the three chambers, the drainage system has many safety features to ensure that high negative pressures can be monitored and relieved quickly. To review these safety features and additional information regarding the chambers of a closed chest tube drainage system, visit the Teleflex Medical Incorporated website.
Sometimes the prescriber will order a chest tube attached to suction to facilitate rapid drainage. In this case, the amount of suction should be prescribed. Chest drainage systems designs include dry suction systems and wet suction systems. Table 10.4 outlines the key differences between dry and wet suction units.
Table 10.4 The Differences Between a Dry Suction Chest Drainage System and a Wet Suction Chest Drainage System
Dry Suction Chest Drainage System
Wet Suction Chest Drainage System
Newer technology.
Negative pressures are controlled by the unit’s design (a system that includes a float ball, vents and controlled release system.
One way valves reduce risk of fluid migration from one chamber to the next if the unit is tipped over.
Water is only used to fill the water seal chamber therefore set up is quick.
A silent system (bubbling isn’t the norm like the wet suction system). In this type of system, bubbling indicates a leak.
Light weight allows for easier transport than a heavy unit.
The control dial on the chest drainage unit controls the amount of suction.
Capable of higher levels of suction as compared to the wet suction system.
Some dry suction units have an air-leak monitor feature.
Suction is regulated by the suction dial on the unit and not the suction source (ie. wall or portable suction machine).
Equipped with a negative pressure release valve to release pressure caused by vigorous coughing, chest tube stripping (not recommended), decreasing or disconnecting suction.
If suction is discontinued, the suction port on the chest drainage system must remain unobstructed and open to air to allow air to exit and minimize the risk of development of a tension pneumothorax
Older technology.
Water level controls the negative pressure transmitted to the chest. As the water level evaporates, the negative pressure lowers. As such water levels must be checked and topped up frequently.
The weight of the fluid makes transport more challenging.
Takes time to set up. Also has a water seal chamber.
These units are noisy because of the bubbling in the water seal chamber. Bubbling is expected
If using suction, increasing the suction at the regulator increases air flow through the system but has minimal effect on the amount of suction imposed on the chest cavity. Excessive suction at the regulator causes the system to be noisier (more bubbling) and quickens evaporation of the water in the water seal chamber.
Some wet suction systems have an air leak monitoring feature.
equipped with a negative pressure release valve to release pressure caused by vigorous coughing, chest tube stripping (not recommended), decreasing or disconnecting suction.
Sources: Atrium, 2009; Teleflex, 2018; Zisis et al., 2015
Table 10.5 provides a list of potential complications and interventions related to chest tube drainage systems.
Table 10.5 Complications and Interventions Related to Chest Tube Drainage Systems
Complications
Interventions
Potential pneumothorax/respiratory distress
This is the primary concern for a patient with a chest tube drainage system.
Signs and symptoms include decreased SpO2, increased work of breathing (WOB), diminished breath sounds, decreased chest movement, complaints of chest pain, tachycardia or bradycardia, hypotension.
Notify health care provider.
Request urgent chest x-ray.
Ensure drain system is intact with no leaks or blockages such as kinks or clamps.
Apply oxygen and take a set of vital signs.
Air leak
An air leak may occur from the chest tube insertion site or the drainage system. Immediately:
check connections and ensure they are secure.
assess insertion site. This may include removing the dressing to observe the insertion site.
You can test the drainage system itself for a leak by
Using a booted (or padded) clamp, begin at the dressing and clamp the drainage tubing momentarily.
Look at the water-seal/air leak meter chamber. Keep moving the clamp down the drainage tubing toward the chest drainage system, placing it at 20 to 30 cm intervals. Each time you clamp, check the water-seal/air leak meter chamber.
When you place the clamp between the source of the air leak and the water-seal/air leak meter chamber, the bubbling will stop. If bubbling stops the first time you clamp, the air leak must be at the chest tube insertion site or the lung.
Accidental chest tube removal or chest tube falls out
A chest tube falling out is an emergency. Immediately apply pressure to chest tube insertion site and apply sterile gauze or place a sterile petroleum gauze and dry dressing over insertion site and ensure tight seal. Apply dressing when patient exhales. If patient goes into respiratory distress, call a code. Notify primary health care provider to reinsert new chest tube drainage system.
Accidental disconnection of the drainage system
A chest tube drainage system disconnecting from the chest tube inside the patient is an emergency. Momentarily but immediately clamp the tube and place the end of chest tube in sterile water or NS. The two ends will need to be swabbed with alcohol and reconnected.
Have an emergency “accidental chest tube removal kit” at the bedside which includes: clamp, petroleum impregnated dressing, two sterile 4 × 4’s; container of sterile normal saline or sterile water, occlusion dressing, alcohol swabs.
Bleeding at the insertion site
Bleeding may occur after insertion of the chest tube. Apply pressure to site and monitor.
Subcutaneous emphysema
Subcutaneous emphysema is painless tracking of air underneath the subcutaneous tissue. It may be seen in the chest wall, down limbs, around drain sites, or around the head or neck. When the skin is palpated, it feels similar to having tissue paper trapped beneath the skin. Subcutaneous emphysema is not life threatening but requires monitoring in the event it worsens. In the event of worsening symptoms suggesting subcutaneous emphysema, report to primary health care provider.
Drainage suddenly stops and respiratory distress increases
The chest tube may be clogged by a blood clot or by fluid in a dependent loop.
Assess the drainage system and the patient, and notify primary health care provider if required.
Sudden increase in bright red drainage
This may indicate an active bleed. Monitor amount of drainage and vital signs, and notify the primary health care provider.
The drainage unit has tipped over
Situate the unit upright. Immediately check the fluid level in the water seal for correct volume. Replace lost fluid and likewise withdraw any excess fluid. If all of the chambers are contaminated with blood, consider replacing the entire unit. Use the swing out floor stand that is a part of the drainage unit. Consider securing the unit to an IV pole.
Data source: BCIT, 2015c; Perry et al., 2018; Teleflex Medical Incorporated, 2009
Checklist 88 reviews the care and management of a person with a closed chest tube drainage system
Checklist 88: Care and Management of a Closed Chest Tube Drainage System
Disclaimer: Always review and follow your agency policy regarding this specific skill.
Safety considerations:
A chest tube may be inserted at the bedside, in procedure room, or in the surgical suite. Health care providers often assist physicians in the insertion and removal of a closed chest tube drainage system.
After initial insertion of a chest tube drainage system, assess the patient at minimum every 15for at least an hour. Once the patient is stable, and depending on the condition of the patient and the amount of drainage, monitoring may be less frequent. Always follow hospital policy for frequency of monitoring a patient with a chest tube.
Prior to managing a patient with a chest tube, review reason for the chest tube, the location of the chest tube, normal volume of drainage, characteristics of the drainage, date of last dressing change, and any previously recorded air leaks measurements.
Safety/emergency equipment must always be at the patient’s bedside and with the patient at all times during transportation to other departments. Safety equipment should include:
Two guarded clamps
Sterile water
Vaseline gauze (Jelonet)
4 × 4 sterile dressing
occlusive dressing or Waterproof tape
small container of sterile water or saline
alcohol swabs
Never clamp a chest tube without a prescriber’s order or valid reason. The tube must remain unobscured and unclamped to drain air or fluid from the pleural space. There are a few exceptions where a chest tube may be clamped; see special considerations below.
Chest tube drainage systems are replaced only when the collection chamber is full or the system is contaminated.
Steps
Additional Information
1. Perform hand hygiene. Identify patient using two identifiers and explain assessment process to patient. Create privacy to assess the patient and drainage system.
Hand hygiene reduces the transmission of microorganisms.
Proper identification provides patient safety measures for safe care.
2. Complete respiratory assessment, ensure patient has minimal pain, and measure vital signs. Place patient in semi-Fowler’s position for easier breathing.
Patient should be in a semi-Fowler’s position, have minimal pain, have no respiratory distress, and have no evidence of an air leak around the insertion site, and no drainage from the insertion site or chest tube equipment.
Frequent assessment of the respiratory status is important if the patient’s condition is stable, resolving, or worsening, and ensures that the chest tube is functioning correctly.
Assessment should be at minimum every 15 minutes for the first hour immediately following chest tube insertion/ Continue until patient is stable. Increase monitoring if patient’s condition worsens.
Chest tubes are painful, as the parietal pleura is very sensitive. Ensure patient has adequate pain relief, especially prior to re-positioning, sitting, or ambulation.
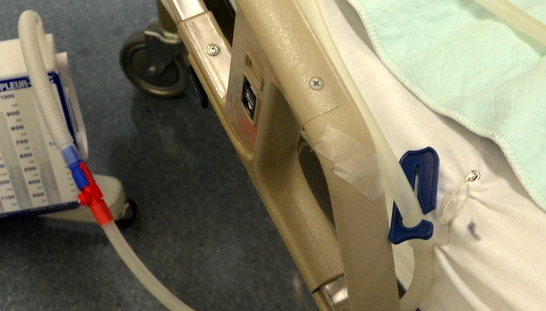
3. Ensure the chest drainage unit is below the level of the insertion site, upright, and secured to prevent it from being accidentally knocked over.
Chest tube lower than insertion site
The drainage system must remain upright for the water-seal chamber to function correctly.
The chest drainage system must be lower than the chest to facilitate drainage and prevent back flow.
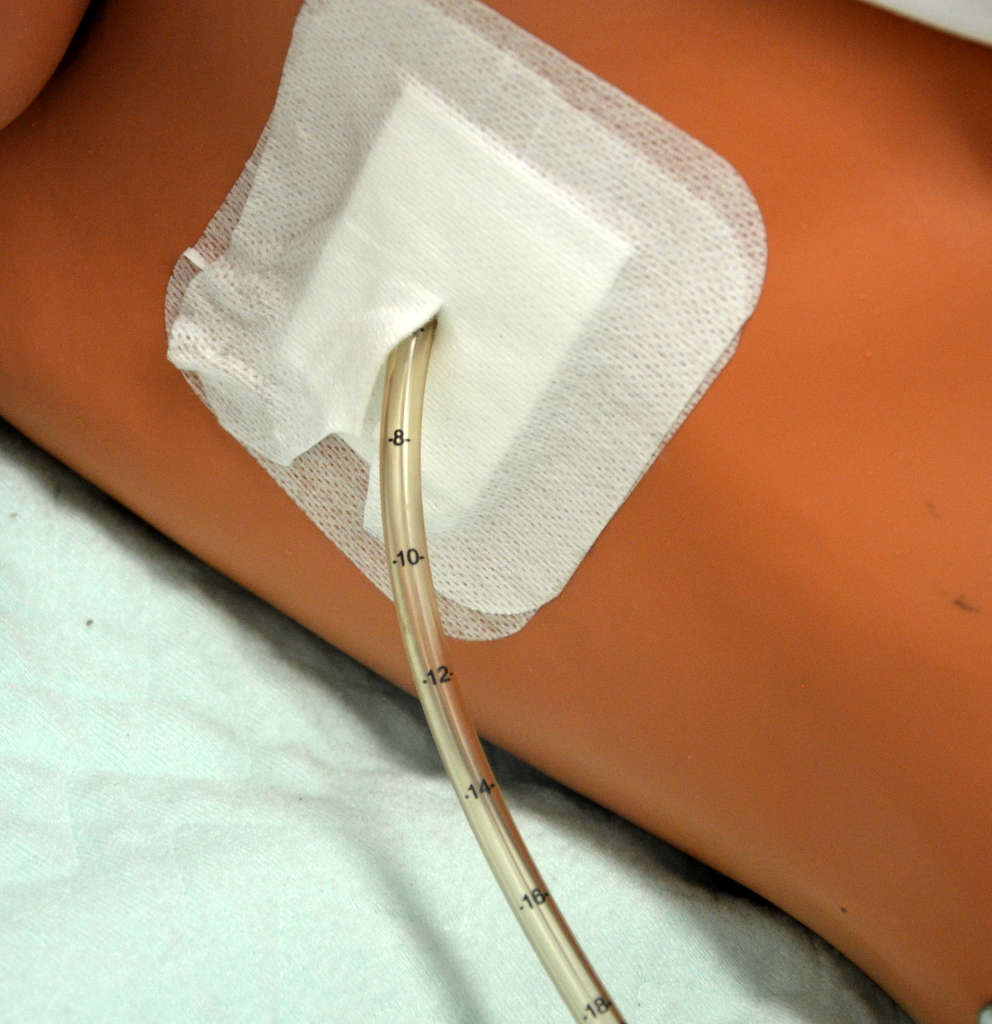
4. Assess chest tube insertion site to ensure sterile dressing is dry and intact and that the chest tube is secured to reduce risk of it being pulled out.
Check insertion site for subcutaneous emphysema.
Dressing should remain dry and intact; no drainage holes should be visible in the chest tube.
Dressing is generally changed 24 hours post-insertion, then every 48 hours. Chest tubes are generally sutured in place.
There should be no fluid leaking from around the site or sounds of air leaks from insertion site.
Chest tube insertion site
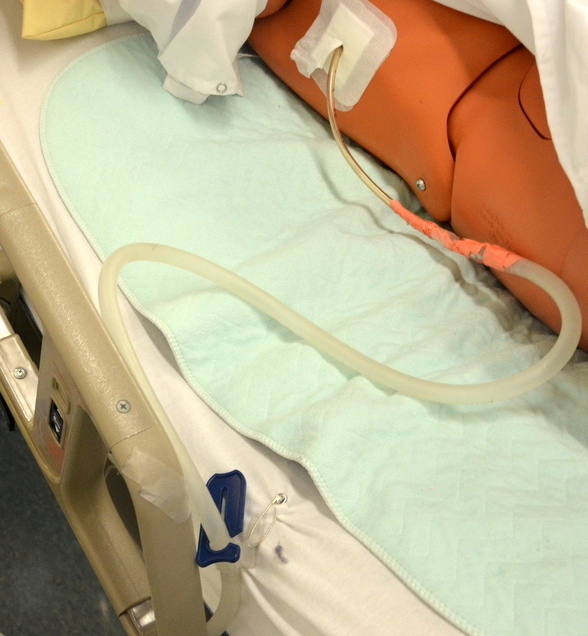
5. Assess the drainage system to ensure the system is intact and to prevent accidental tube removal or disruption of the drainage system.
Ensure tubing is not kinked or bent under the patient or in the bed rails, or compressed by the bed.
Know what kind of chest drainage system this is. If suction is ordered, ensure the unit is functioning (wet suction units bubble; dry suction units only bubble if there is an air leak).
If there is no suction, note any evidence of air leak. Note: when suction is on, air leaks are not demonstrated on the suction unit.
Assess amount and character of the drainage and note if there is any significant changes.
Kinked or bent tubing could interfere with the drainage of the pleural fluid.
Dependent loops may collect fluid and impede drainage.
The long tube may be coiled and secured to a draw sheet with a safety pin (allowing enough tubing so that the patient can move in bed comfortably) to prevent dependent loops.
Tubing free from kinks and dependent loops
6. Ensure prescribed suction is set at the correct level.
Dry suction systems: the amount of suction is determined by the suction control dial. Check that the “float” or ‘bellow’ appears completely in the viewing window.
Wet suction systems: the amount of suction is controlled by the water level. Ensure that the water level is correct and bubbling is evident.
Suction pressure set at – 20 cm. Note the float does not appear in the window. As such suction is not working.
7. If suction is not ordered, ensure the suction port is left open to air.
Suction port on the top of a chest tube drainage system must remain open when suction is not in use. At this point this port functions as a vent
8. Check the water-seal chamber to ensure water level is to the dotted line (2 cm) at least once every shift. Add water as necessary.
Adequate water in the water-seal chamber prevents excess suction being placed on the delicate tissue.
Water levels should be checked each shift as the water may evaporate.
9. Assess the water-seal chamber and/or the drainage tubing for tidaling (water moving up and down) with respirations.
Gentle bubbling is normal as the lungs expand in wet suction systems.
Any bubbles in a dry suction system suggest an air leak.
Tidaling is not evident when the chest drainage unit is attached to suction.
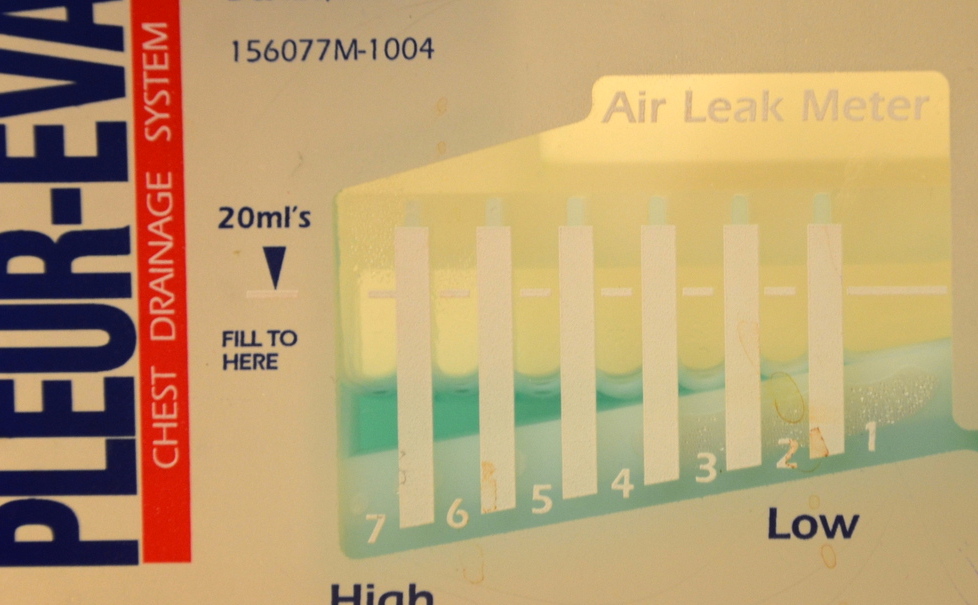
10. Assess air leak meter according to the chest drainage unit’s feature. On every shift, document the level of air leak and if the air leak occurs at rest or with coughing.
Bubbling in the air leak meter indicates an air leak (or suction is on in a wet suction unit).
If bubbling is NOT expected, measure and monitor.
If an air leak is suspected, look for the source of the leak:
Checking and tightening all connections.
Testing the tube for leaks (see special considerations below). If leak is in the tubing, replace the unit.
If the leak may be at the insertion site, remove the chest tube dressing and inspect. Has the chest tube been pulled out beyond the chest wall? If you cannot see or hear any obvious leaks at the site, the leak is likely from the lung.
Check patient history. Would you expect a patient air leak?
Notify the prescriber of any new, increased, or unexpected air leaks that are not corrected by the above actions.
To document the air leak, note the numbered column through which the bubbling occurs. If bubbling is present at the 3rd marker, document “air leak level 3.”
Air leak meter on chest drainage system
11. Check that the clamp is open.
The chest tube should not be clamped unless for specific reasons. See special considerations below.
Blue clamp is open
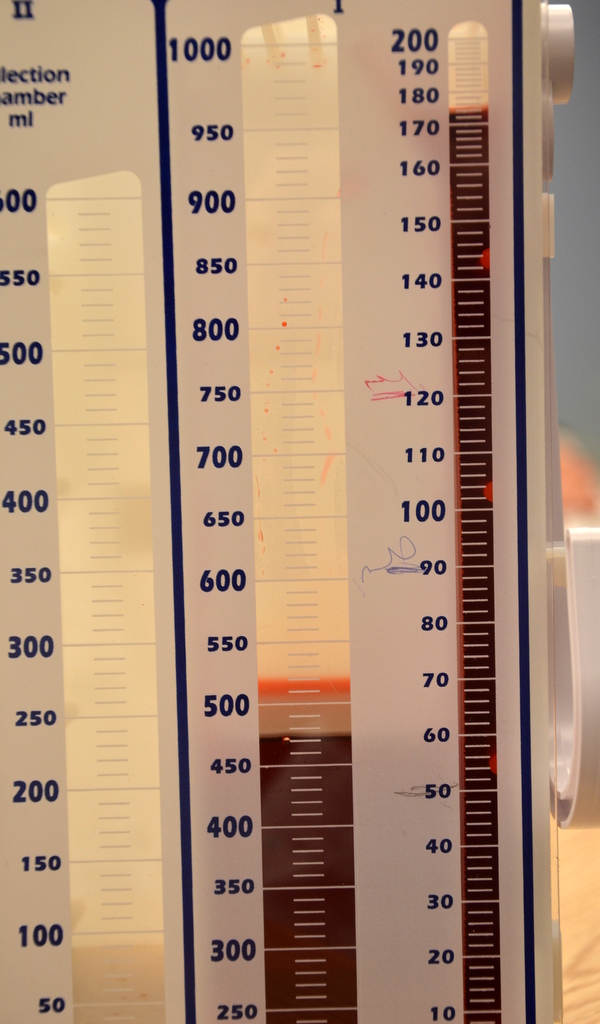
12. Measure date and time, and the amount of drainage, and mark on the outside of the chamber at the end of each shift and prn. Record amount and characteristics of the drainage on the fluid balance sheet and patient chart.
Drainage that is red and free-flowing indicates a hemorrhage. A large amount of drainage, or drainage that changes in colour, should be recorded and reported to the primary health care provider.
Drainage that suddenly decreases may indicate a blood clot or obstruction in the chest tube drainage system.
Drainage in collection chamber
13. Promote oxygenation by encouraging frequent position changes, mobilization, and deep-breathing and coughing exercises.
All of these strategies promote lung expansion and promote fluid drainage.
14. The following should be documented and assessed according to agency policy:
Breath sounds
Patient comfort level or pain level
Appearance of insertion site and/or dressing
Presence of air leaks
Fluctuation (tidalling) in water-seal chamber
Amount of suction
Amount of drainage and type
Presence of subcutaneous emphysema
Proper documentation is required to manage a chest tube drainage system to ensure it is functioning effectively. Sample documentation:
date / time: Chest tube rt. lateral lower chest in situ → underwater seal chest tube drainage system. Resps easy. Chest auscultated ↓air entry RLL. No adventitious sounds. Denies sputum. Continues to DB&C hourly. +2 air leak noted intermittently. No subcutaneous emphysema noted. Dressing dry and intact. ——–BRth RN
Data sources: Bauman & Handley, 2011; BCIT, 2015c; Durai, Hoque, & Davies, 2010; Rajan, 2013; Teleflex Medical Incorporated, 2009
Special considerations:
Do not strip or milk the chest tube: In practice, stripping is used to describe compressing the chest tube with the thumb or forefinger and, with the other hand, using a pulling motion down the remainder of the tube away from the insertion site. Milking refers to techniques such as squeezing, kneading, or twisting the tube to create bursts of suction to move clots. Any aggressive manipulation (compressing the tube to dislodge blood clots) can generate extreme pressures in the chest tube. There is no evidence showing the benefit of stripping or milking a chest tube (Bauman & Handley, 2011; Durai et al., 2010; Halm, 2007).
The only exceptions to clamping a chest tube are: 1) if the drainage system is being changed; 2) if assessing the system for an air leak; 3) if the chest tube becomes disconnected from the chest drainage system—the chest tube should not be clamped for more than a few minutes (Salmon, Lynch, & Muck, 2013); or 4) if the condition of the patient is resolved and the chest tube is ready for removal (as per prescriber’s orders).
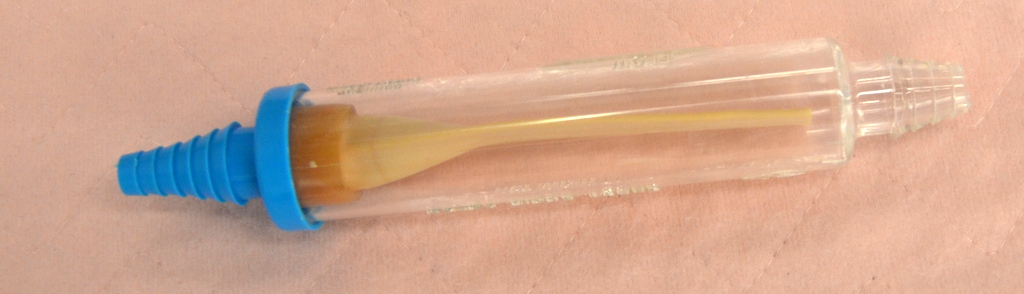
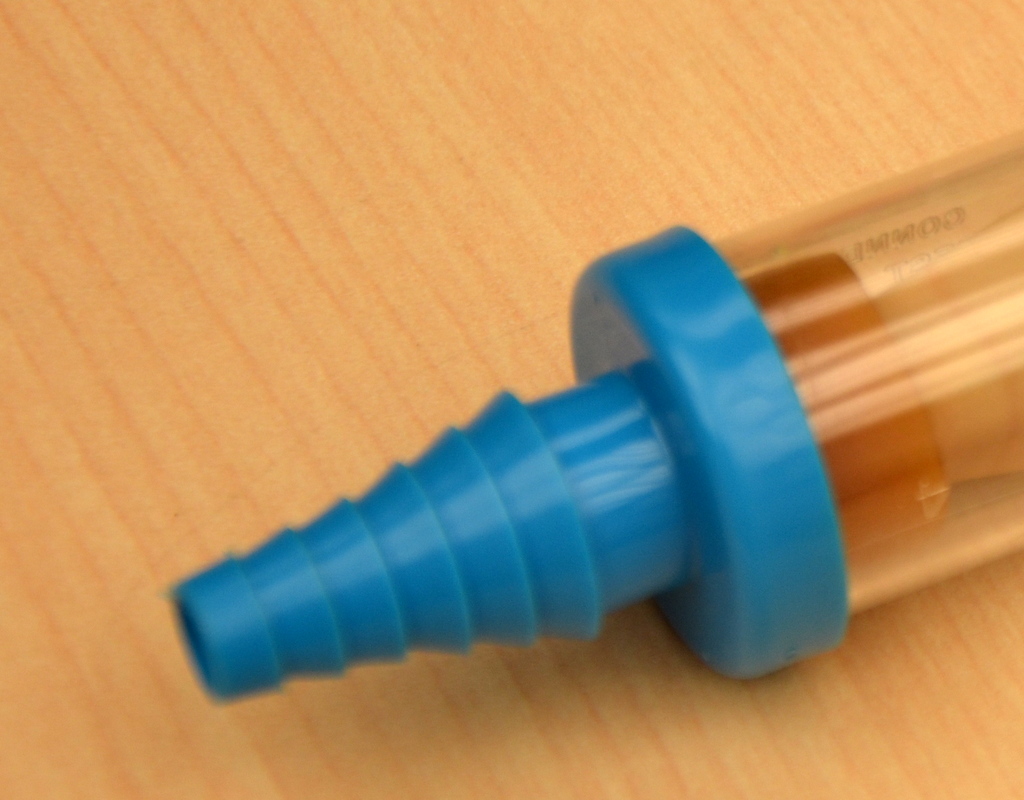
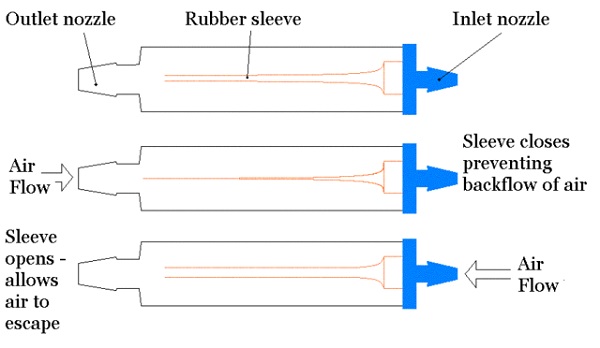
A Heimlich valve (see Figures 10.13 and 10.14) is a small, specially designed flutter valve that is portable and mobile, allowing the patient to ambulate with ease. It attaches to the chest tube at one end and a drainage bag at the other. The valve can be worn under clothing. The valve functions in any position, never needs to be clamped, and can be hooked up to suction if required (Gogakos et al., 2015). Figure 10.15 illustrates how air entering the valve from the patient opens the sleeve to allow air to escape the patient’s pleural space. The sleeve collapses preventing the back flow of air back into the patient.
Figure 10.13 Heimlich valve
Figure 10.14 Blue end connects to chest tube; other end may be left open to air or attach to a small drainage bag
Figure 10.15 Heimlich valve. Demonstration of how they work.
Critical Thinking Exercises
What should you do if your patient’s chest tube becomes disconnected from the chest tube drainage system?
When a patient has a chest tube, what emergency supplies must be at the patient’s bedside at all times?


